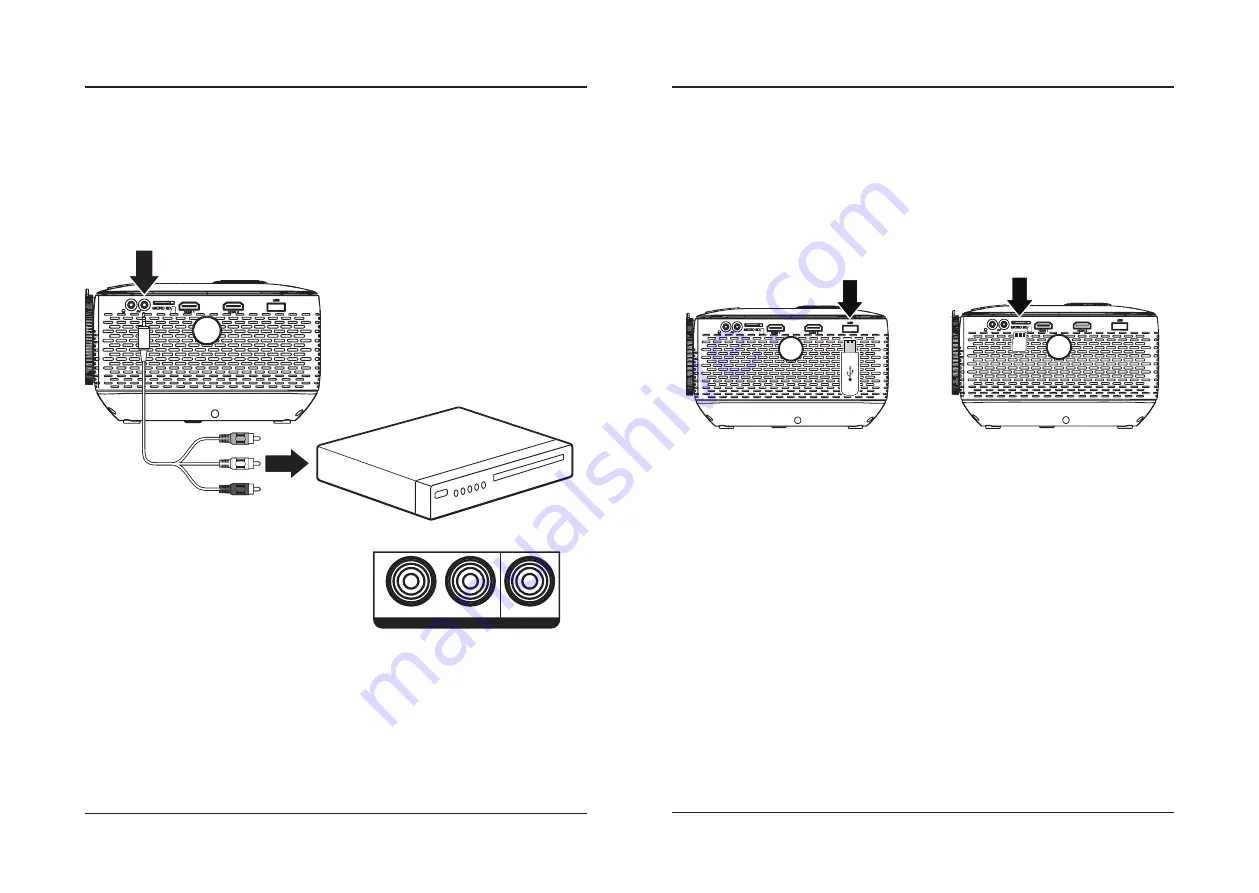
background image

12

13

Audio/Video Input

Requires a 3.5mm to RCA audio/video cable (included).

1.  Connect the 3.5mm to RCA audio/video cable to the AV input on the unit.

2.  Connect the 3.5mm to RCA audio/video cable to the RCA stereo audio outputs and composite video output on 

the media player.

3.  Set the projector's 

Source

 to 

AV 

and use the controls on the connected player to select and play media.

Connect AV cable (included) to 

media player's AV outputs.
Audio Left Channel - White

Audio Right Channel - Red

Video - Yellow

AV IN

R

AUDIO OUT

L

VIDEO

VIDEO OUT

Connecting to Other Devices

MicroSD & USB Storage Devices

Supports MicroSD cards and USB drives up to 128GB. Supports AVI, MOV file formats.

1.  Load a USB drive into the 

USB Port.

2.  Set the 

Source

 to 

Media Player, 

then use the 

Arrow

 buttons to select 

"C:Drive" or "D:Drive" (

C:Drive is the SD 

card, D:Drive is the USB).


3.  Use the 

Arrow

 buttons to select 

Video/Music/Picture,

 then press the 

OK

 button to begin playing content from 

the connected storage device.

Important Notes:

• 

This Unit supports up to 128GB, please make sure that the USB drive or MicroSD card you are using is 
128GB or less.

• 

Please make sure the file that you are trying to play is smaller than 4GB.

• 

Please check to make sure that the media you are trying to view is one of the following supported formats 
(Mpeg1, Mpeg2, Mpeg4, MP3, Jpeg).

• 

If you are using an exFAT MicroSD card or USB drive you will need to convert it to FAT32 or NTSF format.

USB Port

MicroSD Card Slot

Connecting to Other Devices

Summary of Contents for PJ770B

Page 1: ...210 145 80...

Page 2: ...Mini Rechargeable Projector With Bluetooth User s Guide for Model PJ770B v2716 01 For the most up to date version of this User s Guide go to www gpx com...

Page 3: ...eavy or otherwise on the projector This product meets and complies with all Federal regulations See projector enclosure for related safety markings No user serviceable parts inside do not attempt to o...

Page 4: ...included 3 5mm to 3 x RCA audio video cable AC DC power adapter User s Guide Overview Features 5 Includes 5 Projector Features Inputs 6 Projector Setup Charging the Battery 8 Image Adjustment 8 Removi...

Page 5: ...ors 14 Keystone Adjustment 15 Focus Adjustment 14 13 12 11 3 2 8 9 10 1 5 7 6 4 Power Press to power on the projector Press to power OFF Note Please make sure Main Power Switch is ON Exit Return Press...

Page 6: ...CATOR WILL FLASH WHEN THE BATTERY IS LOW PLEASE RECHARGE Image Adjustment Keystone Adjustment For Keystone Correction press the OK 1 2 3 4 5 6 7 8 9 SOURCE MENU FLIP VOL VOL EXIT buttons on the remote...

Page 7: ...ent For best results place the projector in a dark room or other dimly lit area The projector will display a screen size from 30 to 150 Adjust the projector angle and distance to best suit your needs...

Page 8: ...B Supports AVI MOV file formats 1 Load a USB drive into the USB Port 2 Set the Source to Media Player then use the Arrow buttons to select C Drive or D Drive C Drive is the SD card D Drive is the USB...

Page 9: ...right portion of the Main Menu screen and sound played from the projector will be heard through the Bluetooth receiver After initial pairing the projector and the Bluetooth speakers will stay paired...

Page 10: ...t image corners to reduce image distortion Stop Press to stop playback Flip Press to flip display image 180 Play Pause Press to play or pause an individual chapter or track Arrows OK Press to navigate...

Page 11: ...4 Panel Flip Rotate Select to change projection mode Front Rear ceiling Front ceiling Rear 5 Keystone Correction Select to adjust image corners to reduce image distortion 0 22 6 Digital Zoom Select t...

Page 12: ...y cause undesired operation Changes or modifications not expressly approved by the party responsible for compliance could void the user s authority to operate the equipment NOTE This equipment has bee...

Reviews: