background image

Connections (Continued)

12

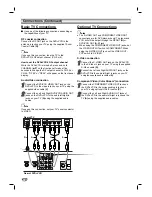
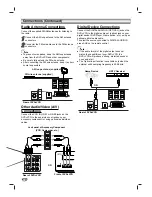
Basic TV Connections

Use one of the following connections, depending on
the capabilities of your TV.

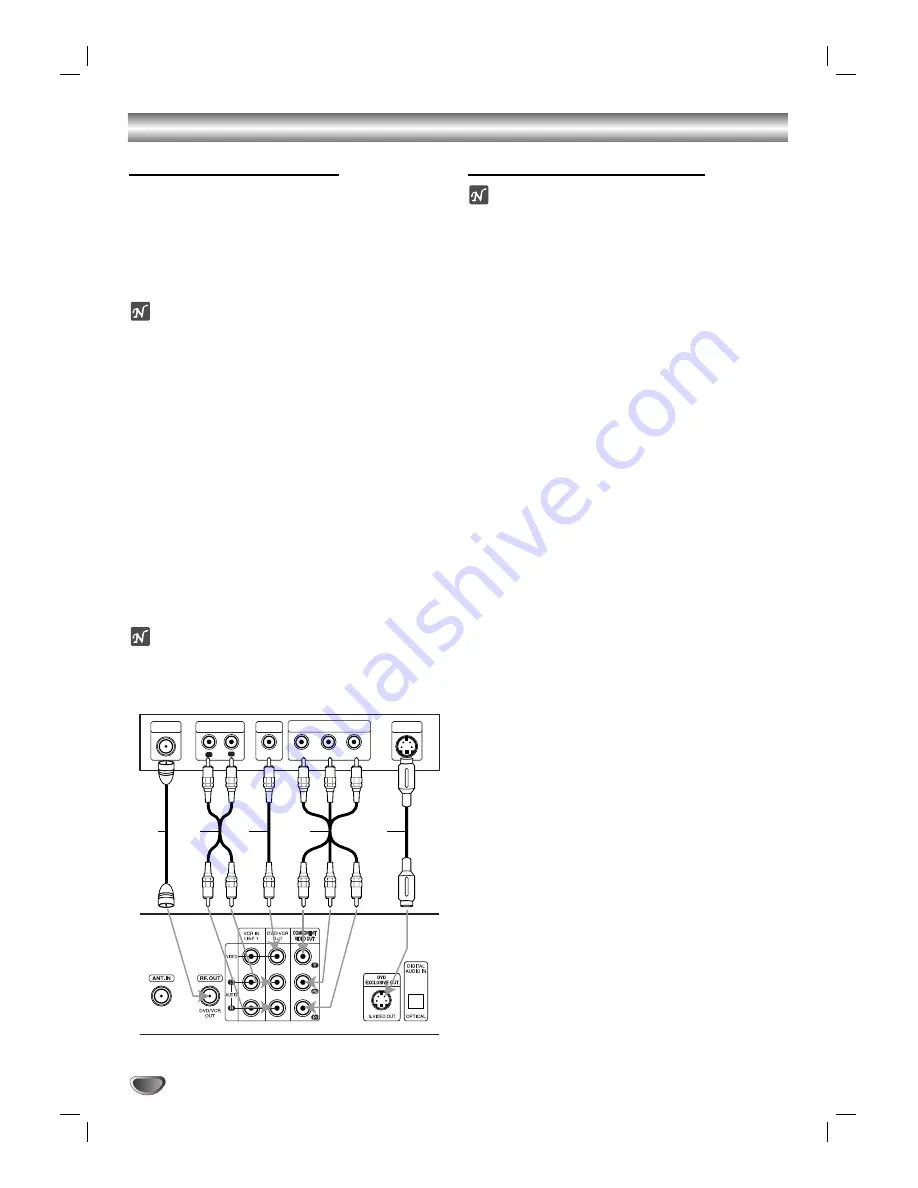
RF coaxial connection

Connect the RF.OUT jack on the DVD+VCR to the
antenna in jack on your TV using the supplied 75-ohm
Coaxial Cable 

(R)

.

ote

If you use this connection, tune the TV to the
DVD+VCR’s RF output channel (CH 3 or 4).

How to set the DVD+VCR’s RF output channel 

While the DVD+VCR is turned off, press and hold
CHANNEL (

v

/

V

) on the front panel for about five 

seconds to change the RF output channel to CH 03 or 
CH 04. “RF 03” or “RF 04” will appear on the front panel
display.

Audio/Video connection 

11

Connect the DVD/VCR VIDEO OUT jack on the
DVD+VCR to the video in jack on your TV using the
supplied video cable 

(V)

.

22

Connect the Left and Right DVD/VCR AUDIO OUT
jacks on the DVD+VCR to the audio left/right in
jacks on your TV 

(A)

using the supplied audio

cables.

ote

If you use this connection, set your TV’s source selector
to VIDEO.

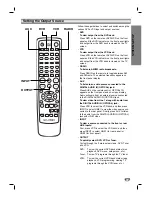
Optional TV Connections

otes

The S-VIDEO OUT and COMPONENT VIDEO OUT
connections are for DVD playback only! The tuner and
VCR will still be output through the RF.OUT

(R)

or

DVD/VCR OUT

(A, V)

jack.

When using the COMPONENT VIDEO OUT jacks, set
the VIDEO OUTPUT switch to COMPONENT. When
using the S-VIDEO OUT jack, set the VIDEO OUT-
PUT switch to S-VIDEO.

S-Video connection 

11

Connect the S-VIDEO OUT jack on the DVD+VCR
to the S-Video in jack on your TV using the supplied
S-Video cable 

(S)

.

22

Connect the Left and Right AUDIO OUT jacks on the
DVD+VCR to the audio left/right in jacks on your TV
using the supplied audio cables 

(A)

.

Component Video (Color Stream

®

) connection

11

Connect the COMPONENT VIDEO OUT jacks on
the DVD+VCR to the corresponding in jacks on
your TV using optional Y/Pb/Pr cables 

(C)

.

22

Connect the Left and Right AUDIO OUT jacks of
the DVD+VCR to the audio left/right in jacks on the
TV 

(A)

using the supplied audio cables.

ANTENNA

INPUT

R

L

R

Y

Pb

Pr

COMPONENT VIDEO INPUT

AUDIO INPUT

L

VIDEO 

INPUT

S-VIDEO 

INPUT

Rear of TV

Rear of DVD+VCR

S

A

V

C

Summary of Contents for HT2010

Page 1: ...User s Guide HT2010 2015 H T 2 0 1 0 H T 2 0 1 5...

Page 2: ...ation This product generates uses and can radiate radio frequency energy and if not installed and used in accordance with the instruction manual may cause harmful interference to radio communications...

Page 3: ...wider than the other A grounding type plug has two blades and a third grounding prong The wide blade or the third prong are pro vided for your safety If the provided plug does not fit into your outle...

Page 4: ...28 VHS Hi Fi Stereo System MTS Broadcast 29 Tape Counter Memory Feature 30 Additional VCR Information 30 DVD Operation 31 36 Playing a DVD 31 General Features 31 Moving to another TITLE 31 Moving to a...

Page 5: ...not have a region code label even though their playback is prohibited by area limits Disc Related Terms Title DVD only The main film accompanying features or music album Each title is assigned a titl...

Page 6: ...re quality will be poor Regular inspection and maintenance are recommended after every 1 000 hours of use depending on the oper ating environment For details please contact your nearest dealer Notes o...

Page 7: ...TUNING v v V V Scans for available radio sta tions in your area REW m m DVD Skips to beginning of current chapter track or to previous chapter track Press and hold for fast reverse search VCR Rewinds...

Page 8: ...tape recorded in Hi Fi OPT Indicates DVD VCR source is set to DIGITAL AUDIO IN Indicates clock total playing time elapsed time remaining time title number chapter track number channel radio frequency...

Page 9: ...ound mode PROLOGIC II Selects PROLOGIC II sound mode BYPASS Sets PRO LOGIC II mode to Off CLEAR Removes a track number on the Program menu or a mark on the MARKER SEARCH menu AUDIO Selects an audio la...

Page 10: ...ction Cap below COMPONENT VIDEO OUT Y Pb Pr DVD OUT Connect to a TV with Y Pb Pr inputs FOR DVD VIEWING ONLY RF OUT DVD VCR OUT Connect to a TV with an RF coaxial input VIDEO OUTPUT Switch Select eith...

Page 11: ...T IN jack The Adapter does not screw on to the DVD VCR it just slips over the jack Without Cable Box If your cable wire is connected to your TV without a converter or descrambler box unscrew the wire...

Page 12: ...connection set your TV s source selector to VIDEO Optional TV Connections otes The S VIDEO OUT and COMPONENT VIDEO OUT connections are for DVD playback only The tuner and VCR will still be output thr...

Page 13: ...he front speakers should be placed at equal dis tances from your primary listening position The speakers should be placed 45 degrees apart relative to the listening position Center speaker Ideally the...

Page 14: ...Digital Device Connections Connect the DIGITAL AUDIO IN OPTICAL jack on the DVD VCR to the digital audio out optical jack on your digital device DVD Player Game device etc using an optional optical a...

Page 15: ...ars on the front panel and on screen display Audio will come from an external source connected to the DIGITAL AUDIO IN OPTICAL jack To view video from Line 1 along with audio from the DIGITAL AUDIO IN...

Page 16: ...e is used it is called Pro Logic as before There is no Pro Logic I mode The Pro Logic emula tion mode is optional MOVIE mode The Movie mode is for use with stereo television shows and all programs enc...

Page 17: ...oding format of discs is usually printed on the packaging Dolby Digital discs are labeled with the logo Dolby Surround encoded programs are labeled with the logo DTS Digital Surround discs are marked...

Page 18: ...d from the center speaker to the listener is 8 feet the center delay time is 2msec 10 feet 8 feet 2 feet or 2msec Setting the delay time in the Dolby Digital and Dolby Pro Logic II mode 1 1 Press DELA...

Page 19: ...u System Convenient on screen menus allow you to set the clock timer recordings and other setup preferences The fol lowing pages describe the on screen menu system Menu Selection Your VCR allows remot...

Page 20: ...stereo tape is played the stereo sound will be heard through the left and right channels If a mono tape is played and the audio output is set to stereo the same mono sound will be heard from both lef...

Page 21: ...incorrect time e g if your local TV station does not send the time or sends the wrong date time you must set the clock manually Manual Clock Set Example July 5 2002 2 15 AM 1 1 Press MENU to display...

Page 22: ...to DVD mode General Explanation This section gives basic instructions for setting up DVD features and preferences Some DVDs require special operations or allow only limited operation during play back...

Page 23: ...the number keys to enter the corresponding 4 digit number according to the lan guage code list on page 41 If you enter the wrong language code press CLEAR Menu Language Select a language for the Setu...

Page 24: ...If no suitable alternative is found playback will stop You must enter the 4 digit password or change the rating level in order to play the disc 5 5 Press SELECT ENTER to confirm your rating selection...

Page 25: ...ts Horizontal lines noise bars will appear on the TV screen This is normal The audio is automatically muted during special effect modes so there is no sound during search During the high speed picture...

Page 26: ...e Next select the desired channel on the DVD VCR and then press PAUSE STEP X again to resume recording Timer Recording The DVD VCR can be programmed to record up to 8 programs within a period of 1 yea...

Page 27: ...inished programming and you want to set the DVD VCR to record the programs you have entered A MAKE SURE YOU HAVE INSERTED A TAPE INTO THE DVD VCR B YOU MUST TURN OFF THE DVD VCR BEFORE IT WILL RECORD...

Page 28: ...CR goes to normal recording mode Dubbing and Editing If you wish to edit or dub recordings from your cam corder or another VCR to this DVD VCR connect your device to the line inputs on the front or re...

Page 29: ...TS broadcast If only STEREO appears on the TV screen The DVD VCR can record in stereo onto the VHS Hi Fi audio tracks if the BROADCAST TYPE option is set to STEREO in the VCR Setup menu The DVD VCR wi...

Page 30: ...ding on the condition of the tape and the kind of the tape T 140 T 160 T 210 etc Additional VCR Information During manual recording Timer recording One Touch Recording playback or fast forward modes t...

Page 31: ...ve specific region codes Your player will not play discs that have a region code different from your player The region code for this player is 1 one General DVD Features ote Unless stated otherwise al...

Page 32: ...at Title icon appears on the TV screen 3 To exit repeat mode press REPEAT a third time The Repeat Off icon appears on the TV screen Repeat A B To repeat a sequence in a title 1 Press A B at the desire...

Page 33: ...r on the screen 2 Press 1 2 to select the Marker number you want to erase 3 Press CLEAR The Marker number will be erased from the list 4 Repeat steps 2 and 3 to erase additional Marker numbers 5 To re...

Page 34: ...epeat Off icon appears on the menu screen Search 1 Press and hold PREV or NEXT for about two seconds during playback The player will go into search mode 2 Press and hold PREV or NEXT continu ously to...

Page 35: ...the program list Repeat Programmed Tracks To repeat the track currently playing press REPEAT The Repeat Track icon appears on the menu screen To repeat all tracks on the program list press REPEAT a s...

Page 36: ...t read fake MP3 files that have the mp3 file extension MP3 disc compatibility with this player is limit ed as follows 1 Sampling Frequency 44 1kHz only 2 Bit rate from 32 320kbps 3 CD R physical forma...

Page 37: ...ions ote If all 30 stations have already been entered MEM FULL will appear on the front panel display for a moment and then a preset number will flash To change the preset number follow steps 5 6 as a...

Page 38: ...securely Insert a disc or tape Check that the disc or tape indicator on the front panel display is lit Select the appropriate video input mode on the TV so the picture from the DVD VCR appears on the...

Page 39: ...mpatible Broadcast program is not in stereo for mat DVD VCR A V Out jacks are not con nected to TV A V In jacks DVD VCR Audio Video Out is not selected for viewing at the TV DVD VCR BROADCAST TYPE mod...

Page 40: ...remote control are depleted The remote uses one set of controls for VCR and DVD operation e g PLAY Correction Wipe them with a cloth slightly mois tened with alcohol Clean the disc Connect the speake...

Page 41: ...7579 Korean 7585 Kurdish 7679 Laothian 7665 Latin 7686 Latvian Lettish Code Language 7678 Lingala 7684 Lithuanian 7775 Macedonian 7771 Malagasy 7783 Malay 7776 Malayalam 7784 Maltese 7773 Maori 7782 M...

Page 42: ...slands KZ Kazakhstan LA Laos LB Lebanon Code Country LC Saint Lucia LI Liechtenstein LK Sri Lanka LR Liberia LS Lesotho LT Lithuania LU Luxembourg LV Latvia LY Libya MA Morocco MC Monaco MD Moldavia M...

Page 43: ...CA jack x 1 Pb Pr 0 7 V p p 75 RCA jack x 2 Audio output analog audio 2 0 Vrms 1 KHz 0 dB 330 RCA jack L R x 1 RF OUT Channel 3 or 4 Switchable VCR Specifications Head system Four head helical scan az...

Page 44: ...pe 1 Way 1 Speaker 1 Way 1 Speaker Impedance 8 4 Frequency Response 110 40 000 Hz 40 1 500 Hz Net Dimensions W x H x D 90 x 125 x 107 mm 195 x 350 x 290 mm 3 5 x 4 9 x 4 2 7 7 x 13 8 x 11 4 Accessory...

Page 45: ...rial or Educational use has the same warranty coverage as stated in this warranty What are the Exceptions This warranty does not cover 1 Normal maintenance service such as video head cleaning 2 Damage...

Reviews: