

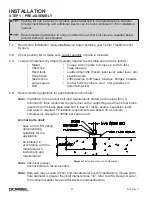
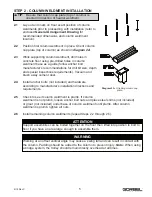
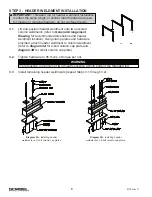

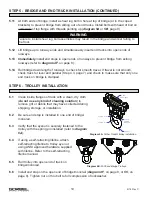

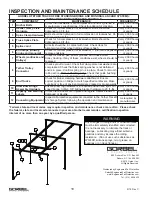

STEP 3 - HEADER WELDMENT INSTALLATION
3.1
Lift and position header weldment onto two secured
column weldments (refer to
General Arrangement
Drawing
for recommended dimensions and header
weldment location). Using clamp plates and hardware
provided, attach header weldment to column weldment
(refer to
diagram 3A
for 2-bolt column cap plate and
diagram 3B
for 4-bolt column cap plate).
3.2
Tighten hardware to 95 ft.-lbs. of torque per nut.
3.3
Install remaining header weldments (repeat Steps 3.1 through 3.2).
IMPORTANT:
Threaded rod for header weldment installation
is either the same length or shorter than threaded rod used
for runway or monorail hangers; do not confuse the two.
Diagram 3A.
Installing header
weldments on 2-bolt column cap plates.
Diagram 3B.
Installing header
weldments on 4-bolt column cap plates.
6
9/18 Rev C
WARNING
There must be a minimum of two threads showing at both ends of the threaded rod.


