background image

22

IO-242

      5/04

6. Turn OFF any unnecessary gas appliances started in step

3.

G

AS

 M

ANIFOLD

 P

RESSURE

 M

EASUREMENT


AND

 A

DJUSTMENT

CAUTION

T

O PREVENT UNRELIABLE OPERATION OR EQUIPMENT DAMAGE, THE GAS

MANIFOLD PRESSURE MUST BE AS SPECIFIED ON THE UNIT RATING PLATE. 

O

NLY MINOR ADJUSTMENTS SHOULD BE MADE BY ADJUSTING THE GAS VALVE

PRESSURE REGULATOR.

Only small variations in gas pressure should be made by adjusting
the gas valve pressure regulator.  The manifold pressure must be
measured with the burners operating.  To measure and adjust the
manifold pressure, use the following procedure.

1. Turn OFF gas to furnace at the manual gas shutoff valve

external to the furnace.

2. Connect a calibrated water manometer (or appropriate gas

pressure gauge) at the gas valve outlet pressure tap (refer
to gas valve figure in previous section).

3. Turn ON the gas supply and operate the furnace.
4. Measure gas manifold pressure with burners firing.  Adjust

manifold pressure according to the 

Manifold Gas Pressure

table:

Gas

Range

Nominal

Natural

3.0 - 3.6"  w.c.

3.5" w.c.

Propane

9.7 - 10.3" w.c.

10.0" w.c.

Manifold Gas Pressure

The final manifold pressure must not vary more than ± 0.3 “ w.c.
from the above specified pressures.  Any necessary major changes
in gas flow rate should be made by changing the size of the burner
orifice.

5. To adjust the gas valve pressure regulator, remove the

regulator cap.

6. Turn the adjustment screw clockwise to increase the

pressure, or counterclockwise to decrease the pressure.

7. Securely replace the regulator cap.
8. Turn OFF gas to furnace at the manual shutoff valve and

disconnect manometer.

9. Reinstall gas valve outlet pressure tap plug before turning

on gas to furnace.

G

AS

 I

NPUT

 R

ATE

 M

EASUREMENT

 (N

ATURAL

 G

AS

 O

NLY

)

The gas input rate to the furnace must never be greater than that
specified on the unit rating plate.  To measure natural gas input
using the gas meter, use the following procedure.

1. Turn OFF the gas supply to all other gas-burning appliances

except the furnace.

2. While the furnace is operating, time and record one complete

revolution of the smallest gas meter dial.

3. Calculate the number of seconds per cubic foot (sec/ ft

3

) of

gas being delivered to the furnace.  If the dial is a one cubic
foot dial, divide the number of seconds recorded in step 2
by one.  If the dial is a two cubic foot dial, divide the number
of seconds recorded in step 2 by two.

G

AS

 S

UPPLY

 P

RESSURE

 M

EASUREMENT

oper

at

ing.

CAUTION

T

O PREVENT UNRELIABLE OPERATION OR EQUIPMENT DAMAGE, THE INLET

GAS SUPPLY PRESSURE MUST BE AS SPECIFIED ON THE UNIT RATING PLATE

WITH ALL OTHER HOUSEHOLD GAS FIRED APPLIANCES OPERATING.

The line pressure supplied to the gas valve must be within the
range specified below.  The supply pressure can be measured at
the gas valve inlet pressure tap or at a hose fitting installed in the
gas piping drip leg.  The supply pressure must be measured with
the burners operating.  To measure the gas supply pressure, use
the following procedure.

With Power and Gas Off:

1. Connect a water manometer or adequate gauge to the “inlet

pressure tap” of the gas valve.
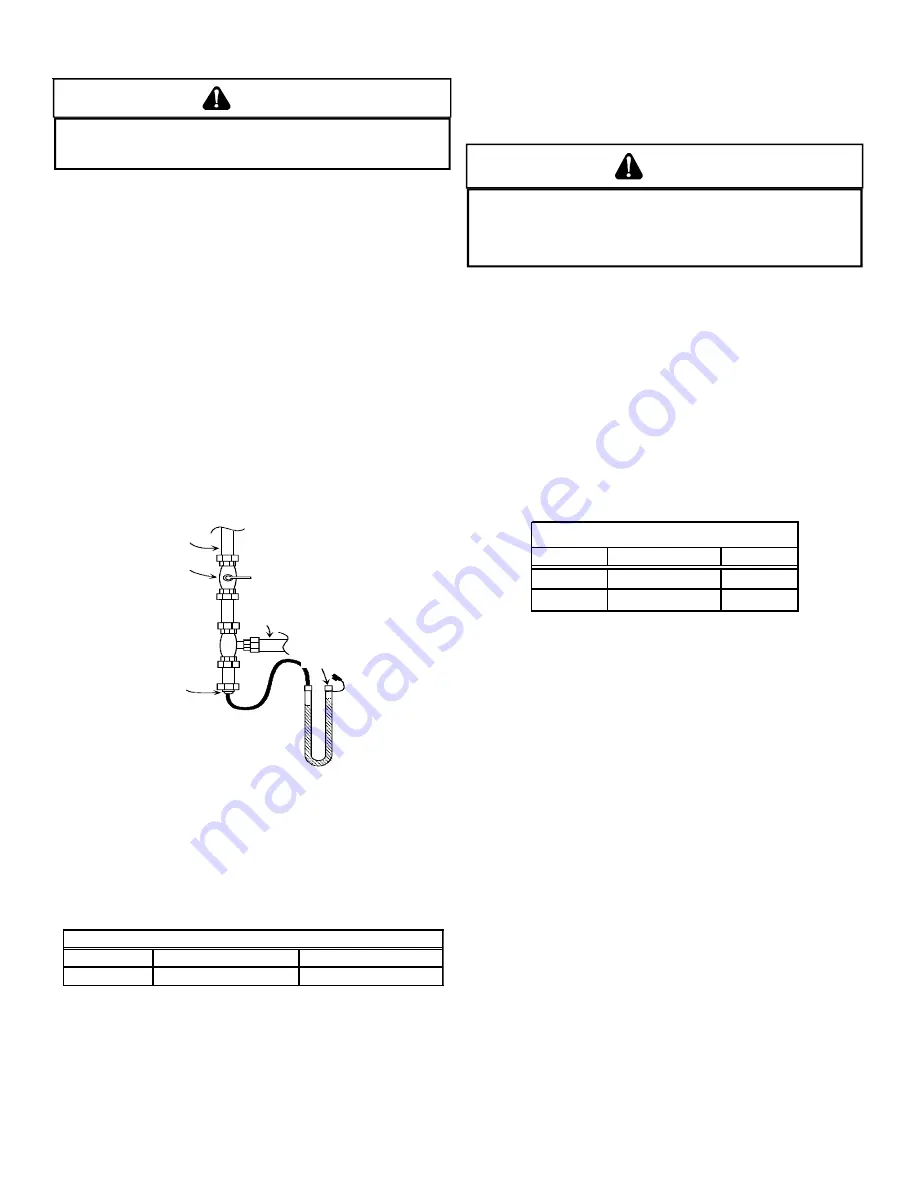
As an alternative method, inlet gas pressure can also be
measured by removing the cap from the drip leg and
installing a predrilled cap with a hose fitting (Figure 26).

With Power and Gas On:

2. Put furnace into heating cycle and turn on all other gas

consuming appliances.

If operating pressures differ from the 

Inlet Gas Supply Pressure

table below, make necessary pressure regulator adjustments, check
piping size, etc., and/or consult with local utility.

G a s   L in e

G a s
S h u t o f f
V a l v e

G a s   L in e  
T o   F u r n a c e

D r ip   L e g   C a p  
W it h   F it ti n g

M a n o m e te r   H o s e

M a n o m e t e r

O p e n   T o

A tm o s p h e r e

 Measuring Inlet Gas Pressure (Alternate Method)

3. Turn ON the gas supply and operate the furnace and all

other gas consuming appliances on the same gas supply
line.

4. Measure furnace gas supply pressure with burners firing.

Supply pressure must be within the range specified in the
table below.

Natural Gas

Minimum: 5.0" w.c.

Maximum:10.0" w.c.

Propane Gas Minimum: 11.0" w.c.

Maximum:13.0" w.c.

Inlet Gas Supply Pressure

If supply pressure differs from table, make the necessary
adjustments to pressure regulator, gas piping size, etc., and/or
consult with local gas utility.

5. Turn OFF gas to furnace at the manual shutoff valve and

disconnect manometer.  Reinstall plug before turning on
gas to furnace.

Summary of Contents for GDS8

Page 1: ...en the unit is in operation Remember it is your responsibility to install the product safely and to know it well enough to be able to instruct a customer in its safe use Safety is a matter of common s...

Page 2: ...ETE THE INSTALLATION 13 FIX 1 LINER TERMINATION 13 FIX 2 CHANGE VENTING ARRANGEMENTS 13 FIX 3 REBUILD THE CROWN 13 FIX 4 RELINING 13 VIII Electrical Connections 14 WIRING HARNESS 14 115 VOLT LINE CONN...

Page 3: ...5 FILTER MAINTENANCE 25 FILTER REMOVAL 26 UPRIGHT FILTER REMOVAL 26 INDUCED DRAFT AND CIRCULATOR BLOWER MOTORS 26 FLAME SENSOR QUALIFIED SERVICER ONLY 26 IGNITER QUALIFIED SERVICER ONLY 26 BURNERS 26...

Page 4: ...ponent failures could result in heating system operational problems TO THE INSTALLER Before installing this unit please read this manual thoroughly to familiarize yourself with specific items which mu...

Page 5: ...ring grounding will be discharged 3 Service integrated control module or connecting wiring following the discharge process in step 2 Use caution not to recharge your body with static electricity i e d...

Page 6: ...lking compound or cement grout Counterflow Installation over a combustible floor If installation over a combustible floor becomes necessary use an accessory subbase see Product Data Book applicable to...

Page 7: ...HE FURNACE POSITION AS CLOSE AS POSSIBLE TO BLOWER DECK TO ALLOW FOR CIRCULATOR BLOWER REMVOAL HOLD DOWN NUTS SUPPORT NUTS 2 x2 x3 8 ANGLE IRON 3 PLACES Suspended Furnace EXISTING FURNACE REMOVAL NOTE...

Page 8: ...furnished with doors are considered a part of the unconfined space 5 3 3 Equipment Located in Confined Spaces a All Air from Inside the Building The confined space shall be provided with two permanen...

Page 9: ...rtical ducts each opening shall have a minimum free area of 1 square inch per 4 000 BTU per hour of total input rating of all equipment in the enclosure Furnace Water Heater Outlet Air Chimney or Gas...

Page 10: ...ada the furnaces must be vented in accordance with the National Standard of Canada CAN CSA B149 1 and CAN CSA B149 2 latest editions and amendments NOTE The vertical height of the Category I venting s...

Page 11: ...OD EQUIPPED APPLIANCE THE POTENTIAL FOR CONDENSATIO N DAM AG E MAY STILL EXIST WITH EXTREMELY COLD CONDITIO NS LONG VENT CONNECTORS EXTERIOR CHIM NEYS OR ANY CO MBINATION OF THESE CONDITIONS THE RISK...

Page 12: ...CHECK 5 LINER CONDITION If a metal liner is present it must be checked It cannot be assumed that all existing metal liners are correctly installed and in good condition Remove the lowest existing vent...

Page 13: ...CSA B149 2 latest editions and amendments assume interior chimneys If in the judgment of the local gas utility installer and or local codes one or more of the above factors is likely to present a prob...

Page 14: ...requirements If a flexible liner is to be used it must be made of the proper materials For most residential applications an aluminum liner should be acceptable If the combustion air supplied to the fu...

Page 15: ...rminal strip as shown in Figure 12 IMPORTANT NOTE To avoid possible equipment malfunction route the low voltage wires to avoid interference with filter removal or other maintenance Integrated Ignition...

Page 16: ...minals TWINNING A twin terminal located on the thermostat terminal strip can be used to twin two furnaces This twin terminal synchronizes the circulation blowers of the two furnaces Furnaces must be s...

Page 17: ...The actual firing rate of the furnace is Input 1 000 heating value of the gas X 3600 constant 52 6 meter time for 1 ft3 of gas Input 3 600 000 52 6 Input 68 400 Btu h METER TIME IN MINUTES AND SECONDS...

Page 18: ...minimum of three inches long Install a 1 8 NPT pipe plug fitting accessible for test gage connection immediately upstream of the gas supply connection to the furnace Use two pipe wrenches when making...

Page 19: ...ely on your sense of smell Contact a local propane gas supplier about installing a gas detecting warning system If the presence of gas is suspected follow the instructions on Page 4 of this manual All...

Page 20: ...is installed and shall be of such a size that the heat exchanger can be viewed for visual light inspection or such that a sampling probe can be inserted into the airstream The access panel must be ma...

Page 21: ...ubleshooting Chart for further explanation of the lighting codes Follow the start up and adjustment items refer to further information in Section XIII Operational Checks FURNACE OPERATION Purge gas li...

Page 22: ...e the number of seconds per cubic foot sec ft3 of gas being delivered to the furnace If the dial is a one cubic foot dial divide the number of seconds recorded in step 2 by one If the dial is a two cu...

Page 23: ...ng ends During normal heating operation the circulator fan will come on approximately 37 seconds after the gas valve opens ON OFF ON OFF ON OFF ON OFF 1 2 1 2 1 2 1 2 90 SECON D DELAY 120 SECON D DELA...

Page 24: ...valve to close and extinguish flame The induced draft blower to be de energized after a fifteen second postpurge and The circulator blower to remain energized continuously until limit control resets 3...

Page 25: ...he red LED If the furnace is in lockout it will or can be reset in any of the following ways 1 Automatic reset The integrated control module will automatically reset itself and attempt to resume norma...

Page 26: ...cleaned by a qualified servicer using emery cloth or steel wool Following cleaning the flame sense signal should be as indicated in the Specifications Sheet IGNITER QUALIFIED SERVICER ONLY If the igni...

Page 27: ...SHES Induced draft blower pressure switch contacts sticking Shorts in pressure switch circuit Inspect pressure switch hose Repair if necessary Inspect flue for blockage proper length elbows and termin...

Page 28: ...er if necessary Check burners for proper alignment Check flue and air inlet piping for blockage proper length elbows and termination Correct as necessary Check induced draft blower for proper performa...

Page 29: ...IR CLEANER ELECTRONIC BLWR CIRCULATOR BLWR ID HUMIDIFIER FLAME SENSOR 115 VAC TRANSFORMER 40 VA 24 VAC C2 GND VALVE GAS CONTROL LIMIT PRIMARY AUTO RESET LIMIT CONTROL S MANUAL RESET ROLLOUT RO1 5 RO2...

Page 30: ...of product failure They are simple to service and forgiving to operate We use quality materials and components Finally every unit is run tested before it leaves the factory That s why we know There s...

Reviews: