background image


REV. 01 2020


25 / 28 


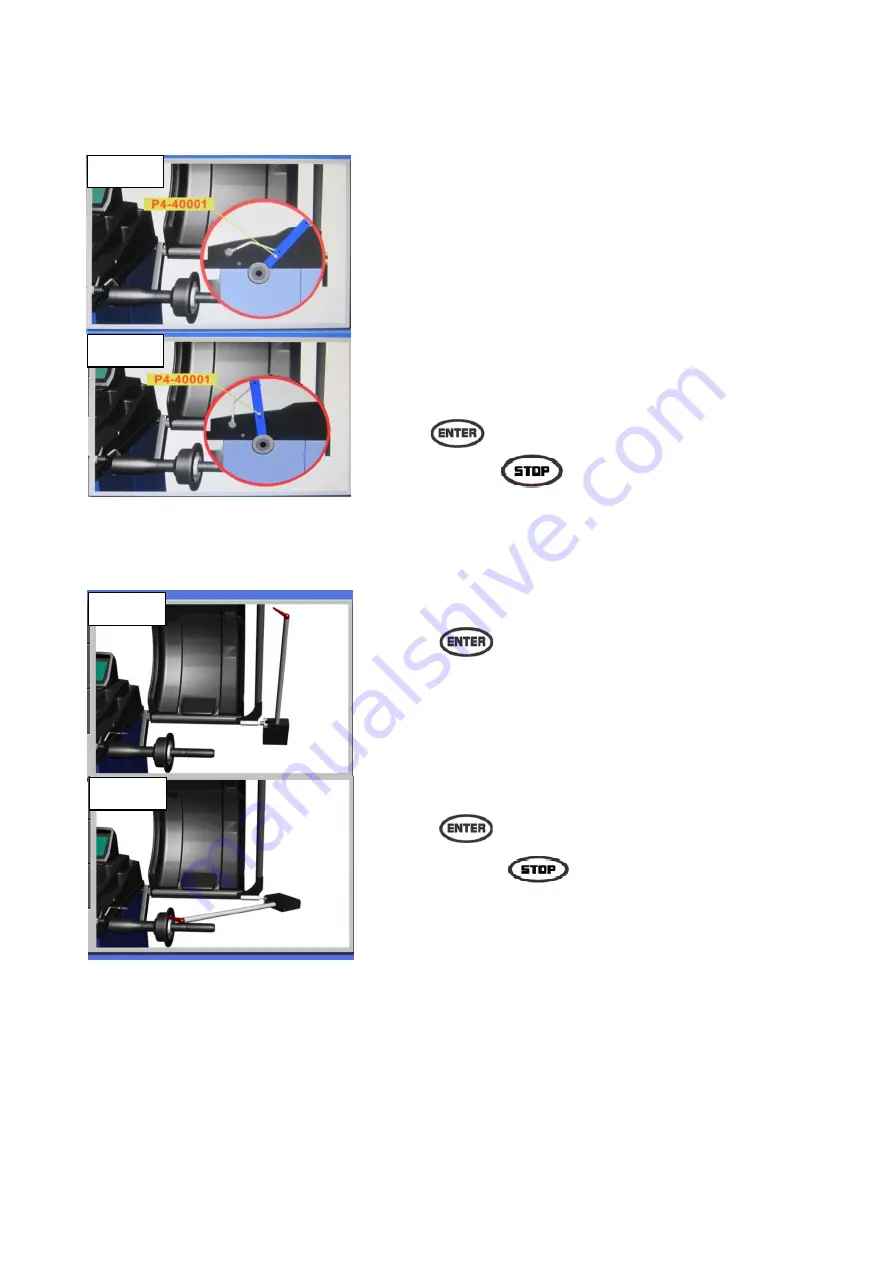
7.2.3    CALIBRATION OF D GAUGE  


7.2.4    CALIBRATION OF B GAUGE – optional  


Place the gauge to the “0” position. 
 
Press              to memorize. 


Set the gauge head to the outer surface of the shaft flange. 
 
Press              to memorize. 
 
To exist, press                . 

Place  the  supplied  calibration  meter  on  the  HIGER 
PROFILE  surface  of  shaft  (“0”  position)  and  then  set  the 
gauge tip into the lower hole of the meter. 


Place  the  supplied  calibration  meter  on  the  HIGER 
PROFILE  surface  of  shaft  (“0”  position)  and  then  set  the 
gauge tip into the upper hole of the meter (“200” position) 
 
Press               to memorize. 
 
To exist, press                .


Fig. 31 

Fig. 30 

Fig. 32 

Fig. 33 

Summary of Contents for GM - U95 PRO

Page 1: ...REV 01 2020 1 28 USE AND MAINTENANCE MANUAL WHEEL BALANCER WITH MICRO PROCESSOR GM U95 PRO...

Page 2: ...roughout this manual the following symbols and printing characters are used to facilitate reading Indicates the operations which need proper care Indicates prohibition Indicates a possibility of dange...

Page 3: ...1 SPACE REQUIRED 4 2 SHAFTASSEMBLY 4 3 WHEEL GUARD MOUNTING 4 4 ELECTRIC CONNECTION 8 8 9 9 5 CONTROL PANEL AND MENU FUNCTION 10 5 1 DISPLAY PANEL 5 2 CONTROL PANEL 10 11 5 3 MENU FUNCTION 12 6 OPERA...

Page 4: ...should be taken as correct 1 3 MANUAL KEEPING For a proper use of this manual the following is recommended Keep the manual near the lift in an easily accessible place Keep the manual in an area protec...

Page 5: ...el under emergency conditions A wheel guard of high impact plastic that is designed to prevent the counterweights from flying out in any directing except toward the floor A switch interlock system pre...

Page 6: ...body G Foot brake H Wheel weight tray I LED lighter J Control panel K Laser pointer on 6 o clock 2 6 TECHNICAL SPECIFICATION Max wheel weight 75kg Wheel diameter 39 1000mm Rim diameter 10 32 255 810m...

Page 7: ...SPORTATION UNPACKING AND STORAGE transported in its original packaging shown on the package itself may be moved by means of a fork lift Insert the forks at the points shown cardboard and the nylon bag...

Page 8: ...on preferably concrete The balancer must sit solidly on its three feet If the balancer is not leveled the balancer will not and may produce inaccurate balance readings elect a location for the balance...

Page 9: ...mproper electrical hook up can damage motor and will not be covered under warranty The machine is supplied with a single phase mains cable plus earth ground Check to make sure the characteristics of y...

Page 10: ...position of application for correction weights 3 Digital readouts AMOUNT OF UNBALANCE inside 4 LED indicator POSITION OF UNBALANCE inside 5 Indicator inner adhesive weight position at 6 o clock 6 Indi...

Page 11: ...signal is enabled pressing of any push button is accompanied by a Beep Fig 8 CONTROL PANEL 1 Unbalance reading selection 2 Unbalance mode selection 3 Function selection UP 4 Rim parameters selection...

Page 12: ...OPT function DIAMETER mm inch WIDTH mm inch WHEEL GUARD on off Start from GUARD closing Approx 1 5g or 0 1 0 25oz BEEP on off Entry SET UP menu g oz unbalance measurement unit See SELF CALIBRATION cha...

Page 13: ...ne Performing a spin can be started by pressing START button or closing the wheel guard if START FROM GUARD CLOSING is enabled When the figures have been established the spin is automatically braked t...

Page 14: ...the inner side of the hub Select the cone that best fits the centre hole in the wheels Slide the cone onto the shaft with the large end towards the faceplate Lift the wheel onto the shaft and centre...

Page 15: ...alues also can be entered either manually or automatically At special request the machine can be supplied with the automatic B gauge 6 3 2 AUTOMATIC ENTRY OF A D Move the A D gauge to measure the A an...

Page 16: ...the initial screen press Fig 16 Correction of outer side Correction of inner side 6 4 2 STATIC MODE The static mode is used for motorcycles or narrow wheels when it is not possible to place the count...

Page 17: ...pointer is actuated to point to 6 o clock adhesive position Fig 19 Balancing of light alloy rims with application of adhesive weights on the rim shoulders Both weight positions are at 6 o clock Balanc...

Page 18: ...ed with the adhesive weights and then measure the dimensions as shown in the diagram Fig 20 Pay attention to press to memorize A1 dimension which should be measured at first then measure AE dimension...

Page 19: ...asured at first then measure AE dimension which will be memorized automatically Fig 22 Press After performing the balancing spin manually rotate the wheel to the unbalance position to clip on the weig...

Page 20: ...se the first spoke of two adjacent spokes Rotate the wheel to move the first spoke to 12 o clock position Press to memorize the position Choose the second spoke of two spokes Rotate the wheel to move...

Page 21: ...ing the static balance press If the unbalance amount shown on the digital readouts is exceeding 30g the digital readouts display YES OPT In this case start OPT function Mark with chalk reference point...

Page 22: ...change Press to end SELF DIAGNOSIS CHAPTER 7 SET UP 7 1 SELF DIAGNOSIS Fig 25 Rotate the wheel in direction of rotation the readouts display from 0 to 255 Rotate the wheel in reverse direction of rota...

Page 23: ...7 2 CALIBRATION To access SELF CALIBRATION menu refer to Fig 8 For the self calibration proceed as follows Fig 26 Weight calibration Distance A gauge calibration Diameter D gauge calibration Width B...

Page 24: ...t spin under normal condition Rotate the wheel manually to 12 o clock and apply 100g weight on the inner side of the rim Start the second spin After the second spin rotate the wheel manually to 12 o c...

Page 25: ...ress to memorize To exist press Place the supplied calibration meter on the HIGER PROFILE surface of shaft 0 position and then set the gauge tip into the lower hole of the meter Place the supplied cal...

Page 26: ...not be held responsible for complaints deriving from the use of spare parts made by other manufacturers or for damage caused by tampering or removal of safety systems 8 2 ORDINARY MAINTENANCE This ba...

Page 27: ...place 3 Reconnect 4 Check for correct voltage 5 Replace The diameter measured is not correct 1 The gauge is not positioned correctly when measuring 2 The gauge is not calibrated 1 Position the gauge c...

Page 28: ...ES PF 211 Universal flange Universal flange for wheels with without central hole suitable for any vehicle wheel with 3 4 5 holes 1 Complete flange 2 Holes detector 3 Pre centering cone 4 T hexagonal w...

Reviews: