background image

10

2

1

ON

3

R

230V~

CLACK

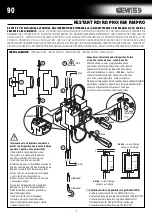
CONFIGURAZIONE CONTATTO AUSILIARIO (SOLO PER VERSIONI PRO) 

AUXILIARY CONTACT SETUP (FOR PRO VERSIONS ONLY) - 

CONFIGURATION CONTACT AUXILIAIRE (SEULEMENT POUR VERSIONS PRO)

CONFIGURACIÓN CONTACTO AUXILIAR (SOLO PARA VERSIONES PRO) - 

KONFIGURATION HILFSKONTAKT (NUR BEI PRO-VERSIONEN)

CONFIGURAÇÃO CONTACTO AUXILIAR (SO PARA VERSÕES PRO) 

È possibile configurare il contatto ausiliario premendo per almeno 

5s il tasto R e poi rilasciandolo. Il passaggio tra le diverse modalità è

confermato con lampeggi rossi del LED di sinistra

The auxiliary contact can be configured by pressing the button key R for

at least 5s, then releasing it. The switch between the different modes is

confirmed when the left red LED blinks.

On peut configurer le contact auxiliaire en appuyant 5 s au moins sur la

touche R, puis en la relâchant. Le passage entre les différents modes est

confirmé par le clignotement rouge de la LED de gauche.

Es posible configurar el contacto auxiliar pulsando durante al menos 5 s

la tecla R y después soltándola. El paso entre las diferentes modalidades

está confirmado con señales intermitentes rojas del LED de la izquierda

Man kann den Hilfskontakt konfigurieren, indem man mindestens 5s lang

die Taste R drückt und sie dann loslässt. Der Wechsel zwischen den

verschiedenen Modi wird durch das rote Blinken der linken LED bestätigt.

É possível configurar o contacto auxiliar ao premir a tecla R durante

pelo menos 5s, libertando-a em seguida. A passagem entre as várias

modalidades é confirmada através de piscas vermelhos do LED de

esquerda.

Un lampeggio LED rosso

Red LED blinks once

Un clignotement LED rouge

Una señal intermitente LED rojo

Ein Blinken der roten LED

Um pisca LED vermelho

Tre lampeggi LED rosso

Red LED blinks three times

Trois clignotements LED rouge

Tres señales intermitentes LED rojo

Drei Blinken der roten LED

Três piscas LED vermelho

Contatto intermittente (*)

Intermittent contact 

Contact intermittent

Contacto intermitente

Blinkender Kontakt 

Contacto intermitente 

Due lampeggi LED rosso

Red LED blinks twice

Deux clignotements LED rouge

Dos señales intermitentes LED rojo

Zwei Blinken der roten LED

Dois piscas LED vermelho

(*) 1Hz per 30s (ripetuto ogni ora) - 

1Hz per 30s (repeated every hour) 

- 1Hz pendant 30 s (répété une fois par heure) 

-  

1Hz por 30s (repetido cada hora) - 

1 Hz für 30 s (wiederholt jede Stunde) - 

1Hz por 30s (repetido a todas as horas)

(default)

1

2

3

R

R

R

Summary of Contents for RESTART RD PRO

Page 1: ...le bleu neutre Conectar la alimentaci n del dispositivo entre fase y el neutro cable negro fase cable azul neutro Die Stromversorgung des Ger ts zwischen Phase und dem Nullleiter anschlie en schwarzes...

Page 2: ...ON OF THE AUTOMATIC RESET DEVICE ACTIVATION D SACTIVATION DU DISPOSITIF DE R ARMEMENT AUTOMATIQUE ACTIVACI N DESACTIVACI N DEL DISPOSITIVO DE REARME AUTOM TICO AKTIVIERUNG DEAKTIVIERUNG DER AUTOMATISC...

Page 3: ...N B The test must be carried out monthly Call a technician to check the device if the residual current device does not trip N B Le test doit tre effectu une fois par mois Si le levier ne se d clenche...

Page 4: ...r l isolation de l installation vers la terre qui doit d passer 70 k dans les versions PRO le seuil est de16 k pour l n 30 mA 5 k pour l n 300 mA En la primera puesta en servicio disparar el interrupt...

Page 5: ...ci n Anlagenfehler Isolations fehler Avaria da instala o Riarmo OK Reset OK R armement OK Rearme OK R ckstellung i O Rearme OK Scatto intempestivo Untimely tripping D clenchement intempestif Caida int...

Page 6: ...ci n y en caso de resultado positivo el interruptor se cerrar Las versiones no PRO no tienen se alizaci n semi intermitente La aver a instalaci n est indicada como estado de bloqueo por medio del LED...

Page 7: ...te LED blinking LED clignotante LED parpadeante LED blinkt LED lampejante Verifica impianto t 90s Check installation t 90s Contr le installation t 90s Control instalaci n t 90s Pr fung der Anlage t 90...

Page 8: ...230V INSERIRE CON LEVA IN POSIZIONE I ON OFF GW94817R 230V 0 INSERIRE CON LEVA IN POSIZIONE I ON OFF GW94817R 230V 0 INSERIRE CON LEVA IN POSIZIONE I ON OFF GW94817R 230V 0 INSERIRE CON LEVA IN POSIZI...

Page 9: ...vidrio y levantando la palanca En caso de falta de reactivaci n interrumpir la operaci n de rearme y contactar un t cnico especializado Eine manuelle R ckstellung versuchen indem die Scheibe bewegt u...

Page 10: ...termitentes rojas del LED de la izquierda Man kann den Hilfskontakt konfigurieren indem man mindestens 5s lang die Taste R dr ckt und sie dann losl sst Der Wechsel zwischen den verschiedenen Modi wird...

Page 11: ...iliary contact 5 230Vac dc Imax 100mA cos 1 Imin 0 6mA AC12 IMQ Mark RD25 40 63A Syst me de distribution TT TN Tension nominale d utilisation Ue 230Va c phase neutre Donn es disjoncteur diff rentiel I...

Page 12: ...po A A IR A S 63 6000A diferencial In 25 40 63A 80 6000A diferencial In 80A Dados interruptor magnetot rmico diferencial In 6 10 13 16 20 25 32A l n 30 300mA Tipo A Curva C Icn 4500 6000 10 000A Pot n...

Reviews: