background image

Question

Reason

Solution

How to edit 
address

2)  Main  controller 
&   u n i t   a r e   i n  
different channel.

1) Revise channel on the main controller according 

to “7.8.2”   

2) Revise channel on unit according to “8.5”.
3)Re-edit address for the whole system.

3)  Unit  address  is 
b e y o n d  s y s t e m 
capacity.

1) Modify the capacity of system according to 7.4
2)Set “Manual Setup” in the unit according to 8.5
3)Re-edit address for the whole system.

Enter unit's “Edit Address” interface manually.

1) Enter unit's “Manual Setup” & set the address to 

“001”.

2)Re-edit  address  for  the  whole  system  &  set  the 

chairman unit for “001”

î

11.FQA


Abnormal”on units

Chairman  unit  can't 
c a r r y  o u t  p r i o r i t y 
function.

1

2

3

4

5

Operation Procedure:
1) Turn on main controller & all the units.
2)  Main  controller  enter  “Edit  Address”  interface  & 

control  all  the  units  to  enter  “Edit  Address” 
interface.

3) Set “address” & “channel” on the main controller.
4) Press “Mic” on units to get address.

1) Main controller is 
off.

Turn on Main controller.

M a i n   c o n t r o l l e r  
can't  control  unit  to 
enter “Edit Address” 
interface

Main  controller  & 
unit  are  in  different 
channel.

Chairman  address 
is not “001”

How to add new units 
for system.

1)Firstly  check  “System  Info”  in  the  main  controller. 

Check  the  value  for  channel  &  current  capacity. 
Then manually set the unit as the same channel & 
address to be current c1. 

For example: system channel—01, current capacity-
--30, then unit shall be set as channel---01, address-
--31.
Details refer to 8.5.
2)Re-edit address for the whole system.

Opera on

05

USER MANUAL | EG-7240 Digital Wireless Conference System

Opera on

USER MANUAL | EG-7240 Digital Wireless Conference System

06

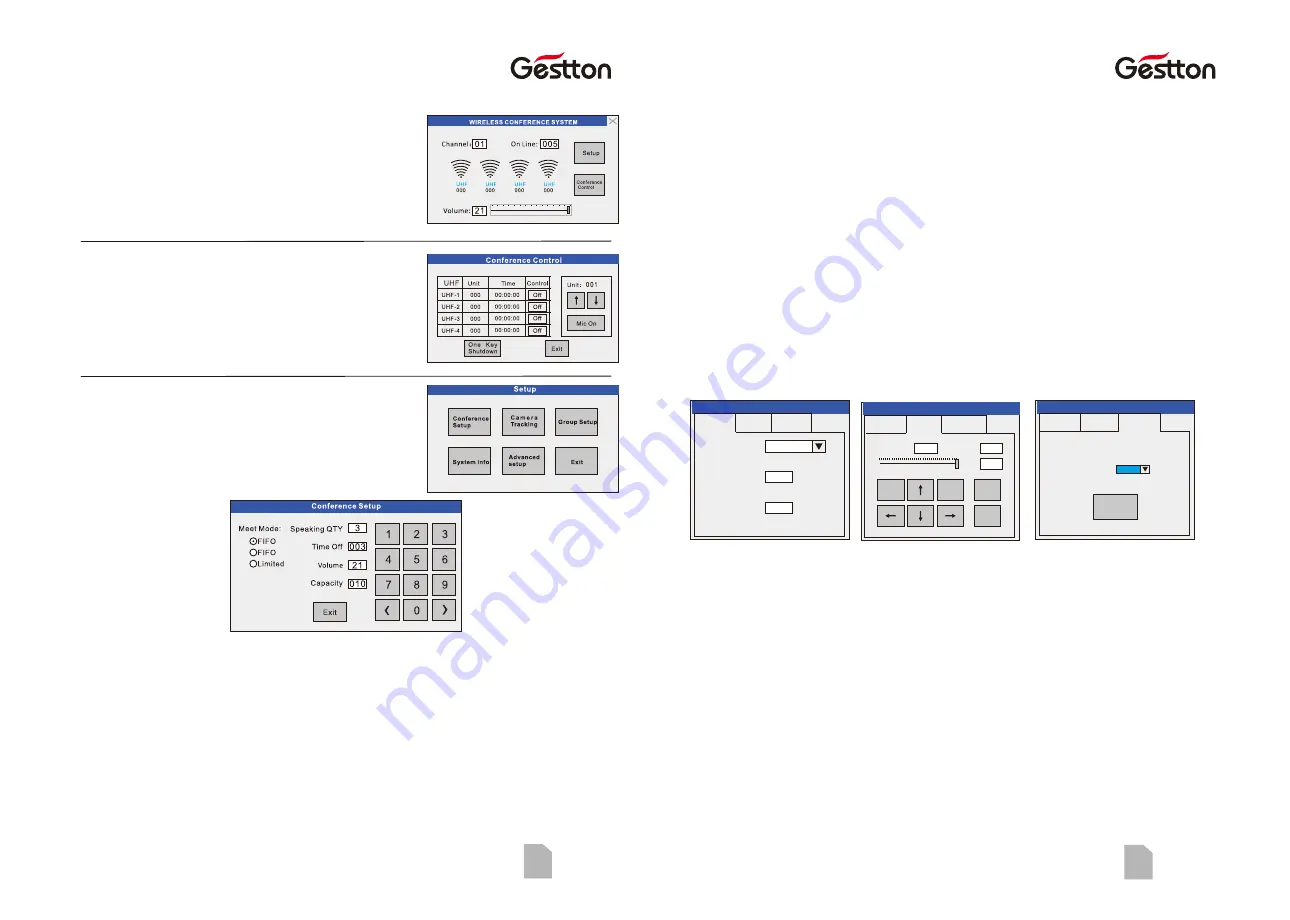
8.1   Status Indication

Indicate:  total  number  of  online  units,  current 
channel,  audio  UHF  status  &  signal  level,  battery 
level(only indicate when low battery), indicate & set 
volume.

8.2   Meet Control
Functions:

( )

1 Check the current UHF audio channel status.

( )

2 Cut off the unit on the channel.

( )

3 Turn on a certain unit.

( )

4 One Key Shutdown, to shut all the units down.

8.3  Setup
Main Menu Interface of Setup

8.4Conference Setup

Meet Mode:

Ÿ

   FIFO: Once the total number of speaking units exceed the set limited number, the first   


turned on unit will be cut off automatically.

Ÿ

LIFO: When the total number of speaking units achieve the set limited number, system 
will cut off the last turned on unit once there are one more unit turned on.

Ÿ

Limited Mode: No more unit can be turned on when the total number or speaking unit 
achieve the set limited number.

Speaking QTY:

Ÿ

To  set  the  limit  of  total  number  of  speaking  unit.  Maximum  4  units  can  speak  in  the 
same time(1 chairman, 3 delegates).


Time Off:

Ÿ

To turn off the unit compulsively by the set certain time (001~999 second). “000” 
mean this function is disable.

  ④

Volume

:

Ÿ


To set the volume of main controller output.

 ⑤

Capacity:

Ÿ

 To limit the total amount of online units.

Ÿ


When the unit address is beyond system capacity, it can't connect to the system.

Ÿ


For example, when set system capacity is 3, system can only connect with those  

units with address of 1,2,3.

8.5 Camera Tracking

There are 3 tabs for this menu.

 A Description

.


Type:to select camera type

Address: to select a camera.

Preset Point: It is the reference number in the camera for saving the camera 

tracking position. (Sony-D70 & BRC-Z330 can't set preset point)

Rotate Rate: to set the camera rotating rate.

Zoom Rate: to set the zoom in/out rate.

Unit: the current tracking unit. “000” is for full view.

Baud Rate: communication speed for RS-232/RS-485. Some of the cameras to be 

with optional baud rate.

Rotate Rate

:

Zoom In

023

Zoon Rate

007

000

Unit

:

Zoom Out

Test

Save

Default Baud rate of this camera:

9600

Current Baud Rate

9600

Restore 
Default

 Camera Tracking Advanced

 Camera Tracking

Type

EVI

-

070

IP

:

Preset:

001

000

 Camera Tracking

 Camera

Tracking

Advanced

 Camera Tracking

 Camera

Tracking

Advanced

Summary of Contents for EG-7240

Page 1: ...X Y Digital Wireless Conference System EG 7240 USER MANUAL ...

Page 2: ...11 Do not defeat the safety purpose of the polarized or grounding type plug A polarized plug has two blades with one wider than the other A grounding type plug has two blades and a third grounding prong The wide blade or the third prong are provided for your safety If the provide plug does not fit into your outlet consult an electrician for replacement of the obsolete outlet 12 Protect the power co...

Page 3: ... comply with the Direc ve 2012 19 EU of the European Parliament on waste electrical finance the cost of treatment and recovery of electronic equipment WEEE in order to reduce the amount of WEEE that is being disposed of in land fill site All of our products are marked with the WEEE symbol this indicates that this product must NOT be disposed of with other waste Instead it is the user s responsibilit...

Page 4: ...then pull the antenna to about 45 angle Power supply AC110 220V To get the best communication the minimum installation height to the ground shall be 1m the minimum distance between launch antenna receiving antenna shall be 2m the minimum distance to wall shall be 1m Keep antennas away from interference such as computer digital equipment TV also big metal item Try to avoid putting barrier in betwee...

Page 5: ... 10 11 12 9 Product overview 7 Charger unit POWER SWITCH AC POWER SOCKET CHARGING OUTPUT POWER 6V IN Charger unit supports charging 40 microphone units at a time User should switch OFF the microphone units and connect the charging port of microphone units to the DC ports with supplied charging cable Charging time is approx 4 5 hours 8 Menu of Main Controller Main controller adopts capacitive touch...

Page 6: ...an speak in the same time 1 chairman 3 delegates Time Off Ÿ To turn off the unit compulsively by the set certain time 001 999 second 000 mean this function is disable Volume Ÿ To set the volume of main controller output Capacity Ÿ To limit the total amount of online units Ÿ When the unit address is beyond system capacity it can t connect to the system Ÿ For example when set system capacity is 3 sy...

Page 7: ...out the system capacity when loading group or restore factory setting Modify system capacity according to the actual amount of units 8 7 System Info To check technical specification of main controller 8 8 Advanced setting Interface of advanced setting 8 8 1 Edit Address System must be edited address before first used Description a Unit address for the current applying unit b Channel The channel fo...

Page 8: ...00 00 00 F5 Xx for Unit 00 for Full View More code Refer to Protocol Table Other Please select Operate EVI D70 YAAN PELCO D PELCO P Camera BRC Z330 Rotate Zoom Save Load Operate Direction Speed Unit 000 Address Preset Central Controller Code Conference Setup Camera Tracking Other Selection Meet Mode Tracking Mode Speaking QTY Time Off Volume Capacity Parameter Conference Setup Camera Tracking Othe...

Page 9: ...dress Manual Setup System Info Edit Address C u r r e n t S e t t i n g 00 000 CH Addr Press Mic to Apply 1 2 3 4 Edit Address Current Setting 00 000 CH Addr Fail Edit Address Current Setting CH Addr 00 000 Complete CONFIG ABNORMAL CH 00 Addr 000 Opera on Once unit is successfully edited address it will shows as picture System will go back to status interface when exiting edit address menu If fail...

Page 10: ...t admin 10 2 Meet Control Ÿ Virtual Saloon Allow user to draw the layout of the meeting table pattern the ID relates to the ID assigned to each microphone unit Ÿ Meet Setup User can configure the setup of the system via this panel including Meet mode Delegate QTY Tracking mode Time off Capacity Volume Ÿ Channel Manage Switch ON OFF the microphone operated on each channel 9 3 Second Screen This win...

Page 11: ...2 Parameters can be selected from SIGN IN SETUP and SECONDARY SCREEN menu accordingly 3 Press Start Sign in to kick off the process operator can see the process message from the PROCEDURE OF SIGN IN window and attendees will see the system message prompted on the display of each microphone unit connected Attendee should press the ENTER button on the microphone to finish the sign in 4 Operator can ...

Page 12: ... 18 4 Click Start at progress window can commence the voting immediately Voting options will be shown on the display of each microphone unit connected in this process Attendees can press YES NO ABST 1 2 3 4 5 button on their microphone units and pressing Enter to confirm their selection Voting data will collected to the system in real time basis operator can see the number of voted units and remai...

Page 13: ...ing then the proposal will be considered as a finished voting operator will not be able to re enter the voting process under this proposal but can only view the result of it But if operator press TERMINATE in the middle of this process then the process will be aborted and the proposal can be re selected to enter the voting process System specifica ons 11 System connection Main Controller camera TV ...

Page 14: ... system 1 Firstly check System Info in the main controller Check the value for channel current capacity Then manually set the unit as the same channel address to be current capacity 1 For example system channel 01 current capacity 30 then unit shall be set as channel 01 address 31 Details refer to 8 5 2 Re edit address for the whole system 1 Modify the capacity of system according to 7 4 2 Set Man...

Reviews: