background image


38

English 

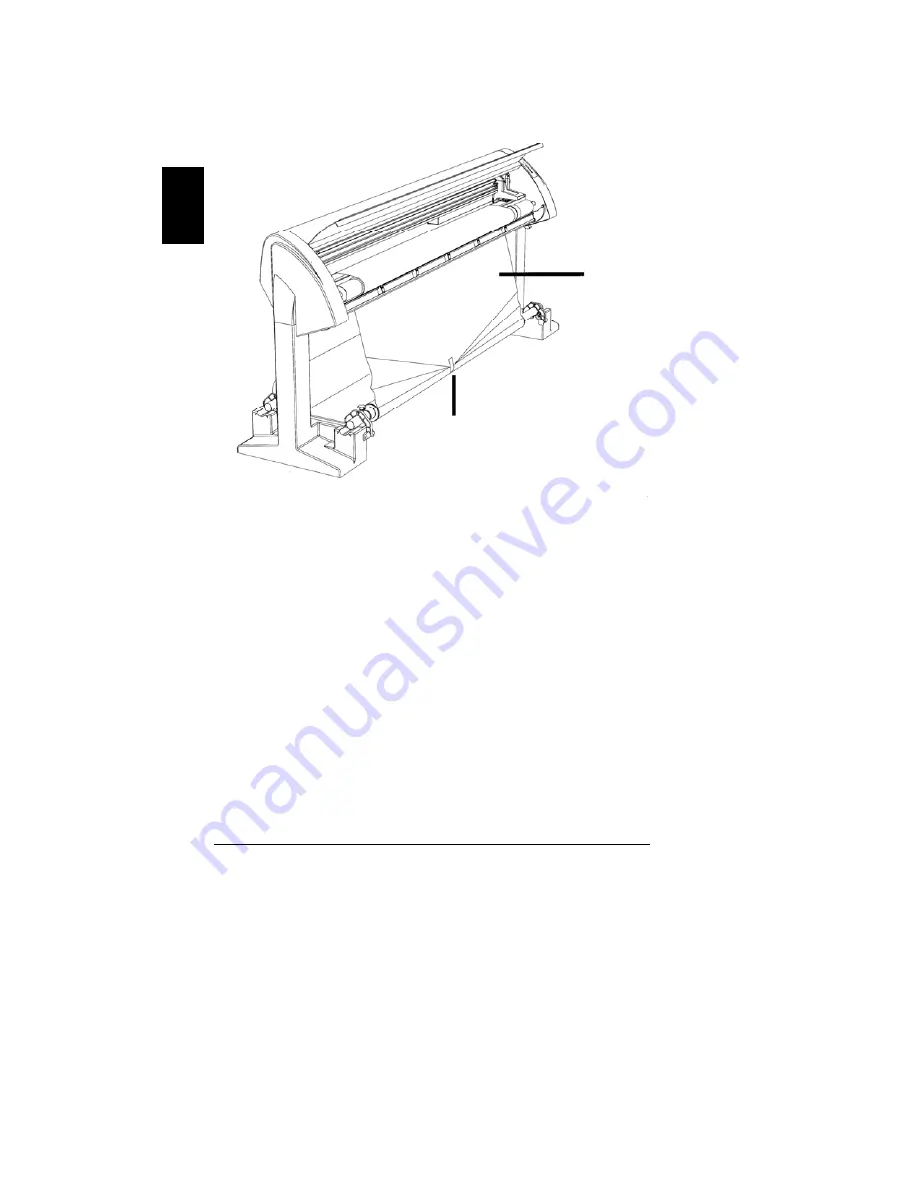
6. Tape 

(1) 

only

 the center of the paper (2) to the take-up 

roll while keeping equal tension on each side of the paper 
(Figure 26). 


Figure 26. Supply Paper Taped to Take-Up Roll 

Key to Figure 

1-Tape between Take-Up Mandrel and paper, 2-Paper  


1

2

Summary of Contents for GERBERplotter Infinity 45

Page 1: ...Infinity 45 85 GERBERplotter Getting Started Manual Manual de Inicio...

Page 2: ...Infinity 45 85 GERBERplotter Getting Started Manual Manual de Inicio...

Page 3: ...o circumstances shall be used in the manufacture or reproduction of the articles shown and the delivery shall not constitute any right or license to do so The information in this document is subject t...

Page 4: ...AL OF BULK INK CARTRIDGE 5 OPERATING THE INFINITY GERBERPLOTTER 6 BASIC CONCEPTS 6 SYSTEM DESCRIPTION 7 GETTING STARTED PROCEDURES AT A GLANCE 9 HARDWARE INSTALLATION 10 INVENTORY 10 UNPACK ASSEMBLE 1...

Page 5: ...ST PLOT 43 INFINITY USER INTERFACE GUIDE 46 ACCESSING SCREENS 47 BULK CARTRIDGE PARAMETERS 49 PAPER MONITORING PARAMETERS 51 COMMUNICATIONS BAUD RATE 53 SITE REQUIREMENTS 54 TECHNICAL SPECIFICATIONS 5...

Page 6: ...Clip 27 Figure 18 Connecting Primer to CPC Connector 28 Figure 19 Infinity Print Head Cartridge and Tube Assembly 29 Figure 20 Print Head Cartridge Assembly 30 Figure 21 Inkjet Cartridge Installation...

Page 7: ...t will quickly get you familiar with the Infinity plotter For more extensive information on the plotter open the Infinity User Interface on your workstation click on the HELP pull down menu and then s...

Page 8: ...t meet the following minimum requirements Windows 2000 or Windows XP professional operating system 20 MB available hard disk space CD ROM drive Mouse pointing device Available serial or network port d...

Page 9: ...ited States call the sales office where you purchased your Infinity Plotter Have the following available Sales order number Version numbers of Infinity firmware and software Version number of AccuMark...

Page 10: ...o frame Sharp Edge Do Not Touch Codestrip Warnings and Cautions This Gerber manual contains Warnings and Cautions that precede steps or procedures Always follow these precautions to avoid injury or eq...

Page 11: ...Technology Refer to Consumables in the manual Appendix Ink Hazards Ink used in the Bulk System Infinity 85 may cause the following health issues Contact with skin or eyes may result in irritation Inh...

Page 12: ...he Infinity plotter comes with two main procedures for calibration Inkjet Cartridge Alignment and Plot Length calibration The Inkjet Cartridge Alignment compensates for slight mechanical differences i...

Page 13: ...Take up Mandrel 5 Bulk Ink Cartridge Infinity 85 6 Control Panel 1 Front Cover The front cover provides access to change inkjet cartridges and to load paper The front cover must be in the down positio...

Page 14: ...ity 85 plotter Access Pens must be pushed before removing the bulk ink cartridge Failure to comply could result in the discharge of ink from the pressurized bulk ink cartridge 6 Control Panel The cont...

Page 15: ...rates the manual section headings that will quickly take you through all facets of getting your Infinity Plotter installed and operational Hardware Installation Software Installation Communication Set...

Page 16: ...the manual Figure 3 Plotter Shipping Container Contents Typical Shipping Container Contents Plotter Support Columns 2 Paper Supply Mandrel with adjustable locking hub Paper Take up Mandrel with adjus...

Page 17: ...25 ft Power cord Software 110 volt 220 volt label Unpack Assemble 1 Remove the left and right support columns Place them about 2 4 meters 8 feet apart 2 Temporarily remove the bolts and washers 4 plac...

Page 18: ...ectors illustrated in Figure 5 during installation of the plotter on the support columns 5 Lift the plotter from the shipping container using the wood handles Carefully set the plotter on the two supp...

Page 19: ...connector to the right support column 10 Attach the plotter to the bottom two mounting holes of each support column with bolts split washers and flat washers removed in step 4 Figure 5 11 Tighten the...

Page 20: ...erials if present plastic wrap securing plotter cover tie wrap securing the drive belt CAUTION Do not manually move the head into the parking position or damage to the plotter may result 16 Manually m...

Page 21: ...otter at its operating location Care must be taken not to put any weight on the plotter throughout this procedure Front and back mandrels should be set on the plotter Figure 7 Plotter Leveling Key to...

Page 22: ...right middle feet positions 2 or 5 to support the plotter b Keep the front and rear feet positions 1 3 4 and 6 threaded in as much as possible For example to level the platen try to lower the high si...

Page 23: ...230 volts proceed to step h 3 If your power source is between 100 120 volts change the plotter to 115 volt operation as follows Figure 8 a Lift the top cover 1 off the plotter b Loosen the screws 2 t...

Page 24: ...electrical box rear panel 3 and tighten the screws 2 f Install the top plotter cover 1 g Install a yellow 110 volt power rating sticker over the yellow 220 volt sticker on the rear h Use a permanent...

Page 25: ...sted pair cable between the plotter network connector and a 10 100 Base T twisted pair network connector in your facility Figure 10 3 For Infinity 45 or Infinity 85 Local use attach the RS 232 serial...

Page 26: ...system by pushing the Access Pens button on the Infinity control panel before removing the bulk ink cartridge Failure to comply could result in the accidental discharge of ink from the bulk cartridge...

Page 27: ...e n is the CD Rom drive letter c Select OK 3 When the Welcome to the Gerber Technology Infinity Installation window opens Figure 12 click on the Install Infinity Software link and follow the on screen...

Page 28: ...22 English Figure 13 WinPlot Warning Dialog Box 4 If you are not using AccuMark to send plots to the plotter install WinPlot using the WinPlot CD...

Page 29: ...ct Gerber Infinity 45 or Gerber Infinity 85 as appropriate 6 Click OK 7 Verify that plotter icon is present in system tray at bottom right corner of screen Network Use Setup Infinity 85 Plotter Setup...

Page 30: ...2 Notice the MAC address number on the rear of the plotter near the network connector The MAC address number may be necessary for reference when entering information in the IP Setup Interface 3 Make...

Page 31: ...ices by selecting Start Settings ControlPanel Gerber Devices 9 Click on the Plotter tab 10 Scroll under Comm Port to select Com Net 11 Enter the IP address from your network administrator under Host 1...

Page 32: ...olds 350 ml of ink Ink is pressurized by a pump Flexible tubes 4 6 connect the bulk ink cartridge to the print head cartridges 2 A quick disconnect fitting 5 is located between the print head cartridg...

Page 33: ...ccessories kit This tool consists of a 100cc syringe a short section of ink outlet tubing and a male side of the CPC connector It will be used in the next step Figure 16 Priming Tool Key to Figure 1 S...

Page 34: ...bbling up into the syringe About 60 ml of ink will be drawn out of the bulk ink cartridge Only a small amount of ink needs to be drawn into the syringe for system priming Typical priming rates are 15...

Page 35: ...allation 1 Push the Access Pens button on the Infinity control panel to put the plotter offline and to de pressurize the bulk ink cartridge 2 Open the new print head cartridges and prepare them for us...

Page 36: ...d cartridge in the left slot of the print head cartridge holder as follows Steps a b and c are illustrated Figure 21 a Insert the inkjet cartridge foot in the holder b Push back on the upper body of t...

Page 37: ...e delivery tube between each print head cartridge and the corresponding CPC connector 8 Push the plotter control panel Access Pens button to return the cartridge holder carriage to the parking station...

Page 38: ...panel 3 Open the plotter cover 4 Pivot the left inkjet cartridge lever up and away from the top of the empty cartridge holder Note The right slot of the inkjet cartridge holder is not used for the Inf...

Page 39: ...ll an adjustable 6 on the left end of the mandrel to secure the paper roll on the mandrel 4 Set the mandrel ends in the front rollers 2 one end at a time Push the paper roll back until the mandrel end...

Page 40: ...Thread the paper through the paper path following the sequence 1 through 6 as shown Figure 23 Note The final steps of take up roll installation and advancing the paper onto the take up roll are cover...

Page 41: ...er take up roll 2 as follows a Insert the paper take up mandrel 12 through the take up roll 2 from the right side The gear end of mandrel will be on the right side b Install an adjustable locking hub...

Page 42: ...36 English Figure 24 Paper Take Up Roll Installation Key to Figure 1 Take Up Mandrel 2 Take Up Roll 3 Adjustable Hub 4 Bail 5 Bail Knob Detail A 1 See Detail A 2 3 4 5 Gears Must Mesh...

Page 43: ...e 25 Figure 25 Nipbar Arm Engagement Key to Figure 1 Nipbar Arm Shown engaged 3 Close the plotter cover 4 Make sure the plotter is offline 5 Push the Paper Adv button on the plotter control panel to a...

Page 44: ...y the center of the paper 2 to the take up roll while keeping equal tension on each side of the paper Figure 26 Figure 26 Supply Paper Taped to Take Up Roll Key to Figure 1 Tape between Take Up Mandre...

Page 45: ...en or it may touch the inkjet cartridges when installed Figure 27 Wrapping Supply Paper Around Introduction Key to Figure 1 Leading edge of paper 2 Take Up Roll 8 Open the Parameter Control Screen on...

Page 46: ...lish Calibration Inkjet Cartridge Alignment 1 Click on the Infinity icon to open the Infinity interface 2 Click on the calibration button to open the calibration screen Figure 28 Plotter Calibration S...

Page 47: ...t the plotter offline by pushing the plotter control panel Online button 5 Choose and enter your alignment data in the Calibration dialog box as follows Figure 28 Forward Reverse Alignment Choose nume...

Page 48: ...step size The Actual Length text window will clear Note Do not click the Update Step Size button more than once 8 Click on the Start Box Test button Figure 28 to plot another 30 inch box 9 Click on th...

Page 49: ...ity series plotter 1 Read the safety instructions at the beginning of the manual before operating the plotter 2 Ensure the Infinity plotter is turned on and online 3 Make sure paper is loaded 4 Now to...

Page 50: ...les to Plot screen by browsing to c Program Files Gerber Technology AccuMark V8 WinPlot Samples or c WinPlot Samples depending on the version of WinPlot installed Select the marker called 1MeterMarker...

Page 51: ...lected we are ready to plot At the WinPlot screen click on Plot to begin Figure 33 Figure 33 WinPlot screen Congratulations You have made your first plot with the Infinity plotter and you are now read...

Page 52: ...here Parameter Select Choose if you want the paper to fall on floor or to spool onto a take up roll Plotter Status These icons show if the plotter is online offline and if the emergency stop loop safe...

Page 53: ...Select Choose if you want the paper to fall on floor or to spool onto a take up roll Plotter Status These icons show if the plotter is online offline and if the emergency stop loop safety interlock is...

Page 54: ...er Calibration Perform Cartridge Alignment or Plot Length calibration procedure Toggle Online Toggles plotter online Home Returns plotter head to the home position Reset Plotter Resets plotter File Do...

Page 55: ...ridge Parameter Table that follows 1 Push the P button on the Infinity Plotter Status screen to access the Parameters screen Note Push the Cartridge tab on the Parameters screen Select any of the foll...

Page 56: ...he amount of ink remaining in the bulk ink cartridge here Bulk Cartridge MFG Date See the bulk cartridge date of manufacture week year by selecting this parameter Use the cartridge within 48 months of...

Page 57: ...onitoring Parameter Table that follows 1 Push the P button on the Infinity Plotter Status screen to access the Parameters screen 2 Push the Paper tab on the Parameters screen Select any of the followi...

Page 58: ...0 to 500 yards meters Default The paper roll length Paper Roll Length After loading the new paper roll click on the New Paper Roll button on this screen select the Paper Roll Length parameter and ente...

Page 59: ...tter power off on 8 Make sure the plotter it is Offline 9 Open the Infinity User Interface 10 Select the Communications screen 11 Choose the desired plotter setting 19200 38400 or 57600 12 Click on Ap...

Page 60: ...tem alternate configuration two HP 51645A cartridges Host Connectivity RS 232 baud rates to 57600 bps Infinity 45 85 Direct 10 base T Ethernet interface Infinity 85 Paper Paper widths in continuous ro...

Page 61: ...the pressurized bulk ink cartridge 2 If the head is positioned over the parking station push Access Pens 3 Remove the bulk ink cartridge from the plotter by pushing on the end of the cartridge until i...

Page 62: ...of ink Temporarily remove ink jet cartridge and remove discard tape Temporarily remove print head cartridge and remove discard tape Install new ink jet cartridge Install new bulk ink cartridge Print i...

Page 63: ...lint free cloth moistened with de ionized water Print head is pausing between passes The plotter is waiting for data from the PC This is normal especially when plotting dense plots or plots with a lot...

Page 64: ...of events that follows an error Note Whenever a bulk cartridge error occurs the cartridge is moved off the parking station and bulk ink pressure is removed Error occurs Error LED on plotter lights Op...

Page 65: ...r HP bulk ink system Cycle power switch If this problems continues call Gerber customer support 026 Bulk Ink Cartridge Failure Bulk ink cartridge may not be properly seated Reseat cartridge then push...

Page 66: ...arlier is displayed 3 Once an IP has been assigned highlight the desired plotter entry in the left hand panel and click on the Web Configuration tab in the right panel 4 Ensure that the assigned IP ad...

Page 67: ...61 English Figure 39 Connection Settings...

Page 68: ...Kit qty 2 each bulk ink cartridge print head cartridge 92334000 Infinity 85 Bulk Ink Cartridge qty 1 92184000 Infinity 85 Print Head Cartridge qty 1 710500438 Infinity 85 Priming Tool qty 1 92335000...

Page 69: ......

Page 70: ...Corporate Headquarters Gerber Technology 24 Industrial Park Road West Tolland CT 06084 USA Tel 1 860 871 8082 Fax 1 860 871 3820 www gerbertechnology com PN 92808000 08 06...

Reviews:

Related manuals for GERBERplotter Infinity 45