background image

Turn off the computer and replace the discharged battery with a charged battery (See 

Battery Charging

). 

NOTE

  Do not restart the computer until you have connected to an AC adapter or replaced the discharged battery 

with a charged battery.  

Refer to 

Battery Tips

 for more information about how you can conserve battery power. Refer to 

Managing Power


for information about how you can setup your computer to effectively manage power for your unique use patterns. 

Managing Power 

Your computer has power management capability so you can reduce the amount of energy used, especially during 
periods of inactivity.  Effective use of power management options can greatly conserve and extend your battery life. 
The power management unit monitors system activity, such as hard drive, keyboard, mouse, or any devices attached 
to a port. If it does not detect activity for a period of time, the computer stops some or all of these devices in order to 
conserve energy.  

Your computer employs a power management scheme that supports ACPI (Advanced Configuration and Power 
Interface), allowing for maximum power conservation and maximum performance at the same time. Windows 
handles all power-saving chores for your computer. 

For more information search for Power Options in Microsoft (R) Help and Support. 

Power Saver 

Your computer includes a utility, the

 Power Saver

, that builds upon the operating system's power management 

capabilities. It is recommended that you use Power Saver rather than the Power Management utility located under 
the Control Panel. Power Saver provides additional ways of saving battery power. 

When on external power, Power Saver provides two profiles: Faster Charge and Normal. When on battery, it 
provides another two profiles: Max Life and Normal. You can easily toggle between the Max Life and Normal 
battery profiles by pressing 

Ctrl+Space

There is also an option to keep the computer awake, while at the same time, saving battery power. 

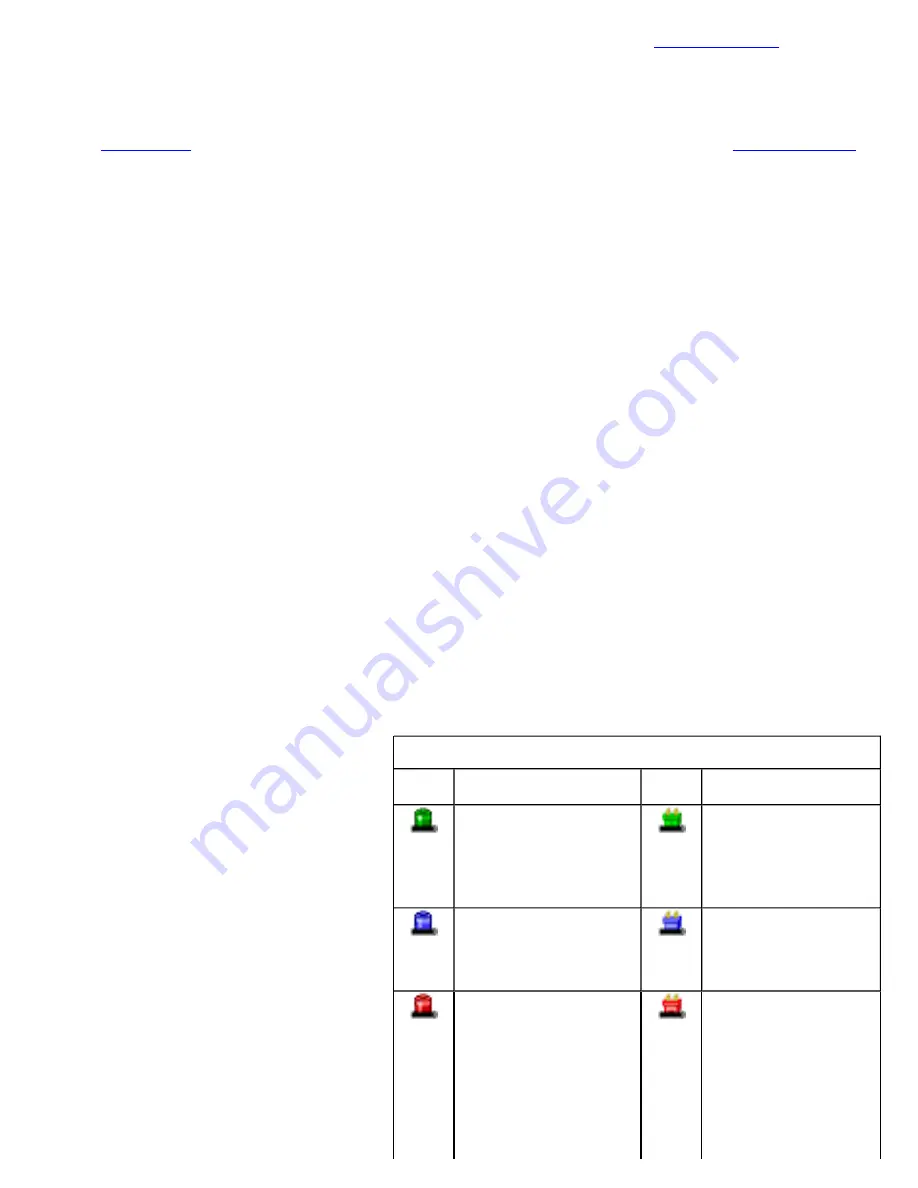
To Set the Power Saver Mode 

1. On the System Tray area of the 

Taskbar, right-click the 

Power Saver


icon (see table). 

2. Select the desired power profile.


NOTE

 You can easily see which 

profile you are currently using by the 
color of the 

Power Saver

 icon (see 

table). 

To Configure Power Saver Settings 

1. On the System Tray area of the 

Taskbar, right-click the 

Power Saver


icon. 

2. From the menu, select 

Configure 

Power Settings

Power Saver

 Icons 

Icon 

Description 

Icon 

Description 


The computer is on 
battery power and set 
to use the Max Life 
battery profile. 


The computer is on 
external power and 
set to use the Faster 
Charge plugged in 
profile. 


The computer is on 
battery power and set 
to use the Normal 
battery profile. 


The computer is on 
external power and 
set to use the Normal 
plugged in profile. 


The computer is on 
battery power and set 
to Stay Awake.  
This setting: 

z

overrides any 

settings that 
cause the 


The computer is on 
external power and 
set to Stay Awake. 
This setting: 

z

overrides 
settings that 
cause the 

Page 37 of 70

VR-2 Help

4/26/2007

file://C:\Documents and Settings\harwoodm\Local Settings\Temp\~hh3F7F.htm

Summary of Contents for GoBook VR-2

Page 1: ...k VR 2 is both expandable and portable supporting the features you expect in a desktop computer but with the mobility of a laptop This online document GoBook VR 2 Help contains all the information you...

Page 2: ...e up the battery connectors 2 Press gently on the battery until it clicks into place 3 Slide the battery locks toward the outside of the computer to lock the battery and ensure they latch completely 1...

Page 3: ...t will still not turn on make sure the electrical outlet you are using works z Check to make sure the battery is installed and charged properly z If the battery does not begin charging remove the batt...

Page 4: ...ating of the wall outlet z Do not push foreign objects into the computer through any of the slots or openings Dangerous voltages are present which could cause electric shock fire or damage sensitive c...

Page 5: ...passwords anywhere on your notebook or carrying case z Be careful when placing your notebook on an airport security conveyor belt In most airports security conveyor belts are safe for computers If yo...

Page 6: ...tches Two display latches hold the display when closed 2 Speakers Integrated Stereo speakers for audio output 3 Pen Stylus Slot A custom touch screen pen stylus is supplied with each unit equipped wit...

Page 7: ...Ion battery 11 Keyboard Task Lights Two task lights located in the display hinges directly below the display illuminate the keyboard to permit typing in a dimly lit or darkened environment 12 Keyboar...

Page 8: ...movable Hard Disk Drive is located on the left side of the unit The latch that secures the Hard Dick Drive is located on the bottom of the unit NOTE make sure the unit is powered off before removing t...

Page 9: ...eader or EXPRESS Card Slot Smart Card Reader or EXPRESS Card 5 PC Card Slot Use this slot for PC Card devices Feature Description 1 DC in Jack Connects to an AC adapter 2 Network Jack RJ45 LAN Connect...

Page 10: ...handle Feature Description 1 Docking Connector 84 pin cradle connector that mates with the Vehicle Dock Office Dock and Mini Dock 2 Memory compartment User expandable memory slot 3 Hard Disk Lock Slid...

Page 11: ...when the keyboard is in Caps Lock mode Ctrl The Ctrl control key works with other keys to perform a variety of functions Enter The Enter key signals the computer that you have completed your entry Th...

Page 12: ...ny key to turn it back on Fn F2 Display toggle Switches the display output between the display screen external monitor if connected and both the display screen and external monitor NOTE When a DVD or...

Page 13: ...o known as Airplane Mode Toggles the power on and off to all radio devices The radio devices include GPS Bluetooth WLAN and WWAN radios NOTE If radio wakeup is enabled radio power will turn back on be...

Page 14: ...ed environment Scr Lk Fn F12 Enters Scroll Lock mode Scroll Lock varies between applications It does not work with some applications Key Icon Description Windows Logo Key Start button Combinations wit...

Page 15: ...ss Fn F4 to dim the headlights 3 Press Fn F5 to brighten the headlights LED Status Indicators Thirteen easy to read LEDs Light Emitting Diodes under the display screen indicate activity status for com...

Page 16: ...ipped and is in the middle of communication it will suspend power to the radio when the battery is low The computer must then be plugged into external power to continue radio communication No Light Th...

Page 17: ...the pressure sensitive touchpad This double tapping on the touchpad selects the desired item and prompts the software to perform the related operation Adjust the touchpad settings by selecting Settin...

Page 18: ...move the pointer to the desired location Release the button z Move the pointer to the desired location Tap the touchpad twice quickly as if you were double clicking however do not remove your finger a...

Page 19: ...E You may still use the display brightness function keys Fn F6 and Fn F7 to adjust display brightness See Managing Power for more information on power management features Simultaneous Display The comp...

Page 20: ...he Taskbar right click the Power Saver icon or 2 From the menu select Configure Power Settings 3 Select the Advanced button 4 Select what you want to happen when you close the display lid Do nothing S...

Page 21: ...y and expandability of the computer The PC Card slot can be used as an interface between your computer and a variety of communications devices such as network adapters SCSI adapters or fax modems They...

Page 22: ...as file copying or deletion is using the card 2 Press the card further into the slot to release the card You will hear a click 3 Remove the card Ports and Connectors Media Storage Your computer comes...

Page 23: ...e back of the computer to unlock the drive 4 Gently pull the drive out of the computer The Optical Disk Drive option Your computer comes with a pre installed CDROM DVD ROM CD RW or DVD RW CD RW combo...

Page 24: ...op the disks z Do not place objects on top of disks CAUTION Do not insert any foreign objects into the disk tray Do not force the tray to open or close manually When not in use keep the tray closed to...

Page 25: ...yle fingerprint scanner can be used for all standard security uses The optional fingerprint scanner provides a greater level of security and convenience for your GoBook VR 2 and your private data Use...

Page 26: ...convenience port expansion and automatic battery recharging enabling you to leverage your computer s features without having to attach and reattach cables and connectors when you move your computer fr...

Page 27: ...GA monitor port to connect your computer to an external monitor You may use an external monitor simultaneously with your notebook s display instead of your notebook s display or as an extension of you...

Page 28: ...or this system In this case you may use a PC Card modem To use the fax data modem port connect a phone cable from the modem port to a telephone jack CAUTION Plug your modem into an analog telephone ja...

Page 29: ...today s mobile user CRMA Express WWAN option If you ordered the CRMA Express module option your computer may support one or more of these Wireless Wide Area Network WWAN radios EDGE GPRS GSM CDMA 1xEV...

Page 30: ...broadband speeds with average data speeds of 220 320 Kbps and bursts up to 384 Kbps on some networks Its theoretical limit is 2 Mbps It delivers four to six times the speed of dial up Internet access...

Page 31: ...embedded antenna options to support wireless communications Improving Radio Coverage Wireless connectivity between your GoBook VR 2 and wireless network access points is essential Maintaining this wir...

Page 32: ...of electrical cable Electromagnetic Interference EMI 1 Electromagnetic Interference EMI is generated by switching circuitry closets or Un interruptable Power Source UPS systems found near computer roo...

Page 33: ...auge to accurately reflect battery capacity You only need to do this once with a new battery or with a battery that s been stored without being used for a long time If the computer is to be stored for...

Page 34: ...the Windows battery gauge to accurately monitor battery status It is recommended you calibrate your battery 3 Slide the battery locks toward the outside of the computer to lock the battery and ensure...

Page 35: ...while Battery Calibration is running If AC remains disconnected for more than two minutes the application will terminate CAUTION Do not remove the battery while Battery Calibration is running Doing so...

Page 36: ...tem will shutdown to prevent the heat from damaging the computer s infrastructure When the computer cools to a normal temperature you can restart the system The higher the temperature the longer the p...

Page 37: ...mmended that you use Power Saver rather than the Power Management utility located under the Control Panel Power Saver provides additional ways of saving battery power When on external power Power Save...

Page 38: ...en the computer was suspended Hibernation saves more power than Standby but takes slightly longer to resume Power Off All applications are closed and the system is shutdown Entering Low Power States T...

Page 39: ...r Saver rather than the Power Management utility located under the Control Panel Power Saver provides additional ways to save battery power To Adjust Power Saver Settings 1 On the System Tray area of...

Page 40: ...data if you remove the battery while the computer is operating or suspended To prevent this shutdown your computer or put it into hibernate suspend to disk mode before removing your battery z If you p...

Page 41: ...etting a password z Boot order setup z Stealth mode setup Using the Setup Utility The Setup Utility allows you to configure your computer s basic settings When you turn your computer on the system rea...

Page 42: ...tings and Information fields 3 on the left side of the menu z Press the up and down arrow keys to cycle through fields on each menu Menu Description Information Displays a summary of the computer s ha...

Page 43: ...your password If you forget your password you may have to return your notebook computer to your dealer to reset it The Information Menu This page displays information about your computer from what kin...

Page 44: ...our format The value takes effect immediately System Date MM DD YYYY Sets the system date The date can be set from January 1 2000 to December 31 2099 The value takes effect immediately Screen Expansio...

Page 45: ...ive I O Device Configuration sub menu Configure I O Devices serial and parallel ports IDE Configuration sub menu Selects the IDE controller and hard disk drive type installed in your system Legacy USB...

Page 46: ...agreement HDD Heater Disabled Enabled If enabled the system is warmed by an HDD Heater UMA Share Memory 64MB 128MB The size of the main memory that is allocated to support the Internal Graphics devic...

Page 47: ...ield Setting Function Stealth Mode Disabled Enabled Enable or disable stealth mode If disabled the computer functions normally and the options listed below are not accessible LED Off LEDs are disabled...

Page 48: ...splay brightness is preserved across suspend resume and boot It is restored to default when the brightness level is set at 0 The default level is mid range Wireless Radios Off All wireless devices are...

Page 49: ...Q3 IRQ4 Sets the interrupt request of this serial port Serial Port B Enabled Disabled User can configure this serial port when set to enabled Base I O address 2E8 2F8 3E8 3F8 Sets the base I O address...

Page 50: ...tplug Enabled Disabled If enabled the SATA Port 2 Hotplug is enabled Primary IDE Cable Type Auto 40 Pins 80 Pins Determines the type of IDE Cable used Channel 1 Master Not Installed If a drive is inst...

Page 51: ...w Only no system changes may be made by the user If Limited some system changes may be made If Full the user may make any system changes except Supervisor Password Set User Password Enter New Password...

Page 52: ...on Boot Menu Type Normal Displays the normal menu seen above Advance Displays boot drive order by device name see Boot Advance Menu below Boot Device Priority Displays boot drive order First listed dr...

Page 53: ...on Boot Menu Type Normal Displays the normal boot menu Advance Displays boot drive order by device name Device Name First listed drive is the primary boot drive Use up and down arrow keys to highlight...

Page 54: ...puter If you use items that are not approved for use with this computer you may cause your computer to malfunction or to emit or receive electromagnetic radiation in excess of local regulations For no...

Page 55: ...rface z Stereo speaker interface Once in the dock the computer s battery is recharged and conditioned automatically whether the computer is active suspended or even powered off Undocking the VR 2 The...

Page 56: ...arge your GoBook VR 2 quickly and efficiently in the your vehicle Once setup it provides drop in convenience with no cables to attach or detach to your GoBook VR 2 when you enter or leave your vehicle...

Page 57: ...sted for surge suppression modem surge protection and RFI EMI noise filtering respectively z The surge suppressor should have diagnostic LEDs that verify good AC ground proper wiring and proper surge...

Page 58: ...anywhere except the edges 2 Hold the card at a shallow angle about 25 degrees and insert the edge connector into the connector slot The 1 Turn off the computer and disconnect the AC adapter 2 Turn the...

Page 59: ...hen you travel The Li ion battery coupled with the power management features of your computer supplies you with more power on the go You may also purchase a secondary 9 cell battery pack for longer ru...

Page 60: ...here it will be exposed to strong vibration z Do not place it near sources of heat such as a radiator z Do not expose the computer to temperatures below 20 C 4 F or above 60 C 140 F z Do not subject t...

Page 61: ...the battery the GoBook VR 2 does not allow the battery to charge if the internal temperature of the battery gets too low 5 C or 41 F or too high 50 C or 122 F z Charge the battery nightly where the t...

Page 62: ...ion for a solution 2 If you are having a problem with a computer application use the Help that comes with the application to find a solution 3 If you still cannot resolve your problem refer to Service...

Page 63: ...erlined inverse and hypertext characters are difficult to read on the screen I changed my display resolution but I see no difference on the screen My screen seems to time out too quickly I have to con...

Page 64: ...receive an out of memory error message PC Card Troubleshooting I can t remove the PC card Diskette Read Error The system does not recognize the PC Card CD ROM when it is inserted into the PC Card soc...

Page 65: ...ervice return z RMA status check on product service z Check status Warranty Service Kit orders z Coordinate requests for product upgrades z Wireless Radio registration z icareServeNet registration and...

Page 66: ...s available for purchase under General Dynamics Itronix s standard terms and conditions of sale GD Itronix hardware products may be reconditioned or be manufactured from parts and components that may...

Page 67: ...b g n Radio Usage CAUTION Due to the fact that the frequencies used by 802 11a b g n wireless LAN devices may not yet be harmonized in all countries 802 11a b g n products are designed for use only i...

Page 68: ...uipment meets certain telecommunications network protective operational and safety requirements as prescribed in the appropriate Terminal Equipment Technical Requirements document s The Department doe...

Page 69: ...have an individual FCC Identifier which are not applicable to this configuration Only the FCC ID shown on the label located on the bottom of the IX605 Laptop PC is applicable The IX605 computer must...

Page 70: ...formation Do not proceed without reviewing the information provided in that document Do not proceed beyond a WARNING or CAUTION until the indicated conditions are fully understood and met Page 70 of 7...

Reviews: