background image

  14 

3.8 

LONG TERM STORAGE

It is important to prevent gum deposits from forming in essential fuel 
system parts such as the carburetor, fuel hose or tank during storage. 
Also, experience indicates that alcohol-blended fuels (called gasohol, 
ethanol or methanol) can attract moisture, which leads to separation 
and formation of acids during storage. Acidic gas can damage the fuel 
system of an engine while in storage.

To avoid engine problems, the fuel system should be emptied before 
storage of 30 days or longer, as follows:

1.  Add a quality gasoline stabilizer to the fuel per the manufacturer's 

specifications, and run the unit for 10-15 minutes.

2.  After engine cools down, remove all gasoline from the fuel tank. 

Use a commercially available, non-conductive vacuum siphon.

 Drain fuel into approved container outdoors, away from 
open flame. Be sure engine is cool. Do not smoke.

3.  Start and run engine until engine stops from lack of fuel.
4.  After  engine  cools  down,  drain  oil  from  engine.  Refill  with 

recommended grade.

5.  Remove spark plug and pour about 1/2 ounce (15 ml) of engine 

oil into the cylinder. Cover spark plug hole with rag. Pull the recoil 
starter  a  couple  times  to  lubricate  the  piston  rings  and  cylinder 
bore. A fogging agent can also be used in the place of oil.

‹ 

 Avoid spray from spark plug hole when cranking engine.

6.  Install and tighten spark plug. Do not connect spark plug wire.
7.  Clean the generator outer surfaces. Check that cooling air slots 

and openings on generator are open and unobstructed.

8.  Store the unit in a clean, dry place.

3.9 

OTHER STORAGE TIPS

•  Do not store gasoline from one season to another.
•  Replace the gasoline can if it starts to rust. Rust and/or dirt in the 

gasoline will cause problems with the carburetor and fuel system.

•  If  possible,  store  the  unit  indoors  and  cover  it  to  give  protection 

from dust and dirt

. BE SURE TO EMPTY THE FUEL TANK.

•  If it is not practical to empty the fuel tank and the unit is to be stored 

for some time, use a commercially available fuel stabilizer added 
to the gasoline to increase the life of the gasoline. Run the unit for 
10-15 minutes, turn off the fuel valve and allow to run until engine 
stops from lack of fuel.

•  Cover the unit with a suitable protective cover that does not retain 

moisture.

‹ 

 NEVER cover the generator while engine and exhaust 
areas are warm.

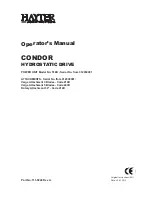
3.10   SPARK ARRESTOR SERVICE

If the engine exhaust muffler has a spark arrestor screen (Figure 16). 
Inspect and clean the screen at least annually. If unit is used regularly, 
inspect and clean more often.



If using the generator on any forest-covered, brush-
covered or grass-covered unimproved land, it must be 
equipped with a spark arrestor. The spark arrestor must 
be maintained in good condition by the owner/operator.

Clean and inspect the spark arrestor when the engine is at ambient 
temperature as follows:

1.  Remove the spark arrestor screen from the muffler by loosening 

the clamp and removing the screw.

2.  Inspect  screen  and  replace  if  torn,  perforated  or  otherwise 

damaged.  DO  NOT  USE  a  defective  screen.  If  screen  is  not 
damaged, clean it with commercial solvent.

3.  Replace the spark arrestor and secure with the clamp and screw.

Figure 16 - Spark Arrestor Screen

CONE

SCREEN

CLAMP

MUFFLER

Maintenance

Summary of Contents for 0065141C

Page 1: ...r www generac com or 1 888 436 3722 DEADLY EXHAUST FUMES ONLY use OUTSIDE far away from windows doors and vents NOT INTENDED FOR USE IN CRITICAL LIFE SUPPORT APPLICATIONS SAVE this Manual Provide this...

Page 2: ...nits Only 11 Maintenance 11 3 1 Performing Scheduled Maintenance 11 3 2 Maintenance Schedule 11 3 3 Product Specifications 11 3 4 General Recommendations 12 3 5 Service Air Filter 13 3 6 Valve Clearan...

Page 3: ...g technique that the manufacturer does not specifically recommend ensure that it is safe for others Also make sure the procedure work method or operating technique utilized does not render the generat...

Page 4: ...tical to correct generator operation Do not alter the installation or permit even partial blockage of ventilation provisions as this can seriously affect safe operation of the generator The generator...

Page 5: ...ntilation of the generator Do not insert objects through unit s cooling slots Never operate the generator if connected electrical devices overheat if electrical output is lost if engine or generator s...

Page 6: ...Refer to Figure 1 and install the Frame Foot and Rubber Bumpers as shown Slide the Rubber Bumper studs through the Frame Foot then install the Locking Flange Nuts Slide the Hex Head Bolts through the...

Page 7: ...Amp single phase 60 Hz electrical lighting appliance tool and motor loads 3 Circuit Breakers AC Each receptacle is provided with a push to reset circuit breaker to protect the generator against elect...

Page 8: ...off when the engine is running This signifies that the meter is tracking hours of operation 2 3 CONNECTION PLUGS 2 3 1 120 VAC 20 AMP GFCI DUPLEX RECEPTACLE This is a 120 Volt outlet protected agains...

Page 9: ...n of the generator The generator MUST be operated outdoors This exhaust system must be properly maintained Do nothing that might render the exhaust system unsafe or in noncompliance with any local cod...

Page 10: ...rt the largest motor 2 Add to that figure the running watts of all other connected loads The Wattage Reference Guide is provided to assist in determining how many items the generator can operate at on...

Page 11: ...g open flames sparks or heat in the vicinity while handling gasoline 1 Use regular UNLEADED gasoline with the generator engine Do not use any gasoline with more than 10 added ethanol Do not use E85 ga...

Page 12: ...in to the Run position If engine falters move choke knob back out to 1 2 Choke position until the engine runs smoothly and then to Run position 2 9 1 MANUAL START This generator is also equipped with...

Page 13: ...er input is protected by a 1 5 Amp replaceable in line fuse Figure 12 Battery Charger Jack BATTERY CHARGER INPUT 3 1 PERFORMING SCHEDULED MAINTENANCE It is important to perform service as specified in...

Page 14: ...on the generator internal windings will eventually decrease the insulation resistance of these windings 3 4 2 TO CLEAN THE GENERATOR Use a damp cloth to wipe exterior surfaces clean A soft bristle br...

Page 15: ...before re installing it NOTE To order a new air filter please contact the nearest authorized service center at 1 888 436 3722 Figure 15 Air Filter KNOB TO OPEN AIR BOX 3 6 VALVE CLEARANCE Intake 0 15...

Page 16: ...e the unit in a clean dry place 3 9 OTHER STORAGE TIPS Do not store gasoline from one season to another Replace the gasoline can if it starts to rust Rust and or dirt in the gasoline will cause proble...

Page 17: ...Low oil level 10 Excessive rich fuel mixture 11 Intake valve stuck open or closed 12 Engine has lost compression 1 Turn Fuel Shut off ON 2 Clean or replace air filter 3 Fill fuel tank 4 Drain fuel tan...

Page 18: ...MENT SERVICE PARTS Description Part No Oil Quart 0G0752 Spark Plug 0G84420101 Air Filter 0G84420151 Fuel Filter 0H1326 Battery 0G9449 Battery Fuse 0K3029 Spark Arrestor 0K3857 Maintenance Kit 005577 0...

Page 19: ...17 Notes...

Page 20: ...10 07 14 Printed in U S A 2014 Generac Power Systems Inc All rights reserved Specifications are subject to change without notice No reproduction allowed in any form without prior written consent from...

Page 21: ...m o 1 888 436 3722 PELIGRO EMANACIONES DE ESCAPE MORTALES Use NICAMENTE EN EXTERIORES lejos de ventanas puertas y ventilaciones NO EST N DESTINADOS AL USO EN APLICACIONES CR TICAS DE SOPORTE A LA VIDA...

Page 22: ...uci n del mantenimiento programado 11 3 2 Programa de mantenimiento 11 3 3 Especificaciones del producto 11 3 4 Recomendaciones generales 12 3 5 Servicio del filtro de aire 13 3 6 Luz de v lvulas 13 3...

Page 23: ...cnica de funcionamiento que el fabricante no recomienda espec ficamente aseg rese de que sea seguro para otras personas Aseg rese tambi n de que el procedimiento m todo de trabajo o t cnica de funcio...

Page 24: ...ciones suficientes puede causar inconsciencia o incluso la muerte El flujo adecuado y sin obstrucciones de aire de enfriamiento y ventilaci n resulta cr tico para el funcionamiento adecuado del genera...

Page 25: ...use el generador si los dispositivos el ctricos conectados se recalientan si se pierde la salida el ctrica si el motor o el generador producen chispas o si se observan llamas o humo mientras la unida...

Page 26: ...lte la Figura 1 e instale el pie del bastidor y los parachoques de caucho como se muestra Deslice los esp rragos de los parachoques de caucho a trav s del pie del bastidor e instale las contratuercas...

Page 27: ...30 A monof sicos de 60 Hz 3 Disyuntores CA Cada tomacorriente cuenta con un disyuntor de pulsar para reconectar para proteger al generador contra sobrecargas el ctricas 4 Vaciado de aceite Se usa para...

Page 28: ...llevando un registro de las horas de funcionamiento 2 3 ENCHUFES DE CONEXI N 2 3 1 TOMACORRIENTE DOBLE DE 120 VCA 20 A GFCI Es un tomacorriente de 120 V protegido contra sobrecargas por un disyuntor...

Page 29: ...er inseguro al sistema de escape o que infrinja cualquier c digo y o norma local Siempre use en interiores una alarma de mon xido de carbono alimentada por bater a instalada conforme a las instruccion...

Page 30: ...ios de consumo funcionando de todas las otras cargas conectadas La gu a de referencia de potencia en vatios se provee para asistir en la determinaci n de cu ntos elementos puede accionar el generador...

Page 31: ...que se fume o que haya llamas abiertas chispas o calor en la zona mientras maneje gasolina 1 Use gasolina com n SIN PLOMO en el motor del generador No use ninguna gasolina con m s de 10 de etanol a a...

Page 32: ...y luego a la posici n de funcionamiento Si el motor falla intermitentemente tire de la perilla del cebador nuevamente a la posici n de medio cebado hasta que el motor funcione suavemente y luego a la...

Page 33: ...1 5 A sustituible Figura 12 Conector del cargador de bater a BATER A ENTRADA DEL CARGADOR 3 1 EJECUCI N DEL MANTENIMIENTO PROGRAMADO Es importante ejecutar el mantenimiento como se indica en el Progra...

Page 34: ...el aislamiento de estos devanados 3 4 2 LIMPIEZA DEL GENERADOR Use un pa o h medo para limpiar las superficies exteriores Se puede usar un cepillo de cerdas suave para aflojar tierra compactada aceite...

Page 35: ...es de volver a instalarla NOTA Para pedir un filtro de aire nuevo comun quese con el centro de servicio autorizado m s cercano llamando al 1 888 436 3722 Figura 15 Filtro de aire PERILLA PARAABRIR LA...

Page 36: ...cuentren abiertas y sin obstrucciones 8 Almacene la unidad en un lugar limpio y seco 3 9 OTROS CONSEJOS SOBRE EL ALMACENAMIENTO No almacene gasolina de una estaci n a otra Sustituya el contenedor de g...

Page 37: ...de admisi n se encuentra atorada abierta o cerrada 12 El motor ha perdido compresi n 1 Gire la v lvula de cierre de combustible a la posici n ON 2 Limpie o sustituya el filtro de aire 3 Llene el tanq...

Page 38: ...cripci n N m de pieza Aceite cuarto de gal 0G0752 Buj a 0G84420101 Filtro de aire 0G84420151 Filtro de combustible 0H1326 Bater a 0G9449 Fusible de bater a 0K3029 Supresor de chispas 0K3857 Kit de man...

Page 39: ...17 Notas Notas...

Page 40: ...Impreso en EE UU 2014 Generac Power Systems Inc Todos los derechos reservados Las especificaciones est n sujetas a cambios sin aviso No se permite la reproducci n bajo ninguna forma sin previo consen...

Reviews: