GeChic On-Lap M505E User Manual Download Page 9

3


Chapter 2 Installation Instructions


Section 1 Setup of M505 Monitor & Use of Sleeve Bag


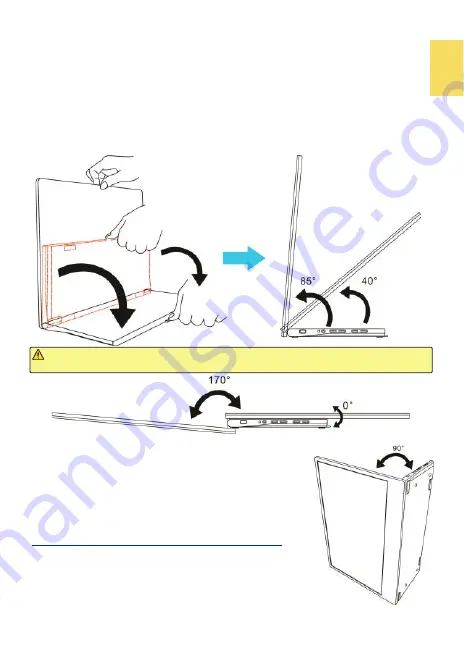
1. Set up M505 Monitor and Adjust the Angle


In the Fig. shown, erect the monitor on the desk. Hold the display by one hand and 

hold the pull of the I/O base to pull down the I/O base by the other hand. When 

the base is placed on the desk flat, adjust the screen angle between 40° and 85°.


Do not setup the monitor more than 90°. When angle is more than 90°, the moni-

tor will overturn forward, causing the panel crack. When the display angle is less 

than 40° degrees, the monitor may fall slowly to 0°.


     Warning: The rotation range of the hinge is between 0° to 170°. Please do not 

rotate it more than 170°, otherwise the monitor may be damaged or cracked. 


2. Notices of Vertical Display


(1) In the Fig. shown, place the monitor with button side 

upward and pull the I/O base out to a 90° angle with the 

display. Please place the monitor on a flat desk. Do not 

touch or shake the monitor, or the screen may be 

cracked from overturning.


When using vertical display for long time, please adopt 

M505 VESA 100 Aluminum Alloy Bracket (Optional)


and 

VESA arm for safety. Please refer to Section 7.


(2) The monitor doesn't support automatic rotation. 

Please refer to Chapter 4 and select " Portrait (flipped) " 

of "Orientation".


Summary of Contents for On-Lap M505E

Page 1: ...User Manual On Lap M505E Monitor...

Page 2: ...Section 4 Connect to Game Console Set Up for 2 Player Games 6 Section 5 Use of HDMI OUT Port 6 Section 6 Connect to Headphones or Speakers 8 Section 7 Installation of VESA 100 Arm or Wall Mount 9 Chap...

Page 3: ...15 1 15 2 16 17 1 M505 17 2 USB Type C MacBook Pro Air PC 18 3 HDMI IN PC 19 4 HDMI IN 19 5 HDMI OUT 20 6 22 7 VESA 100 23 LED OSD 23 1 LED OSD 23 2 OSD 24 26 1 Windows 11 10 26 2 Mac OS X 27 28 1 28...

Page 4: ...age environment 5 Cleaning On Lap Monitor Unplug the power input before cleaning Please use soft cloth to clean touch screen For stubborn stains please use lightly dampened cloth to wipe again Do not...

Page 5: ...hen the same image is dis played for hours In this case the screen is recovered slowly by turning off the power for a few hours Federal Communications Commission FCC Class B Statement Notice This equi...

Page 6: ...its electronic accessories e g adapter cables and Rear Dock must not be disposed of with your other household waste In stead it is your responsibility to dispose of these items by handing it over to...

Page 7: ...1 Chapter 1 Parts of On Lap Product Accessories Section 1 Parts Description...

Page 8: ...lug is for USB C DP Alt port of PC the other plug is for M505 to transmit power and video signals USB A to USB C Power Touch Signal Cable 1 2m One plug is USB A male for USB port of PC power adapter o...

Page 9: ...40 degrees the monitor may fall slowly to 0 Warning The rotation range of the hinge is between 0 to 170 Please do not rotate it more than 170 otherwise the monitor may be damaged or cracked 2 Notices...

Page 10: ...port therefore there is no more adapter or HDMI cable required 2 Power M505E Monitor by the 5V 2A Adapter Apply to Smartphone Please follow the steps below for connection 1 Use 5V 2A Power Adapter an...

Page 11: ...er by the HDMI IN Port 1 Convert one plug of USB Type C Video Cable 1m to USB C Female to USB A Male Adapter and then insert it into the USB A port on the PC and insert the other plug to the DC IN por...

Page 12: ...n two moni tors each displaying half The two monitors can only display the same image Section 5 Use the HDMI OUT Port 1 Connect to a Projector or Digital Whiteboard It is able to synchronize the displ...

Page 13: ...ogy up to 14 monitors can be daisy chained 3 Connect USB power cables to adapters and plug the adapter into the power extension socket As soon as power is on the monitors turn on automatically Press O...

Page 14: ...the steps below for connection 1 Use mini HDMI to HDMI A Video Cable Optional to connect a camera or video recorder to the HDMI IN port on M505 monitor 2 Use HDMI A Video Cable 1 2m to connect live br...

Page 15: ...by There is no light when the monitor is off 2 Hot Keys Description Power Press Power Button to power on off the Monitor Input Source Exit Press this button to show Input Source and then press to swit...

Page 16: ...Movie mode to display the dark scene more clearly 2 Blue Light Reduction Select On to reduces the screen s blue light automatically 3 Color Temperature Select Cool to increase the blue color of the im...

Page 17: ...urce selected in Input Source will be displayed If no such selected video signal inputs the monitor will show No signal warning message and won t detect other video sources 3 Charge from NB PC Select...

Page 18: ...cification Section 1 General Specification Item On Lap M505E Panel Wide screen 15 6 inch 16 9 True Resolution 1920x1080 Color Depth 16 7M Colors Brightness 250 cd m Typ Contrast Ratio 700 1 Typ Viewin...

Page 19: ...0x768 60Hz 47 712 60 015 1366x768 60Hz 47 712 59 790 1360x1024 60Hz 63 606 59 836 1400x1050 60Hz 65 317 59 978 1440x900 60Hz 55 935 59 887 1600x900 60Hz 55 990 59 946 1600x1024 60Hz 63 675 59 901 1680...

Page 20: ...e 5V 2A current to monitor If it causes the monitor to flicker or fail to be turned on due to the insufficient current please refer to Chapter 2 Section 2 Point 2 3 When connecting the USB C DP Alt po...

Page 21: ...IV On Lap 5V 2A DC 5V PC USB x2 5V 2A AC 30 10 2 2 1...

Page 22: ...99 99 0 01 WEEE Rear Dock EU EU VCCI B V...

Page 23: ...15 1...

Page 24: ...16 2...

Page 25: ...17 1...

Page 26: ...18 1 2 3...

Page 27: ...19 1 2 3 HDMI OUT HDMI A 1 2m 1 HDMI OUT 2 HDMI IN...

Page 28: ...20 2 1 2 3...

Page 29: ...1 2 3 21...

Page 30: ...22 1 2 3 4 4...

Page 31: ...1 2 3 23...

Page 32: ...24 Display Settings ECO Mode Auto Adjust Settings Aspect Ratio Overscan HDMI Video 1080P 720P OSD OSD Menu OSD OSD OSD OSD OSD OSD OSD...

Page 33: ...25 Auto Power Off Power Button Lock Input Source Information On Lap Reset...

Page 34: ...26 1...

Page 35: ...27...

Page 36: ...28 1 R53848 RoHS...

Page 37: ...29 3 2...

Page 38: ...30 GeChic Corporation 11F 3 No 138 Zhongming S Rd West Dist Taichung City 40361 Taiwan Customer Service service gechic com Rev 2022 3 1...

Page 39: ......

Page 40: ...Rev 2021 3 1...

Reviews: