


11
6)
Auto Power Off: Select "On" to launch this function, when no image dis-
played on the screen, the monitor will enter Standby mode, and power off
itself
after 2 minutes
.
Select "Off" to disable this function. The monitor will
stay in standby mode and will not power off.
7)
Power On/Off Indicator: Select "Off" to turn off the Power On/Off Indicator.
8)
Power Button Lock: Select "On" to lock the Power Button.
5.
Audio
Adjust the audio volume or turn on the mute mode. When
“
On
”
is selected for
“
Mute
”,
the monitor stop playing audio and can
’
t release the mute mode by
pressing volume buttons. After setting
“
Mute
”
mode as
“
Off
”,
the audio can be
played.
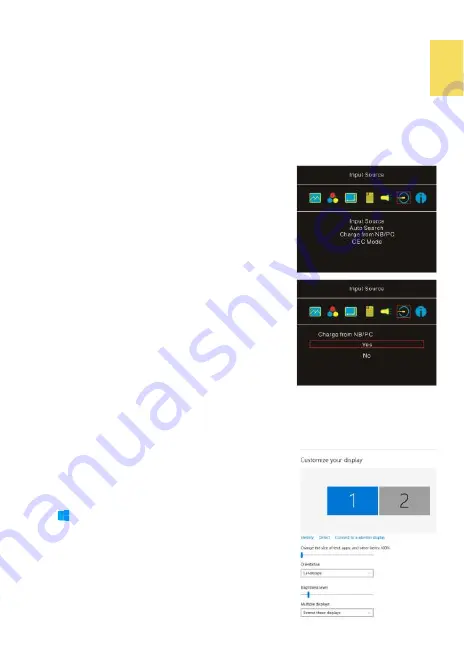
6.
Input Source
1)
Input Source: Select
HDMI
or
USB Type
-
C
for the
video signal input.
2)
Auto Search: When "On" is selected, the monitor
will detect two video input sources in sequence,
and the monitor will display the first one read.
When "Off" is selected, only the video source
selected in Input Source will be displayed. If no
such selected video signal inputs, the monitor
will show "No signal" warning message, and
won
’
t detect other video sources.
3)
Charge from NB/PC: Select "Yes", the computer/
smartphone will charge the monitor through the
USB
-
C port
. Select "No", this power input will be
closed.
Before selecting
“
No
”,
please connect the
power adapter to the DC IN port on M505, or the
monitor can
’
t work due to no power input.
4)
CEC Mode: When "On" is selected, users can turn
on/ turn off the monitor by connecting to a
device with HDMI CEC function such as DVD player, camera, or PlayStation
game console.
7.
Information: Show Frequency of the input image, On
-
Lap model name, firm-
ware version, etc.
1)
Reset: Select "Yes" to reset to defaults.
Chapter 4 Settings of Extended Display
Section 1 Settings of Extended Display on
Windows 11/10
Click , select
[
Settings]
→
[
System
]
→
[
Display
]
, and
choose
"Extend these displays"
at Multiple displays.
Select
"1920x1080"
at Resolution and select
"Landscape" at Orientation for horizontal display.
Select "Portrait (Flipped)" for vertical display, and then
click
“
Apply
”.
Summary of Contents for On-Lap M505E
Page 1: ...User Manual On Lap M505E Monitor...
Page 7: ...1 Chapter 1 Parts of On Lap Product Accessories Section 1 Parts Description...
Page 21: ...IV On Lap 5V 2A DC 5V PC USB x2 5V 2A AC 30 10 2 2 1...
Page 22: ...99 99 0 01 WEEE Rear Dock EU EU VCCI B V...
Page 23: ...15 1...
Page 24: ...16 2...
Page 25: ...17 1...
Page 26: ...18 1 2 3...
Page 27: ...19 1 2 3 HDMI OUT HDMI A 1 2m 1 HDMI OUT 2 HDMI IN...
Page 28: ...20 2 1 2 3...
Page 29: ...1 2 3 21...
Page 30: ...22 1 2 3 4 4...
Page 31: ...1 2 3 23...
Page 33: ...25 Auto Power Off Power Button Lock Input Source Information On Lap Reset...
Page 34: ...26 1...
Page 35: ...27...
Page 36: ...28 1 R53848 RoHS...
Page 37: ...29 3 2...
Page 39: ......
Page 40: ...Rev 2021 3 1...


