background image

Vscan Extend Settings

4-2

Vscan Extend

 – 

User Manual

5721203-100


Rev. D

Settings

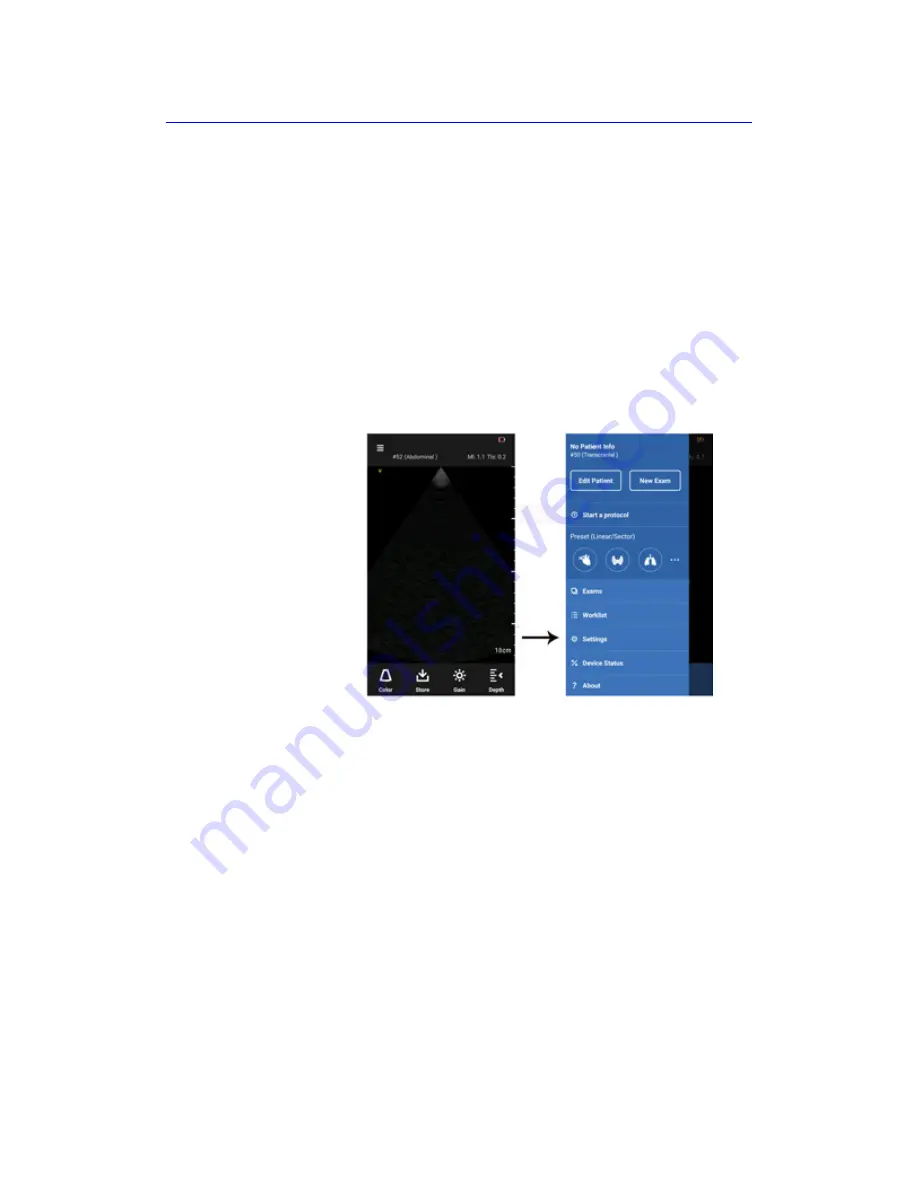
The following settings and functions are available under the 
main Settings menu.

Scan Settings

Press 

Menu

 -> 

Settings


Figure 4-1.

Settings

• 

Brightness - adjusts the screen brightness of the device

Swipe the brightness level indicator to the left to decrease 
the brightness and swipe to the right to increase the 
brightness.

Summary of Contents for Vscan Extend

Page 1: ...Technical Publications Vscan Extend Version 1 0 User Manual 5721203 100 English Rev D Operating Documentation Copyright 2016 By General Electric Co ...

Page 2: ...pean Directive 93 42 EEC concerning medical devices This manual is a reference for the Vscan Extend It applies to all versions of the 1 0 software for the Vscan Extend ultrasound system Manufacturer GE VINGMED ULTRASOUND A S Strandpromenaden 45 3191 Horten Norway Tel 47 3302 1100 Fax 47 3302 1350 ...

Page 3: ...r Center at 1 800 682 5327 or 1 262 524 5698 REV DATE YYYY MM DD REASON FOR CHANGE Rev A 2016 04 05 Initial draft Rev B 2016 05 19 Included External Battery charger label Included Power button under device labels Included revised rating label Included sections in Privacy and Security chapter Rev C 2016 06 01 Removed breast and testes from indication of use statement Included the revised rating lab...

Page 4: ...i 2 Vscan Extend User Manual 5721203 100 Rev D This page intentionally left blank ...

Page 5: ...liance to the Directive The location of the CE marking is shown in the Safety chapter of this manual EN55011 Industrial scientific and medical equipment Radio frequency disturbance characteristics Limits and methods of measurement IEC 60601 1 CAN CSA C22 2 No 601 1 Medical Electrical Equipment Part 1 General Requirements for Safety IEC 60601 2 37 Medical electrical equipment Part 2 37 Particular r...

Page 6: ...ces IEC 62304 Medical device software Software life cycle processes IEC 62366 Medical devices Application of usability engineering to medical devices IEC 60601 1 11 Requirements for medical electrical equipment and medical electrical systems used in the home healthcare environment IEC 60601 1 12 Requirements for medical electrical equipment and medical electrical systems intended for use in the em...

Page 7: ...n Extend probe immersible portion is IPX7 Class II Equipment EQUIPMENT in which protection against electric shock does not rely on BASIC INSULATION only but in which additional safety precautions such as DOUBLE INSULATION or REINFORCED INSULATION are provided there being no provision for protective earthing or reliance upon installation conditions Type BF Applied part TYPE BF APPLIED PART providin...

Page 8: ... JAPAN CHINA Importer Information Turkey DANGER The following optional feature IS NOT available in the USA and its territories Ophthalmalic DANGER The following optional feature IS NOT available in JAPAN Ophthalmalic DANGER The following optional feature IS NOT available in CHINA Ophthalmalic ...

Page 9: ... Indications for use for all countries except USA China and Japan 1 4 Indications for use for USA China and Japan 1 5 Contraindication for use for USA China and Japan 1 5 Intended users 1 6 Prescription Device 1 6 Operator profile 1 6 Warnings Important Safety Considerations 1 7 Contact Information Contacting GE Ultrasound 1 10 Global ultrasound support center phone numbers 1 11 Manufacturer 1 14 ...

Page 10: ... 2 25 Explanation of the Pollution control label for China 2 29 Chapter 3 Preparing Vscan Extend for Use Package contents Vscan Extend package contents 3 2 Environmental requirements Environmental requirements for the device 3 3 System description System overview 3 4 Accessories and Configurations 3 7 External battery charger compartment option 3 11 Display screens 3 12 Vscan Extend Battery Batter...

Page 11: ...4 Tricefy 5 62 Chapter 6 Vscan Extend Maintenance System care and maintenance Overview 6 2 Inspection 6 3 Cleaning and disinfection Cleaning the device 6 4 Method of cleaning Manual 6 6 Disinfecting the device 6 7 Disinfecting the probe 6 9 Rinsing and Lubricating Agents 6 11 Upgrade software Scanner software 6 12 Troubleshooting Vscan Extend troubleshooting 6 14 System Warning Messages 6 16 Chapt...

Page 12: ... Requirements 8 8 Network Protocols 8 8 Information Protection Overview 8 9 Network Security 8 9 System Protection Vscan Extend system protection 8 16 Personal Information Collected by the Product Information collection and use 8 17 Manual information collection 8 18 Information disclosure 8 19 Retention and destruction of personal information 8 19 Potential Hazardous Situations Resulting From Fai...

Page 13: ...Vscan Extend User Manual 1 1 5721203 100 Rev D Chapter 1 Introduction Contents Overview on page 1 2 Warnings on page 1 7 Contact Information on page 1 10 ...

Page 14: ...cer G8L Vscan Extend is a trademark of General Electric Company General description Vscan Extend is a pocket sized battery powered general purpose diagnostic ultrasound system The system consists of a handheld unit with a 5 inch touch screen display and a permanently attached probe The battery can be charged either in the system or alone The system is capable of transferring images wirelessly to a...

Page 15: ...cal signals into a series of digital image signals which are stored in memory Once in memory the image can be displayed in real time on the image monitor A probe is an accurate solid state device providing multiple image formats The digital design and use of solid state components provides highly stable and consistent imaging performance with minimal required maintenance Safety Read and understand...

Page 16: ...ence of Fluid Imaging Guidance for Needle Catheter Placement e g paracentesis pericardiocentesis thoracentesis amniocentesis Peripheral Vascular Imaging e g arteries and veins Thoracic Lung e g pleural motion sliding line artifacts Adult Cephalic and Pediatrics With the addition of the linear array transducer on the single dual headed probe solution the specific clinical applications and exam type...

Page 17: ...ominal Renal OB GYN Urology Fetal Evaluation of Presence of Fluid Imaging Guidance for Needle Catheter Placement e g paracentesis pericardiocentesis thoracentesis amniocentesis Peripheral Vascular Imaging e g arteries and veins Thoracic Lung e g pleural motion sliding line artifacts Adult Cephalic and Pediatrics With the addition of the linear array transducer on the single dual headed probe solut...

Page 18: ...cian assistants medical students The users may or may not be working under supervision or authority of a physician Prescription Device For USA only CAUTION Federal law restricts this device to sale by or on the order of a physician Operator profile Qualified and trained healthcare professionals with at least a basic level of general ultrasound training that includes limited image acquisition techn...

Page 19: ...f the gorilla glass is broken Do not use the AC DC adapter if showing visible damages Use only the designated power accessories battery and charger Failure to do so may result in electrical shock or fire Do not place the battery near a heat source or expose it to direct flame Such exposure may lead to corrosive liquid leakage electrical shock or fire To reduce risk for electrical shock do not plug...

Page 20: ...property damage To prevent injury or damaged do not use or charge the battery if it appears to be damaged Signs of damage include but are not limited to discoloration warping and leaking battery fluid Do not expose the battery to fire high temperature or direct sunlight Do not immerse or expose the battery to water Do not use or store the battery inside a vehicle during hot weather Do not drop or ...

Page 21: ... that are provided with the battery charger Discontinue charging a battery that gives off extreme heat or a burning odor Use the battery only in the Vscan Extend Use the battery only for its intended use and according to the instructions in the product documentation CAUTION Ensure to backup data regularly and to erase the data before sending the Vscan Extend for service To access or add patient in...

Page 22: ...tor or the appropriate support resource listed on the following pages Internet https vscan gehealthcare com http www gehealthcare com USA TEL 1 800 437 1171 Ultrasound Service Engineering 9900 Innovation Drive Wauwatosa WI 53226 Clinical Questions Please contact your local Applications or Sales Representative Service Questions For service contact your local Service Representative ...

Page 23: ...ales or Service Representative Global ultrasound support center phone numbers For countries not listed in the tables below please contact the local distributor When contacting Support you will have to provide your system ID If the system ID is unknown please give the Temporary System ID Vscan Extend to be properly routed for support Americas Table 1 1 Americas Region Telephone United States1 800 4...

Page 24: ...gypt 202 19434 hot line Finland 0981710182 France 0800139140 G D Luxembourg 080022973 Germany 08004373784 Greece 302109690660 Holy See 800 827168 Hungary 36 23 410 510 Ireland 1800992557 Israel Contact local distributor Italy Central 800 827168 Italy North East 800 827166 Italy North West 800 827164 Italy South 800 827170 Liechtenstein 0041 44 809 9293 Monaco 0800139140 Netherlands 8000994442 Nort...

Page 25: ...D Saudi Arabia 800 1243002 South Africa 800 111 671 Spain 902 400 246 Sweden 0201201436 Switzerland 0800556958 Turkey Contact local distributor UAE 800 3646 UK 0845 8503392 Ukraine 38 044 391 37 56 57 Table 1 2 Europe Middle East and Africa Continued Region Telephone ...

Page 26: ...425 8025 Singapore 65 62773444 Australia 1 800 659 465 New Zealand 0800 65 94 65 Japan 0120 055 919 Korea 82 2 1544 6119 Bangladesh 880 29135488 Sri Lanka 94 114891178 Bhutan Contact GE India Maldives Contact GE India Nepal Contact local distributor Malaysia 1800 88 3911 Thailand 66 26248400 Vietnam Contact local distributor Philippines Contact local distributor Indonesia Contact local distributor...

Page 27: ...2 1 5721203 100 Rev D Chapter 2 Safety Contents Introduction on page 2 2 Owner responsibility on page 2 3 Important safety considerations on page 2 5 Maximum probe temperature on page 2 24 Device labels and symbols on page 2 25 ...

Page 28: ... icons that precede precautionary statements in the text The following icons are used to indicate precautions DANGER Indicates that a specific hazard is known to exist which through inappropriate conditions or actions will cause Severe or fatal personal injury Substantial property damage WARNING Indicates that a specific hazard is known to exist which through inappropriate conditions or actions ma...

Page 29: ... If servicing is required contact GE See Contact Information on page 1 10 for more information The owner of Vscan Extend should ensure that only properly trained fully qualified personnel are authorized to operate the system Before authorizing anyone to operate the system it should be verified that the person has read and fully understands the operating instructions contained in this manual It is ...

Page 30: ...eir region or country Notice against user modification Never modify this product including system components cables and so on User modification may cause safety hazards and degradation in system performance All modification must be done by a GE qualified person Software upgrade following GE recommendations can be done by the user CAUTION For USA only Federal law restricts this device to sale by or...

Page 31: ... injury or damage Patient Safety Patient identification Always include proper identification with all patient data Identification errors could result in an incorrect diagnosis If the Vscan Extend needs to be sent for repair ensure that the patient information is backed up and confirm backup was successful The patient information MUST be erased from internal memory See Backup on page 5 42 for more ...

Page 32: ...nt errors or failure to detect details in the image The user must become thoroughly familiar with the operation of the Vscan Extend in order to optimize its performance and to recognize possible malfunctions General precautionary advice for the use of diagnostic ultrasound in combination with ultrasound contrast agents Mechanical hazards A damaged probe may result in injury or increased risk of co...

Page 33: ...d Never operate the equipment in the presence of flammable or explosive liquids vapors or gases Malfunctions in the Vscan Extend or sparks can electrically ignite these substances Operators should be aware of the following points to prevent such explosion hazards If flammable substances are detected in the environment do not plug in or turn on the system If flammable substances are detected after ...

Page 34: ...it components may cause short circuiting which could result in an electrical fire Pacemaker hazard The possibility of the system interfering with pacemakers is minimal However as this system generates high frequency electrical signals the operator should be aware of the potential hazard this could cause Electrical Safety Device classifications Vscan Extend is an internally powered device type BF T...

Page 35: ...omptly Latex is a component of many medical devices including surgical and examination gloves catheters incubation tubes anesthesia masks and dental dams Patient reaction to latex has ranged from contact urticaria to systemic anaphylaxis For more details regarding allergic reaction to latex refer to FDA Medical Alert MDA91 1 March 29 CAUTION Connection to a PC can be done when the PC is in complia...

Page 36: ...mage which may impair the ultrasound unit s essential performance see Electrical Safety on page 2 8 There is no guarantee that interference will not occur in a particular installation If this equipment is found to cause or respond to interference attempt to correct the problem by one or more of the following measures Re orient or re locate the affected device Increase the separation between the un...

Page 37: ... behavior which may be caused by such electromagnetic radiation The ultrasound unit is intended for use in the electromagnetic environment specified in the tables below The user of ultrasound unit should assure that the device is used in such an environment FCC compliance statements 1 This device may not cause harmful interference and 2 This device must accept any interference received including I...

Page 38: ...on a circuit different from that to which the receiver is connected Consult the dealer or an experienced radio TV technician for help This Class B digital apparatus complies with Canadian ICES 003 This device complies with Industry Canada license exempt RSS standard s Operation is subject to the following two conditions 1 This device may not cause interference and 2 This device must accept any int...

Page 39: ... une installation résidentielle Cet équipement génère utilise et peut émettre de l énergie radiofréquence S il n est pas installé et utilisé conformément aux instructions il peut provoquer des interférences sur les communications radio Cependant il n est pas garanti que des interférences ne se produiront pas dans certaines installations Si cet équipement cause des interférences à la réception radi...

Page 40: ...cker emissions EN IEC 61000 3 3 Complies Table 2 2 Electromagnetic immunity Part 1 Guidance and manufacturer s declaration electromagnetic immunity The Vscan Extend is intended for use in the electromagnetic environment below The customer or the user of the Vscan Extend should assure that it is used in such an environment Immunity test EN 60601 test level Compliance level Electromagnetic environme...

Page 41: ...r mains interruptions it is recommended that the ultrasound unit is powered from an uninterruptible power supply or a battery Power frequency 50 60 Hz magnetic field EN IEC 61000 4 8 3 A m 3 A m Power frequency magnetic fields should be at levels characteristic of a typical location in a typical commercial or hospital environment NOTE UT is the a c mains voltage prior to application of the test le...

Page 42: ...ipment should be used no closer to any part of the ultrasound unit including cables than the recommended separation distance calculated from the equation applicable to the frequency of the transmitter Recommended separation distance 80 MHz to 800 MHz 800 MHz to 2 5 GHz where p is the maximum output power rating of the transmitter in watts W according to the transmitter manufacturer and d is the re...

Page 43: ...above the ultrasound unit should be observed to verify normal operation If abnormal performance is observed additional measures may be necessary such as re orienting or relocating the ultrasound unit b Over the frequency range 150 kHz to 80 MHz field strengths should be less than 3 V m Table 2 3 Electromagnetic immunity Part 2 Continued Guidance and manufacturer s declaration electromagnetic immun...

Page 44: ... maintaining a minimum distance between portable and mobile RF communications equipment transmitters and the ultrasound unit as recommended below according to the maximum output power of the communications equipment Separation distance according to frequency of transmitter m Rated maximum output of transmitter W 150 kHz to 80 MHz 80 MHz to 800 MHz 800 MHz to 2 5 GHz 0 01 0 12 0 12 0 23 0 1 0 38 0 ...

Page 45: ...f TI can be found in NEMA Standards Publication UD 3 Standard for Real Time Display of Thermal and Mechanical Acoustic Output Indices on Diagnostic Ultrasound Equipment Revision 2 EN IEC 60601 2 37 Medical electrical equipment Part 2 37 Particular requirements for the safety of ultrasonic medical diagnostic and monitoring equipment Mechanical Index MI is the estimated likelihood of tissue damage d...

Page 46: ...recision of the output display are summarized in the table below Accuracy of the output display TI MI parameters depends on the measurement system precision the acoustic model used to calculate the parameters and variation in the acoustic output of probes and systems The measurement precision and overall accuracy of the measurements have been assessed by determining both the random and the systema...

Page 47: ...ated to the exposure time Controls can help to reduce patient exposure even though it may not directly affect acoustic output The British Medical Ultrasound Society has suggested some maximum scanning times relative to displayed TI as follows Table 2 6 Maximum scanning times Obstetric scanning General Abdominal Peripheral Vascular Adult cephalic Musculoskeletal cardiac and other scanning TI time T...

Page 48: ...ical information During a diagnostic ultrasound examination high frequency sound penetrates and interacts with tissue in and around the area of anatomy to be imaged Only a small portion of the sound energy is reflected back to the probe for use in constructing the image while the remainder is dissipated within the tissue The interaction of sound energy with tissue at sufficiently high levels can p...

Page 49: ...aining During each ultrasound examination the user is expected to weigh the medical benefit of the diagnostic information that would be obtained against the risk of potential harmful effects Once a diagnostic image is achieved prolonging the exposure cannot be justified It is recommended that all users receive proper training in applications before performing them in a clinical setting Environment...

Page 50: ...om is at 23 C NOTE Thermal phantom made with tissue mimicking material as referenced in EN IEC 60601 2 37 Probe placed upright in contact with above thermal phantom Auto freeze capability is disabled Lens temperature is monitored for 30 minutes Table 2 7 Maximum probe temperature Probe Max Temp in deg C Simulated use Max Temp in deg C Still air Vscan Extend configured with Sector probe Phased arra...

Page 51: ...ls Vscan Extend Labels Example Figure 2 2 Vscan Extend rating label NOTE The label shown in Figure 2 2 is a sample The label varies country to country based on country requirements 1 Rating label 2 Inner label 3 UDI label contains UDI information 4 Serial number label contains device serial number ...

Page 52: ...can Extend User Manual 5721203 100 Rev D Vscan Extend Labels Example continued Figure 2 3 Vscan Extend battery label Figure 2 4 Vscan Extend AC DC adapter label Figure 2 5 Vscan Extend external battery charger label ...

Page 53: ...nd system Vscan Extend battery Vscan Extend External battery charger Follow instructions for use Read and understand all instructions in the User s Manual before attempting to use the ultrasound unit Vscan Extend system Vscan Extend External Battery charger TÜV mark Vscan Extend system Prescription device statement for the USA only Caution Federal law restricts this device to sale by or on the ord...

Page 54: ...External Battery charger Serial number Vscan Extend system Vscan Extend External Battery charger Unique Device Identification UDI Every system has a unique marking for identification Scan or enter the UDI information into the patient health record according to governing laws Vscan Extend system Refer label inside Vscan Extend system Assembled in Romania Romania is a country name Identify the custo...

Page 55: ...environmental conditions as defined in the product manual and periodic maintenance schedules specified in Product Maintenance Procedures shall be followed strictly Consumables or certain parts may have their own label with an EFUP value less than the product Periodic replacement of those consumables or parts to maintain the declared EFUP shall be done in accordance with the Product Maintenance Pro...

Page 56: ...Safety 2 30 Vscan Extend User Manual 5721203 100 Rev D ...

Page 57: ...ser Manual 3 1 5721203 100 Rev D Chapter 3 Preparing Vscan Extend for Use Contents Package contents on page 3 2 System description on page 3 4 Battery on page 3 15 First time use on page 3 22 Activation on page 3 24 ...

Page 58: ...l items listed below are included in the package Figure 3 1 Vscan Extend package contents 1 Vscan Extend softcase with device and probe 2 USB cable 3 Gel bottle location 4 Region specific plugs 5 AC DC adapter 6 Battery Table 3 1 Package content Item Description Vscan Extend Quick Card Vscan Extend User Manual Service contact information ...

Page 59: ...iewing images The display viewing angle should be as small as possible If you are having difficulty seeing the image due to the lighting conditions try to change brightness see Scan Settings on page 4 2 or change your position location of use The time required for the Vscan Extend to warm from minimum storage between uses until the device is ready for use at 20 degrees ambient is approximately 1 m...

Page 60: ...d configured with a Sector probe for deep scanning Figure 3 2 Vscan Extend with a Sector probe NOTE Green LED indicates Vscan Extend is fully charged and an amber LED indicates it is charging 1 Display 2 Sector probe 3 Serial port For Service ONLY 4 Power button 5 LED indicates charging status 6 USB port and Power connector ...

Page 61: ...array and linear array transducer for deep and shallow scanning Figure 3 3 Vscan Extend with Dual probe NOTE Green LED indicates Vscan Extend is fully charged and an amber LED indicates it is charging 1 Display 2 Dual probe 3 Serial port For Service ONLY 4 Power button 5 LED indicates charging status 6 USB port and Power connector ...

Page 62: ...aring Vscan Extend for Use 3 6 Vscan Extend User Manual 5721203 100 Rev D Vscan Extend Dual Probe Figure 3 4 The dual probe 1 Phased array transducer deep scanning 2 Linear array transducer shallow scanning ...

Page 63: ...le battery 3 USB cable 4 MicroSD memory card For service personnel only Not for customer use 5 Soft case 6 User Manual 7 Hardcopy Quick Card The microSD card provided in the device captures error logs and is strictly for Service personnel only The user must remove this microSD card and insert a blank one when performing data backup The microSD card that captures error log files is used for trouble...

Page 64: ...ssory Figure The microSD card provided in the device captures error logs and is strictly for Service personnel only The user must remove this microSD card and insert a blank one when performing data backup The microSD card that captures error log files is used for troubleshooting by the Repair Depot Not available in all countries ...

Page 65: ...ries continued Table 3 4 Optional accessories Accessory Figure 1 Additional Soft case 2 Robust case to carry complete Vscan Extend set 3 Robust case to carry only scanner gel and potential extra battery 4 External Battery charger 5 Additional Battery 6 Additional AC adapter 7 Hardcopy User manual ...

Page 66: ... labeling of exam data with patient ID A A A FIPS compliant data encryption A A A Data backup capability on microSD card A A A Wireless image transfer to shared network folders A A Enterprise grade wireless encryption standards including EAP and WPA2 PSK A A Mobile Device Management client support A A Access to GE marketplace to selectively download and install Vscan Extend apps Bladder Volume A A...

Page 67: ...rectly plugging the AC DC adapter or externally by placing the Vscan Extend battery on the external battery charger NOTE Scanning is disabled during charging if charged in the main unit Figure 3 5 External battery charger compartment The table below lists the units or parts that can be replaced by the user CRU Customer Replacable units Table 3 6 CRU Description Part number Battery 5693456 AC DC ad...

Page 68: ...illustrational purposes Actual screen output or graphics may vary Phased array transducer 1 Header Menu icon Patient information Exam number Battery level indicator MI and TI values 2 Depth scale 3 Footer Color icon Gain Depth Store Linear array transducer 1 Header Menu icon Patient information Exam number Battery level indicator MI and TI values 2 Depth scale 3 Footer Color icon Gain Depth Store ...

Page 69: ...Patient information Exam number Battery level indicator MI and TI values 2 Depth scale 3 Footer Color icon Gain Depth Store 4 Color bar 5 Color ROI Region of Interest Linear array transducer 1 Header Menu icon Patient information Exam number Battery level indicator MI and TI values 2 Depth scale 3 Footer Color icon Gain Depth Store 4 Color bar 5 Color ROI Region of Interest ...

Page 70: ...Preparing Vscan Extend for Use 3 14 Vscan Extend User Manual 5721203 100 Rev D Display screens continued Figure 3 8 Menu screen ...

Page 71: ...arge the battery before use for at least 1 5 hours Establish a routine for charging the battery to maximize system availability The battery must be charged while housed in the Vscan Extend or in the external battery charger The Li ION battery used in Vscan Extend with the battery code is displayed below Figure 3 9 Vscan Extend battery Battery specification Table 3 7 Battery specification Items Uni...

Page 72: ...ment WARNING Use only the AC adapter provided with the Vscan Extend The Vscan Extend cannot be charged via the USB cable when connected to a PC CAUTION The AC adapter must be kept outside the patient environment refer to local regulation and EN 60601 1 1 Patient environment WARNING Do NOT simultaneously touch the patient and the charger plug on the AC adapter ...

Page 73: ...gure 3 13 Insert the plug Voltage requirements The AC DC adapter will function on voltage from 100 to 240 VAC and 50 60 Hz 1 North America Japan 2 China 3 Australia New Zealand 4 UK Hong Kong Singapore 5 Continental Europe and Korea for unearthed electrical outlet CAUTION Only use mains power of 100 240 VAC Voltage outside this range can cause a malfunction or destroy the AC DC adapter ...

Page 74: ...e optional External battery charger compartment 1 Place the external battery charger on a flat surface 2 Insert the battery in the compartment NOTE Do not apply excessive pressure to the battery while inserting it into the compartment There is no snap provided on the external battery charger The battery fits smoothly into the compartment without a click 3 Plug the charger plug into the charger con...

Page 75: ...ator is displayed on the screen The following icons are displayed Table 3 8 Battery level indicator Icon Description Battery fully charged 95 Battery 75 charged 70 and 95 Battery 50 charged 45 and 70 Battery critical or low Battery 45 Prepare to recharge the battery or have a spare battery available Battery charging ...

Page 76: ... 1 Insert the battery in the compartment until the lid clicks in place Figure 3 15 Inserting battery To remove the battery 1 Power off the Vscan Extend 2 Push the button on the battery compartment lid and lift the battery Figure 3 16 Removing battery CAUTION Do not attempt to remove the battery without powering off the Vscan Extend ...

Page 77: ... rapidly It is possible to charge the battery several times each day if needed When storing the Vscan Extend for a period longer than three months remove the battery from the Vscan Extend main unit Recharge the battery every three months to maintain battery performance When the battery is stored separately storage can be at least one year before recharging the battery is needed NOTE Make sure to r...

Page 78: ...to power on Vscan Extend 3 Activate Vscan Extend See Vscan Extend activation on page 3 24 for more information Power on off To power on the Vscan Extend Press the Power button Device boots up and scan screen displays within 45 seconds NOTE The Scan screen displays only when the device has been activated See Activation on page 3 24 for more information To power off the Vscan Extend 1 Press the Powe...

Page 79: ... standby mode The device is ready to scan within a second NOTE When resuming the device from standby mode a new exam is created and the previous exam data is lost if not previously saved Sleep Mode Vscan Extend enters sleep mode if it continues to be in standby mode for more than 3 hours Push the Power button again to resume from sleep mode The device is ready to scan within approximately 5 second...

Page 80: ...al activation activate Vscan Extend by visiting the url https vscanactive gehealthcare com from a PC 3 Scenario 3 Activation without internet access If there is no internet access contact GE Service see page 1 8 for phone numbers then see Offline activation on page 4 12 to activate Vscan Extend Activation using Wi Fi The activation process includes steps to register the Vscan Extend device NOTE Wh...

Page 81: ...rce 2 Press the Power button to power on Vscan Extend The Startup screen displays followed by the Language screen NOTE The default language is set to English 3 To choose another language press Change Language Figure 3 17 Select language 4 Choose the desired language The screen changes back to the Language screen 5 Press Next ...

Page 82: ...and Time screen displays NOTE The current date and time is set by default 7 Press Change Date and Time to change the date and time if needed Figure 3 18 Date and Time Choose either the automatic date and time format which sets the date and time by synchronizing through the internet OR Set the date and time manually 8 Press Next ...

Page 83: ...non clinical Wi Fi hotspot to start activation NOTE A non clinical Wi Fi has access to the public internet which is not part of the hospital internet If you are unable to view the non clinical Wi Fi or do not have the password contact your system administrator NOTE If you do not have access to public Wi Fi proceed with manual activation of the device See Manual activation on page 3 35 for more inf...

Page 84: ...ting Wi Fi continued 1 Enter the authentication details to connect to the network Figure 3 20 Authentication code 2 Once the device connects to the network press the Back arrow to exit the Settings screen The screen changes back to the Wi Fi screen Figure 3 19 on page 3 27 3 Press Next ...

Page 85: ...egistrants press Register to create an account Enter the required details Figure 3 21 Registration details NOTE If you have previously registered a Vscan Extend device press Already Registered using your registered email See Registered users on page 3 31 for more information Figure 3 22 Keyboard tips HINTS Press the Arrow key twice to get the letters in all caps and press the number key to toggle ...

Page 86: ...ve GE activities or to receive special offers and promotions Press Register 3 An email is sent to the email address used during registration NOTE The email has a link requiring you to change your password for security purposes 4 Press Activate my device Figure 3 23 Choose an option 5 Vscan Extend has been activated Press Start Using Device Figure 3 24 Start using Vscan Extend ...

Page 87: ... Vscan Extend is connected to a non clinical Wi Fi 1 Press Already Registered 2 Enter your email ID and password Figure 3 25 Already Registered NOTE If you log in with a wrong email ID a pop up message displays Login error Your email ID is not confirmed yet Try again with a valid email ID ...

Page 88: ...tered users continued 3 While the activation process is in progress the wireless is connecting to the GE Store and the activation key is being entered automatically 4 Press Activate my device 5 Vscan Extend has been activated Start using the device Figure 3 26 Start using Vscan Extend ...

Page 89: ...s Forgot Password 2 An email is sent to your confirmed email address with a link to reset the password Figure 3 27 Forgot password 3 Click on the link on a personal computer to reset the password 4 Enter your email ID and new password The Vscan Extend is activated and ready to use Figure 3 28 Reset password and start using Vscan Extend ...

Page 90: ...ress Retry and try to activate the device again Figure 3 29 Retry 2 If the problem persists contact your internet service provider and GE at help gehc com to connect to the network 3 If the network is not accessible or you are unable to connect to the network you can activate Vscan Extend manually See Manual activation on page 3 35 for more information ...

Page 91: ...access If there is no internet access call GE Service center or contact your local Sales representative 2 Follow the directions provided on the site to generate the activation key for Vscan Extend The following information is required The Vscan Extend serial number written on the rear label of the system 3 User information as per the figure below Figure 3 30 User Information 4 Enter other necessar...

Page 92: ...5721203 100 Rev D Manual activation continued 5 Press Submit to initiate registration Figure 3 33 Submit 6 The Activation key is generated Store the key in a convenient location to enter into the device and for future reference Figure 3 34 Activation key details ...

Page 93: ...d 1 Enter the activation key generated while registering on the portal https vscanactive gehealthcare com Figure 3 35 Enter activation key 2 Press Activate Figure 3 36 Start using the device 3 Vscan Extend has been activated Start using the device HINTS Press the Backspace key if a mistake occurred while entering the activation key ...

Page 94: ...Preparing Vscan Extend for Use 3 38 Vscan Extend User Manual 5721203 100 Rev D ...

Page 95: ...can Extend Settings Contents Settings on page 4 2 Scan Settings on page 4 2 Server Settings on page 4 3 Diagnostics on page 4 12 Wi Fi on page 4 21 MDM Installation Procedures Optional on page 4 24 Certificate Authority on page 4 28 GE Marketplace on page 4 31 ...

Page 96: ...tings and functions are available under the main Settings menu Scan Settings Press Menu Settings Figure 4 1 Settings Brightness adjusts the screen brightness of the device Swipe the brightness level indicator to the left to decrease the brightness and swipe to the right to increase the brightness ...

Page 97: ...to set the value Unit of Measurement set unit of measurement 1 Press Unit of Measurement 2 Choose the desired unit 3 Press OK to set the value Set current preset as default 1 Press Set Current Preset as Default 2 Press Yes to set the displayed preset as default Server Settings Allows to configure the DICOM servers Figure 4 2 Server settings Worklist Server gets patient and intended study informati...

Page 98: ...continued To configure the Worklist server 1 Press Menu Settings Figure 4 3 Settings 2 Scroll down to Server Settings Press Worklist Server Figure 4 4 Worklist server HINTS Press the title bar the entire top section on the screen or swipe left most side of the screen to access the Menu ...

Page 99: ...xtend to the hospital wireless network See Activation using Wi Fi on page 3 24 for more information 1 Enter all fields to add a new Worklist server Figure 4 5 Configure Worklist Server NOTE Swipe upwards to get the full screen and enter all details Contact the hospital IT administrator for details ...

Page 100: ...TE By default DICOM is listed while configuring the Worklist Server Figure 4 6 DICOM listed 2 Enter any unique name for Calling AE Title e g Nixon Building Schedule 3 Press Add Server to add the Worklist Server 4 Press Verify to verify communication with the Worklist Server Figure 4 7 Verify Worklist Server ...

Page 101: ...ings for all components 5 Press and hold the selected Worklist entry to add to the favorites list By default the first added Worklist server is set as the favorite To remove a Worklist server from the favorites list press and hold on the server name If you wish to change it press and hold to remove the current favorite and add the preferred server Figure 4 8 Add to favorites NOTE If only one DICOM...

Page 102: ...xtend User Manual 5721203 100 Rev D Configure Worklist Server continued 6 To add another Worklist server press Add Figure 4 9 Add another Worklist server 7 To delete the Worklist Server press the Delete icon Figure 4 10 Delete Worklist ...

Page 103: ...Settings Vscan Extend User Manual 4 9 5721203 100 Rev D Configure Image Server 1 Press Menu Settings Figure 4 11 Menu 2 Scroll down to Server Settings Press Image Server Figure 4 12 Image Server ...

Page 104: ...e Image Server continued 3 Enter your Image server s IP address port number and Remote AE Title Figure 4 13 Configure Image Server NOTE Enter any unique name for Calling AE Title e g Nixon Building Image Archive Contact the hospital IT administrator for details 4 Press Add Server ...

Page 105: ...on with the Image Server is ok Figure 4 14 Verify Image Server Verify OK pop up displays if the communication with the Image Server is ok If communication fails Check the server settings and make necessary corrections Vscan Extend and the DICOM image server are not connected to the same network Check network settings for all components ...

Page 106: ...ne image server you can set one as a favorite Once an image server is set as a favorite saved images are automatically exported once patient information is added or edited for any exam Diagnostics Figure 4 16 Diagnostics System Diagnostics Performs main board or hardware diagnostics Display Test Perform this test if there is a problem with the display Use a swiping motion to navigate through all t...

Page 107: ...t Facility Name Session Duration When the device is idle data access is active for the duration set The default duration is 1 hour The following values are available to set the duration 5 min 15 min 1 hr 5 hrs 1 day never WARNING When the device is idle for the duration set it is the reponsibility of the user to ensure that the device is not used by unauthorized persons as it may lead to data loss...

Page 108: ...through an option key either manually enter the serial number of the device in the portal on a PC to obtain the option key or if Wi Fi is connected check for updates Figure 4 18 Configuration Press View Modules to obtain the list of enabled modules Figure 4 19 Enabled modules My Account Set User account About Provides device information ...

Page 109: ...N provides access to the Admin settings 1 Create a new PIN four digit number e g 1234 for security purpose Figure 4 20 Create admin PIN 2 Enter the new PIN again for confirmation Figure 4 21 Confirm new PIN NOTE The PIN is critical to accessing system data Avoid sharing this PIN with non administrators and take precautions to not lose this PIN ...

Page 110: ...Vscan Extend Settings 4 16 Vscan Extend User Manual 5721203 100 Rev D Administrator Access continued The new PIN provides access to advanced settings Figure 4 22 Advanced Settings ...

Page 111: ... to the first use or after the system has been reset Once the PIN is set the user is prompted for the PIN every time the device is powered ON or after the session duration time has expired 1 Create a new PIN for data storage and access for e g 1234 Figure 4 23 User PIN 2 Confirm the new PIN for security purpose Confirmation is only required after PIN creation Figure 4 24 Confirm PIN ...

Page 112: ...of system data Avoid sharing the PIN to unauthorized users for data protection Figure 4 25 Remember PIN The new PIN provides access to data storage and retrieval during normal use of the Vscan Extend Incorrect PIN The Vscan Extend prompts to enter the PIN after power ON or reboot User can skip entering the PIN and continue scanning by pressing the scan symbol at the bottom of the screen see Figure...

Page 113: ...ued 1 A pop up message displays when an incorrect PIN is entered Figure 4 26 Wrong PIN 2 After 5 wrong attempts the Vscan Extend displays a pop up message to Backup data on a microSD card before the next login See Backup on page 5 42 for more information Figure 4 27 Backup data ...

Page 114: ... wrong PIN is entered a pop up message displays for every incorrect PIN entry thereafter For e g 4 3 2 1 attempt s left Figure 4 28 Remaining attempts NOTE It is highly recommended to back up data on a microSD card before the last attempt After the 10th attempt the system resets and returns to the initial screen where a new pin should be entered see Figure 4 23 on page 4 17 ...

Page 115: ...ork For Wi Fi to work on the Vscan Extend 1 Activate Wi Fi on the device 2 Connect to a specific network Activating Wi Fi To activate Wi Fi on the Vscan Extend 1 Press Menu Settings Admin Settings Figure 4 29 Admin Settings 2 Enter the Admin PIN to access advanced settings settings of the operating system See Administrator Access on page 4 15 for more information ...

Page 116: ...Vscan Extend Settings 4 22 Vscan Extend User Manual 5721203 100 Rev D Activating Wi Fi continued 3 Press Settings on the Dashboard Figure 4 30 Advanced Settings ...

Page 117: ...ght to turn ON Wi Fi 2 Press Wi Fi Figure 4 31 Menu Choose the network if you know the credentials or contact your system administration Procedure to check the MAC Address NOTE If the Wi Fi network has been configured with the MAC address press MAC Address on the Advanced Settings screen Figure 4 32 Mac address ...

Page 118: ...s Forget network MDM Installation Procedures Optional NOTE Network administrators use MDM Mobile Device Management to manage devices on the network 1 Press Google Play Store on the Dashboard screen See Configuring Wi Fi on page 4 23 for more information NOTE You will be prompted to create a new account or add an existing one Choose Add new and follow the instructions Google Play Store is now avail...

Page 119: ...721203 100 Rev D MDM Installation Procedures Optional continued 2 Install the correct MDM agent from Google Play Airwatch Mobile Iron Figure 4 34 MDM 3 View the MDM service client with the help of your IT department Figure 4 35 MDM installed ...

Page 120: ...D MDM Installation Procedures Optional continued 4 Press the Back arrow to go to Dashboard 5 Press Kiosk Settings NOTE Kiosk Settings provides access to advanced settings Figure 4 36 Kiosk Settings 6 Press Admin Console App Chooser Figure 4 37 Admin Console App Chooser ...

Page 121: ...Extend User Manual 4 27 5721203 100 Rev D MDM Installation Procedures Optional continued 7 Select the MDM Agent and press Update Figure 4 38 Select MDM Agent Figure 4 39 Update The MDM agent is listed in the Dashboard ...

Page 122: ...d Wi Fi networks and also to provide authentication to online secure servers You can get a certificate from your system administrator or download it from sites that require authentication 1 Press the icon at the bottom of the Wi Fi Screen Certificate delivery is completed using an over the air enrollment method where the certificate is delivered directly to your Vscan Extend via a browser link NOT...

Page 123: ...Press Install certificate Figure 4 41 Install certificate To complete the install you need to add the certificate to your device s security credentials Press Security on the Settings screen Select Install from phone storage to get the certificate file from the downloads folder of your device ...

Page 124: ...s Now that the certificate has been added to your device s credentials you can set the certificate name and choose Wi Fi depending on the certificate s purpose Figure 4 42 Download Certificate The certificate is successfully downloaded onto your Vscan Extend You can now choose it while connecting to a certificate based Wi Fi authentication ...

Page 125: ...Bladder Volume Lung Protocol Case Exchange and Tricefy on the Vscan Extend NOTE GE Marketplace registration is separate from device registration when activating the Vscan Extend NOTE If the email used during registration is not confirmed you need to confirm the email to access GE Marketplace Figure 4 43 Confirm email A confirmation is sent to the email address to confirm your email and set your pa...

Page 126: ...can Extend Settings 4 32 Vscan Extend User Manual 5721203 100 Rev D Installing Vscan Apps 1 Press GE Marketplace on the Settings screen Figure 4 44 GE Marketplace Figure 4 45 Connecting to GE Marketplace ...

Page 127: ... Installing Vscan Apps continued 2 List of available Vscan apps are displayed Figure 4 46 List of Vscan Apps 3 Select the App for example Bladder Volume Press Install Figure 4 47 Install app 4 The App gets downloaded and prompts you to install Press Install ...

Page 128: ... and press Update on the App for example Lung Protocol NOTE If no apps have been installed a message displays You have no apps installed yet NOTE While the apps are updating there is no loss of data The updated app requires no new permission Uninstalling Apps 1 Press Menu Settings GE Marketplace Press the App to uninstall For example Bladder volume 2 Press Uninstall Figure 4 48 Uninstall ...

Page 129: ... email address is not entered to register the Vscan Extend The following message displays The email address is not confirmed in our system Request a confirmation to be resent OR Enter a password matching the email to confirm your device Figure 4 49 Resend confirmation email Enter a valid email address A confirmation email is sent On your PC set the password Figure 4 50 Set password ...

Page 130: ...ss but the Vscan Extend is yet to be confirmed Type the registered email address and password Press Login Figure 4 51 Request for confirmation email A message displays This Vscan Extend device has been registered to your account The user account details page displays Figure 4 52 Account details Press the Back arrow and press GE Marketplace ...

Page 131: ...Extend User Manual 5 1 5721203 100 Rev D Chapter 5 Using Vscan Extend Contents Scanning on page 5 2 Measurements on page 5 24 Review and recall of stored data on page 5 26 Using Vscan Extend Apps on page 5 47 ...

Page 132: ...e 6 6 Clean the transducer see Disinfecting the probe on page 6 9 If required clean the device and the display see Disinfecting the device on page 6 7 If required disinfect the transducer see Disinfecting the probe on page 6 9 Ensure that the main unit and the transducer are properly cleaned after each use and before storing in the case WARNING If any damage is found on the transducer or its cable...

Page 133: ...rmation regarding probe care refer to the website http www3 gehealthcare com en Products Categories Ultrasound Ultrasound_Probes Select Dual Probe on Vscan and G3S Probe on Vscan from the Transducer list to get the details CAUTION If the gel comes in contact with the eye consult the gel manufacturer s instructions Table 5 1 Compatible Gels Aquasonics 100 Parker Laboratory Inc Clear Image Sonotech ...

Page 134: ...tandards on page i 3 under any operating condition described in this user manual see Environmental requirements for the device on page 3 3 To help keeping the Vscan Extend operating temperature at an optimal functional level and to ensure longer scanning time with maximum frame rate it is recommended to hold the Vscan Extend so that there is good contact between the device and the hand CAUTION For...

Page 135: ...rientation The dual probe is provided with an orientation mark and a green LED light This mark and the LED light are identifying the orientation of the probe using the fixed symbol displayed on the screen In the case of the dual probe the LED light is also indicating which probe head is active Figure 5 2 Dual probe Orientation mark phased array active 1 Orientation marking on probe 2 Orientation m...

Page 136: ...nd 5 6 Vscan Extend User Manual 5721203 100 Rev D Probe orientation continued Figure 5 3 Dual probe Orientation mark linear array active 1 Orientation marking on probe 2 Green LED light 3 Orientation marking on screen ...

Page 137: ... 2 Create New Exam from the Menu screen Press Menu Press New Exam NOTE A new exam gets created when Vscan Extend enters Standby mode and also when Vscan Extend is disconnected from a PC NOTE A new exam will not get saved only with patient details The exam will get saved when an image or video is saved for that exam NOTE It is recommended to enter patient information using alphanumeric characters ...

Page 138: ...exam is automatically saved NOTE Current exam ends only when a new exam is created Editing patient information for an exam Patient information can be entered in two ways Edit Patient on the Menu screen DICOM Retrieve patient information from DICOM modality worklist 1 Press Menu Edit Patient Figure 5 4 Edit patient details ...

Page 139: ...ls 3 Retrieve patient information from DICOM modality worklist broker See DICOM Modality Worklist Retrieve patient information from DICOM Modality Worklist broker on page 5 37 for more information 4 Retrieve the patient information from the DICOM modality worklist broker Press Save 5 Patient information also gets saved when the patient is associated with an exam with images ...

Page 140: ...Extend User Manual 5721203 100 Rev D Search Patient A patient can be searched from either My Worklist or by entering the patient name or ID 1 Press Menu Edit Patient Figure 5 6 Edit patient 2 Press Search icon Figure 5 7 Search icon ...

Page 141: ... patient name or ID in the search field 4 Find patient information on My Worklist Optional If the device is configured for DICOM depending on the configuration purchased patient information can be pulled from My Worklist Perform the exam for this patient and press Save Figure 5 8 Search patient NOTE Patient information can be modified if needed using the Edit Patient feature ...

Page 142: ... combination before scanning Table 5 2 Supported imaging modes Probe Black and white imaging Color flow G3S Phased array X Harmonic X Dual probe G3S phased array and G8L linear array X Harmonic for G3S phased array X Table 5 3 Phased array transducer in G3S and Dual Probe deep scanning presets Phased array transducer in G3S and Dual Probe deep scanning Preset Optimized for Cardiac Heart Aorta Lung...

Page 143: ...Linear transducer in Dual Probe shallow scanning Preset Optimized for Vascular Veins Arteries Soft tissue Small organs Pediatric recommended minimum weight 4 kg Musculoskeletal including Long bone Hip Knee Shoulder and Elbow Lung Thoracic Pleural motion Fluid detection Adult Cephalic Various cephalic structures Ophthalmic Ophthalmic Ophthalmic is available as an option for certain countries but is...

Page 144: ...hange the preset and probe 1 Press Menu 2 Press the on the Preset tab Figure 5 9 Menu page 3 The presets for the available probe s are displayed The preset automatically selected activates the probe for that preset Select the desired probe preset Figure 5 10 Change Preset ...

Page 145: ...re available for quick access on the Menu page To save favorites 1 Press Menu 2 Press the on the Preset tab Figure 5 11 Menu page 3 Press and hold the preset icon to select the desired favorite The icon changes to blue to indicate the saved favorite Figure 5 12 Presets favorites 1 Probe Preset Availability 2 Preset Favorites blue icon ...

Page 146: ...e Menu page displays the selected favorites Figure 5 13 Menu page NOTE Only three presets can be selected as favorites at one time Deselect a current favorite in order to add another preset as a favorite To deselect a favorite press and hold the preset icon The color of the icon changes to gray Figure 5 11 ...

Page 147: ...ging is intended to provide two dimensional images and measurement capabilities concerning the anatomical structure of soft tissue Black and white imaging is the default scanning mode Figure 5 14 Black and white scan screen NOTE As a safety precaution scanning is not possible when charging the battery ...

Page 148: ...Black and white gain increases or decreases the amount of echo information displayed in an image It may have the effect of brightening or darkening the image if sufficient echo information is generated Press the Gain icon The gain slider disappears after a few seconds Press Gain again to activate the slider Use the gain slider to increase or decrease gain Press the Gain icon again to hide the cont...

Page 149: ...ew to look at larger or deeper structures it decreases the field of view to look at structures near the skin line Press the Depth icon Use the depth slider to increase or decrease depth The depth slider disappears after a few seconds Press the Depth icon again to activate the control Press the Depth icon again to hide the depth control if needed Figure 5 16 Depth ...

Page 150: ...city and direction of fluid motion within the black and white image 1 Press the Color icon Figure 5 17 Color scan A color flow area displays on top of the black and white image 2 Press and hold the color region of interest The region of interest changes to yellow indicating it is ready to be moved within the scan area Drag the region of interest to the desired area of interest ...

Page 151: ... Extend User Manual 5 21 5721203 100 Rev D Color imaging continued 3 Press Gain to access the color gain control Figure 5 18 Color gain Color gain amplifies the overall strength of echoes processed in the color area ...

Page 152: ...negative velocity or visa versa The maximum velocity is displayed on top of the color bar Color steer Slant the ROI Region of Interest of the Color Flow linear image left or right to get more information without moving the probe Press and hold the color region of interest The region of interest changes to yellow indicating it is ready to be steered in a different direction Drag the region of inter...

Page 153: ...ty data The resulting time stamps are used for storing and playing cineloops smoothly The AutoCycle feature should typically detect heart rates in the range 46 100 beats per minute If the detected heart cycle is outside this range or if the cyclicity quality is too poor a default 2 sec loop will be used instead The detected start and stop times for the AutoCycle are not necessarily in phase with t...

Page 154: ...e and color imaging Up to eight measurements can be performed on an image Measurements can be done during image review or on recalled stored images To perform a measurement 1 On a frozen image press Measure The measurement calipers displays 2 Drag to position the calipers to obtain the desired measurement 3 To store the image with a measurement press Store Figure 5 20 Measurement ...

Page 155: ...721203 100 Rev D Taking measurements continued 4 Press Add New to make additional measurements on the displayed image Up to 8 measurements can be made on a single image Figure 5 21 Add new measurement 5 Press Delete to delete a single measurement ...

Page 156: ...quired images and videos must be stored to the microSD card See Backup on page 5 42 for more information NOTE The number of images and videos that can be stored depends on the internal memory of the device NOTE Backup data at regular intervals If backup is not performed the internal memory data can be lost and cannot be retrieved Reviewing and recalling images or videos from an exam list 1 Press M...

Page 157: ...er Manual 5 27 5721203 100 Rev D Reviewing and recalling images or videos from an exam list continued Figure 5 22 View stored images and videos NOTE Press on the image in the Exams screen Use the right left arrow to naviagte through the images videos ...

Page 158: ...ly or from an exam list Deleting individual images or videos 1 Press Menu 2 Press Exams 3 Select the Exam from which images or videos are to be deleted 4 Press Delete 5 Select the images or videos to be deleted Figure 5 23 Images to be deleted 6 Press Delete to delete the images OR 7 Press Cancel to cancel deletion Figure 5 24 Delete or cancel ...

Page 159: ... Extend User Manual 5 29 5721203 100 Rev D Delete images from an exam list 1 Press Menu 2 Press Exams 3 Select the exam from the list Figure 5 25 Images to be deleted 4 Press Delete to delete the images OR 5 Press Cancel to cancel deletion ...

Page 160: ... can be generated using these audit logs The audit logs capture the following information 1 Device Start Shut down time 2 Incorrect password attempts 3 Additions and modifications to system configuration including DICOM connection Windows Share connection Wi Fi connection and security details SSID Network disconnect connect timings Application software install uninstall upgrade Registration of par...

Page 161: ...ernal memory can be exported to a PC with a USB cable The folder and file names start with the device ID serial number then exam ID and NNNNN The folder structure looks like Archive EEEEEEE XXXXXXX EEEEEE NNNNN XXXXXXX mpg Archive EEEEEEE XXXXXXX EEEEEE NNNNN XXXXXXX jpg where EEEEEEE is the device ID XXXXXX is the exam ID NNNNN is the file number in the folder The files file names and folder name...

Page 162: ...NOTE All the required fields need to be entered 3 Press Verify A Verify OK message displays 4 Create a shared folder on the PC and provide the credentials and domain name 5 Provide access to users who need access to the shared folder NOTE Windows Share can also be added as a favorite and can be deleted as a favorite NOTE Share option is enabled only when any one of the fields in the patient detail...

Page 163: ... Share images 1 Press Menu on the scan screen 2 Press Exams to be exported 3 Press Upload Selected 4 Select the created Windows Share destination The exported folder is as as shown in the Figure 5 27 below Figure 5 27 Exported image folder Figure 5 28 Images inside the exam folder ...

Page 164: ... 5 34 Vscan Extend User Manual 5721203 100 Rev D Share images continued 5 If the exported image does not get transferred to the PC or if the transfer fails a red icon appears next to the image Figure 5 29 Transfer failed ...

Page 165: ...User Manual 5 35 5721203 100 Rev D Device Status To monitor control DICOM and Windows share jobs press Settings Device Status The exam screen displays the job status which range from in progress success failed not started Figure 5 30 Device Status ...

Page 166: ...e information Modality Worklist Store DICOM users can use 1 DICOM Modality Worklist Retrieve patient information from DICOM modality worklist broker 2 Add patient identifying information to exam manually selecting from modality worklist 3 DICOM Store Export DICOM images from Vscan Extend to the DICOM image server DICOM modality worklist server To configure the DICOM modality worklist server See Co...

Page 167: ... download and refresh a DICOM modality worklist An exam can be linked to an existing patient pulled from the worklist prior to exporting to the DICOM image server NOTE It is not necessary to refresh the modality worklist for each exam NOTE When data is accessed for the first time the device prompts for a PIN enter the pin for security purposes 1 Press Menu Worklist Figure 5 31 Worklist ...

Page 168: ...ist Retrieve patient information from DICOM Modality Worklist broker continued 2 Press Refresh to download Worklist entries Figure 5 32 Refresh Worklist NOTE It is not be possible to change the following DICOM attributes received from worklist Patient Name Patient ID and Accession Number ...

Page 169: ...ID is linked to the exam This is required before exporting images or videos See Patient examination on page 5 7 for more information 1 Press Menu Exams Figure 5 33 Exams 2 Press the Export icon Figure 5 34 Export NOTE Individual images from an exam or an entire exam can be selected for export NOTE At least one of the required fields in patient details need to be filled in before export is enabled ...

Page 170: ...ages from Vscan Extend to DICOM image server continued 3 If more than one storage destination is configured select the desired destination Figure 5 35 Choose destination 4 Press Upload Selected to export the exam Figure 5 36 Upload selected exam The selected exam s are exported to the DICOM server ...

Page 171: ...id not attempt to export an image no icon displays next to the image NOTE To refresh the screen to see the current status exit the page and return to the same page Figure 5 37 Transfer failed All still images can be sent to the DICOM image server Videos may be sent to the DICOM image server only if Enable MultiFrame DICOM is selected in the DICOM server configuration Up to 100 images can be export...

Page 172: ...kup For example 1000 videos in 50 to 60 exams takes approximately 14 minutes to back up to the microSD card To backup patient data 1 Power OFF the Vscan Extend 2 Remove the Battery See Inserting removing the battery on page 3 20 for more information Remove the microSD card containing the log files from the device and insert a blank microSD card 3 Remove the microSD card containing the log files fr...

Page 173: ... 5 A pop up displays Figure 5 39 Backup data message Press Allow to initiate backup OR Cancel to stop the backup process 6 If the backup process is successful the patient exam logs and configuration data are backed up on the microSD card The following message displays Figure 5 40 Backup successful ...

Page 174: ...le memory on the microSD card is less than 50 when initiating backup the process fails Retry backup If still unsuccessful insert a new microSD card and try again 7 After backup is complete power OFF the Vscan Extend Remove the battery Remove the backup microSD card and store in a safe place 8 Insert the original microSD card containing the error logs into the device Power ON the Vscan Extend ...

Page 175: ... microSD card 3 Remove the microSD card containing the log files from the device and insert the microSD card with the backed up data See Figure 6 3 on page 6 12 to insert the SD card 4 Press Menu Settings Restore Figure 5 42 Restore CAUTION The restore procedure overwrites the existing data on the Vscan Extend When restoring previously backed up patient data you must first backup the current patie...

Page 176: ...e device If the restore procedure fails a pop up displays Figure 5 44 Restore failed If the microSD card does not contain any patient details to restore a pop up displays The system automatically shuts down Figure 5 45 Power off 7 After restore is complete power OFF the Vscan Extend Remove the battery Remove the backup microSD card and store in a safe place The data is still retained on the microS...

Page 177: ...an Extend Bladder Volume Lung Protocol Tricefy Uplink Bladder Volume The Bladder Volume App calculates the bladder volume using 3 distance measurements from two orthogonal images transverse and sagittal Two distances are taken from the transverse image and one distance from the sagittal image at the widest points to calculate the bladder volume ...

Page 178: ...ing the Bladder Volume application 1 Press Menu Settings GE Marketplace Figure 5 46 GE Marketplace A list of available apps displays 2 Press Bladder Volume App to view details 3 Press Install See Installing Vscan Apps on page 4 32 for more information The Bladder app installs ...

Page 179: ... 49 5721203 100 Rev D Bladder Volume settings 1 Press App Settings from the Settings menu A pop up displays Figure 5 47 Bladder Volume app settings 2 Press on the desired formula Figure 5 48 Bladder volume formula 0 7 x D1 x D2 x D3 0 52 x D1 x D2 x D3 ...

Page 180: ... is active Live image is frozen The Bladder Volume App runs an algorithm on the currently displayed image frame finding the widest points on the bladder contour and placing the measurement calipers at these widest points 1 On the scanned transverse image press to Freeze The Bladder Volume App icon displays at the bottom of the screen Figure 5 49 Bladder App icon 2 Scroll to select a suitable frame...

Page 181: ...Bladder icon to start the bladder measurement The measurement cursors appear to perform the measurement The widest points D1 and D2 in a transverse image are perpendicular to each other Figure 5 50 Transverse NOTE The Transverse Measure screen is displayed by default 1 D1 Longitudinal maximum length 2 D2 AP diameter ...

Page 182: ...ust the measurement calipers manually if required 5 Press Store The screen enters sagittal capture 6 Press to Freeze Scroll to select the best frame 7 Press Measure Frame Figure 5 51 Measure Frame The image along with the measurement values and volume displays Figure 5 52 Measurement values 8 Press Store ...

Page 183: ...nnot be used on stored images in the gallery NOTE If a sagittal image is acquired first and the step needs to be changed to sagittal press the Sagittal toggle button Figure 5 53 Toggle button Exiting Bladder Volume 1 Press Close to exit the Bladder Volume App Figure 5 54 Exit Bladder Volume App A pop up displays for confirmation 2 Press Quit to exit the Bladder Volume app 3 Press Cancel to continu...

Page 184: ...images 3 Helps to calculate a total lung score 4 Generates a simple report at the end of the exam Installing the Lung Protocol application 1 Press Menu Settings GE Marketplace A list of available apps displays 2 Press Lung Protocol to view details 3 Press Install The Lung Protocol app installs Lung Protocol settings 1 Press Start a protocol on the Menu screen 2 Press the Lung Protocols Settings ic...

Page 185: ...ys Figure 5 56 Settings The Settings menu has the following functions choose the number of segments to be scanned choose the type of assessment enter the Help mode Number of segments Three different configurations are available for the number of segments Press on the radio button to choose any one of the following 4 x 2 7 x 2 6 x 2 ...

Page 186: ...is required to guide the user through the Lung Protocol Swipe from left to right to turn ON the Help mode on the Lung Protocol Settings menu See Figure 5 56 on page 5 55 Help mode assists in the following Skip when you enter the next segment swipe from right to left to skip the current segment Next swipe from right to left to enter the next segment When multiple images are scored in the same segme...

Page 187: ...en Figure 5 57 Back arrow 4 Press Lung Protocol to start using the lung protocol NOTE The settings are automatically saved If the settings need to be changed stop the current protocol on the menu screen and modify the current settings on the Settings menu Using Lung Protocol 1 Press Menu 2 Press Start a protocol 3 Press Lung Protocol Figure 5 58 Lung protocol ...

Page 188: ...gment for example 1R to 2R where 1R is the first segment of the right lung Similarly 1L is the first segment of the left lung OR Swipe from left to right to move to the previous segment The number of segments that can be scored depends on the number of segments selected on the Settings menu NOTE The user is able to store multiple images per segment Only the latest saved image for a particular segm...

Page 189: ...Score to score the images Choose the score for each segment OR Press Go Back to acquire more images Depending on the type of assessment chosen on the Lung Protocol Settings menu either Quantitative or Qualitative assessment scores are displayed Both the screens are shown below Figure 5 62 Quantitative and Qualitative Scores NOTE It is not mandatory to score all images 1 Quantitative 2 Qualitative ...

Page 190: ...m right to left to enter the report screen The report shows the current patient name patient ID and total lung score Figure 5 63 Quantitative report Figure 5 64 Qualitative report Press Save to save the report The report is stored with all the images and videos from the gallery Press Exams on the Menu screen to view the images and the report ...

Page 191: ... Vscan Extend User Manual 5 61 5721203 100 Rev D Exit Lung Protocol 1 Press Menu on the Lung protocol screen 2 Press Stop current protocol A pop up displays Figure 5 65 Stop current protocol 3 Press Exit to stop the protocol ...

Page 192: ...100 Rev D Tricefy Tricefy Uplink helps to upload exams to the cloud 1 Press Menu Settings GE Marketplace 2 Press Install The Tricefy Uplink app installs Using Tricefy 1 Press Menu Settings Server Settings 2 Press Tricey under Image Server Figure 5 66 Tricefy ...

Page 193: ...Rev D Using Tricefy continued 3 Enter your email address to register for Tricefy and press Activate OR if you have a Tricefy login enter that address and press Login Figure 5 67 Tricefy Activate or login 4 Press Add Server and Verify Figure 5 68 Add Ticefy and Verify ...

Page 194: ...tend User Manual 5721203 100 Rev D Using Tricefy continued 5 Press Menu Export icon Figure 5 69 Export 6 Press Upload Selected to export the exam Figure 5 70 Upload selected exam The selected exam s are exported to the Tricefy server ...

Page 195: ... Extend User Manual 6 1 5721203 100 Rev D Chapter 6 Vscan Extend Maintenance Contents System care and maintenance on page 6 2 Inspection on page 6 3 Upgrade software on page 6 12 Troubleshooting on page 6 14 ...

Page 196: ...e recommend that the following procedures be observed as part of the customer s internal routine maintenance program CAUTION The user must ensure that safety inspections are performed at least every 12 months according to the requirements of the patient safety standard EN ES IEC 60601 1 and its national deviations or according to the requirements of the IEC62353 standard medical electrical equipme...

Page 197: ...ire length of electrical cables for cuts or abrasions Equipment for cracks loose or missing hardware Before each use 1 Inspect the lens the probe housing and the cable 2 Look for damage that might allow liquid into the probe 3 Test the functionality of the probe CAUTION If any defects or damages are found on the control unit the probe or its cable DO NOT use the Vscan Extend Contact GE service WAR...

Page 198: ...cy After Each Use Inspect the transducer see Inspecting the Vscan Extend on page 6 3 Clean the transducer see Disinfecting the probe on page 6 9 If required clean the device and the display see Disinfecting the device on page 6 7 If required disinfect the transducer see Disinfecting the probe on page 6 9 Ensure that the main unit and the transducer are properly cleaned after each use and before st...

Page 199: ...nzene abrasive cleaners or other strong solvents as these may cause damage to the Vscan Extend Do not soak or saturate probes with solutions containing bleach ammonium chloride compounds or hydrogen peroxide Special accessories Special accessories are not applicable Point of Use Processing No point of use processing is required prior to cleaning ...

Page 200: ... Wipe the inside of the door with a soft cloth moistened with a mild general purpose non abrasive soap and water solution 3 Wipe dry with a soft cloth Figure 6 1 Open the USB door Method of cleaning Manual CAUTION Avoid any liquid making contact with the internal device components including the micro USB connector and battery terminal contacts which are not designed for making contact with liquids...

Page 201: ... disease transmission liquid chemical germicides must also be selected to minimize potential damage to the probe NOTE Refer to the cleaning agent labeling for preparation and use instructions NOTE Follow the manufacturer s instructions for storage use and disposal of the disinfection solution NOTE No special accessories are required for disinfection Table 6 1 Germicides PI Spray Pharmaceutical Inn...

Page 202: ... order to disinfect the precleaned surface Repeated use of the product may be required to ensure that the surface remains visibly wet for 3 minutes at room temperature 20 degrees Sani Cloth HB 1 Use one Sani Cloth HB towelette to completely preclean the surface of the device probe and cable 2 Ensure that no debris and bioburden are left behind 3 Discard used towelette 4 Use a second Sani Cloth HB ...

Page 203: ...ials used in the transducer housing cable and lens Although a necessary step in protecting patients and employees from disease transmission liquid chemical germicides must also be selected to minimize potential damage to the probe Refer to the internet link below for the latest list of compatible cleaning solutions and disinfectants http www3 gehealthcare com en Products Categories Ultrasound Ultr...

Page 204: ...in order to achieve the desired effect Rinse the part of the probe which is in contact with the germicide according to the germicide manufacturer s instructions Wipe dry with a soft towel 1 Maximum saline level 2 Minimum saline level a Linear array transducer b Phased array transducer c G3S probe WARNING Use additional precautions e g gloves and gown when decontaminating an infected probe The prob...

Page 205: ...required WARNING CREUTZFELDT JAKOB DISEASE This device is not indicated for neurological use Neurological contact on patients with this disease MUST BE avoided If a device probe becomes contaminated there is no adequate means to disinfect it In this case the contaminated device probe MUST BE discarded in accordance with local biologic waste hazard procedures Biological Hazard ...

Page 206: ...NOTE Before proceeding with the upgrade ensure that the battery is fully charged and the charger is plugged in To perform a software upgrade 1 Remove the battery See To remove the battery on page 3 20 for more information 2 Remove the microSD card that captures the error log files from the device lightly push the SD card holder and pull out the SD card 3 Insert the application software microSD car...

Page 207: ...are version is New software version is 7 Press OK to proceed with the upgrade NOTE You cannot upgrade the Scanner software to a software version lower than the currently installed software If you try to do so a message displays Not allowed to proceed The Vscan Extend may have security patches which need an update WARNING GE is not responsible for any virus affecting the Vscan Extend device which m...

Page 208: ...Contact GE Service see page 1 10 Broken battery connection Contact GE Service see page 1 10 Defective AC adapter or charger Contact GE Service see page 1 10 Mains power is down Temperature is outside the specified limits Ensure the ambient temperature is within the specified limits see Environmental requirements for the device on page 3 3 Display screen is blank when the device is powered on Conne...

Page 209: ...in the operating temperature of the Vscan Extend at an optimal functional level it is recommended to hold the Vscan Extend so there is good contact between the device and the hand This will also ensure a longer scanning time with maximum frame rate Vscan Extend is not entering the scan screen and stays on the GE start up screen Battery may not have sufficient charge Charge the Vscan Extend battery...

Page 210: ... critical WARNING System is overheating and will shut down If the problem persists contact GE service WARNING Probe is overheating and the system will shut down If the problem persists contact GE service WARNING Battery is critically low or below 15 Plug in charger WARNING System voltage is at critical level and will shut down If the problem persists contact GE service ...

Page 211: ...form system backup Scanning not allowed WARNING Unable to connect Check Wi Fi connection WARNING Check battery and recharge the system If the problem persists contact GE service WARNING System internal memory usage is 50 to 60 Perform system backup WARNING Scanning is not allowed when AC is connected WARNING Scanning is not allowed when connected to a PC ...

Page 212: ...Vscan Extend Maintenance 6 18 Vscan Extend User Manual 5721203 100 Rev D ...

Page 213: ...Vscan Extend User Manual 7 1 5721203 100 Rev D Chapter 7 Appendix Contents Specifications on page 7 2 Acoustic Output Reporting Tables on page 7 3 Measurement accuracy on page 7 12 ...

Page 214: ...eight including cable 85g Dual probe Weight including cable 120g Phased array transducer for deep scanning Field of view for black and white imaging up to 70 degrees with maximum depth of 24 cm The color flow sector represents blood flow within an angle of 40 degrees Broad bandwidth sector probe from 1 7 to 3 8 MHz Footprint 13 x 19 mm Linear transducer for shallow scanning Field of view for black...

Page 215: ...2db Output Beam Area Active aperture area Normalizing Coefficient Equivalent Aperture Diameter same Pulse Beam Width Beam diameter at 6 dB Equivalent Beam Diameter Acoustic Working Frequency Center frequency Pulse Average Intensity Attenuated Pulse Average Intensity Pulse Intensity Integral Attenuated Pulse Intensity Integral Temporal Average Intensity Attenuated Temporal Average Intensity at dept...

Page 216: ...on Rate Pulse repetition frequency Thermal Index same Bone Thermal Index same Cranial Bone Thermal Index same Soft Tissue Thermal Index same Pulse Duration same 12 dB Output Beam Dimensions same Distance from the Source to a Specified Point same Depth for TIB Depth at which the relevant index is maximum Break Point Depth same Depth for TIS Depth at which the relevant index is maximum Table 7 1 Def...

Page 217: ...ating mode b This probe is not intended for transcranial or neonatal cephalic uses If so the table entries are replaced by a meaning no data are provided for this operating condition since the maximum reported value is not reported for the reason listed If neither an index or a footnote is given this means that the index is irrelevant for this probe mode combination Operating Conditions All table ...

Page 218: ...Vscan Extend User Manual 5721203 100 Rev D Acoustic Output Reporting Tables for Track 3 EN IEC 60601 2 37 Dual Probe Phased array transducer Operating Mode black white Figure 7 1 Phased array transducer black white ...

Page 219: ...ustic Output Reporting Tables Vscan Extend User Manual 7 7 5721203 100 Rev D Dual Probe Phased array transducer Operating Mode black white and color Figure 7 2 Phased array transducer black white and color ...

Page 220: ...Appendix 7 8 Vscan Extend User Manual 5721203 100 Rev D Dual Probe Linear array transducer Operating Mode black white Figure 7 3 Linear array transducer black white ...

Page 221: ...ustic Output Reporting Tables Vscan Extend User Manual 7 9 5721203 100 Rev D Dual Probe Linear array transducer Operating Mode black white and color Figure 7 4 Linear array transducer black white and color ...

Page 222: ...Appendix 7 10 Vscan Extend User Manual 5721203 100 Rev D Sector probe Phased array transducer G3S Operating Mode black white Figure 7 5 Phased array transducer black white ...

Page 223: ...ic Output Reporting Tables Vscan Extend User Manual 7 11 5721203 100 Rev D Sector probe Phased array transducer G3S Operating Mode black white and color Figure 7 6 Phased array transduce black white and color ...

Page 224: ...e equipment that includes routine accuracy checks with tissue mimicking phantoms Please be advised that all distance and Doppler related measurements through tissue are dependent upon the propagation velocity of sound within the tissue The propagation velocity usually varies with the type of tissue but an average velocity for soft tissue is assumed This equipment is designed for and the accuracy s...

Page 225: ...nual 7 13 5721203 100 Rev D Speed of Sound in Tissue The average value 1540 meters second is used for all calculations Depending on the tissue structures this generalization may give errors from 2 typical to 5 much fatty tissue layers present ...

Page 226: ...Appendix 7 14 Vscan Extend User Manual 5721203 100 Rev D ...

Page 227: ... and Security Contents Introduction on page 8 2 Privacy and Security Environment on page 8 3 Privacy and Security Capabilities on page 8 3 Network Connectivity on page 8 6 Information Protection on page 8 9 Personal Information Collected by the Product on page 8 17 ...

Page 228: ...system and information from risks to confidentiality integrity and availability Security protects Privacy but also protects more broadly against these risks Privacy requires security In Healthcare one must balance privacy security and safety Most of the time there isn t a conflict between these three domains of risk The healthcare provider organization is encouraged to use risk management procedur...

Page 229: ...e securely erased and or the media should be securely deleted 5 The display of the Vscan Extend should be placed in a way limiting the visibility to the user only Privacy and Security Capabilities The GE Healthcare Vscan Extend incorporates a broad assortment of capabilities to enable Privacy and Security This section describes the capability and use of these Privacy and Security capabilities Acce...

Page 230: ... used to change the System level configuration A user can access the Admin mode by entering the Admin PIN Patient Privacy Consent Management Patient Privacy Consent Management is the process to support the patient to express their privacy requirements This is different from other forms of consent such as the consent to treat There is no integrated functionality in the system for Patient Privacy Co...

Page 231: ...n addition deletion modification reviewed excluding the PC connect scenario f Details of applications used Bladder app Lung protocol etc 5 Data Export a Data export Date Time including end point and Wi Fi SSID information b Data Backup Restore detail 6 Invalid Device PIN attempt 7 Kiosk admin mode login success and failure Management of Audit logs Back up of audit logs Back up of audit logs can be...

Page 232: ...are 3 Image Video storage via the JPG MPEG feature System interconnections The figure below shows the possible interconnections for the Vscan Extend Ultrasound system For a particular installation typically a subset of the interconnections is utilized Figure 8 1 Vscan Extend network diagram 1 GE Health Cloud 2 Hospital Public Wireless infrastructure 3 Vscan Extend Device 4 Hospital Clinical Networ...

Page 233: ...al public wireless service that are used for GE cloud connectivity to push the data using SSL TLS The table below describes interconnections in more detail For details regarding protocols port numbers and firewall configurations see Inbound firewall configuration on page 8 10 Outbound firewall configuration on page 8 11 Table 8 1 Interconnections Source destination Network service Description PACS...

Page 234: ...Requirements Host Characteristic 1 TCP IP network 2 Both DHCP and static IP allocation are supported Network Protocols Wireless network protocols The following wireless protocols are supported 1 IEEE 802 11b 2 IEEE 802 11g 3 IEEE 802 11n Internet Protocol Version 1 IPv4 2 IPv6 ...

Page 235: ... a single security safeguard will allow compromise of the system Network Security GE strongly recommends that medical information systems are operated in a secure network environment that is protected from unauthorized intrusion There are many effective techniques for isolating and protecting medical information systems including implementing firewall protection demilitarized zones DMZs Virtual Lo...

Page 236: ...e describes the suggested configuration of the network infrastructure regarding the different network services Table 8 2 Inbound Firewall configuration Local port Remote port Protocol Programs Recommended configuration of network infrastructure Network service 1041 Any TCP All Open to DICOM server s connected to the Vscan Extend but only if DICOM Retrieve is used Closed towards internet DICOM Retr...

Page 237: ...ended configuration of network infrastructure Network service Any 1042 TCP DICOM Open to DICOM server s connected to the Vscan Extend Closed towards internet DICOM store Any 1043 TCP DICOM Open to DICOM server s connected to the Vscan Extend but only if DICOM Query is used Closed towards internet DICOM Query Any 1044 TCP DICOM Open to DICOM server s connected to the Vscan Extend but only if DICOM ...

Page 238: ...lly from the system The Vscan Extend Ultrasound system s internal firewall has exemptions for ports used by the defined DICOM dataflows in the system Defining a new DICOM dataflow or changing an existing dataflow will cause the internal firewall configuration to automatically change This ensures that only ports configured for a dataflow have an exemption in the internal firewall Windows share Wind...

Page 239: ...ypted on the media The storage device and the content on the storage device must be physically protected and handled according to applicable regulations and guidelines for handling personal information PI protected health information PHI Data can also be exported through a USB cable to a PC Only the images or videos will be exported The patient information will not be displayed Removable media on ...

Page 240: ...uthorized intrusion External dataflows The Vscan Extend supports interconnections to external storage systems This includes connections to Remote Archives Windows Share and DICOM servers The security of data stored on these systems must be secure d on the external storage system outside the scope of the Vscan Extend Ultrasound system Data Integrity Capabilities To ensure the integrity of any softw...

Page 241: ...M PACS server See System interconnections on page 8 6 for more information Securing data on Local Archive and Local Archive Shared If local archive is used backup and or transfer procedures must be established for the local archive If disk management is not performed within a pre defined period a warning message displays Securing data on Remote Archive and DICOM PACS servers If external archive is...

Page 242: ...system Linux on the Vscan Extend Ultrasound system Hence the users will have no access to internet web browsing e mail clients installing any software on the system nor adding files except for application related files through the application Android features controlled Android operating system is controlled through an Admin PIN The user does not have access to the Android system Vscan Extend oper...

Page 243: ...user management is also stored on the system The following types of information are collected for the purposes of patient medical diagnosis user management audit logging and or debug logging 1 Patient demographics 2 Medical diagnostics and measurements 3 Ultrasound images 4 Facility information 5 Provider information 6 Device data Patient information collected is either entered manually by the use...

Page 244: ...llation The user should limit the collect of PI to what is really needed Only PI required for the purpose of treatment or healthcare operations should be collected Even though the Vscan Extend supports PI collection for treatment or healthcare operaitons the system might support collection of more data than is needed for a particular installation Limit the PI collection to the content needed The u...

Page 245: ...information Retention and destruction of patient data The information collected is stored on the system until it is manually removed Requirements and policies for limited collection and or destruction of Patient Information on the system must be implemented by establishing appropriate procedures There is no support for such functionality in the system Retention and destruction of user information ...

Page 246: ...llection use and disclosure of PI PHI There is no support for such functionality in the system Such requirements can only be implemented by operational procedures Information to individuals of collection use and disclosure of PI PHI Some users of the Vscan Extend may have certain requirements and policies to inform individuals patients about the collection use and disclosure of PI PHI There is no ...

Page 247: ...mation or patient data 3 Corruption of images or other exam information or patient data Warning In addition to the hazardous situations identified above connection of the Vscan Extend to a network that includes other equipment could result in other unidentified risks to patients operators or third parties The responsible organization should identify analyze evaluate and control these risks on an o...

Page 248: ...Privacy and Security 8 22 Vscan Extend User Manual 5721203 100 Rev D ...

Page 249: ...nt option 3 11 I Indication for use 1 4 1 5 Information Requesting 1 10 Inspection 6 3 L Lung Protocol Lung Protocol 5 54 M Measurements 5 24 P Package contents 3 2 Patient examination 5 7 Power on off 3 22 Preparing Vscan ExtendTM for Use 3 1 Probe and Presets 5 12 R Regulatory Requirements i 3 Review and recall of stored data 5 26 S Safety Acoustic output 2 19 Device labels and symbols 2 25 Elec...

Page 250: ...Index 2 Vscan Extend User Manual 5721203 100 Rev D USB export 5 31 Using Vscan Extend 5 1 V Voltage requirements 3 17 Vscan Extend Battery 3 15 Vscan Extend Maintenance 6 1 Vscan Extend Settings 4 1 ...

Page 251: ......

Reviews: