3-60
F650 Digital Bay Controller
GEK-106310AE
3.2 HUMAN MACHINE INTERFACE (HMI)
3 HUMAN INTERFACES. SETTINGS & ACTUAL VALUES
3
3.2.6.7 CHANGE SETTINGS
To enter this menu press the enter/shuttle key when the option “Change Settings” is selected in main menu. A secondary
level will be displayed with different sublevels as shown on Table 3.34: or Table 3.35:. Press up-down key or rotating the
shuttle key, (left for moving up and right for moving down) select the next level to be displayed, press the enter/shuttle key
again to enter in next level and press ESC key to return to previous level if desired. This navigation will be performed the
same for all the menus in "Change Settings". Once the last sublevel is reached, move up and down to visualize the settings
selected.
To change a particular setting, press the enter/shuttle key on the setting to be modified. After selecting the setting, the value
for that setting will appear between brackets. Choose the new value moving up and down . After selecting the appropriate
value press again the enter/shuttle key to fix that value. To save the new settings, go to the end of the menu pressing down
key or
rotating the shuttle key right, and select the menu “Press Enter to save settings”. When pressing the shuttle key
inside this menu the new settings will be saved.
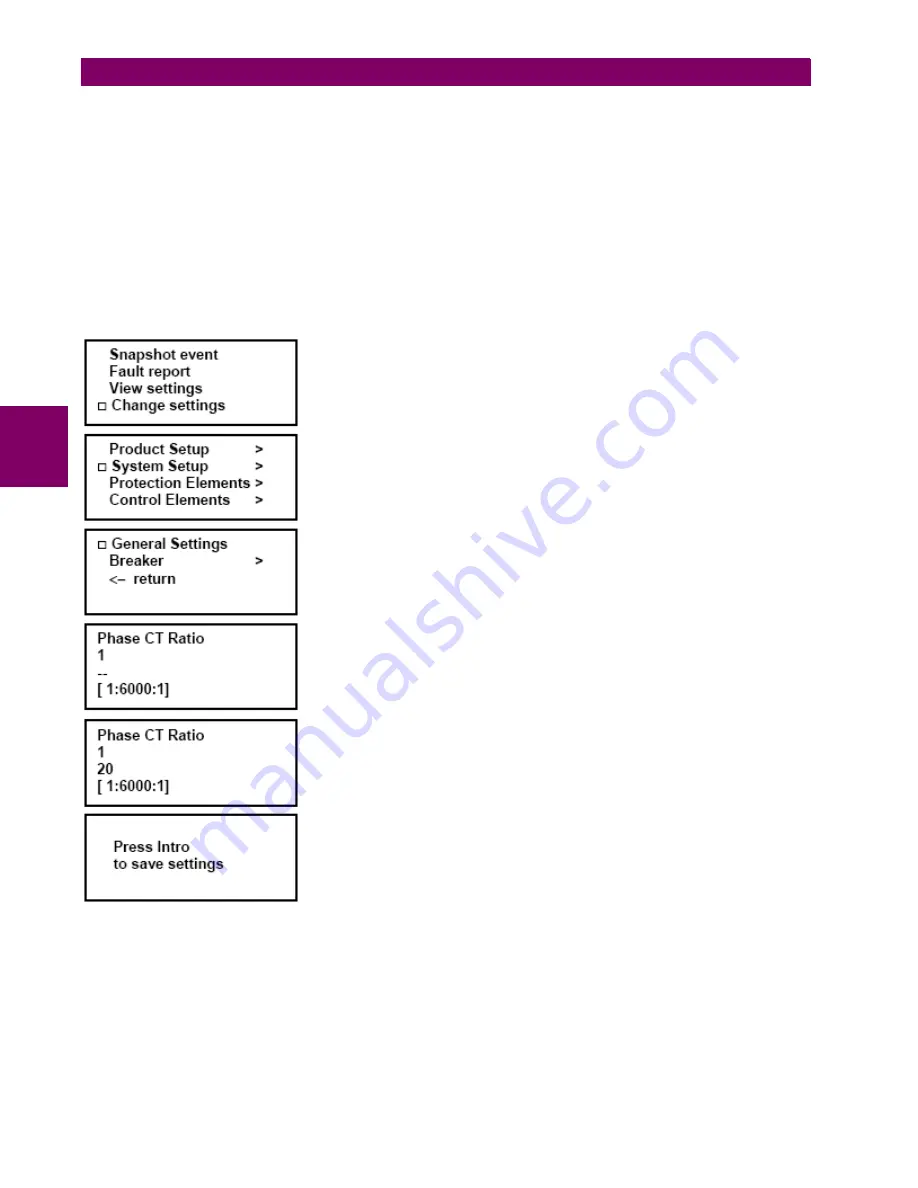
Select the menu Change settings and press the enter/shuttle key to enter in the next
sublevel.
If there is more than one sublevel, select the next sublevel by pressing the up-down
keys or rotating and pressing the enter/shuttle key till the last level is reached.
Press the enter/shuttle key in the function to be modified
-> Group of settings
-> Setting to be modified
-> Value
-> Range and step
Pressing the enter/shuttle key, value appears between brackets and can be modified
pressing the up-down keys or
rotating the shuttle key. Pressing again the enter/
shuttle key, the new value will be accepted.
Once all settings inside the group have been modified, go to the last screen pressing
the down key or
rotating the shuttle key and press Enter. At this moment of time, the
new settings will be active in the relay.
Figure 3–27: CHANGE SETTINGS PROCEDURE IN HMI
Summary of Contents for Multilin F650
Page 66: ...2 38 F650 Digital Bay Controller GEK 113000AE 2 6 EXTERNAL CONNECTIONS 2 PRODUCT DESCRIPTION 2...
Page 210: ...6 28 F650 Digital Bay Controller GEK 113000AE 6 18 THERMAL IMAGE ELEMENT 49 6 COMMISSIONING 6...
Page 256: ...A 36 F650 Digital Bay Controller GEK 113000AE A 1 LOGIC OPERANDS APPENDIX A A...
Page 270: ...B 14 F650 Digital Bay Controller GEK 113000AE B 3 LINK LOSS ALERT LLA APPENDIX B B...
Page 272: ...GEK 113000AE F650 Digital Bay Controller C 2 APPENDIX C C 1 FACTORY DEFAULT LOGIC C...
Page 273: ...GEK 113000AE F650 Digital Bay Controller C 3 APPENDIX C C 1 FACTORY DEFAULT LOGIC C...
Page 275: ...GEK 113000AE F650 Digital Bay Controller C 5 APPENDIX C C 1 FACTORY DEFAULT LOGIC C...
Page 276: ...GEK 113000AE F650 Digital Bay Controller C 6 APPENDIX C C 1 FACTORY DEFAULT LOGIC C...
Page 279: ...GEK 113000AE F650 Digital Bay Controller C 9 APPENDIX C C 1 FACTORY DEFAULT LOGIC C...
Page 280: ...GEK 113000AE F650 Digital Bay Controller C 10 APPENDIX C C 1 FACTORY DEFAULT LOGIC C...
Page 281: ...GEK 113000AE F650 Digital Bay Controller C 11 APPENDIX C C 1 FACTORY DEFAULT LOGIC C...


