5-12
Dash Port 2 Docking Station
Revision A
2000966-138
Troubleshooting: Troubleshooting Procedures
No picture appears on the remote display
and the following conditions apply:
The remote display’s illuminated LED
is amber.
The docking station’s communication
indicator is either illuminated green
OR is NOT illuminated at all.
The docking station or the monitor is
defective.
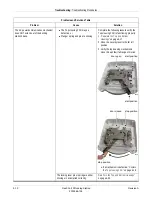
1. Remove the monitor from the docking
station.
2. Manually depress the locking lever pin
and slide the security lever to the far left
position.
3. Verify the AC power/communication
mechanism extends out of the docking
station’s base and locks into position.
4. If the AC power/communication
mechanism does NOT extend out of the
docking station’s base, see
power/communication mechanism does
NOT extend out of the docking station’s
base.”
5. If the AC power/communication
mechanism extends out of the docking
station’s base, then complete the
following tasks.
a. Replace the docking station with a
known good docking station.
b. If a picture appears on the remote
display, then replace the PCB in the
defective docking station. See
“Replace the Connector Assembly
FRU or PCB FRU”
c. If a picture still does NOT appear on
the remote display, replace the
monitor.
The security lever is already in the central
position BEFORE the monitor has been
placed on the docking station.
The locking mechanism may have been
accidentally activated before the monitor
was placed on the docking station.
1. Remove the monitor.
2. Re-set the docking station’s locking
mechanism by moving the security lever
to the unlock (far right) position.
The security lever doesn’t move to the
central position when the monitor has been
placed on the docking station.
The monitor’s footpad and/or GCX plate
may have been removed. Without both
components, the monitor WILL NOT safely
or correctly function with the docking
station.
Replace the missing footpad and/or GCX
plate. See the Dash Patient Monitor’s
Service Manual.
Cables or other objects may be preventing
the monitor from activating the locking
mechanism.
Verify the docking station’s base is free of
objects.
The monitor might not be positioned
correctly on the docking station to activate
the locking mechanism.
Remove and re-position the monitor.
The Top Assembly FRU has failed.
Problems and Solutions Table
Problem
Cause
Solution
Summary of Contents for Dash Port 2
Page 1: ...Dash Port 2 Docking Station Service Manual 2000966 138 RevisionA ...
Page 7: ...Revision A Dash Port 2 Docking Station 1 1 2000966 138 1 Introduction ...
Page 8: ...1 2 Dash Port 2 Docking Station Revision A 2000966 138 For your notes ...
Page 15: ...Revision A Dash Port 2 Docking Station 2 1 2000966 138 2 Equipment Overview ...
Page 16: ...2 2 Dash Port 2 Docking Station Revision A 2000966 138 For your notes ...
Page 27: ...Revision A Dash Port 2 Docking Station 3 1 2000966 138 3 Installation ...
Page 28: ...3 2 Dash Port 2 Docking Station Revision A 2000966 138 For your notes ...
Page 41: ...Revision A Dash Port 2 Docking Station 4 1 2000966 138 4 Maintenance ...
Page 42: ...4 2 Dash Port 2 Docking Station Revision A 2000966 138 For your notes ...
Page 59: ...Revision A Dash Port 2 Docking Station 5 1 2000966 138 5 Troubleshooting ...
Page 60: ...5 2 Dash Port 2 Docking Station Revision A 2000966 138 For your notes ...
Page 73: ...Revision A Dash Port 2 Docking Station 6 1 2000966 138 6 Part Lists Drawings and Replacement ...
Page 74: ...6 2 Dash Port 2 Docking Station Revision A 2000966 138 For your notes ...
Page 100: ...A 2 Dash Port 2 Docking Station Revision A 2012659 002 For your notes ...
Page 103: ...Revision A Dash Port 2 Docking Station B 1 2012659 002 B Appendix B Remote Display ...
Page 104: ...B 2 Dash Port 2 Docking Station Revision A 2012659 002 For your notes ...
Page 107: ... ...


