background image

Revision C

CASE

12-49

2060290-201

System Configuration

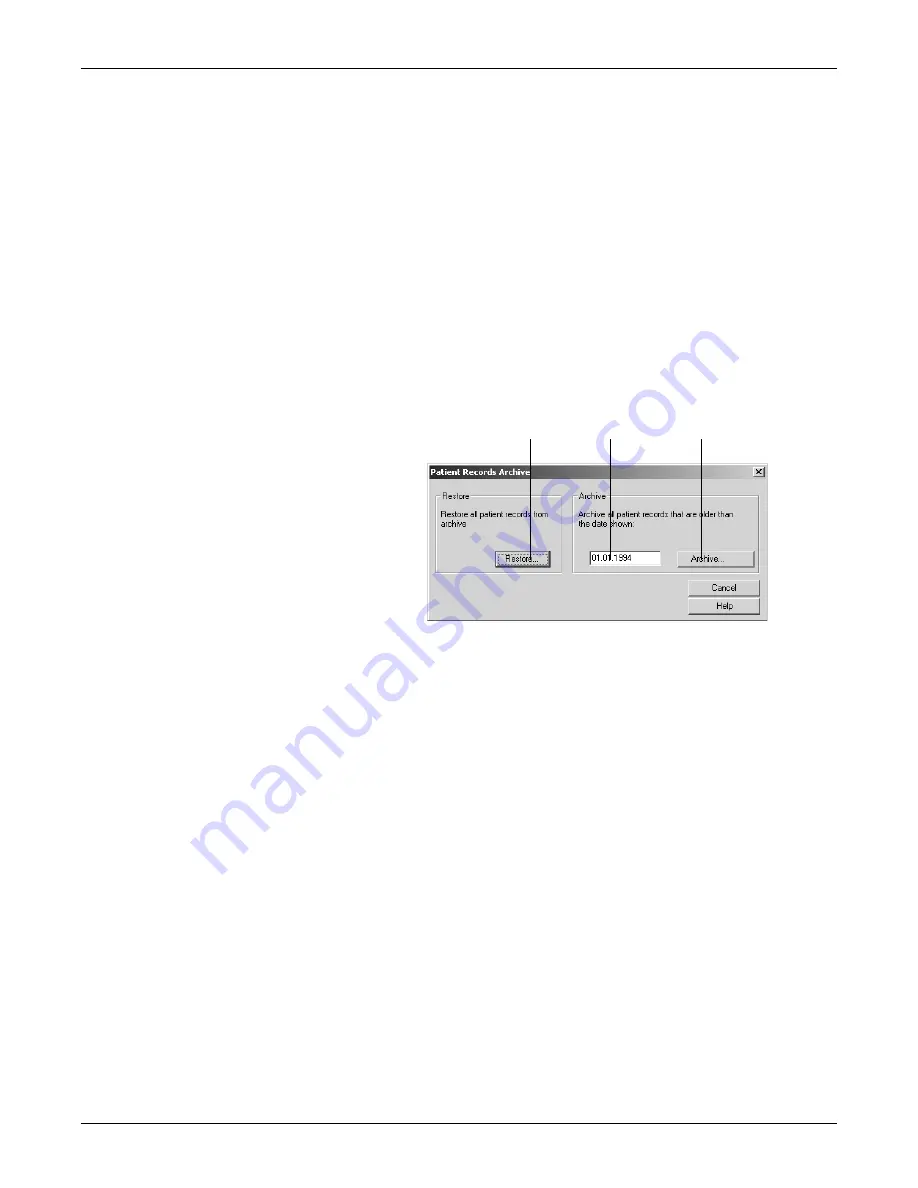
Archiving Patient Records

With the 

Archive Patient Records

 function you can export patient records 

not currently used to an external medium. The date and test type remain 
included in the patient record list. An asterisk * identifies archived 
patient records.

Do not copy the data to the root directory (e.g. d:\), create a subdirectory 
(e.g. d:\data\).

If you want to view an archived patient record, the system will indicate 
the storage medium. Archived patient records can be transferred to the 
MUSE database system only after they have been restored.

Click 

Archive Patient Records

 (

K

 on the 

General

 tab) to display the setup 

window.

1. Enter a date: patient records older than this date will be archived. 

2. Click the 

Archive...

 button.

3. Insert the storage medium and, after archiving, label it with the 

number displayed.

4. Select the target drive or directory.

5. Click 

OK

. Observe the instructions displayed on screen.

6. Proceed in a similar way to restore archived patient records.

Note

When working in a network environment, quit the program before 
archiving or compressing patient records. Run a backup of all data 
before archiving or compressing them. Please note that each file to 
archive must be smaller than the capacity of the storage medium.

929A

1

2

6

Summary of Contents for CASE V6.7

Page 1: ...GE Healthcare CASE V6 7 Software Version 6 73 Operator s Manual 2060290 201 ENG Revision C ...

Page 2: ...tice CASE MAC MARS and MUSE are trademarks owned by GE Medical Systems Information Technologies GmbH a General Electric Company going to market as GE Healthcare 2015 2017 General Electric Company All rights reserved GE Medical Systems Information Technologies Inc 8200 West Tower Avenue Milwaukee WI 53223 USA Tel 1 414 355 5000 1 800 558 5120 US Only GE Medical Systems Information Technologies GmbH...

Page 3: ...ified in EN 55011 class A Magnetic and electrical fields are capable of interfering with the proper performance of the device For this reason make sure that all external devices operated in the vicinity of the system cart comply with the relevant EMC requirements X ray equipment MRI devices radio systems cellular telephones etc are possible sources of interference as they may emit higher levels of...

Page 4: ...CE 2 CASE Revision C 2060290 201 CE Marking Information For your notes ...

Page 5: ... Biocompatibility 1 13 Technical Maintenance 1 13 Legal Notice 1 13 Security Patches 1 13 Service Information 1 15 Service Requirements 1 15 Equipment Identification 1 15 2 Equipment Overview CASE System 2 3 Front View 2 3 Rear View 2 4 Putting the CASE System Into Service 2 5 Connecting the System Components 2 5 Mains Connection Power Up Functional Test 2 6 Switching the System Off 2 8 Function K...

Page 6: ...lectrode Placement 3 9 NEHB Lead Electrode Placement 3 10 CM5 CC5 ML CML Auxiliary Lead Electrode Placement 3 11 CM5 CC5 CH CMH Auxiliary Lead Electrode Placement 3 12 Attaching the Acquisition Module 3 13 4 Selecting a Patient Record and Test Type Selecting a Patient Record from the Local Database 4 3 Overview 4 3 Selecting a Patient Record 4 4 Retrieving a Patient Record from the MUSE System Dat...

Page 7: ...ling the Zoom Mode 5 24 Analyzing Full Disclosure ECG Segments Save as Resting ECGs 5 25 Report Printout 5 26 Generating the Interpretation 5 27 Copying Diagnostic Statements Using Acronyms 5 28 Comparing Resting ECGs 5 29 Comparing Two Resting ECGs 5 29 Comparing Median Complexes from Multiple Resting ECGs 5 33 6 Exercise Test Patient Education 6 3 Entering Test Information 6 4 Overview 6 4 Patie...

Page 8: ...erview 6 28 Test End Phase 6 29 Overview 6 29 Operating Steps 6 29 After the Test Post Test Review 6 31 Test Summary 6 31 Overview 6 31 Tabular Summary 6 33 METS Formula 6 33 Graphic Trends 6 35 Overview 6 35 Viewing the Full Disclosure ECG 6 36 Viewing Medians Replacing max ST Changes 6 37 Viewing TWA Medians Replacing max TWA Values 6 38 Sample Cardiac Cycles 6 39 Overview 6 39 Reanalysis 6 41 P...

Page 9: ...or 7 3 Setting Up the Ambulatory Blood Pressure Monitor 7 4 Acquisition Screen 7 4 Operating Steps 7 5 Post Test Review 7 7 Downloading Data 7 7 Test Summary 7 8 Patient Information 7 9 Test Information 7 9 Measurement Results 7 11 Generating or Editing the Interpretation 7 12 Graphics 7 13 Tabular Summary 7 14 Hourly Averages 7 15 Statistics Summary 7 16 Report Printout 7 17 8 Spirometry Test Sen...

Page 10: ...anagement Overview 9 3 Selecting Patient Records 9 4 Viewing Editing Printing Patient Records 9 6 Printing a Combined Report 9 6 Viewing and Printing Patient Records from the MUSE System 9 7 Archiving Exporting Deleting Patient Records 9 8 Save to Archive 9 8 Transfer to MUSE 9 9 Send 9 9 Export 9 10 Working Temporarily with the Local Database 9 12 10 Operation with Administrative Tools Overview 1...

Page 11: ...s 12 16 Lead Sequence Tab 12 17 Modifying the Lead Sequence 12 17 Configuring Leads Ex1 Ex2 Ex3 12 18 Protocol Editor Tab 12 19 Selecting the Default Protocol 12 19 Protocol Editor Screen 12 20 Creating a New Phase 12 22 Editing Stage or Phase Information 12 22 Final Report Tab 12 23 Miscellaneous 1 Tab 12 24 Miscellaneous 2 Tab 12 26 Editing the Comments Test Types Reason for Test Reasons for Ter...

Page 12: ... Devices 12 45 Copying Patient Records 12 48 Archiving Patient Records 12 49 Compressing Patient Records 12 50 Changing System Date and Time 12 50 Procedure Statistics 12 51 Printer Settings 12 52 Devices Tab 12 53 Modem Tab 12 54 MUSE Tab 12 55 Option Code Tab 12 58 Country Settings Tab 12 59 EMR Tab 12 60 Connectivity Server Tab 12 61 Adding Inbound Connections 12 62 DICOM Tab 12 63 A Cleaning a...

Page 13: ...tion B 7 Exercise Test Interpretation XTI B 8 Duke Treadmill Score B 9 References B 10 Risk Factors B 11 Spirometry Reference Value Equations Interpretation Modes Measurements B 13 Reference Value Equations B 13 ECCS Zapletal B 13 NHANESIII B 13 Knudson B 14 Forche B 14 Finland B 14 Brazil B 15 Interpretation Modes B 16 Europe B 16 CHS B 18 Definition of Spirometry Test Values B 19 Installing the ...

Page 14: ...x CASE Revision C 2060290 201 C Order Information Order Information C 3 Accessories C 3 D Technical Description Technical Specifications CASE System D 3 ...

Page 15: ...Revision C CASE 1 1 2060290 201 1 Introduction ...

Page 16: ...1 2 CASE Revision C 2060290 201 For your notes ...

Page 17: ...e Intended Audience This manual is geared for clinical professionals Clinical professionals are expected to have working knowledge of medical procedures practices and terminology as required for completing these examinations Illustrations All illustrations in this manual are provided as examples only They may not necessarily reflect your equipment setup or data displayed All names appearing in exa...

Page 18: ...ices such as defibrillators CASE provides a user selectable option for printouts of prognostic scores on selected reports Vector loops are also available CASE can be configured in a network environment for multiple CASE and CardioSoft CS stations allowing the user to create a central database of patient demographics and collected patient physiological data CASE is intended to be used primarily in ...

Page 19: ... in accordance with the instructions given in this manual This equipment is protected against the effects of cardiac defibrillator discharge to ensure recovery as required by test standards Accuracy of the Input Signal Reproduction Recording speed accuracy is tested using the method described in IEC 60601 2 51 sub clause 51 108 4 4 The maximum error is 5 Frequency Response is tested according to I...

Page 20: ...fer to the equipment in general The order in which safety statements are presented in no way implies order of importance Danger indicates an imminent hazard which if not avoided will result in death or serious injury Warning indicates a potential hazard or unsafe practice which if not avoided could result in death or serious injury Caution indicates a potential hazard or unsafe practice which if n...

Page 21: ...parts in the socket of the power cord Do not use extension cables with multiple portable socket outlet MPSO In the patient vicinity the printer installed on the system cart must meet the requirements of IEC 60601 or it must be a GE Healthcare modified printer with a connected protective earth conductor potential equalization Observe the installation instructions supplied with the printer All devic...

Page 22: ...ment of doubt concerning the safety of connected devices the user must contact the manufacturers concerned or other informed experts as to whether there is any possible danger to the patient the operator or the environment as a result of the proposed combination of devices Standards IEC 60601 1 1 EN 60601 1 1 must be complied with in all cases For connection of the system cart to a network a trans...

Page 23: ...cal findings Risk of Suffocation Dispose of the packaging material observing the applicable waste control regulations and keeping it out of children s reach Risk of Poisoning Follow all manufacturer instructions for preparing and storing chemicals required for the application or maintenance of the device and store all chemicals in their original containers to prevent poisoning risk Risk of Injury ...

Page 24: ...nstallation Equipment Damage Set up the device in a location which affords sufficient ventilation The ventilation openings of the device must not be obstructed The ambient conditions must be ensured at all times Restricted Sale In the USA U S Federal Law restricts this device to sale by or on the order of a physician Password Protection If access to the system is protected with a password the pass...

Page 25: ...de Not suitable for use in the presence of a flammable anesthetic mixture with air or with oxygen or nitrous oxide Method s of sterilization or disinfection recommended by the manufacturer sterilization not applicable disinfection see Appendix A Mode of operation continuous operation Caution consult accompanying documents Consult instructions for use Type CF signal input defibrillation proof Follo...

Page 26: ...y CE marked per the Medical Device Directive 93 42 EEC of the European Union Manufacturer s identification Order number Revision letter Serial number Ident number Lot number Unique Device Identification is a unique marking for identification of the medical device Mass This symbol indicates that the waste of electrical and electronic equipment must not be disposed as unsorted municipal waste and mu...

Page 27: ...l and therefore left to the user to assess whether they are needed to perform the exam A field RACE is one of these optional fields It has been acknowledged by the medical profession as useful to analyze some pathologies You should be aware that in some jurisdictions the processing of data revealing an individual s racial origin is subject to legal requirements such as obtaining the patient s prio...

Page 28: ...1 14 CASE Revision C 2060290 201 Safety Information security patch compatible with your operating system and install it on your system Registration and download http prodsecdb gehealthcare com ...

Page 29: ...ow A Product Code B Year Manufactured 00 99 00 2000 01 2001 02 2002 and so on C Fiscal Week Manufactured D Production Sequence Number E Manufacturing Site F Miscellaneous Characteristics D 1 XX 0005 G XX Month Manufactured A January B February C March D April E May F June G July H August J September K October L November M December Year Manufactured 1 2001 2 2002 3 2003 and so on Product Code Two c...

Page 30: ...1 16 CASE Revision C 2060290 201 Service Information ...

Page 31: ...Revision C CASE 2 1 2060290 201 2 Equipment Overview ...

Page 32: ...2 2 CASE Revision C 2060290 201 For your notes ...

Page 33: ...stem CASE System Front View A C B D E F G H I 01A A Monitor B Function keypad C Paper tray D Console for PC keyboard and mouse E Power button non breaking of AC power F Wheel locks G Thermal writer H USB drives 2 I Acquisition module holder ...

Page 34: ...2 4 CASE Revision C 2060290 201 CASE System Rear View K L 02A K Connector access panel L Equipotential pin power inlet with fuses mains switch ...

Page 35: ...nel 1 Connect the cables to the system components and secure the connections with retaining screws 2 Guide the cables through the opening in the access panel and connect them to the appropriate ports as shown on the reference diagram 3 Close the panel Note Coil the excess cable for storage as shown above DO NOT squeeze the cables when closing the access panel Cable clamps Reference diagram ...

Page 36: ...ine and secure the power cord with the clamp provided Note DO NOT turn the system on yet 2 Connect the system to the potential equalization system 3 Connect all other system components to the power line and put them into operation as outlined in the respective operator manuals 4 Turn on the mains power switch on the back of the system 85A Power inlet Potential equalization pin Mains power switch B...

Page 37: ...rs click Cancel 9 The initial CASE screen will appear When you see the initial CASE screen see Initial Screen on page 2 16 and no error message appears the system is operational Note The screen saver is automatically disabled during ECG acquisition Scan the hard drive for viruses once a week Run a functional test on a regular basis about once a month this includes an inspection of the cables and o...

Page 38: ...tem will automatically shut down Warning Loss of Data Improper shutdown of the CASE system e g turning the system off with the mains power switch before all programs are closed may damage the databases Note Turn off CASE with the mains power switch only if it will not be used for a prolonged period of time This switch disconnects the system from mains power 087A 1 2 ...

Page 39: ...e softkeys can be used to control the exercise test The softkeys are activated by clicking With F2 or Esc you can remove the softkey panel from the screen 52A Symbol Description Press pretest to initiate the pretest phase and to advance through the pretest stages to return to the preceding pretest stage press longer than 2 seconds Press exercise to initiate the exercise phase and to advance throug...

Page 40: ...d values for the user defined columns of the tabular summary see Configuring the Tabular Summary on page 12 14 Press enter BP to enter the patient s blood pressure Press 12 lead to record a 10 second ECG 5 seconds from memory 5 seconds from when key was pressed Press medians to record a medians report Press rhythm to record a continuous real time ECG rhythm strip terminate recording with stop writ...

Page 41: ...omatic arrhythmia reporting a one page arrhythmia report is printed on the thermal writer on occurrence of an arrhythmia Press speed w or w to increase or decrease the treadmill speed or ergometer workload Press grade up or down to increase or decrease the treadmill grade Press start tmill or STOP tmill to start or stop the belt When restarted after FAST stop the treadmill returns to the previous ...

Page 42: ... one set with IEC labeling 2 Connect the patient cable to the acquisition module To remove the cable from the acquisition module press in the spring lock located on the side of the cable 3 Plug the individual lead wires into the acquisition module and connect the electrode clips to the BNC sockets of the lead wires Observe the lead labels the labels on the cable and on the acquisition module must ...

Page 43: ... inaccuracies in the ECG Trace each individual leadwire from its acquisition module label to the colored connector and then to the proper electrode to ensure that it is matched to the correct label location Note The ECG signal input is isolated and defibrillation proof only in conjunction with the CAM 14 acquisition module type BF ...

Page 44: ...open the paper compartment lid Caution The lid has a gas spring and opens automatically 2 Place fanfold paper in the paper storage compartment such that the oblong hole in the paper is at the back the blank side faces toward the roller the first fold is on the left 3 Allow approximately 3 to 4 inches 10 cm of paper to extend out of the paper compartment and make sure that it is straight 063A 064A ...

Page 45: ... Paper 4 Hold the protruding paper sheet with your right hand and close the lid with your left hand you must hear the lid lock into place Then the paper will be transported to the next cue hole 5 The writer is now ready for operation 065A 066A 067A ...

Page 46: ...s of the local database for selection of a patient and test C Archived Data Click to view patient records archived on a CD ROM D MUSE Browser Click to display the MUSE system database E Operator s Manual Click to display the Operator s Manual see Viewing and Printing the Operator s Manual on page 2 17 F System Configuration Click to display the System Configuration menu see System Configuration on...

Page 47: ...pter Clicking an index entry will also display the corresponding page of the manual To print the document 1 Select File in the menu bar then Print 2 In the print dialog choose the print options the Print Range all pages the current page or a section of the document the print quality the number of copies 3 Click OK to initiate the printout Online Help On many screens you will find a Help button Cli...

Page 48: ...network station name 12 lead ECG leads selectable information on the exercise test and ergometer HR and blood pressure EGMO Storage of the Full Disclosure ECG continuous storage of a maximum of 15 leads color coded arrhythmias any segment of the full disclosure ECG can be zoomed and stored NETS Data Storage on Network Server storage of examination data on low volume server 3000 examinations storag...

Page 49: ...the configured report as a Word formatted file CDRW Data Export to External Archive DSPC Display Configuration configuration of the vital signs window ITBL In Test Tabular Summary display of the tabular summary during exercise tests ITRD In Test Trend display of trends during exercise tests PRVT Previous Test Retrieval display of the previous exercise test during an exercise test TWAA T Wave Alter...

Page 50: ...rface DICM DICOM Interface software package for communication with the DICOM interface STHY ST HT Hysteresis 4 more exercise stress test values ST HR hysteresis HR recovery HR reserve used FVE recovery EXTI Exercise Test Interpretation XTI evaluation of the exercise stress test with respect to risk of mortality functional capacity coronary heart disease required option codes ERG2 STHY recommended ...

Page 51: ...Revision C CASE 3 1 2060290 201 3 Preparing the Patient ...

Page 52: ...3 2 CASE Revision C 2060290 201 For your notes ...

Page 53: ...em Use only the GE Healthcare recommended electrodes and contact agents The signal acquisition screen will show the applied electrodes and the signal quality after the right arm electrode has been applied When the right arm electrode becomes detached the system behaves as if all electrodes were disconnected Observe the information given in sections Recording ECGs of Pacemaker Patients on page B 6 ...

Page 54: ...1 Shave any hair from each electrode site and degrease each site with alcohol 2 Remove the epidermal skin layer at each site Use an abrasive pad or skin prep cream for example EPICONT Part no 217 083 12 CAUTION Skin Lesions Do not rub the skin vigorously to avoid inflammation or bleeding 31A ...

Page 55: ...n Improper connection will cause inaccuracies in the ECG Trace each individual leadwire from its acquisition module label to the colored connector and then to the proper electrode to ensure that it is matched to the correct label location CAM 14 AHA Label IEC Label RL N RA R LA L LL F V1 C1 V2 C2 V3 C3 V4 C4 V5 C5 V6 C6 A1 A1 A2 A2 A3 A3 A4 A4 ...

Page 56: ...eft sternal border C V3 green C3 green Midway between sites B and D D V4 blue C4 brown Mid clavicular line in the fifth intercostal space E V5 orange C5 black Anterior axillary line on the same horizontal level as D F V6 purple C6 purple Mid axillary line on the same horizontal level as D G LA black L yellow Left arm resting ECG J RA white R red Right arm resting ECG H LL red F green Left foot res...

Page 57: ... between sites B and D D V4 blue C4 brown Mid clavicular line in the fifth intercostal space E V5 orange C5 black Anterior axillary line on the same horizontal level as D F V6 purple C6 purple Mid axillary line on the same horizontal level as D G LA black L yellow Left arm resting ECG J RA white R red Right arm resting ECG H LL red F green Left foot resting ECG I RL green N black Right foot restin...

Page 58: ...ommended to apply the limb leads on the back opposite the limb electrode positions shown above AHA Label IEC Label Electrode Placement A V1 red C1 red Fourth intercostal space at the right sternal border B V2 yellow C2 yellow Fourth intercostal space at the left sternal border C V3 green C3 green Midway between sites B and D D V4 blue C4 brown Mid clavicular line in the fifth intercostal space E V...

Page 59: ...le B A2 E orange E light blue Sternum at the level of C and D C V4 blue C4 brown Mid clavicular line in the fifth intercostal space D V6 purple C6 purple Left mid axillary line on the same horizontal level as C E F LL red RL green F green N black Right and left thighs G A3 I orange I light blue Right mid axillary line on the same horizontal level as C and D I A1 H orange H light blue Neck avoid ca...

Page 60: ...ng the Lead Sequence on page 12 7 or Modifying the Lead Sequence on page 12 17 AHA Label IEC Label Electrode Placement A A1 A1 orange Nst white Attachment point of 2nd rib to right sternal edge B A2 A2 orange Nax white Fifth intercostal space on the left posterior axillary line Same position as V7 C7 C V4 blue Nap white C4 Mid clavicular line in the fifth intercostal space Same position as V4 C4 L...

Page 61: ...rode Placement In addition to the standard electrodes apply one electrode on the sternum A1 and one in location V5R C5R A2 Electrode Electrode Placement A1 Nst Mid sternum at the second intercostal space A2 Nax In the fifth intercostal space in the right anterior axillary line V5F C5R 37A ...

Page 62: ...andard electrodes apply one electrode on the sternum A1 one in location V5R C5R A2 and one on the neck A3 Electrode Electrode Placement A1 Mid sternum at the second intercostal space A2 In the fifth intercostal space in the right anterior axillary line V5F C5R A3 On either side of the neck or anywhere above the shoulders 38A ...

Page 63: ...1 and 2 on the acquisition module vary with the test performed Resting ECG Button 1 initiates ECG analysis Button 2 initiates a rhythm report Button 3 stops the writer Exercise Test For exercise tests different tasks can be assigned to the buttons see Miscellaneous 1 Tab on page 12 24 The default functions of the buttons are Button 1 initiates 12 lead report Button 2 initiates a rhythm report Butt...

Page 64: ...3 14 CASE Revision C 2060290 201 Attaching the Acquisition Module For your notes ...

Page 65: ...Revision C CASE 4 1 2060290 201 4 Selecting a Patient Record and Test Type ...

Page 66: ...4 2 CASE Revision C 2060290 201 For your notes ...

Page 67: ...st type or enter a new patient 048A A B C E F G H I J D A Click next page previous page to display more patient records B The bar cursor highlights a patient record C Text boxes for the patient s Last Name Patient ID D Option buttons for selection of the test type see Devices Tab on page 12 53 E Click New Test to select the highlighted patient and go to the acquisition screen of the selected test ...

Page 68: ...o be modified a Type over the current data and b click Accept 4 Follow these steps to start a test with the selected patient a Click New Test or b press Enter 5 As an alternative you can select a patient by double clicking the name 6 If you are working with the keyboard only a Select the test type with the cursor keys b press the Tab key c enter the patient s name and d confirm the selection with ...

Page 69: ...e same way as from the local database see previous page The patient selection window has one additional button Order List see next page Note This is an optional feature When you enter a new patient or edit patient information the data is first saved to the local database The data will appear in the MUSE system only after you have transferred the test to MUSE and confirmed the data there Please ref...

Page 70: ...The list only shows orders for your location The list shows orders for all locations D The list only shows orders for the selected test type The list shows all orders E The list only shows orders for the selected patient The list shows orders for all patients F The list will be updated according to the current search criteria After changing the search criteria you can press the Enter key to start ...

Page 71: ...s wearing a pacemaker apply a check mark in the Pacemaker check box using the spacebar see also p 6 11 7 Enter the patient s gender with m male or f female 8 Click Accept to save the patient record to the database 9 Select the test type 10 Click New Test The acquisition screen for the new test appears Note The system will automatically capitalize the first letter of the first and last names The pa...

Page 72: ... save this summary with the patient record Before selecting the external program choose a patient in CASE To change the selected patient you will have to exit the external program and select another patient in CASE Dialog between CASE and the external program 1 Start CASE 2 Select patient 3 Select external program on procedure selection screen the external program must already be configured 4 Perf...

Page 73: ...Revision C CASE 5 1 2060290 201 5 Resting ECG ...

Page 74: ...5 2 CASE Revision C 2060290 201 For your notes ...

Page 75: ...t Information Tab The Patient Information tab is open 1 Verify the patient s name and ID If the data is incorrect click Modify to change 2 Enter the blood pressure readings or initiate a blood pressure measurement with Start BP 3 Enter a designation for the Room 5 characters max 4 Select a Location Number or a Location Name names can be configured on the MUSE tab see MUSE Tab on page 12 55 Note Yo...

Page 76: ...om the list boxes 5 Type any Comment about the test 6 Answer the Extra Questions 7 Enter an Order Number This number will appear on the printed reports and on the Test Summary Note The Reason for Test library can be edited see section Editing the Reason for Test Library on page 12 4 You can define two Extra Questions as needed see section Miscellaneous Tab on page 12 8 You enter the names of the p...

Page 77: ...medication will influence the analysis with the HEART ECG analysis program The following medications may affect the diagnosis If one or more of these medications are used a reanalysis may become necessary after changing the medication information 053A R 3 2 1 digitalis antiarrhythmics Ic diuretics antiarrhythmics III psychotropics Ca channel antagonists Verapamil steroids Ca channel antagonists Ni...

Page 78: ...rs in the area below With this modality you can acquire a 10 second resting ECG with subsequent analysis and or you can record the full disclosure ECG for a period of up to 60 minutes 054A R A N M L O K J 2 I G E D C B H F A Lead check window B Schematic representation of the applied electrodes green correct yellow lead problem high impedance white not used red electrode disconnected or lead break...

Page 79: ...to end the test and display the report G Click to load system setups stored for different system users see section Custom Setups Factory Setup on page 12 38 H Click to display the resting ECG setup menu see section Resting ECG Setup on page 12 3 I Click to return to the initial screen J Click to select a temporary lead sequence from the list K Heart Rate L Lead label Click the label with the right...

Page 80: ...ition to initiate acquisition and analysis of the 10 second ECG Note When you select ECG Acquisition before the system had time to save 10 seconds of ECG data a bar graph will inform you of the ongoing storage process The analyzed 10 second ECG appears at the top of the screen A new tab provides the corresponding interpretation 054A R 1 2 ...

Page 81: ... check the system evaluation and ECG measurement results 6 If necessary repeat the procedure with ECG Acquisition 7 If you do not wish to record the ECG for a prolonged period of time see next page click Stop FD Post Test Review to terminate signal acquisition Note Clicking Stop FD Post Test Review brings up the Test Summary see Test Summary on page 5 11 055A R 7 6 3 4 5 ...

Page 82: ...d a You can make an ECG recording Rhythm Writer Stop Writer b You can click Event Marker Full Disclosure to enter event marks vertical line c The most recent arrhythmia is always displayed d The remaining storage time the total number of stored QRS complexes and the number or arrhythmic events is displayed 3 Click Stop FD Post Test Review to terminate the procedure Note Clicking Stop FD Post Test ...

Page 83: ...ick to display patient list for a new test G Click to display a list with more tests of the current patient local database H Click to display a list with more tests of the current patient MUSE database system I Click to display the print setup window J Click to display a list of tests to compare with the current test K Click to display the interpretation window where a detailed interpretation of t...

Page 84: ...measurement results are identified with the symbol In the same window you can select and deselect the View system evaluation feature This feature also affects the printout the combined report the transfer to MUSE and data export Interpretation A window opens where you can generate the test interpretation see section Generating the Interpretation on page 5 27 Note Changes to the patient information...

Page 85: ...st group of 6 standard leads format 1 x 10s V1 V6 displays the second group of 6 standard leads B Click icon to activate the zoom function Position the magnifying glass on the region of interest and click An enlarged view of the selected region appears see next page Zoom Mode C Click to change the gain amplitude D Click to change the speed E Click to select the frequency for re filtering the 10 se...

Page 86: ...gment can be displayed in all leads 059A R A B C D E F A Click to select the lead With you scroll through the leads with you open the list B Click icon to terminate the zoom function C Click to select the zoom factor D Click icon to print the segment E Click icon to copy the segment to the Clipboard F Cursor position in mV ...

Page 87: ... on all ECG waveforms 1 Position the cursor on the first measurement point and click A caliper appears 2 Position the cursor on the second measurement point and click Now you will see the second caliper the measuring line and the measurement results 3 Click the right mouse button to remove measurement points 510A R 1 3 2 1 3 2 ...

Page 88: ...ed the basis for analysis You are free to perform additional measurements if needed 511A R A B D E C A Click button for a reanalysis with the HEART ECG analysis program only see next page B Click button to display the tabular summary C Click to select the gain amplitude D Click to select the speed E Click icon to copy the waveform area to the Clipboard ...

Page 89: ...re shown below the ECG baseline The measurement marks above the baseline can be edited The table in the top right hand corner indicates the time intervals The T offset measurement mark can be adjusted in each individual lead see page after next Measurements can also be performed on the complex 512A R A B D E C I H G F A Click to select the lead to be highlighted B Click to display the medians wind...

Page 90: ...s analysis results Note The P onset and P offset markers may be dashed e g in the presence of atrial fibrillation This indicates that the program was unable to locate the exact beginning and end of the P wave In this case you can click the marks and drag them to the correct position the marks are now solid instead of dashed It is possible to restore the marks to the original position by clicking t...

Page 91: ...e selected lead disappear 2 Holding the mouse button depressed move the T offset mark to the correct position 3 Click icon to select the leads whose T offset marks you also wish to adjust Adjusting the T offset mark on this screen page 5 19 does not affect the position of the T offset mark on the previous screen page 5 17 513A R 2 1 3 ...

Page 92: ...f the RR interval from the mean RR interval Furthermore you can determine the HR over a selectable ECG segment 514A R A B C D E A Click to select the lead With you scroll through the leads with you open the list B Click to determine the number of cardiac cycles only for atrial fibrillation or flutter C Click to select the gain amplitude D Click to select the speed E Click icon to copy the waveform...

Page 93: ...played 3 Click the right mouse button to remove the markers and data In the presence of atrial fibrillation or flutter In this situation you will have to define a cardiac cycle yourself 1 Click Cycles and select the number of cycles over which the HR is to be determined 2 Click on a point of the ECG to mark the beginning of the interval to be measured A marker appears 3 Count the number of cardiac...

Page 94: ...ctor Loops This screen shows the median complexes of the orthogonal FRANK leads X Y and Z as well as the vector loops in three planes 515A R A B C A Click to adjust the gain B Median complex C Click torso to toggle between right and left sagittal planes ...

Page 95: ...mation about filters etc C Click to open a list showing all identified arrhythmias D Click to select gain and speed E Click icon to activate the zoom function F Click icon to print the entire full disclosure ECG or selected segments G Click icon to delete the full disclosure ECG H Select the number of lines and whether or not the events are to be color coded I Click icons for automatic scrolling o...

Page 96: ... one lead 4 Select the lead 5 Click the Format 2 option button if you wish to print multiple leads and select the leads 6 This box indicates the number of pages to print check paper supply before printing 7 Click the Save button to save the print setup 8 Initiate the printout or close the window with Cancel Enabling the Zoom Mode 1 Click the zoom icon 2 Position the magnifying glass on the region ...

Page 97: ...ure ECG and save this segment as an additional resting ECG in the procedure list 1 Click the zoom icon 2 Position the magnifying glass on the region of interest and click 3 Click 10 s of the selected segment will be displayed at a larger scale 4 Confirm the displayed question with Yes to save the segment in the box as a separate resting ECG 527A R 1 3 4 ...

Page 98: ...ort Configured Report 10 second ECG up to 3 different formats with or without Interpretation or ACI TIPI score two more formats of the 10 second ECG Medians Vector Loops 2 Select the lead format for the 10 second ECG 3 Select the number of copies to print 4 Choose the leads if you selected the Swedish Median H1 format 5 Select the rhythm leads 6 Select whether or not the Median H1 report is to inc...

Page 99: ...an be copied to the Interpretation area on the right In the Interpretation area you can edit the texts as needed enter new text copy remove etc Refer to section Editing the Interpretation Library on page 12 5 for information on editing the standard texts 525A R A B C D E F G A Click icon to open folders individually B Click icons to simultaneously open or close all folders C Click button to open a...

Page 100: ... Insert to copy the corresponding full text to the Interpretation Note As an alternative you can double click a text to copy it from left to right 4 Select the check box if you wish to copy each text to a new line Note Interpretative statements transferred to MUSE that are part of the acronym list will be replaced with the appropriate acronyms 526A R 2 3 4 ...

Page 101: ...3 and up to 6 ECGs Comparing Two Resting ECGs The system offers two alternatives you can compare the present ECG with an earlier recording or you can retrieve a stored examination as described in section Selecting Patient Records on page 9 4 and compare it with a second ECG 1 Click Compare A window opens listing all the patient s resting ECGs 2 Select an ECG 3 Click OK to clear the window The comp...

Page 102: ...ck to select the lead With you scroll through the leads with you open the list B Click tabs to compare the Medians and the Interpretation C Acquisition date and time D Click icon to activate the zoom function E Click icon to copy the waveform area to the Clipboard F Procedure 1 G Procedure 2 ...

Page 103: ...ying glass on the region of interest and click Identical segments of the two procedures are superimposed With the scroll boxes you can shift the segment of procedure 2 horizontally and vertically 520A R A B A Click scroll box to move the segment of procedure 2 to the right and left B Click scroll box to move the segment of procedure 2 up and down ...

Page 104: ... down and to the right and left Interpretation Click the Interpretation tab to display the screen for comparison of the two interpretations The following details of the two procedures are displayed the measurement results the system evaluation and the interpretation 521A R A C B D A Measurement results of procedure 1 B Interpretation of procedure 1 C Measurement results of procedure 2 D Interpreta...

Page 105: ...y 1 Click Compare A window opens listing all the patient s resting ECGs 2 Holding the Shift key down select the procedures 3 Click OK to clear the window The comparison screen with the medians of the selected procedures appears 522A R A B C D E F A Acquisition date B Click to select the gain C Click to select the leads D Click icon to activate the zoom function E Click icon to print the screen F C...

Page 106: ... the zoom icon 2 Position the magnifying glass on the region of interest and click The selected median is displayed at a larger scale 523A R A B C D E A Acquisition date B Click to select the lead C Click icon to terminate the zoom function D Click icon to print the median E Click button to display the 3D graph ...

Page 107: ...ected procedures The scroll boxes allow you to rotate the illustration horizontally and vertically 524A R A B C D E A Click to select the lead B Click icon to terminate the zoom function C Click icon to print the illustration D Click to select the color E Click to start and stop the continuous rotation of the illustration set the speed with the slider below ...

Page 108: ...5 36 CASE Revision C 2060290 201 Post Test Review For your notes ...

Page 109: ...Revision C CASE 6 1 2060290 201 6 Exercise Test ...

Page 110: ...6 2 CASE Revision C 2060290 201 For your notes ...

Page 111: ...the test you should give your patient some information about what will happen in the course of the test Click the Patient Education button on the pre acquisition screen to display a description of what the patient can expect to happen before during and after the exercise test ...

Page 112: ...click Modify to change 2 Select the protocol for the next test refer to section Protocol Editor Tab on page 12 19 for information on changing the default protocol 3 Confirm or change the Max predicted HR for the exercise test refer to section Miscellaneous 1 Tab on page 12 24 for information on changing the calculation method 4 Enter the Target HR of the Max predicted HR refer to section Miscellan...

Page 113: ...te The Patient Information can be assigned to the patient file or only to the pending test Note Before initiating TWA analysis check that all TWA settings are correct see TWA Tab on page 12 30 and that the electrodes are properly applied according to the instructions given in chapter Preparing the Patient on page 3 1 ...

Page 114: ... or select them from the list boxes 6 Type any comment about the test 7 Answer the Extra Questions 8 Enter an Order Number This number will appear on the printed reports and on the Test Summary Note The Reason for Test library can be edited see section Miscellaneous 2 Tab on page 12 26 You can define two Extra Questions as needed see section Entering Extra Questions on page 12 28 You enter the nam...

Page 115: ...26 Calculating Patient Risk To calculate the patient s risk for stroke and CHD you must enter the patient s age and gender The system will assume some values for parameters that are unknown or out of range Refer to Risk Factors on page B 11 for the table of values The risk calculations are a prediction of group incidence and may not apply to individual patients Refer to the American Heart Associat...

Page 116: ...alues calculated by the system Edited values are marked with an asteriks 1 Click the AHA Stroke Risk or the AHA CHD Risk tab 2 Enter the factors that influence both coronary AND stroke risks 3 Enter the factors that influence stroke OR coronary risk 4 Click Stroke Risk or Coronary Heart Disease Risk 94A 95A 2 2 3 3 4 2 2 1 3 4 1 ...

Page 117: ...The actual waveform data appears in the area below 056A S B S D A C E F G H J I K L M O P Q R T U N A Tabs showing the different ECG analysis data B Lead check status window other tabs are explained in During the Test on page 6 18 ST Arrhy 6 19 Medians and 6 25 12SL C Schematic representation of the applied electrodes green correct yellow lead problem high impedance white not used red electrode di...

Page 118: ...t F Click to display Patient Education G Click to select an exercise test protocol A new protocol will become effective in the next phase H Click to relearn the median complex With Relearn Medians you can also restart the learn phase when not all electrodes are applied I Click to load system setups stored for different system users J Click to edit the exercise test setup K Click to return to the i...

Page 119: ... Patients It is very important that you indicate on the first database screen pictured below whether your patient has a PACEMAKER implanted A check indicates that the patient DOES have a pacemaker We recommend the following filter setting for exercise tests FRF ON ...

Page 120: ...being used click Relearn Medians to manually activate ST measurement and arrhythmia analysis 2 Click Select Protocol to verify that the appropriate test protocol is active or to select another protocol 3 Click Patient Education to display the patient exercise test instructions 4 Click Custom Setup to select and load user specific test settings 5 Click Setup to edit the exercise test setup Note Onc...

Page 121: ...ils B Tabs to display windows with ECG test data see ST Arrhy Window on page 6 18 to Interpretation Window on page 6 26 for details C Button to mark and save ECG events see section Arrhythmia Review on page 6 45 D Current heart rate and bar graph indicating percentage of max predicted HR see Miscellaneous 1 Tab on page 12 24 and illustrations below Turns red when max HR is exceeded E Most recent B...

Page 122: ...e clock each new phase pretest exercise recovery resets the clock to zero H Current stage stage clock restarts with each new stage I Treadmill belt speed and grade bicycle ergometer pedal speed RPM and load METS metabolic equivalents see METS Formula Metabolic Equivalents on page 6 22 RPP Rate Pressure Product 85A S Current HR 86A S Target HR in Max predicted HR ...

Page 123: ...age 12 19 The first QRS complex of the exercise phase is saved as the baseline complex Operating Steps 1 Wait until the message Median update ceased Relearn disappears the baseline ST measurement appears and the blood pressure has been taken 2 Press a the 12 lead button to initiate a recording on the thermal writer or laser printer b the12SL button to acquire and analyze a baseline ECG c the media...

Page 124: ...il the treadmill belt is moving before stepping onto the belt Otherwise severe injury could result from a fall For the same reason avoid rapid changes in belt speed If a higher load level is selected manually before the treadmill is started with the start tmill button the treadmill will accelerate to the speed corresponding to the manually selected load level For a FAST stop of the treadmill in an...

Page 125: ...ing in the Tabular Summary will be Manual comment Press to enter comments to appear in the Tabular Summary enter BP Press to enter BP readings 12 lead Press to start an ECG recording 12 leads 5 seconds from memory 5 seconds of real time data recall Press to print a 10 second delayed recall report on the thermal writer rhythm Press to start a continuous rhythm report on the thermal writer stop writ...

Page 126: ... A B D I K C E F G H A Click the lead label to display the median complexes of other leads The message Scan indicates that the system has chosen the lead with the most significant ST depression Leads aVR aVL V1 are not considered B Click the tab to display the ST Arrhy window C Click Superimposition to display the median complexes from all leads superimposed click again to restore normal presentat...

Page 127: ... select different lead groups see Screen Tab on page 12 13 for information on how to assign the leads to the groups C Click Superimposition to display the median complexes of the selected group superimposed click again to restore normal presentation D Display other median complexes backward forward E Median label the complex is updated at the time interval selected in the Protocol Editor ...

Page 128: ...re in the waterfall to display the median complex and measurement of the corresponding point in time associated phase stage HR BP and METS appear at the right 60A S A B C D E A Click the tab to display the Waterfall window B Click the lead label to change the displayed leads C Median complex ST measurement and corresponding waterfall D Color code of the different amplitudes in mV E Click to select...

Page 129: ...can be configured See Configuring the Tabular Summary on page 12 14 for details Use the detailed format to enter or edit data 1 Click the value to change 2 Enter the new value Edited values are bold To enter new data 1 Click in an empty field 2 Enter the new value 61A S B A C A Click Tabular Summary tab to display the window B Select to display the stage format 1 line per stage C Select to display...

Page 130: ... value of a stage is reached after a stage time of 60 seconds default value can be changed see section Miscellaneous 1 Tab on page 12 24 METS speed x 26 8 x 0 1 grade 100 x 1 8 x speed x 26 8 3 5 3 5 speed miles per hour grade percent METS speed x 0 1 grade 100 x 1 8 x speed 3 5 3 5 speed meters per minute grade percent METS 12 3 x load 3 5 x weight weight x 3 5 load Watt weight kg ...

Page 131: ...e tab to display the Trends window B Click an option button to display other trend formats Click Custom to display user configured trends Click ST Level Slope to display the trend of ST level and slope versus time Click ST HR Loops to display the 2 dimensional representation of ST level versus HR see section Configuring Trends on page 12 15 C Click to display other trend displays backward forward ...

Page 132: ...CG strips stored during the last 10 seconds of each stage acquired manually or acquired automatically as configured see section Protocol Editor Screen on page 12 20 63A S A B C A Click the tab to display the ECG Strips window B Click to display the other ECG strips backward forward C Test data of the ECG strip ...

Page 133: ...t only if the message Median update ceased Relearn has disappeared from the ST Arrhy window at the time the 12SL report is stored Note The system stores up to five 12SL reports 64A S 65A S A B D E F C A Click the tab to display the 12SL window B Click button to display the interpretation C Click to select the recording D 12SL measurements and interpretation E Click to clear the Interpretation wind...

Page 134: ...e Interpretation window B Click to enter or edit the interpretation C Enter or select summary statements for the different interpretation categories and for the Overall Impression D Click to enter the Conclusion E Click to confirm the test results F Click to clear the window G Select to include the Duke Treadmill Score in the Test Results and in the Final Report or deselect H Click to edit the Duk...

Page 135: ...of the median complexes will appear in the lower part of the screen for reference 68A S B A C D E F G A Details of the displayed median complexes B Click tabs to view other ECG data windows C Click Close to clear the second test window D Click to view more median complexes backward forward E Click to display the baseline medians F Click to display the peak exercise medians G Click to display the m...

Page 136: ...hase Recovery Phase Overview Press the recovery button to advance to the recovery phase The clock begins timing the recovery phase In recovery the treadmill speed and grade or the bicycle load will change according to the protocol configuration ...

Page 137: ...d and grade no longer display Operating Steps 1 Enter or select the Reasons for Termination multiple selections are permitted 2 Select the Angina Index which is necessary to calculate the Duke Treadmill Score 3 Enter or select summary statements multiple selections are permitted 4 Enter the Conclusion 5 Click Modify to edit the Duke Treadmill Score see Duke Treadmill Score on page B 9 Enable the D...

Page 138: ...nu tabs to review and edit the data 9 Click Print or press test end to print the final report see Report Printout on page 6 56 10 Click Post Test Review to review the stored test information This will end the display of the patient ECG waveforms Note If you do not want to go to Post Test Review Click New Test to start a new test or click Initial Screen to end ECG display and go to the initial scre...

Page 139: ...Results area area for exercise measurements and machine Exercise Test Interpretation XTI E Interpretation area area for the physician s interpretation F Click to display patient list for a new test G Click to display a list with more tests of the current patient local database H Click to display a list with more tests of the current patient MUSE database system I Click to display the print setup w...

Page 140: ...results are identified with the symbol You can also choose whether or not to display the system evaluation Note After opening the edit window with Modify you can select a check box to remove the Exercise Test Interpretation from the Measurement Results window Interpretation A window opens where you can generate the test interpretation Test End Phase on page 6 29 J Click to display the interpretati...

Page 141: ... Edited values are bold To enter new data 1 Click in an empty field 2 Enter the new value Note Only the stage format of the Tabular Summary is transferred to the MUSE system METS Formula See METS Formula Metabolic Equivalents on page 6 22 for details of the METS formulas Between two stages the METS value will be interpolated The correct METS value of a stage is reached after a stage time of 60 sec...

Page 142: ...6 34 CASE Revision C 2060290 201 After the Test Post Test Review value can be changed see section Miscellaneous 1 Tab on page 12 24 ...

Page 143: ... display other trend formats Click Custom to display user configured trends Click ST Level Slope to display the trend of ST level and slope versus time Click ST HR Loops to display the 2 dimensional representation of ST level versus HR To expand the ST and HR axes click Auto Scale ST and Auto Scale HR see section Configuring Trends on page 12 15 If you purchased the STHY option ST HT Hysteresis ST...

Page 144: ...st Review Viewing the Full Disclosure ECG By selecting the Full disclosure option on the trend screen you can view the full disclosure ECG The operating controls in the full disclosure window are explained in section Full Disclosure ECG on page 6 47 942A S ...

Page 145: ...ST Changes 1 Locate the ST value in the trend graph of interest and click a new window with the corresponding median complex will open 2 Click on the ST value in the median complex window a new window with the new and old ST values appears 3 Click Yes and the ST value will be changed 943A S 1 2 3 ...

Page 146: ...w with the corresponding median complexes will open 3 Click on the TWA value in the median complex window a new window with the new and old TWA values appears 4 Click Yes and the TWA value will be changed Note Dashed lines appear in case of noisy signal and or when the heart rate is too high see TWA Heart Rate Limit in Chapter 12 System Settings under TWA Tab on page 12 30 949A S 1 3 2 ...

Page 147: ...ysis on page 6 41 73A S D B A C E F G H I J A Click the lead label to change the displayed leads B Click to display the Sample Cardiac Cycles C Click to view more sample cardiac cycles D Click to show and hide the measurement marks E Select the speed of the displayed medians F Select the gain for the displayed medians G Select the number of lines 1 3 6 H Number of medians shown per stage All cardi...

Page 148: ...2060290 201 After the Test Post Test Review I Click icon to activate the zoom and reanalysis function see next page J Click Reset to original to discard the results of the reanalysis and return to the original measurements ...

Page 149: ...n be edited To activate reanalysis Click the Zoom icon on the Sample Cardiac Cycles screen position it over a complex and click the left mouse button 74A S B D E C F G H A A Click to select another lead B Details of the selected median complex C Measurement marks determined by the system D Click to Reanalyze E Click an option button to select the complexes to reanalyze F Click to reset the measure...

Page 150: ...nalyze to restore the original analysis results Reset to original restores the original results for all complexes of the entire exercise test Performing Measurements on the Median Complex Amplitudes mV intervals ms and slopes mV s can be measured on all sample cardiac cycles 1 Position the cursor on the first measurement point and click A caliper appears 2 Position the cursor on the second measure...

Page 151: ... these leads This method prevents false positive TWA values particularly when permanently disturbed leads are excluded 938A S B C D E F H A G A Click to view more sample TWA cycles B Click to show and hide the measurement marks C Select the speed of the displayed medians D Select the gain for the displayed medians E Select the number of lines 1 3 6 F Number of medians shown per stage All cardiac c...

Page 152: ...scribed under Performing Measurements on the Median Complex on page 6 42 75A S A B C D F G E H G A Details of the selected ECG strip B Click to display the ECG Strips window C Click icon to delete the displayed ECG strip D Click to change the gain E Click to change the speed F Click icon to print the displayed ECG strip G Click to display the other ECG strips H Click icon to include the ECG strip ...

Page 153: ...n the Median Complex on page 6 42 Significant arrhythmias are displayed red 76A S A B C D F G E H A B C E G H F I D H A Click to view other Arrhythmia Review leads B Details of the displayed Arrhythmia Review strips C Click icon to delete the displayed Arrhythmia Review strip D Click to display the Arrhythmia Review window E Click to change the gain F Click to change the speed G Click icon to prin...

Page 154: ...PLT atrial fibrillation AFIB pause of 2 missed beats2 2 The arrhythmia analysis algorithm will not output these events in the presence of supraventricular arrhythmia e g atrial fibrillation PAU2 pause of 1 missed beat2 PAU1 ventricular bigeminy VBIG paroxysmal supraventricular tachycardia PSVT pacer error PERR ventricular escape beat ESC premature ventricular contraction PVC premature supraventric...

Page 155: ...when filter or cubic spline were enabled or disabled e g in the form of FRF off FRF Spline ON Spline 77A S A J B D G H I K M N O P C E F L A Click lead label to change displayed lead B Marks beginning and end of an arrhythmia C Click to display the Full Disclosure ECG window D Scroll box to display different time windows The markers to the right of the scroll bar allow direct access to the corresp...

Page 156: ...selected segments K Click icon to go to the trend display L Click icon to delete the full disclosure ECG M Select the number of waveforms viewed N Click to show and hide the arrhythmia strip markers beginning end O Select or deselect the arrhythmia color coding P Click icons for automatic scrolling of the ECG waveform adjust the scroll speed with the slider below ...

Page 157: ...up window opens 2 Select the paper speed 3 Click the Format 1 option button if you wish to print only one lead 4 Select the lead 5 Click the Format 2 option button if you wish to print multiple leads and select the leads 6 This box indicates the number of pages to print check paper supply before printing 7 Click the Save button to save the print setup 8 Initiate the printout or close the window wi...

Page 158: ...ed view of the selected region appears The operating controls basically remain the same When you click the printer icon however only that page will be printed 78A S B A A Click icon to print the displayed screen B Click icon to initiate one of the following actions the ECG strip is saved the ECG strip is printed or the ECG strip is saved and printed see section Writer Tab on page 12 12 ...

Page 159: ...edia The ECG is played back at 60 times the original speed so that you can listen to a 10 minute recording in 10 seconds Playback of the recording is in stereo lead V2 is assigned to the left channel lead V5 to the right channel The continuously increasing heart rate corresponds to the exercise phase the subsequent decrease to the recovery phase Arrhythmias can be heard very clearly Also refer to ...

Page 160: ...asurement of the corresponding point in time associated phase stage HR BP and METS appear at the right 79A S A C D F H B E G A Click the lead label to change the displayed leads B Median complex selected in the waterfall C Click to display the Waterfall D Select check box to view the 3D graph see next page E Color code of the different amplitudes in mV F Details of the selected median complex G Cl...

Page 161: ...Revision C CASE 6 53 2060290 201 After the Test Post Test Review 3D Graph 84A S A B C A Click to select another lead B Click to rotate the display horizontally C Click to rotate the display vertically ...

Page 162: ...creen shows the measurements from the 12SL ECG analysis 80A S A B C D F E A Analysis results B Click to change the gain C Click to change the speed D Click to display the 12SL Report E Click to select another 12SL ECG F Click to view the corresponding Vector Loops see next page ...

Page 163: ... perform measurements as described in section Measuring the ECG on page 5 15 The vector loop is saved with the 12SL report only if the message Median update ceased Relearn has disappeared from the ST Arrhy window at the time the 12SL report is stored 81A S A B C D A Median complex B Click torso to toggle between right and left sagittal planes C Click to change the gain D Click to return to the 12S...

Page 164: ...e documents for the report Configured Report Tabular Summary Graded Exercise Summary Report etc In the Trend Reports section select the report formats to print 2 Select the gain 3 Select the Configured Report format see section Report Editor on page 12 10 4 Select the number of copies for each report section 5 Select the printer 6 Check the total number of pages 7 Initiate the printout 8 Click Del...

Page 165: ...Revision C CASE 6 57 2060290 201 After the Test Post Test Review Temporary changes to the selections will be lost when you close the window ...

Page 166: ...t 5 seconds of raw data at a speed of 50 mm s x 6 Rhythm Report A continuous real time recording of raw ECG data 3 6 12 leads Leads for arrhythmia report correspond to leads on the screen not with laser printer Arrhythmia Report Automatic 10 second documentation of arrhythmias showing 2 5 seconds of raw data prior to ectopic beat Leads for arrhythmia report correspond to leads on the screen Recall...

Page 167: ... I II III aVF V2 V6 V1 aVR aVL excluded for ST elevation aVR is excluded Sample Cardiac Cycles Records median morphologies for 12 leads at user defined intervals Intervals defined in Protocol Editor for each protocol by configuration of Store Median interval 25 or 50 mm s Trend Reports Records plots of PVCs heart rate and blood pressure or any custom combination of parameters Trends Custom Also pr...

Page 168: ...s enabled at the remote station see section Miscellaneous 1 Tab on page 12 24 The pretest phase has already started 1 Click Remote View on the initial screen to view the remote exercise test screen 2 Click the Setup button and enter the PC names in the left column of the window 3 Click the arrow buttons to enter the corresponding IP address automatically If the system does not find the IP address ...

Page 169: ...evision C CASE 6 61 2060290 201 Monitoring of Remote Exercise Test Workstations C Click to return to the initial screen D Name of the remote station E Click to change the gain F Click to change the speed ...

Page 170: ...6 62 CASE Revision C 2060290 201 Monitoring of Remote Exercise Test Workstations For your notes ...

Page 171: ...Revision C CASE 7 1 2060290 201 7 Ambulatory Blood Pressure Measurement ...

Page 172: ...7 2 CASE Revision C 2060290 201 For your notes ...

Page 173: ...the TONOPORT Operator s Manual Caution Patient Hazard Disconnect TONOPORT from the patient when it is connected to the PC Note Check that the correct port for the ambulatory blood pressure monitor is configured see section Devices Tab on page 12 53 The blood pressure can be measured in kPa or mmHg For selection of the blood pressure unit see Country Settings Tab on page 12 59 Connect TONOPORT V de...

Page 174: ...d first TONOPORT V devices of version 2 0 and later will automatically copy that patient s ID number from the CASE database D Click to download the stored data to the system E Click to delete the data stored in the ambulatory blood pressure monitor F Click to load system setups stored for different system users G Click to display the setup menu for ambulatory blood pressure measurements see sectio...

Page 175: ...P measurements and the duration of the protocol D Information whether or not data is stored in the monitor With TONOPORT V version 2 0 and later E Patient ID stored in the TONOPORT device F Patient data from the CASE database assigned to the patient ID 4 Click the Clear Data button to delete data stored in the monitor with TONOPORT V devices version 2 0 and later this command will also clear the p...

Page 176: ...o protocols Refer to section Editing the BP Protocol on page 12 32 for information on configuring the protocols Note If you are using TONOPORT V devices version 2 0 and later check the displayed patient data to avoid data mismatch 7 Turn the monitor off and disconnect it from the PC 8 Connect the monitor to the patient see TONOPORT Operator s Manual ...

Page 177: ...tient Simply click Select and you will see the acquisition screen Be sure to download the data to the same database from which you read the patient ID 4 Click Connect 5 Click Download Data After the download the Test Summary tab appears Note Do not forget to delete the data stored in the monitor This is to ensure that the monitor does not contain data from a previous test when used on a new patien...

Page 178: ...Measurement Results Statistics Summary E Interpretation F Click to display patient list for a new test G Click to display a list with more tests of the current patient local database H Click to display a list with more tests of the current patient MUSE database system I Click to display the print setup window J Click to display the interpretation window where a detailed interpretation of the test ...

Page 179: ...o the patient Note The Patient Information can be assigned to the patient file or only to the pending test Test Information The Test Information window opens These are the tabs of the menu Patient Information Test Personnel Medications You can edit the data the changes you make will be assigned to this procedure not to the patient or display the other tabs by clicking the tab headers 184A BP 185A ...

Page 180: ...ist boxes 4 Type any Comment about the test 5 Answer the Extra Questions 6 Enter an Order Number This number will appear on the printed reports and on the Test Summary Note The Reason for Test library can be edited see section Miscellaneous Tab on page 12 33 You can define two Extra Questions as needed see section Miscellaneous Tab on page 12 33 You enter the names of the physicians and of the tec...

Page 181: ...atistics intervals and the blood pressure limits for this report 053A R 3 2 1 193A BP A B C D A Select to perform the statistical analysis with the Statistics Intervals from the ambulatory BP device otherwise the intervals set in the system will be used see section Editing the BP Protocol on page 12 32 The check box is accessible only when 1 or 2 BP periods have been selected at TONOPORT V B Selec...

Page 182: ...e Interpretation area you can edit the texts as needed enter new text copy cut paste etc Refer to section Editing the Interpretation Library on page 12 34 for information on editing the standard texts Note As an alternative you can double click a text to copy it from left to right 186A BP A B C D E A Click icon to open folders individually B Click icons to simultaneously open or close all folders ...

Page 183: ...1 2 and 3 This format can be preset in the System Settings and is saved as a user specific configuration The selected format will also be used for printouts A small window with the values corresponding to the measurement will be displayed as you move the mouse over the diagram For measurements taken with TONOPORT IVa the ECG strips are also displayed 187A BP B A C D A Click a tab to display the co...

Page 184: ...r Summary Note Individual measurements in the Tabular Summary can be suppressed by double clicking or by clicking with the right mouse button they can be restored in the same way Suppressed measurement data are excluded from the statistical analysis 188A BP ...

Page 185: ... CASE 7 15 2060290 201 Post Test Review Hourly Averages The diagram shows the Hourly Averages of all measurements taken during the monitoring period Click Tabular to view the same values in tabular format 189A BP ...

Page 186: ... the diastolic values right as well as the frequency distribution given as a percentage The table below indicates the maximum minimum and mean values as well as the standard deviations The percentage of readings that exceeded the set limits is shown at the bottom Similar report pages exist for the day time the night time and the wake up time 190A BP ...

Page 187: ...hics Tabular all measured values in tabular format Hourly Averages tabular and graphics format Statistics Summary Statistics Summary as histogram minimum maximum and mean values standard deviation Phases same as Statistics Summary but divided into day time wake up time and night time ECG Strips all ECG strips in chronological order TONOPORT IVa Configured Report 2 Select the number of copies to pr...

Page 188: ...7 18 CASE Revision C 2060290 201 Post Test Review For your notes ...

Page 189: ...Revision C CASE 8 1 2060290 201 8 Spirometry Test ...

Page 190: ...8 2 CASE Revision C 2060290 201 For your notes ...

Page 191: ...ments LF 501 respiration flow sensor for VC and FVC measurements For information on setup and operation of the sensors refer to the separate operator manuals Check whether the system is set up for the correct sensor see section Devices Tab on page 12 53 and connect the sensor to the configured port ...

Page 192: ...t click Modify to change 2 Enter a designation for the Room 5 characters max 3 Select a Location Number or a Location Name names can be configured on the MUSE tab see MUSE Tab on page 12 55 4 Check that the patient information is complete Note Depending on the selected reference value equation the program requires the gender height weight date of birth and race data for calculation of the spiromet...

Page 193: ... the list boxes 5 Type any Comment about the test 6 Answer the Extra Questions 7 Enter an Order Number This number will appear on the printed reports and on the Test Summary Note The Reason for Test library can be edited see section Editing the Reason for Test Medication Library on page 12 36 You can define two Extra Questions as needed see section Miscellaneous Tab on page 12 36 You enter the nam...

Page 194: ...nformation Medications 1 Click the Medications tab 2 Enter or choose a maximum of 5 medications 3 Enter the medication dose Note You can edit the medication library see section Editing the Reason for Test Medication Library on page 12 36 53A R 3 2 1 ...

Page 195: ...ATS mode American Thoracic Society the program will first determine the best expiratory and inspiratory curves of a test based on the largest sum of FVC FEV1 or FIVC FIV1 Then the system will determine the test acceptability using the ATS criteria see Acceptability Criteria on page 8 10 The best three tests are sorted according to the largest sum of FVC FEV1 and stored see ATS Summary table In the...

Page 196: ...ection Acquisition Tab on page 12 35 for information on selecting the Measurement Mode the Interpretation Mode or the Equation for Reference Value Calculation or on entering the PT Code 201A SP S R H A B C E I J K L N M D Q F G O P A Click buttons to change the waveform scale B Click option button to display the flow volume loop C Click option button to display the volume time curve D Reference cu...

Page 197: ...easurement the patient should sit straight and hold the SpiroSoft sensor in a horizontal position 4 Click Start Test then click OK to confirm that the patient is not yet breathing through the sensor I Click to start the test J Click to start the bronchodilator test K Click to terminate the test L Click for the post test review M Click to load system setups stored for different system users see sec...

Page 198: ...ar Note The flow volume measurements in the ATS mode must meet specific criteria Acceptability Criteria The exhalation in the FEV1 maneuver must be longer than 6 seconds configurable beep see section Acquisition Tab on page 12 35 Otherwise you will see the message Exhalation too short An expiratory plateau must be achieved i e the expiratory volume must not vary more than 30 ml within the last sec...

Page 199: ... 202A SP B C E D F A A Click option button to display the volume time curve B FEV1 value C Click option button to display the Current test the Best test or the ATS Summary D System evaluation according to the selected interpretation mode for Best test only E Measuring values reference values and percentage deviation according to the selected equation for calculation of the reference values F ATS a...

Page 200: ...des are not available VC Measurement 1 Explain the test maneuver to the patient 2 Attach nose clip to ensure that the entire respiratory volume passes through the sensor 3 Click Start Test and ask your patient to perform the following maneuver when the orange indicator on the sensor lights up Inhale exhale and inhale again completely through the sensor Then your patient may resume normal breathing...

Page 201: ...uver to the patient 3 Check the nose clip 4 Click Start Test and ask your patient to perform the following maneuver when the orange indicator on the sensor lights up Inhale completely through the sensor Exhale maximally and as quickly as possible then inhale again completely and as quickly as possible Then your patient may resume normal breathing ...

Page 202: ...he system evaluation or deselect G Click to display patient list for a new test H Click to display a list with more tests of the current patient local database I Click to display a list with more tests of the current patient MUSE database system J Click to display the print setup window K Click to display a list of tests to compare with the current test L Click to display the interpretation window...

Page 203: ...culation of reference values Test Information The Test Information window opens see Entering Test Information on page 8 4 Note The Test Information is not assigned to the patient but to the test data FVC Measurement Click the FVC Measure tab to display the acquisition screen with the corresponding flow volume loop and the measuring values The status line indicates the ambient conditions set at the...

Page 204: ...opied to the Interpretation area on the right In the Interpretation area you can edit the texts as needed enter new text copy cut paste etc Refer to section Editing the Interpretation Library on page 12 37 for information on editing the standard texts Note As an alternative you can double click text to copy it from left to right 206A SP A B C D E A Click icon to open folders individually B Click i...

Page 205: ... changing the setup permanently 1 Select the documents to be included in the report Configured Report Standard Page with Flow Volume Loop Volume Time Curve Measurements Interpretation appears on the Standard Page 2 Select the number of copies to print 3 Select a format for the Configured Report click Modify to display the Report Editor see section Report Editor on page 12 10 4 Select the printer 5...

Page 206: ...ther one of the same patient recorded earlier 1 Click Compare A window opens listing all the patient s spirograms 2 Select a test 3 Click OK to clear the window 204A SP A B C A Data relating to test 1 reference test test selected first B Click tab to display the flow volume loops and tabular data C Data relating to test 2 ...

Page 207: ...n screen with the flow volume loop The screen shows the two curves and the percentage deviation from the reference values or the percentage of the reference values attained 209A SP A B A Click option button to display the volume time curve B Change the tabular display from of ref values to deviation from ref values ...

Page 208: ...8 20 CASE Revision C 2060290 201 Post Test Review For your notes ...

Page 209: ...Revision C CASE 9 1 2060290 201 9 File Management ...

Page 210: ...9 2 CASE Revision C 2060290 201 For your notes ...

Page 211: ...rds can be viewed edited printed exported to another storage medium transferred to the MUSE database system or deleted Click Local Database to open the window with the names of all stored patients In this window you can click Test to view all tests select a patient and then click Test to view only this patient s tests ...

Page 212: ...d and confirmed by a physician transferred the patient record was transferred to the MUSE system Full disclosure ECG the full disclosure ECG has been stored Patient patient s name when all tests in the database are listed The list can be sorted by columns To do so click on a column header with the left mouse button The right mouse button is used to restore the original width of a column H Enter a ...

Page 213: ...update the list according to your selections 4 Select a patient record by clicking Note Patient records marked with an asterisk are stored on an external medium You can select multiple patient records holding the Shift key depressed Click Select all to select all displayed patient records In a network environment do not review a patient s test at more than one workstation at a time N Click button ...

Page 214: ...iew the record only in that case it remains on the external medium or if you want to restore it to your PC Patient records transferred to the MUSE system database can be viewed and printed with the MUSE Browser When you have selected the option Delete local test data after transfer to MUSE on the MUSE tab see section MUSE Tab on page 12 55 all test data will be automatically deleted from the local...

Page 215: ...rompted The MUSE web page will appear 3 Select Display with Frame or Display without Frame 4 Submit query or identify the patient record to be retrieved by patient ID or name 5 Display the individual documents of the patient record 6 Print reports using the Acrobat Reader printer tools on screen tool bar directly above the report page DO NOT use the Internet Explorer printer tools toolbar at the t...

Page 216: ...ect all Save to Archive To save the patient record s to a SD card click the Save to Archive button Note Use SD cards ONLY to transfer data from MAC ECG systems To send the patient record s to a MUSE system click the Transfer to MUSE button Note This button is enabled only if the data transfer to the MUSE system has been selected on the MUSE tab see MUSE Tab on page 12 55 Data sent to the MUSE syst...

Page 217: ...n the program is configured accordingly see MUSE Tab on page 12 55 Data sent to the MUSE system can be viewed and printed with the MUSE Browser Please note Select the Landscape format before each printout Send Click the Send button to send the patient record s via modem or save them to a storage medium To send records via modem click Transmission via modem enter telephone number name and password ...

Page 218: ...the Export button to export the data For the PDF format select the documents to print in the Print window A Select option button to export data as a PDF file B Select option button to export data as a Microsoft Word file C Select option button to export the attached documents ergospirometry D Select option button to export data as a Microsoft Excel file E Select option button to export data as an ...

Page 219: ...12 23 Otherwise the setup screen for configuration of the final report will appear C Enter the printer driver for PDF files D Select check box if you wish to automatically export each test after completion as a PDF XML or Word file and with the name selected at E and whether the attached documents are to be included in the export E Select the patient and or test information to be included in the f...

Page 220: ... the data network 2 Click System Configuration to display the system configuration menu 3 Click Database 4 In the Database Setup window select use offline database The patient list without the corresponding examinations will be copied to the local database Now you can disconnect the PC from the data network and continue working with the local database as usual i e you can select a patient and perf...

Page 221: ...se Offline Database When you terminate the program with this button the patient list will be copied to the local database Continue working with your PC as usual When you have finished working with the local database exit the program reconnect the PC to the network and start the program New tests as well as new patients for whom tests exist will automatically be copied to the database on the server...

Page 222: ...9 14 CASE Revision C 2060290 201 Working Temporarily with the Local Database For your notes ...

Page 223: ...Revision C CASE 10 1 2060290 201 10 Operation with Administrative Tools ...

Page 224: ...10 2 CASE Revision C 2060290 201 For your notes ...

Page 225: ...E 10 3 2060290 201 Overview Overview The program can be used in combination with the following administrative tools medical reimbursement program hospital information system HIS EMR system electronic medical records ...

Page 226: ...will have to exit the examination program and choose the patient in the administrative tool After ending the test and terminating the examination program the most important data but no curves will be transferred to the administrative tool Dialog between the administrative tool and CASE start of the administrative tool selection of the patient display of the patient s medical record selection of an...

Page 227: ...Revision C CASE 11 1 2060290 201 11 DICOM Interface ...

Page 228: ...11 2 CASE Revision C 2060290 201 For your notes ...

Page 229: ...tocol for the exchange of these data The following functions are supported performing procedures on the basis of the order list scheduled examinations performing procedures without the order list unscheduled examinations sending procedure data to the archiving system Note A valid DICOM option code will activate the DICOM interface as well as the DICOM tab Configurations on the DICOM tab should be ...

Page 230: ...rst An order list query is automatically sent via the network These are the default search criteria orders for all patients orders for the present day today orders assigned to this workstation 3 If required you can changed these default settings Then click Find to start the query 4 Select the order from the list More details can be found below the order list 5 Click Start Procedure The procedure w...

Page 231: ... after it has been analyzed see Field Service Manual the data will be sent to the archiving system Depending on the DICOM configuration only the ECG waveforms for exercise stress tests only or the ECG waveforms and the test report as configured for the printout will be sent to the archive After a successful transfer the exam is labelled Transferred DCM in the examination list When the data were su...

Page 232: ...these fields depends on the program configuration B Search criterion for the workstation find orders for a specific workstation or find orders for all workstations C Search criterion date find orders for the selected time period or find orders irrespective of a time period D Search criterion patient name patient ID find orders for patients with a given last name or patient ID or find orders for al...

Page 233: ...Revision C CASE 12 1 2060290 201 12 System Settings ...

Page 234: ...12 2 CASE Revision C 2060290 201 For your notes ...

Page 235: ...C Select or deselect display of the 1 mV calibration pulse D Select the speed and gain screen E Select the screen format F Select to hear the lead off alarm If selected the system will emit a beep when an electrode becomes disconnected G Select to enable the Cubic Spline algorithm automatic compensation of baseline fluctuation Cubic Spline causes a signal delay of approx 2 seconds H Click to enabl...

Page 236: ...etup Editing the Reason for Test Library In this window you can edit the library for the Reason for Test list box You can enter a maximum of 12 statements 1 Click Modify to display the Reason for Test library 2 Select a blank line 3 Enter the text ...

Page 237: ... Click a line to highlight it 3 Click a second time to enable the edit mode and enter your changes 4 With the icons at the bottom of the window you can open or close folders insert chapters insert lines delete chapters sort texts alphabetically 92A R A B C D A Click icon to open or close folders B Click icon to insert chapters or lines C Click icon to delete chapters D Click icon to sort texts alp...

Page 238: ...ng Drug Names 1 Click Modify to display the Medications library 2 Click down arrow to open the list 3 Select the medication group 4 Click the Drug Name box and enter the medication name Note Assigning the correct names to the groups is the responsibility of the physician 93A R 2 2 4 4 ...

Page 239: ...ed Modifying the Lead Sequence 1 Select the number of monitored leads These are the leads to be recorded 2 Select a Lead Sequence 3 Open the list box of the channel where you want to record another lead and select 4 Enter the lead label Configuring Leads Ex1 Ex2 Ex3 5 Choose unipolar or bipolar 6 Choose the 1st electrode site for Ex1 7 Select the 2nd electrode site for Ex1 bipolar the 2nd site for...

Page 240: ...cer pulses will be displayed with an amplitude of 0 5 mV QRS Beep The system emits a beep each time it detects a QRS complex only with CAM 14 acquisition module Axis Graph An axis graph is shown in Tabular Summary and in the Median Report B Select sampling rate for full disclosure ECG C Enter prompt for Extra Question 1 appears in Test Information Test Personnel D Select answer format for prompt 1...

Page 241: ... Medians Vector Loops 2 Select the screen format for the 10 second ECG You can choose two more formats 3 Select a report format 4 Click Modify to edit the report or create a new Configured Report see Report Editor on page 12 10 5 Select the number of copies to print 6 Select the rhythm leads 7 Select the printer 8 Choose the leads if you selected the Swedish H1 format 9 Select check box if you wis...

Page 242: ...e At the time the report is printed the program will replace these report items with the actual data 1 Click to select and open a report template 2 Click in the window and type the text 3 Click Insert Report Items to open the list of available data fields and select an item by double clicking 4 Highlight the text and select the font 5 Select the font size 6 Select the font format bold italics or u...

Page 243: ...is name will allow you to select the template later on when configuring the printed report If edited Reports 1 and 2 must be saved under a new name 11 Click to delete the template 12 Close the Configured Report window A Click to select the logo B Use arrow buttons or text fields to define the size and position of the logo A B 944A ...

Page 244: ...e writer gain C Click to select the writer speed D Click to select writer for In Test Reports E Select or deselect automatic in test reports configured in the Protocol Editor see Protocol Editor Tab on page 12 19 F Select or deselect display of the ST Table in the 12 lead reports G Define output of manually acquired in test reports Print Print Save or Save H Select peak exercise report type none M...

Page 245: ...gnal ratio low middle high electrodes with a high impedance are shown yellow D Select the gain for the displayed ECGs E Select the speed for the displayed ECGs F Select a median group Then select the leads for this group G Select the ECG format for the screen display H Click to configure the Tabular Summary see next page I Click to configure the Trends see Configuring Trends on page 12 15 K Click ...

Page 246: ...Configure Tabular Summary on the Screen Tab on page 12 13 to display the configuration window The highlighted items are selected for display 1 Click a highlighted item to deselect it 2 Click a deselected item to select it 3 To create your own column headings a Type the new column heading b Click a heading to select it Note You can enter the values for columns 1 through 5 either directly in the Tab...

Page 247: ...gure Trends on the Screen Tab on page 12 13 to display the configuration window You can choose the parameters for 6 graphic trends 1 Select the parameter for the left Y axis 2 Select the parameter for the right Y axis 3 Choose the ECG lead for the ST related graphic trends 911A S 2 1 3 ...

Page 248: ...lds to select the vital signs to display 2 Right click a window item to choose a different font size or move the item These are the choices in the menu move bigger font smaller font 3 Click the appropriate item in the menu to change the font size 4 Click Move to choose another location for the item A box appears around the selected item 5 Click in the box and holding the mouse button down move it ...

Page 249: ... name You may also define different lead sequences for the screen display and the printouts Note The first two lead sequences are fixed and cannot be modified Modifying the Lead Sequence 1 Select the number of monitored leads These are the leads to be recorded 2 Select a Lead Sequence 3 Open the list box of the channel where you want to record another lead and select 4 Enter the lead label 5 Selec...

Page 250: ... or bipolar 7 Choose the 1st electrode site for Ex1 8 Select the 2nd electrode site for Ex1 bipolar the 2nd site for unipolar leads is always CT 9 If required change the name of the lead sequence step 2 and click OK to save If you change any of the selections of an Ex lead the sequence name is given as ...

Page 251: ...m a blank template e g TEST 14 3 Click Modify F to edit existing protocols or create new ones This displays the Protocol Editor window Note You can select protocols for pharmacological tests e g Dobutamine at D 914A S A B D E F C D E F A Click to print the exercise test setup B Click option button to select the treadmill exercise testing device C Click option button to select the bicycle ergometer...

Page 252: ...ected on the Writer tab The medians saved with Store Median are included in the Medians report 915A S A B C D E F G H I J A Phase name B Selected protocol C Stage name D Select or deselect a ramping phase continuous speed load increase selectable only when phase name e g BRUCE is highlighted separately adjustable for each phase ...

Page 253: ... interval after first report Median Report First time of first median report Median Report Repeat print interval after first report BP First time of first BP prompt or measurement BP Repeat interval after first BP prompt or measurement Store Median First time first median stored Store Median Repeat interval after first stored median F Click a button to add a new protocol delete or print an existin...

Page 254: ... delete this stage or phase click the Delete stage or Delete phase button 7 To add a stage click Add stage 8 To add a phase select a phase Then click Add phase or Add graded phase The new phase is inserted below the selected phase Note New protocols can be created only when the displayed protocol is blank or was deleted New phases can be created only when an existing phase is deleted first and whe...

Page 255: ...se Test Interpretation XTI Sample Cardiac Cycles ECG Strips Arrhythmia Review All prints all stored strips or arrhythmias Selected prints ECG strips or arrhythmias from the post test review 12SL Vector Loops Waterfall Sample TWA Cycles with measurement marks median complexes with ST measurement marks 2 Select a report format 3 Click Modify to edit the report or create a new Configured Report see R...

Page 256: ... the Max predicted HR WHO max predicted HR 220 age AHA max predicted HR for age 25 160 for age 75 115 for age between 25 and 75 160 age 25 x 45 50 D Select FRF or Cubic Spline see A E Select the Target HR as a percentage of the max predicted heart rate and the max blood pressure F Choose the arrhythmia lead selection mode Scan or Manual if Manual select leads G Select the reports to be initiated w...

Page 257: ... x load increase stage time Example load of the last completed stage 125 Watts last stage aborted after 1 minute load increase 25 Watts stage time 2 minutes 125 W 1 x 25 2 137 5 W This value is also used to determine the percentage of the target load J Select Save full disclosure ECG then choose the phase when storage of the full disclosure ECG should start the sampling rate and whether or not you...

Page 258: ...to open the edit window 2 Edit delete or add new statements Configuring the Measurement Results 1 Click Modify to display the Measurement Results window 2 Select the parameters to be included in the Measurement Results Test Summary Note ST HR Index is the maximal change in ST depression as a function of change in heart rate during recovery Selection of multiple parameters may cause report header t...

Page 259: ...e topics if data will be sent to MUSE Additional statements can be entered in the window on the right To do so click in the blank space below the last statement 1 Select the topic to edit 2 Click in the text box and edit the text 3 Delete or change existing statements or add new ones a maximum of 20 statements can be entered for each topic 4 Click the up down arrows to change the order of topics a...

Page 260: ...ing Extra Questions Click Modify to open the Extra Questions window 1 Click in the text box for the first question and type a text 20 characters max 2 Select the answer format Alphanumeric Numeric Yes No 3 Enter the second question in the same way 920A S 1 2 3 ...

Page 261: ... J points B Click option button to select calculation method for post J point Manual set post J point at D Auto select formula at C C Select formula for calculation of post J point D Manually select post J value E Select or deselect the ST Criteria F Click option button to select ST Slope criteria G Select the max ST elevation depression when the limit is reached a message appears on the acquisiti...

Page 262: ...nformation time it was saved heart rate TWA and noise values for each lead 923A S B F A C D E A Select the TWA Heart Rate Limit TWA values whose HR exceeds this limit are excluded from calculation of the maximum TWA value and are identified with a question mark on the display B Select the TWA Noise Limit TWA values whose noise value exceeds this limit are excluded from calculation of the maximum T...

Page 263: ...Select box to change the statistical night time D Click to select the measurement protocol E Click to edit the protocol see next section F Click to change the systolic blood pressure limit for the day time G Click to change the systolic blood pressure limit for the night wake up time H Select check box to add the pulse pressure value systolic pressure minus diastolic pressure to the following repo...

Page 264: ...er measurements are to be taken at exactly or at approximately the selected intervals 5 Select the BP interval 6 Select the deflation rate 7 Enter a name for the protocol 8 Select the inflation pressure for the first measurement 9 Select the length of ECG strips TONOPORT IVa only 10 Select whether you wish to record an ECG with each with every second or with every third BP measurement TONOPORT IVa...

Page 265: ...he ambulatory blood pressure measurement setup B Select documents to be included in the report C Select the Configured Report format D Click button to edit the Configured Report or create a new one see Report Editor on page 12 10 E Select number of copies F Enter Extra Question 1 20 characters max G Enter Extra Question 2 20 characters max H Select the answer format for the Extra Questions I Click...

Page 266: ...rpretative statements You can enter a maximum of 12 statements 1 Click Modify to display the Interpretation library 2 Click a line to highlight it 3 Click a second time to enable the edit mode and enter your changes 4 With the icons at the bottom of the window you can open or close folders insert chapters insert lines delete chapters sort texts alphabetically ...

Page 267: ... and saturation with water vapor at a body temperature of 37 C Note Exiting the spirometry setup menu with OK confirms all data and the PT code At the same time date and time in the PT Code line on the acquisition screen will be updated 205A SP A B CD E F GH I J K A Click to print the spirometry test setup B Select the Equation for Reference Value Calculation C Select the Interpretation Mode D Sel...

Page 268: ...spirometry test setup B Select documents to be included in the report C Select the Configured Report format D Click button to edit the Configured Report or create a new one see Report Editor on page 12 10 E Select number of copies F Enter Extra Question 1 20 characters max G Enter Extra Question 2 20 characters max H Select the answer format for the Extra Questions I Click to edit the Reason for T...

Page 269: ...atements You can enter a maximum of 12 statements 1 Click Modify to display the Interpretation library 2 Click a line to highlight it 3 Click a second time to enable the edit mode and enter your changes 4 With the icons at the bottom of the window you can open or close folders insert chapters insert lines delete chapters sort texts alphabetically ...

Page 270: ...n or pre acquisition screen or from the the General tab of the System Configuration see General Tab on page 12 40 Save 1 Click the Save button 2 In the Save Setup window select the target drive from the list Hard drive Disk drive A 3 Select a line in the Setup window A 4 In the Save As box enter a name 5 Click Save Note With this command you save the setups of all modalities not just of the select...

Page 271: ... the Factory Setup will delete your own exercise test protocols and phases The following parameters cannot be loaded stored or reset to the factory defaults Exercise Tests Remote View thermal writer port Spirometry Tests ambient conditions System Configuration all settings on the General tab Load the Factory Setup 1 Click the Custom Setup button on the acquisition or pre acquisition screen or on t...

Page 272: ...ct the simulated patient data for demonstration purposes only to avoid misinterpretation of the data Anti Aliasing Select check box to smooth the ECG signal traces Enable Test Information Window Select check box to automatically display the Test Information window on the acquisition or pre acquisition screen Select check box to automatically delete tests saved to an archive B Enter or select the d...

Page 273: ...to display the assignment list available only when unassigned tests exist see Assignment List on page 12 47 I Click to transfer resting ECGs see Receiving Resting ECGs from Other ECG Devices on page 12 45 J Click to copy patient records to another medium The patient records remain stored in the local database see Copying Patient Records on page 12 48 K Click to archive patient records not currentl...

Page 274: ... 201 System Configuration Adjusting the Screen Size for Widescreen Monitors 1 Select custom 2 Click 3 Adjust the height of the displayed window to 10 cm using a ruler 4 Adjust the width in the same way 5 Clear the window 3 4 5 945A ...

Page 275: ...local user list will be deleted 1 Click Set Administrator User Name to log on as administrator 2 Select a user from the list 3 Register the user with the appropriate privileges Note Note down the administrator s user name and assign all privileges to the administrator Call up the capture settings from the User List The selected events will be captured The records are saved to the Event Log You inv...

Page 276: ...er ID numbers assigned at the CASE unit 2 Select the user group 3 Select the user s custom setup see Custom Setups Factory Setup on page 12 38 4 Select the user s privileges Edit Data user is authorized to edit test and patient data System Configuration user is authorized to edit the System Configuration Setup user is authorized to edit the test settings 5 Enter a password Be sure to remember the ...

Page 277: ... 1 Select the transmission modality ECG system connected to modem port CASE ECG recorder connected to modem port MAC ECG recorder If you wish to accept only procedures from registered physicians select the check box The physician s last name must be entered at the MAC 1200 and MAC 1600 before acquisition of the resting ECG The same physician s name must be registered in the user list in the physic...

Page 278: ...nually Conditions for automatically assigning tests to patients The patient ID is new and is transferred to the database together with the patient data of the incoming test The patient ID already exists and last name first name as well as the date of birth are identical with the information of the incoming test Blank data fields are considered as identical If these conditions are not met the test ...

Page 279: ...pport or your local Service Representative Assignment List In the assignment list you will find all tests that were not automatically assigned to a patient record This list appears whenever incoming ECGs cannot be assigned or you can display it manually from the General tab see General Tab on page 12 40 1 Click the patient record 2 Click Find to select the patient or enter a new patient 3 Click to...

Page 280: ...from a removable media or network drive to the local database When moved the data record will be deleted from the source medium Click Copy Patient Records J on the General tab to display the setup window 1 Select the patient 2 Select the patient records to copy 3 Select the target drive and or directory 4 Click to copy patient records TO a USB drive or SD card 5 Click to move patient records FROM ...

Page 281: ...atabase system only after they have been restored Click Archive Patient Records K on the General tab to display the setup window 1 Enter a date patient records older than this date will be archived 2 Click the Archive button 3 Insert the storage medium and after archiving label it with the number displayed 4 Select the target drive or directory 5 Click OK Observe the instructions displayed on scre...

Page 282: ...e will be compressed 2 Click the Compress button Note When working in a network environment quit the program before copying or compressing patient records Run a backup of all data before copying or compressing them Please note that the size of each copied file must be less than the capacity of the storage medium Changing System Date and Time Click Change System Date Time M on the General tab to di...

Page 283: ...ted to authorized system users Procedure Statistics Click Procedure Statistics N on the General tab to display the setup window 1 Enter the date range for the statistical analysis 2 Select the period month quarter year 3 Click to calculate the statistics 4 Click to export the data to Microsoft Excel 932A 3 1 4 2 ...

Page 284: ...rinter O on the General tab page 12 40 to display the setup window 1 Select the printer 2 Select the Color Printouts check box if desired 3 Define the colors 4 Select the ECG grid format 5 Click Default to restore the initial settings 6 Click OK to clear the window 946A 4 3 2 1 5 ...

Page 285: ...e modality is inactive E Click to select the SpO2 monitor model and the port F Click to select the ergometer model and the port G Click to select the ambulatory BP device and the port none indicates that the modality is inactive H Enter or select the path to the Holter ECG program I Select deselect an external program for spirometry enter or select the path J Specify the TTL output signal characte...

Page 286: ... not in the patient vicinity Note For Dial Mode Hang up Prefix and Hang up Suffix please refer to the user manual of your modem 934A A B C E D A Select modem port and baud rate same baud rate at sending and receiving units B Select the modem type C Field for entry of the initialization string entered automatically for MultiTech and ELSA modems initialization string for other modem types e g MultiT...

Page 287: ...information required for communication with the MUSE web system C Select if SSL is configured at the MUSE Web server D Box for entry of the port number E MUSE exercise test lists comments reason for test interpretation etc are used Yes No Click Synchronize Lists to load the lists from the MUSE Web server F Select when data is not transferred to a MUSE system G Select to transfer data to a MUSE sys...

Page 288: ...modification to a test to the MUSE system L Select to automatically delete patient records from the local database after transfer to a MUSE system M Select to start the modem connection before the transfer N Enter the MUSE Site number O Click to configure the Internet browser Enter the path to the Internet browser to start the MUSE Browser Both the Internet browser Internet Explorer version 4 0 an...

Page 289: ...ion The following exercise test information is not transferred to the MUSE system because MUSE does not support this type of data Sokolov index QT dispersion full disclosure ECG arrhythmia review ST HR slope ST HR index waterfall TWA trends TWA medians ...

Page 290: ...d option code sheets or on a disk 1 Click Modify 2 When asked Change software option Are you sure click Yes to clear the window 3 Enter the option code in the appropriate field or 4 Click Load to load the option code from disk 5 To enable an option for a limited period of time click the icon and enter the expiration date if not yet displayed Note If you are working with the simulated test data Tes...

Page 291: ...he control buttons with text labels C Select to limit the length of patient IDs 3 to 29 digits D Select to enable the Patient ID Check feature select patient ID type E Select to enable the Swedish report formats F Select the language G Select the time and date format H Select the units for weight height and speed the same speed unit must be selected at the treadmill I Select the ST level unit J Se...

Page 292: ...rface via a network B Select to transfer data to the EMR interface via a shared directory C Set or select the communication folders read orders from the EMR interface write data to the EMR interface D Click to view the error log E Set or select the error log folder F Click to start data transfer patient data test data from CASE to the EMR interface directories selected at A or B ...

Page 293: ...A A B C D F E A Select to automatically export data in Word XML or PDF format as configured in the System Configuration see System Configuration on page 12 40 and Export on page 9 10 The selection is also valid for data export to the MUSE system see MUSE Tab on page 12 55 If deselected the system settings defined for export and for MUSE apply B Select to delete patient records that were successful...

Page 294: ...ttings 948A A B C D E A Click to select the target directory the existing directory where the incoming data are stored will be added here The connectivity server will monitor this directory and the data received will be downloaded B Click to select the type of connection Serial or Modem C Click to select the modem type see Modem Tab on page 12 54 D Click to select the port for the connectivity ser...

Page 295: ...60290 201 System Configuration DICOM Tab Note A valid DICOM option code will activate the DICOM interface as well as the DICOM tab Configurations on the DICOM tab should be referred to IT Service staff see Field Service Manual ...

Page 296: ...12 64 CASE Revision C 2060290 201 System Configuration For your notes ...

Page 297: ...Revision C CASE A 1 2060290 201 Cleaning and Maintenance A Cleaning and Maintenance ...

Page 298: ...A 2 CASE Revision C 2060290 201 Cleaning and Maintenance For your notes ...

Page 299: ...ith a phenol base or peroxide compounds to disinfect the external surfaces Cables Disconnect the cable from the system before cleaning or disinfection To disconnect cables always pull on the plug not on the cable Rub the cables clean with soap water use a disinfectant for disinfection All cleaning agents and disinfectants commonly used in hospitals and containing up to 70 alcohol are suitable Do n...

Page 300: ... with adequate training and experience The inspections can be carried out by GE Healthcare Service within the framework of a service agreement The Technical Inspections include Visual inspection of the device and of the accessories for mechanical damage that may impair their function Verification of the safety related labeling for legibility A function test Measurement of the leakage current and o...

Page 301: ...Revision C CASE B 1 2060290 201 Miscellaneous B Miscellaneous ...

Page 302: ...B 2 CASE Revision C 2060290 201 Miscellaneous For your notes ...

Page 303: ... the ergometer ECG type P10 Baud rate 4800 The ergometer software must be version V436 or V236 ergometers with a 4 button control panel must be software version 752 or M343 Plug the round connector of the connecting cable into the J10 RS 232 port of the ergometer and the other end into one of the COM ports of the system Treadmills Connect treadmills to the COM ports Model Configuration Ergoline 90...

Page 304: ...phase If no external BP monitor is connected the system defaults to the BP monitor integrated in or connected to the ergometer Note If the systolic pressure is expected to exceed 200 mmHg 26 7 kPa select a higher deflation rate at the BP monitor to expedite the measurement The Bosotron 2 will terminate the measurement after approx 90 seconds If the Bosotron 2 identifies problems while taking a mea...

Page 305: ...MAC 3500 MAC 5000 MAC 5500 to LAN serial port RS232 modem Modem Connect the modem to a COM port using a serial cable Laser Printer Warning Shock Hazard In the patient vicinity the printer installed on the system cart must meet the requirements of IEC 60601 or it must be a GE Healthcare modified printer with a connected protective earth conductor potential equalization Observe the installation inst...

Page 306: ...e of anti virus software Recording ECGs of Pacemaker Patients It is not possible to display pacing pulses directly in all situations At a sweep speed or writer speed of 50 mm s and a pulse duration of just 0 5 ms the width of the recorded pacing pulse would be a mere 0 025 mm When the pace enhancement is enabled see Miscellaneous Tab on page 12 8 a 6 ms impulse with the correct polarity and with a...

Page 307: ...loride electrodes If other electrodes are used we recommend disconnecting the patient cable from the system before delivering the defibrillation shock The Cubic Spline and the FRF algorithm cause a signal delay of approx 2 seconds therefore they should be disabled if the patient has to be defibrillated while the ECG is being recorded Acquisition Tab on page 12 3 We recommend using non polarizing d...

Page 308: ...overy FVE recovery ST HR hysteresis and HR reserve used The Exercise Test Interpretation XTI program compares the exercise measurements against established thresholds and provides statements and reasoning texts explanation of the statements when thresholds are exceeded Following is an example of a statement with the accompanying reasoning text Ischemia probably caused by coronary artery disease be...

Page 309: ...n horizontal downsloping and upsloping ST segments nor is Q wave significance considered Note The user must verify and possibly correct the system calculated value 2 Duke Treadmill Score Risk Categories are assigned according to the following ranges 5 low 10 to 4 9 intermediate 10 high 3 Prognosis percentages for 5 year survival and average annual mortality are calculated from the nomogram of the ...

Page 310: ...B Califf R M Pryor D B Prognostic value of a treadmill exercise score in outpatients with suspected coronary artery disease The New England Journal of Medicine 325 12 849 853 Sept 1991 Mark D B An overview of risk assessment in coronary artery disease The American Journal of Cardiology 73 19B 25B March 1994 Mark D B Hatky M A Harrell F E Lee K L Bengton J R Califf R M Pryor D B Exercise treadmill ...

Page 311: ... or out of range the system uses the following risk factor values Coronary Heart Disease Risk Factor Values for Unknown or Out of range Parameters Parameter Value Value Used Age female unknown unknown 30 years 74 years 40 30 74 Age male unknown unknown 30 years 74 years 33 30 74 Age gender unknown all values 33 HDL Cholesterol unknown 25 96 50 25 96 Total Cholesterol unknown 139 330 199 139 330 Sy...

Page 312: ... Diabetes unknown no Smoker cigarettes unknown no CVD cardiovascular disease unknown no AF atrial fibrillation unknown no LVH left ventricular hypertrophy unknown no Female Stroke Risk Factor Values for Unknown or Out of range Parameters Parameter Value Value Used Age unknown 54 years 86 years 56 54 86 Systolic Blood Pressure unknown 95 204 104 95 204 HYP RX anti hypertensive medication unknown no...

Page 313: ... 2 The reference values are height and gender related and are defined for patients aged 5 to 18 years Note Height range from 107 cm to 182 cm For patients exceeding the range limits the limit values will be used The equation defines the following reference values FEV1 FVC calculated from single values FEV1 FVC MEF25 MEF50 MEF75 MMEF PEF VC same as FIVC NHANESIII This reference value equation was p...

Page 314: ...rdisierung der Österreichischen Gesellschaft für Lungenerkrankungen und Tuberkulose 1994 The reference values are height and gender related and are defined for patients aged 5 to 90 years for adolescents the values are also weight related Note Age range from 5 to 90 years For patients exceeding the range limits the limit values will be used A range for height is not defined The equation defines th...

Page 315: ...ues are height and gender related and are defined for men aged 25 to 78 years and women aged 20 to 78 years Note Age range 25 to 78 years for men and 20 to 78 years for women For patients older than the upper limit the upper limit will be used A range for height is not defined The equation defines the following reference values PEF FVC FEV1 FEV1 FVC MMEF The reference values by MALLOZI were publis...

Page 316: ...g to these criteria 1 Expiratory flow limitation 2 Curve typical of restriction 3 Expiratory stenoses 4 Impaired peripheral respiration Expiratory flow limitation If all four interpretation criteria are normal the interpretative statement Normal lung function values is displayed Possible causes increased airway resistance e g asthma reduced pulmonary elasticity e g emphysema airway obstruction Cri...

Page 317: ...y fibrosis Criterion FVC Act xx FVC Ref and VC MAX 2 x MEF50 0 8 Definition Interpretative Statement 70 normal 50 70 curve typical of mild restriction 49 curve typical of moderate to severe restriction if 70 further lung function measurement recommended Possible causes Stenoses in the large airways extrathoracic flow obstruction expiratory tracheal stenosis Criterion FVC Act PEF 0 8 Definition Int...

Page 318: ...ing The most important criterion used is the FEV1 FVC ratio the changes of FEV 1 and FVC are also considered The underlying reference values are those published by KNUDSON Possible causes reduced pulmonary elasticity emphysema impaired ventilatory distribution peripheral airway obstruction Criterion VC MAX 2 x MEF50 Definition Interpretative Statement T50 0 8 s normal T50 0 8 1 s mild expiratory f...

Page 319: ...s FEV1 FEV6 FEV1 as a percentage of FEV6 PEF peak expiratory flow MEF75 maximal expiratory flow when 75 of FVC remain to be exhaled MEF50 maximal expiratory flow when 50 of FVC remain to be exhaled MEF25 maximal expiratory flow when 25 of FVC remain to be exhaled MMEF maximal mid expiratory flow between 25 and 75 of FVC FIVC forced inspiratory vital capacity FIV1 forced inspiratory volume in the f...

Page 320: ...dians button Incorrect heart rate or arrhythmia results The program may have selected two unsuitable leads Manually select two good leads see section Miscellaneous 1 Tab on page 12 24 Displayed data are incomplete The screen diagonal entered in the System Configuration section General Tab on page 12 40 is incorrect For screens below 17 inches the Windows taskbar is always on top Windows settings T...

Page 321: ...hic and select the field Download True Type Font as Softfont If these steps do not correct the problem change the grid format System Configuration General tab Printer deselect Dotted line select grid format Tip If the grid lines appear too strong select a shade of gray rather than black Message Not enough free memory on hard drive Free storage capacity on the hard drive where your database is stor...

Page 322: ...e remote service capability Warning Patient Hazard Disconnect the patient from CASE during remote servicing Virus Protection Any anti virus software installed on the CASE must be compatible with the CASE operating system Automatic online updates should be disabled Instead we recommend periodically updating the virus definition database via modem or TCP IP network using the manual Live Update featu...

Page 323: ... twice between two PCs you must select the portrait orientation after the second transfer Sending a Fax 1 Display the screen to print 2 Select the fax as the printer e g fax printer CAPTURE FAX BVZP The program converts the ECG to an image file Depending on computer power this may take a few minutes The status indicator shows the page being converted The fax software is activated automatically aft...

Page 324: ...opics we recommend that you refer to these physician s guides Physician s Guide to GE Stress Systems Part No 2051167 001 TWA Physician s Guide Part No 2020044 067 Physician s Guide to Audio ECG Assessment of Stress Tests Part No 2062179 001 HEART Resting ECG Interpretation Program Part No 22747702 12 SL Physician s Guide Part No 416791 004 ...

Page 325: ...Revision C CASE C 1 2060290 201 Order Information C Order Information ...

Page 326: ...C 2 CASE Revision C 2060290 201 Order Information For your notes ...

Page 327: ...ons 2079551 001 22 inch EIZO wide screen LCD monitor 2088456 001 19 inch EIZO Black LCD monitor 2019792 001 DVI cable 2079551 001 22 INCH WIDESCREEN LCD MONITOR 2077699 001 Keyboard USA 2077699 002 Keyboard Czech 2077699 003 Keyboard Danish 2077699 004 Keyboard Dutch 2077699 007 Keyboard French 2077699 008 Keyboard German 2077699 009 Keyboard Hungarian 2077699 010 Keyboard Italian 2077699 011 Keyb...

Page 328: ...ited number of tests NET3 requires NET2 and NETS 2014659 014 Arrhythmia Detection Documentation ARRY 2014659 003 2D Waterfall Display 2DWF requires ERG2 2014659 004 MUSE Browser BRWS 2014659 006 Data Export EXPD 2014659 007 Report Export as PDF File EPDF 2014659 008 Report Export as Word File EWRD 2014659 009 Display Configuration DSPC 2014659 010 In Test Tabular Summary ITBL 2014659 011 In Test T...

Page 329: ...401855 002 Power cord GB 401855 003 Power cord Italy 401855 004 Power cord Israel 401855 007 Power cord Switzerland 401855 108 Power cord India 401855 009 Power cord Denmark 401855 010 Power cord Australia 405535 012 Power cord Japan 2028038 002 Power cord China 700609 002 Cable T 2000 T 2100 treadmill to stress system 400073 001 Serial communication cable 700607 001 RS422 connection cable to trea...

Page 330: ...C 6 CASE Revision C 2060290 201 Order Information Order Information ...

Page 331: ...Revision C CASE D 1 2060290 201 Technical Description D Technical Description ...

Page 332: ...D 2 CASE Revision C 2060290 201 Technical Description ...

Page 333: ...fact in all leads Baseline correction Cubic Spline or Finite Residual Filter algorithm QRS detection and analysis Based on automatic or manual lead selection ECG output Real time ECG QRS beep TTL synchronization output Heart rate Automatic arrhythmia detection documentation and annotation Full disclosure ECG Beat to beat ECG record and event review Reanalysis Post test medians remeasurement from E...

Page 334: ...F algorithm Common mode rejection 140 dB 123 dB with AC filter disabled Input impedance 10 MΩ 10 Hz defibrillator protected Patient leakage 10 µA Pace detect Orthogonal LA LL and V6 750 µV 50 µs Communication storage MUSE CV system compatible via diskette or SD card network optional MUSE CV Web compatible for retrieval view printing of MUSE CV system data Local storage minimum 10 GB hard drive sto...

Page 335: ...25 50 mm s Sensitivity Gain 2 5 5 10 20 mm mV Displayed vital signs data configurable Heart rate target heart rate blood pressure exercise clock stage clock phase clock protocol speed grade Watts METS RPP and SpO2 Other displayed data ST scan median complexes arrhythmias ventricular ectopic min counter 3 to 15 waveforms lead check torso and 12 leads waterfall displays trends tabular summary stored...

Page 336: ...Thermal perforated fanfold 300 sheets per pack Paper size Letter size 214 6 mm x 280 mm 8 45 in x 11 in A4 size 210 mm x 280 mm 8 27 in x 11 in Table 5 Environmental Power Requirements Item Description Power supply AC operation only Operating voltage range 100 120 VAC 47 63 Hz 2 8 A 200 240 VAC 47 63 Hz 1 4 A Power consumption 350 Watts maximum 1200 BTU Hr 250 Watts normal 850 BTU Hr 30 Watts stan...

Page 337: ...hrough RJ45 MUSE compatible 6 Serial ports COM 1 6 treadmill BP ergometer SpO2 4 Analog and 1 TTL trigger output analog ergometer camera synch etc Display Port for monitor External DVD CD RW Drive DVD to USB ordered separately External CD RW Drive DVD to USB ordered separately External SD Card Reader SD to USB Table 7 Safety Item Description Certification UL 60601 1 classified UL classified for CA...

Page 338: ...the disposal of hazardous materials Patient mode of operation Continuous Patient leakage current 10 µA Degree of protection against electrical shock Type BF defibrillation protection for the patient cable acquisition module Defibrillator recovery time The recovery time from defibrillator discharge is maximum 8 seconds Maintenance frequency Recommended user daily visual inspection and cleaning Reco...

Page 339: ...SE system technical specifications 3 Caution Definition 6 Classification 11 Cleaning Equipment Surface Cables 3 Combined Report 7 Comments Enter in Tabular Summary 17 Comparing Exercise Tests 27 Comparing Spirograms 18 Cubic Spline 10 Custom Setups Load Save Delete 38 D Danger Definition 6 Default Printer Set 6 Device characteristics 15 DICOM interface 1 Disposal 4 Drugs Assign to Medication Group...

Page 340: ...mpare 27 Export settings 11 Extra Questions Enter Exercise Tests 28 F Factory Setup Load 39 Fax Transmission of Reports 23 Flow Volume Measurement 9 FRF 10 Full Disclosure ECG Exercise Test Print 49 View 47 Full disclosure ECG analyze segments and save as resting ECG 25 Full Disclosure ECG Resting ECG Print 24 Save 10 View 23 FVC Measurement with LF501 13 FVC Measurement with SpiroSoft 9 G GE Prod...

Page 341: ... Resting ECG 7 MUSE System Archive Export Delete Patient Records 8 Setup 55 View Print Stored Reports 7 MUSE System Database 6 N New Patient Enter 7 O Offline database 12 Operator s Manual View Print 17 Option Code Enter 58 Options 18 Order 6 Order List 6 Order number 4 P Patient Data Enter 4 Patient Education 3 Patient ID 7 Patient Information Tab Ambulatory Blood Pressure Measurement 9 Exercise ...

Page 342: ...ition Tab 35 Miscellaneous Tab 36 Spirometry Test Values Definitions 19 SpO2 Monitor Connect 5 Statistics Summary Ambulatory Blood Pressure Measurement 16 System Configuration Connectivity Server Tab 61 Country Settings Tab 59 Devices Tab 53 DICOM Tab 63 EMR Tab 60 General Tab 40 Modem Tab 55 MUSE Tab 55 Option Code Tab 58 System Date and Time Change 50 T Tabular Summary Ambulatory Blood Pressure ...

Reviews: