background image

Chapter 6: Advanced setup 

62 

TruVision DVR 30 User Manual 

For more information in Bandwidth Throttle Management, see “Bandwidth throttle 
management” on page 43. 

E-mail settings 

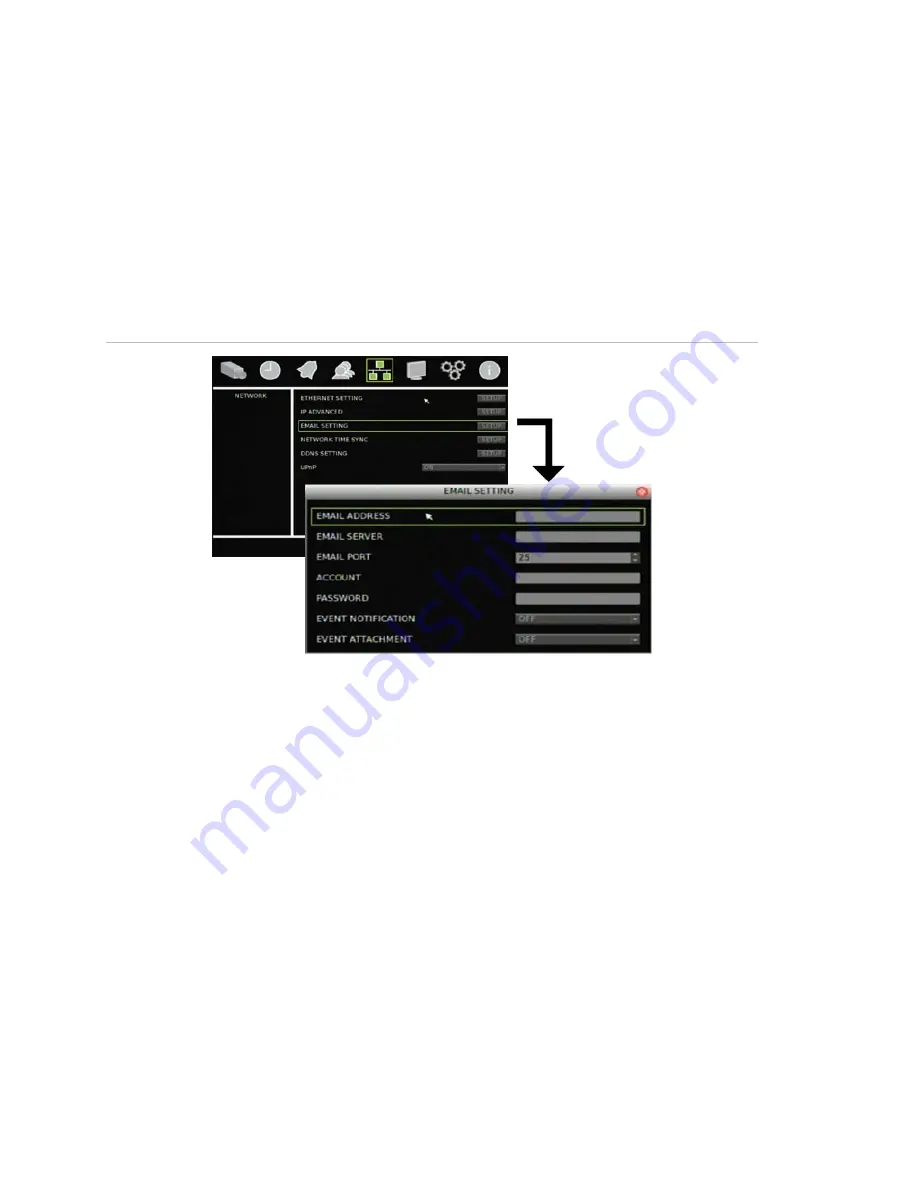
The TVR 30 has the option to send e-mail notifications of alarm events through the 
network. Use the Email Setting screen (shown in Figure 32 below) to configure the 
e-mail settings. 

Figure 32: Email Setting screen 


To define e-mail settings: 

1.  Click Network on the main menu to display the Network screen. 
2.  Click Email Setting Setup to display the Email Setting screen. 
3.  Enter the e-mail address to whom the notification is sent in the Email Address edit 

box. 

4.  Enter the e-mail server of the e-mail account from whom the notification is sent in 

the Email Server edit box. 

5.  Enter the e-mail port number of the e-mail account from whom the notification is 

sent in the Email Port edit box. 

6.  Enter the e-mail address of the e-mail account from whom the notification is sent 

in the Account edit box. 

7.  Enter the password of the e-mail account from whom the notification is sent in 

the Password edit box. 

8.  Select On in the Event Notification to enable e-mail notification. 

Summary of Contents for Appliances 30

Page 1: ...GE Security P N 1068702 REV A ISS 10NOV09 TruVision DVR 30 User Manual...

Page 2: ...ound to comply with the limits for a Class A digital device pursuant to part 15 of the FCC Rules These limits are designed to provide reasonable protection against harmful interference when the equipm...

Page 3: ...ng the mouse 12 Using the IR remote control 16 Operating modes 17 Main menu overview 18 Chapter 4 Basic operation 23 Turning on the TVR 30 24 Live mode 24 Spot monitor 25 Logging on 26 Controlling a P...

Page 4: ...io and remote 69 RS 485 settings 70 RS 232 settings 70 Hard drive settings 70 Importing and exporting configuration settings 71 Boot log 71 Upgrading the firmware 73 Appendix A Specifications 75 Produ...

Page 5: ...TruVision DVR 30 User Manual 1 Chapter 1 Product introduction Summary This chapter provides an overview of the TVR 30 including its features and functions Content Product overview 2...

Page 6: ...er a multiplexer and a video server to create a single security solution The TVR 30 s pentaplex operation enables users to view live video search and play back any recorded video by date and time or b...

Page 7: ...des information on how to install and connect peripherals to your device Content Installation environment 4 Unpacking the TVR 30 and its accessories 4 HDD capacity 5 Back panel overview 6 Connecting d...

Page 8: ...it near water Moisture can damage the internal components To reduce the risk of fire or electric shock do not expose this unit to rain or moisture Chassis Equipment weighing less than 35 lbs 15 9 kg m...

Page 9: ...calculator HDD capacity Storage capacity for the TruVision DVR 30 varies depending on the model Refer to Table 1 below for more information Table 1 TruVision DVR 10 model types Model Model number Des...

Page 10: ...R 30 Figure 1 TVR 30 back panel 1 2 3 4 5 6 7 8 9 10 12 11 13 14 1 Video out 2 Video in top row loop out bottom row 3 Audio out 4 S video port 5 Audio in 6 Digital video output 7 Alarm I O and RS 485...

Page 11: ...a PTZ control 7 Alarm output 8 Connect to alarm input cables 9 Connect to a network attached storage NAS device This device is currently not supported 10 Connect to USB devices 11 Connect to a network...

Page 12: ...k panel Connecting external devices When connecting external devices to include as part of the entire system such as a USB drive or any other USB devices connect those devices only when the unit displ...

Page 13: ...ol interfaces 10 Controlling the TVR 30 10 Front panel overview 11 Status LEDs 12 Using the mouse 12 Mouse toolbar 13 Using the IR remote control 16 Controlling multiple DVRs with one remote control 1...

Page 14: ...nt panel remote control and mouse Web browser The Web browser interface uses Internet Explorer to simulate the display and control functions of the VGA monitor on a remote PC The Web browser interface...

Page 15: ...descriptions Item Name Description 1 Numeric buttons Display the corresponding video in full screen while in both live and playback mode The number of the button corresponds to the camera number Press...

Page 16: ...ws Table 3 Status LED descriptions LED Name Description Power Steady indicates that the correct power is connected to the unit Network Blinking indicates that the DVR is connected to a network Alarm S...

Page 17: ...icons Table 4 below describes the icons that appear on the mouse toolbar Table 4 Mouse toolbar icons Icon Description User is logged in Numerical value indicates the user s access level User icon wit...

Page 18: ...able hard disk space left Indicates the hard disk is full Camera commands The camera commands appear when you point to Cameras on the mouse toolbar Click a camera number to display that camera in live...

Page 19: ...refers to the display of live video in programmed sequence of cameras Search Displays the Search screen Archive Lets you archive video Archives the video being played back while in playback mode PTZ L...

Page 20: ...4 5 6 7 Table 6 IR remote control descriptions Item Name Description 1 Function buttons Change the TVR 30 operating mode For example press PTZ to go into PTZ mode See Operating modes on page 17 for m...

Page 21: ...c button depends on the remote ID assigned to the TVR 30 The remote ID assigned is 1 by default See Controlling multiple DVRs with one remote control below for more information 3 The remote control is...

Page 22: ...nd buttons Each command displays a dialog screen that lets you edit a group of TVR 30 settings The main menu screen is shown in Figure 6 below Access to different option screens varies depending on yo...

Page 23: ...t s system information including model ID network address firmware version and MAC addresses Using the main menu Use the mouse or directional arrow keys to navigate through the menu commands and displ...

Page 24: ...era name Enter characters into an edit box through the virtual keyboard See Using the virtual keyboard below for more information Button Triggers a special function or allows you to display a new scre...

Page 25: ...hin the action frame or press Enter in the front panel or remote control to display the virtual keyboard 3 Select the characters required 4 When finished click OK on the virtual keyboard to close the...

Page 26: ...Chapter 3 Operating instructions 22 TruVision DVR 30 User Manual...

Page 27: ...onitor 25 Controlling the spot monitor 26 Logging on 26 Controlling a PTZ camera 27 Accessing PTZ mode 27 PTZ control buttons 27 Calling up a preset PTZ point 28 Exiting the PTZ control mode 29 Playin...

Page 28: ...te the device Use the power switch on the back panel to turn on the unit Live mode The TVR 30 automatically enters into live mode once powered on Live mode refers to the mode in which the TVR 30 displ...

Page 29: ...igure 10 below displays the multiscreen formats available as defaults Figure 10 Display formats 1 1 2 3 4 5 6 7 8 9 10 11 12 13 14 15 16 1 2 3 4 5 6 9 8 7 8 9 10 11 12 13 16 15 14 1 2 3 4 8 7 6 5 9 10...

Page 30: ...he TVR 30 is shipped with a predefined user for the system administrator The default system administrator logon uses admin as a user name with a password of 1234 You can modify the admin password but...

Page 31: ...numeric buttons on the front panel remote control or the mouse toolbar Click PTZ in the mouse toolbar or press the PTZ button on the front panel or remote control The PTZ control interface displays a...

Page 32: ...ck on a camera in the mouse toolbar or use the numeric buttons to select a camera 2 Click the PTZ icon in the mouse toolbar or press the PTZ button to display the PTZ control as shown in the figure be...

Page 33: ...in live mode Searched video playback Play back video starting from a specific date and time Instant video playback To play back video instantly press the Play button on the front panel remote control...

Page 34: ...en 2 Enter a start date and time in the Go To field 3 Click Play Data Recorded video will begin to play back starting from the specified date and time To search for recorded video using the Calendar M...

Page 35: ...Calendar Mode use the Select fields to specify a start date and time 5 Click Play Data to begin playback To search for recorded video by events 1 Click Search to display the Search screen 2 In the Ch...

Page 36: ...ch screen displays as shown in the figure below 3 Specify your search criteria Before entering any search criteria highlight the search type field and specify how you want the search criteria to be ha...

Page 37: ...Figure 14 Playback controls Playback control options Option Description Play reverse Plays video backwards at a speed based on how many times you press the key Press once to play video 1x twice for 2...

Page 38: ...y archiving settings such as date range events and data type Figure 15 Archive screen Using Quick Archive in live mode To archive recorded video using Quick Archive while in live mode 1 Insert the bac...

Page 39: ...el If using a digital video disc DVD insert the disc into the DVD drive If both media are found in the TVR 30 the USB device takes precedence over the DVD 2 Press the Archive button on the front panel...

Page 40: ...ch camera to archive The system archives all the data in the DVR In addition when specifying a time range to archive selecting the original file format results in the exporting of video clips that inc...

Page 41: ...ing the DVR player 1 Launch the DVR player 2 Click Play to display the Data List dialog box The Data List dialog box displays a list of all archived video If you don t see a list click Open and browse...

Page 42: ...live or menu mode when no buttons are pressed for five minutes Turning off the TVR 30 To avoiding potentially damaging the TVR 30 use the proper method to turn off the unit To turn off or restart the...

Page 43: ...lso specify settings on the Web browser interface to optimize video playback and recording performance when operating in a low or limited bandwidth environment Content Overview 40 Browser connections...

Page 44: ...functions To access the TVR 30 open a Web browser and enter the IP address assigned to the TVR 30 as a Web address In the log on screen enter the default user ID and password User ID admin Password 12...

Page 45: ...lays if PTZ control is available for the selected camera indicated by a PTZ icon You can drag this panel anywhere on the screen 5 Viewer View live or playback video 6 Zoom Zoom in or out on video 7 Do...

Page 46: ...or pause playback video You can also search for video by events or text Click the Search button to display the Event List screen Select the appropriate tab and enter your search criteria The Event Lis...

Page 47: ...P settings on page 61 Both live dual streaming and bandwidth throttle management can be used simultaneously or individually For example if you display live video in the Web browser with the bandwidth...

Page 48: ...Chapter 5 Using the Web browser 44 TruVision DVR 30 User Manual Figure 19 PTZ camera in Web browser...

Page 49: ...ustomizing a user 47 Enabling password 49 Defining access privileges 49 Configuring cameras 50 Motion detection alarm 51 Assigning PTZ protocol 52 Adjusting video image 53 Assigning a camera name 54 C...

Page 50: ...30 User Manual Advanced IP settings 61 E mail settings 62 DDNS settings 63 UPnP 63 Display settings 63 Display format 64 Camera title display 64 Unit name display 64 Dwell time 64 Sequence order 65 Ev...

Page 51: ...d level 4 access The administrator can customize the seven standard users and define their privileges Use the Users screen shown in Figure 20 below to manage users Note When accessing the main menu fo...

Page 52: ...he user you want to customize in the Account box 4 Click Mod in the Account box to display the virtual keyboard 5 Enter a new user name and click OK to return to the User screen User names are case se...

Page 53: ...highest Additionally setting an access level to Anyone allows anyone to access the function regardless of their assigned access privileges Table 12 below provides a list of functions and privileges av...

Page 54: ...l for each of the privilege using the drop down list Configuring cameras This section describes how to configure your cameras using the Cameras screen shown in Figure 23 on page 51 For each camera you...

Page 55: ...for which you want to define a motion detection alarm 3 Click the Motion Detection Setup button to display the Motion Detection screen 4 In the Motion Detection box select the schedule of when you wan...

Page 56: ...s you test by making motions on the camera how much motion is required to trigger an alarm at the selected sensitivity level A buzzer sounds off when an alarm is triggered 7 Select the target size in...

Page 57: ...ue Use the Adjust Video screen shown in Figure 24 below to modify these settings Figure 24 Adjust Video screen To adjust video image 1 Click Cameras on the main menu to display the Cameras screen 2 Cl...

Page 58: ...l keyboard displays 3 Enter the new camera name You can enter up to 11 characters 4 Click OK to exit the virtual keyboard and return to the Cameras screen The new camera name is displayed Configuring...

Page 59: ...ytime range using the Daytime Begin and Daytime End boxes 4 Select the nighttime range using the Nighttime Begin and Nighttime End boxes 5 Select On in the Weekend Schedule box to enable weekend sched...

Page 60: ...ult Each camera s FPS is calculated using the total PPS divided by the total number of cameras Recording quality values include Expert Mode Best Quality Normal Quality Low Quality Event Only Rec Wizar...

Page 61: ...ng in daytime nighttime and weekends in the corresponding boxes The Average FPS and Average Quality boxes are automatically populated based on the settings you specified and on the hard drive capacity...

Page 62: ...want to configure 5 Select your recording settings in the corresponding boxes Use the Normal FPS and Normal Quality boxes to select the recording resolution and quality under normal conditions Use th...

Page 63: ...C s IP address in the Alert IP edit box 6 Enter the PC s port in the Alert Port box Enabling the alarm buzzer In the Alarms screen select On in the Buzzer box to enable alarm buzzer An audible sound i...

Page 64: ...ain network settings Use the Network screen shown in Figure 30 below to define the network settings of the TVR 30 including Ethernet settings IP settings E mail notification settings Syncing the TVR 3...

Page 65: ...the DHCP box and continue with steps 5 through 9 5 Enter the network s dynamic IP address in the IP edit box 6 Enter the subnet mask in the Netmask edit box 7 Enter the gateway IP address in the Gate...

Page 66: ...reen 2 Click Email Setting Setup to display the Email Setting screen 3 Enter the e mail address to whom the notification is sent in the Email Address edit box 4 Enter the e mail server of the e mail a...

Page 67: ...lay the Network screen 2 Click DDNS Setting Setup to display the DDNS Setting screen 3 In the Use DDNS box select On to enable the DDNS function 4 Enter the host name If you leave this box blank the s...

Page 68: ...ed on screen You can select a format of one row or two rows Camera title display Select Yes in the Camera Title box to display the camera title name on screen Unit name display Select Yes in the Show...

Page 69: ...ras by camera number Click Back to clear the last sequence position Click Back repeatedly to clear all positions in the sequence Note To configure the sequence order for the spot monitor click Spot Se...

Page 70: ...Chapter 6 Advanced setup 66 TruVision DVR 30 User Manual...

Page 71: ...nit name RS 485 and RS 232 settings upgrade and hard drive settings Only users with appropriate access privileges can define and modify advanced configurations Content Overview 68 System date and time...

Page 72: ...isplay RS 485 setting RS 232 setting Firmware upgrade Hard drive setting Storing and uploading configuration settings Shutting down the device Click System on the main menu to access the System screen...

Page 73: ...ick Daylight Saving Time to display the Daylight Saving Time screen This screens lets you enable and configure Daylight Saving Time For more information see Daylight Saving Time below Daylight Saving...

Page 74: ...485 ports Settings defined in this screen must match the PTZ settings of the camera connected to the RS 485 port To access the RS 485 Setting screen click RS 485 Setting on the System screen RS 232 se...

Page 75: ...exporting configuration settings Use the Configuration screen to import or export configuration settings Click Export Config to export the TVR 30 s configuration settings into a configuration file Cli...

Page 76: ...mat Disk DiskIOER Disk I O error OverHeat Overheat hdd detected CoolDown HDD temperature back to normal from overheat state PurgeDB Normal Purge normal PurgeDB Event Purge Event DayStime Change day sc...

Page 77: ...t Playback Playback CH XX Change Pb channel S XXXXXX XXXXXX Playback start time information E XXXXXX XXXXXX Playback stop time information MENU Menu text Log what menu user entry OPTION Option text Lo...

Page 78: ...de the unit s firmware Click Upgrade Firmware to upgrade the firmware through a USB flash drive Click Firmware Download to connect the device to a network and download the upgrade file 4 Click Upgrade...

Page 79: ...TruVision DVR 30 User Manual 75 Appendix A Specifications Summary This appendix provides specifications for the TVR 30 Content Product specifications 76 Battery removal 77...

Page 80: ...out Live Dual Streaming Yes HDD interface 4 SATA interface 1 DVD 3 HDD Communication interface 1 RJ45 10M 100M self adaptive Ethernet Interface 1 RS 485 interface 1 RS 232 interface USB interface 4 U...

Page 81: ...only be removed by a recycling or service technician The remote control comes with two AAA alkaline batteries To remove the remote control batteries 1 Detach the remote control s back cover 2 Replace...

Page 82: ...Appendix A Specifications 78 TruVision DVR 30 User Manual...

Page 83: ...TruVision DVR 30 User Manual 79 Appendix B Factory defaults Summary This appendix provides the TVR 30 S factory defaults Content Menu defaults 80 Network defaults 80...

Page 84: ...ames per second NTSC 25 frames per second PAL at CIF Record quality FPS Normal Quality Menu timeout 5 minutes Video standard NTSC Disk overwrite mode Overwrite Brightness 0 Contrast 0 Hue 0 Saturation...

Page 85: ...TruVision DVR 30 User Manual 81 Appendix C Warranty and support Summary This appendix provides information on warranty and support for the TVR 30 Content Warranty information 82 Contacting support 82...

Page 86: ...ys Table 15 Technical support North America T 1 888 437 3287 Toll free in the US Puerto Rico and Canada 1 503 885 5700 outside of the toll free area F 1 888 329 0332 Tualatin tech support 1 561 998 62...

Page 87: ...ion DVR 30 User Manual 83 Appendix D KTD 405 keyboard mapping Summary This appendix provides information on how to operate the TVR 30 using the KTD 405 keyboard Content TVR 30 to KTD 405 keyboard mapp...

Page 88: ...menu Menu Press Esc while in live mode Enter Press Enter Changing a camera Press the camera number and Enter Live Press Play Zoom Press Zoom Search Press Search Display Press View and the 5 button mu...

Page 89: ...trolling a PTZ camera 27 D display camera title display 64 display format 64 dwell time 64 event display 65 POS transaction display 65 sequence order 65 unit name display 64 F front panel overview 11...

Page 90: ...de 57 Rec wizard 56 remote control 16 S spot monitor connecting the spot monitor 25 system audio output and key beep 69 configuration settings 71 Daylight Saving Time 69 hard drive settings 70 RS 232...

Reviews: