background image

Advanced EnerVista 750/760 Setup features

750/760 Quick Reference Guide

27

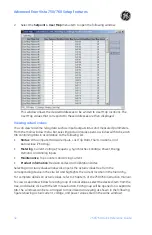
Event Recorder

: The event recorder captures contextual data associated with the last 

512 events, listed in chronological order from most recent to the oldest.

Oscillography

: The oscillography waveform traces and digital states provide a visual 

display of power system and relay operation data captured during specific triggered 
events.

Waveform capture (trace memory)

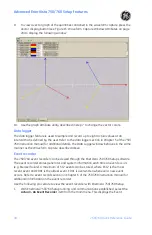
The EnerVista 750/760 Setup software can be used to capture waveforms (or view trace 
memory) from the 750/760 relay at the instance of a trip. A maximum of 512 cycles can be 
captured and the trigger point can be adjusted to anywhere within the set cycles. A 
maximum of 16 waveforms can be buffered (stored) with the buffer/cycle trade-off.
The following waveforms can be captured:

Phase A, B, and C currents (

I

a

I

b

, and 

I

c

)

Ground and Sensitive ground currents (

I

g

 and 

I

sg

)

Phase A-N, B-N, and C-N voltages (

V

a

V

b

, and 

V

c

)

Digital data for output relays and contact input states.

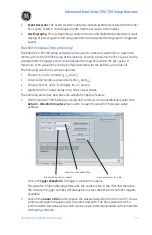
The following procedure describes the waveform capture feature.
1.

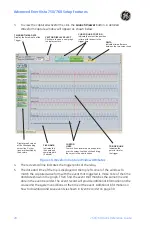
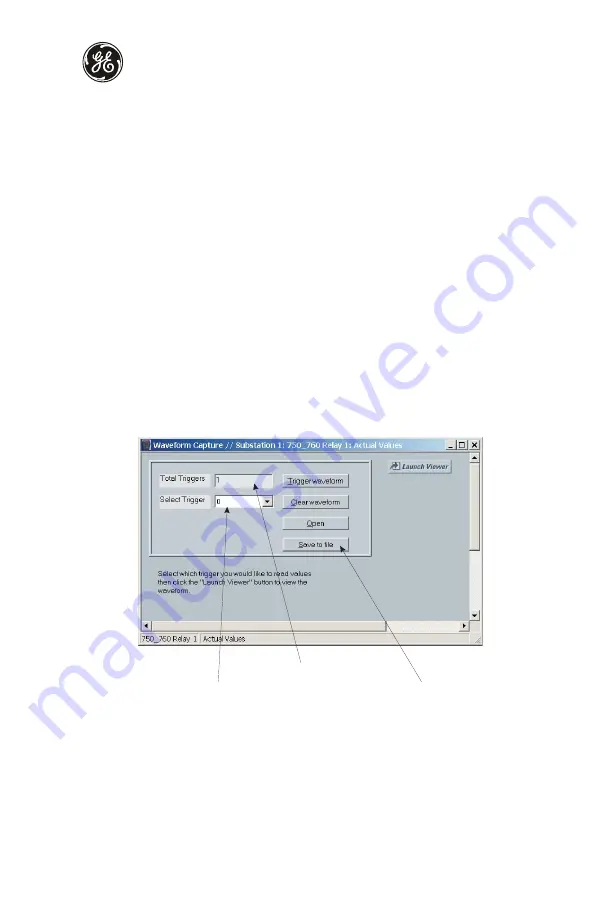
With EnerVista 750/760 Setup running and communications established, select the 

Actual > Waveform Capture

 menu item to open the waveform capture setup 

window:

Click on 

Trigger Waveform

 to trigger a waveform capture.

The waveform file numbering starts with the number zero in the 750/760; therefore, 
the maximum trigger number will always be one less then the total number triggers 
available.

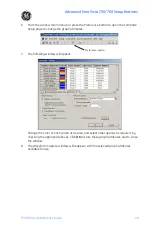
2.

Click on the 

Save to File

 button to save the selected waveform to the local PC. A new 

window will appear requesting for file name and path. The file is saved as a CSV 
(comma delimited values) file, which can be viewed and manipulated with compatible 
third-party software.

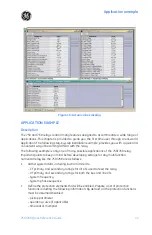
Number of available files

Files to be saved or viewed

Save waveform to a file

Summary of Contents for 750

Page 1: ...der Code GEK 106477E Copyright 2006 GE Multilin GE Multilin 215 Anderson Avenue Markham Ontario Canada L6E 1B3 Tel 905 294 6222 Fax 905 201 2098 Internet http www GEmultilin com ISO9001 2000 G E M ULT...

Page 2: ......

Page 3: ...INTS VIA THE FRONT PANEL 8 TYPICAL APPLICATION SETUP 9 System setpoints 9 Logic input setpoints 10 Protection setpoints 10 ENERVISTA 750 760 SETUP SOFTWARE INTERFACE 11 Overview 11 Hardware 11 CONNECT...

Page 4: ...values 32 APPLICATION EXAMPLE 33 Description 33 Power system data 40 Control system requirements 40 Instrument transformer data 40 Phase protection settings 40 Neutral protection settings 41 S2 System...

Page 5: ...demand levels and energy consumption is also performed To aid new users in setting up basic protection setpoints are set to typical default values and advanced features are disabled These settings can...

Page 6: ...nnectors are fitted with mechanisms such as automatic CT shorting to allow the safe removal of the relay from an energized panel There are no electronic components in the case Figure 1 Case dimensions...

Page 7: ...t equipment Figure 2 Single and double unit panel cutouts Before mounting the relay in the supporting panel remove the unit from the case From the front of the panel slide the empty case into the cuto...

Page 8: ...fer to Ethernet connection on page 5 before starting the following procedure To remove the unit from the case 1 Open the door by pulling from the top or bottom of its right side It will rotate to the...

Page 9: ...ay 6 Once the unit is fully inserted the latch will be heard to click locking the handle in the final position The unit is mechanically held in the case by the handle s rolling pins which cannot be fu...

Page 10: ...s of control power supply type The label found on the left side of the relay specifies its order code or model number The installed power supply s operating range will be one of the following LO 20 to...

Page 11: ...els for AC voltage inputs each with an isolating transformer The nominal secondary voltage must be in the 50 to 240 V range The three phase inputs are designated as the bus voltage The Bus VT connecti...

Page 12: ...he shield of the cable shall be grounded at one point only usually at the PLC computer end only Figure 10 Analog output connections ACCESSING SETPOINTS VIA THE FRONT PANEL Refer to Chapter 1 750 760 i...

Page 13: ...ing the EnerVista 750 760 Setup software Select the Setpoints Relay Setup Installation 750760 Operation menu item to access the following page The relay leaves the factory with setpoints programmed to...

Page 14: ...Logic Inputs menu item The setpoints are shown as sub pages of the following tree Protection setpoints Refer to the Application example on page 33 for details on how to set the 750 760 Feeder Mangemen...

Page 15: ...eated for eventual downloading to the device In on line mode you can communicate with the device in real time This no charge software provided with every 750 760 relay can be run from any computer sup...

Page 16: ...EnerVista 750 760 Setup software interface 12 750 760 Quick Reference Guide Figure 11 Communications using the front RS232 port Figure 12 Communications using rear RS485 port...

Page 17: ...for Ethernet communications see Configuring Ethernet communications on page 15 1 Install and start the latest version of the EnerVista 750 760 Setup software available from the GE EnerVista CD See the...

Page 18: ...d parity settings in their respective fields 8 Click the Read Order Code button to connect to the 750 760 device and upload the order code If an communications error occurs ensure that the 750 760 ser...

Page 19: ...hen connected a new Site called Quick Connect will appear in the Site List window The properties of this new site cannot be changed The 750 760 Site Device has now been configured via the Quick Connec...

Page 20: ...e S1 RELAY SETUP ZV COMMUNICATIONS ZV NETWORK CONFIGURATION menu 8 Click the Read Order Code button to connect to the 750 760 and upload the order code If an communications error occurs ensure that th...

Page 21: ...each device Device Definitions Settings Actual Values Commands Communications 3 Expand the Settings Relay Setup list item and double click on Front Panel to open the Front Panel settings window as sho...

Page 22: ...line mode relay connected to directly communicate with a 750 760 relay Communicating relays are organized and grouped by communication interfaces and into sites Sites may contain any number of relays...

Page 23: ...from this list 6 For setpoints requiring an alphanumeric text string e g message scratchpad messages the value may be entered directly within the setpoint value box 7 In the Setpoint System Setup dia...

Page 24: ...front panel display For specific details on setpoints refer to Chapter 5 of the 750 760 instruction manual Downloading and saving setpoints files Setpoints must be saved to a file on the local PC befo...

Page 25: ...he user to create new setpoint files independent of a connected device These can be uploaded to a relay at a later date The following procedure illustrates how to create new setpoint files 1 In the Fi...

Page 26: ...is illustrated in the following procedure 1 Establish communications with the 750 760 relay 2 Select the Actual A5 Product Info menu item and record the Software Revision identifier of the relay firm...

Page 27: ...t the File Print Settings menu item 3 The Print Export Options dialog box will appear Select Settings in the upper section and select either Include All Features for a complete list or Include Only En...

Page 28: ...ed to the EnerVista 750 760 Setup environment as described in Adding setpoints files to the environment on page 21 1 Select the previously saved setpoints file from the File pane of the EnerVista 750...

Page 29: ...2 Select the Communications Update Firmware menu item 3 The following warning message will appear Select Yes to proceed or No the cancel the process Do not proceed unless you have saved the current s...

Page 30: ...he following settings will have to me manually programmed MODBUS COMMUNICATION ADDRESS BAUD RATE PARITY if applicable When communications is established the saved setpoints must be reloaded back into...

Page 31: ...n be captured Phase A B and C currents Ia Ib and Ic Ground and Sensitive ground currents Ig and Isg Phase A N B N and C N voltages Va Vb and Vc Digital data for output relays and contact input states...

Page 32: ...ide additional information on the cause and the system conditions at the time of the event Additional information on how to download and save events is shown in Event recorder on page 30 Display graph...

Page 33: ...age to change the graph attributes 7 The following window will appear Change the Color of each graph as desired and select other options as required by checking the appropriate boxes Click OK to store...

Page 34: ...Logger window behaves in the same manner as the Waveform Capture described above Event recorder The 750 760 event recorder can be viewed through the EnerVista 750 760 Setup software The event recorde...

Page 35: ...ommunications Guide for additional information on the User Map 1 Select a connected device in EnerVista 750 760 Setup EVENT LISTING Lists the last 512 events with the most recent displayed at top of l...

Page 36: ...toreclose 760 Only Metering Current Voltage Frequency Synchrocheck Voltage Power Energy Demand and Analog Inputs Maintenance Trip Counters and Arcing Current Product Information Revision Codes and Cal...

Page 37: ...one of many possible applications of the 750 760 relay Important points to keep in mind before developing settings for any multifunction numerical relay like the 750 760 are as follows Gather system d...

Page 38: ...ilized adding the capability for monitoring pole discrepancy an indication of a potential mechanical problem within the main contact mechanism of the breaker If the relay will be used to respond to lo...

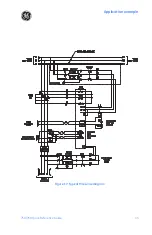
Page 39: ...Application example 750 760 Quick Reference Guide 35 Figure 17 Typical three line diagram...

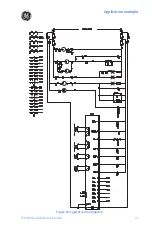
Page 40: ...Application example 36 750 760 Quick Reference Guide Figure 18 Typical connection diagram RS485 SERIAL NETWORK...

Page 41: ...Application example 750 760 Quick Reference Guide 37 Figure 19 Typical control diagram...

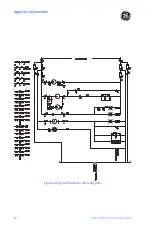
Page 42: ...Application example 38 750 760 Quick Reference Guide Figure 20 Typical breaker control diagram...

Page 43: ...Application example 750 760 Quick Reference Guide 39 Figure 21 Typical relay control diagram...

Page 44: ...equipment The above data will be used to set the output relays to achieve breaker control and to set digital inputs for breaker status remote operations remote status and alarm indication The example...

Page 45: ...ground current You should now be familiar with maneuvering through and editing setpoints As such we will now limit our discussion to just the values that must be programmed in order to meet the requi...

Page 46: ...n the relay is purchased There is additional flexibility with regards to the VT inputs as nominal values are not required before the relay is ordered therefore more settings are needed to prepare the...

Page 47: ...to work with the autorecloser functions S3 LOGIC INPUTS ZV MISC FUNCTIONS to trigger oscillography fault simulation and start demand intervals For breaker position monitoring enter the following valu...

Page 48: ...ed as follows 1 Select the Setpoints S3 Logic Inputs Logic Input Setup menu item The following window will appear 2 Change the corresponding setpoints as indicated and then press Save These setpoints...

Page 49: ...as follows 1 Select the Setpoints S3 Logic Inputs User Inputs User Input A menu item to display the following window 2 Change the corresponding setpoints as indicated and then press Save S5 Protection...

Page 50: ...NST OC 1 DELAY 0 00 s PHASES REQUIRED FOR OPERATION Any Two For the Phase Instantaneous Overcurrent 2 element enter the following values in the S5 PROTECTION Z PHASE CURRENT ZV PHASE INST OVERCURRENT...

Page 51: ...lowing screen 2 Change the corresponding setpoints as indicated and then press Save To set the Phase Instantaneous Overcurrent 2 function 1 Click on the Phase Instantaneous Overcurrent 2 tab to displa...

Page 52: ...fter each setpoint is completed to move to the next message NEUTRAL INST OC 2 FUNCTION Trip NEUTRAL INST OC 2 PICKUP 3 33 x CT from 2000 A pickup 600 A primary NEUTRAL INST OC 2 DELAY 0 00 s The Groun...

Page 53: ...eutral Instantaneous Overcurrent 1 function 1 Click on the Neutral Instantaneous Overcurrent 1 tab to display the following screen 2 Change the corresponding setpoints as indicated and then press Save...

Page 54: ...ve definite time Additional time delay 10 0 s Additional Considerations The line will be considered de energized if the voltage drops to less than 10 of nominal voltage A trip condition will be initia...

Page 55: ...hange the corresponding setpoints as indicated then press Save Auxiliary relays For the Auxiliary 3 Relay enter the following values in the S4 OUTPUT RELAYS ZV 3 AUXILIARY setpoints page Press the ent...

Page 56: ...r those users who use different settings for different seasons of the year Manual group selection can be initiated from the keypad or via communications The following example illustrates how the 750 7...

Page 57: ...points S3 Logic Inputs Control Functions menu item to display the following window 2 Change the corresponding setpoints then press Save INSTALLATION Now that programming for the sample application is...

Page 58: ...e Relay In Service LED Indicator will now turn on and the SELF TEST WARNING Relay Not Ready diagnostic message will disappear TECHNICAL SUPPORT GE Multilin contact information and call center for prod...

Reviews: