background image

Digiplex IV User Manual 

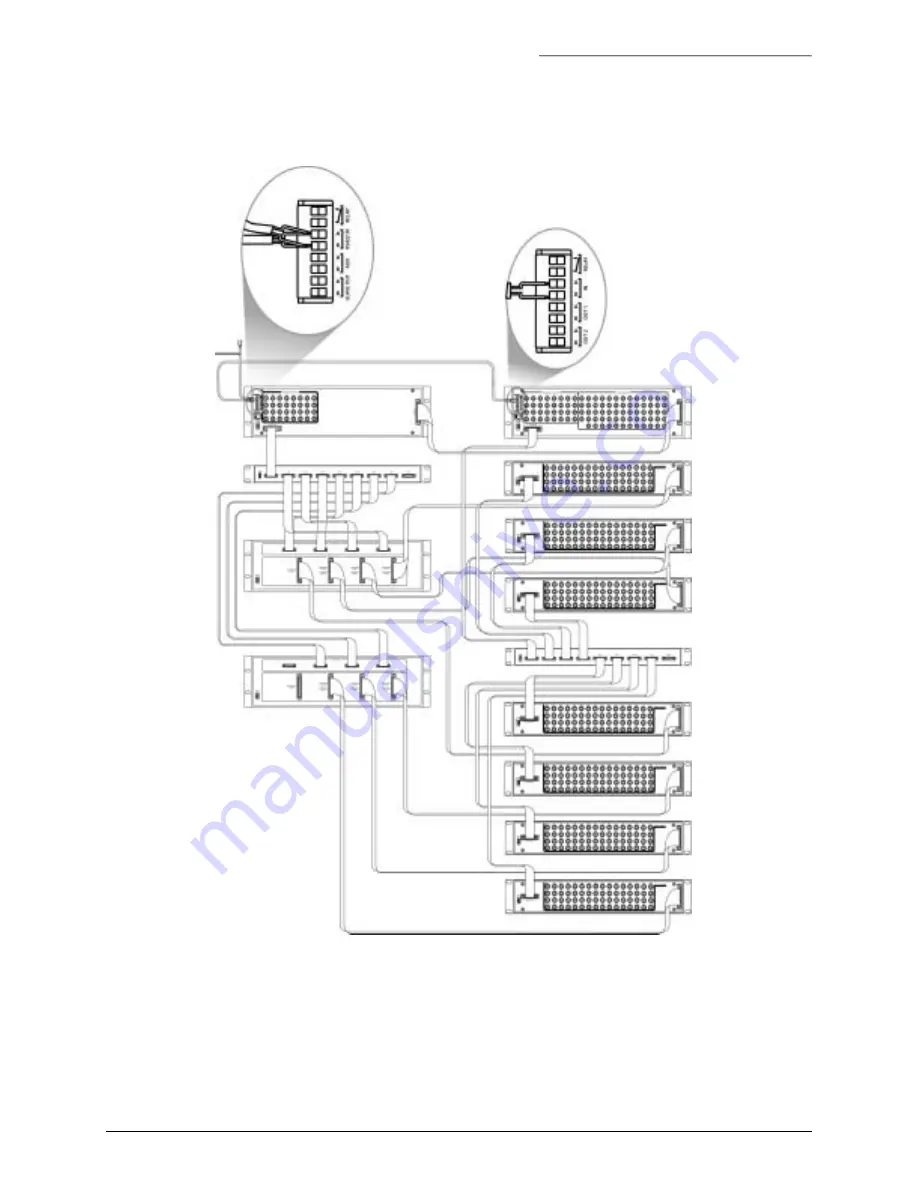
Appendix G. System Configurations 


1034169B / December 2003 

71 

512 I

NPUTS BY 

36 

TO 

64 O

UTPUTS


RS422 control in 

KTD-440N


providing 32 additional 

monitor outputs 

KTD-440G 

KTD-442-1


with eight KTD-443 cards 

from chassis KTD-441-1 

through KTD-441-4 

KTD-442-2


with six KTD-443 cards 

from chassis KTD-441-5 

through KTD-441-7 


KTD-440


with video inputs 0 – 63 
and monitor outputs 1 – 32


KTD-441-1


with video inputs 64 – 127 

KTD-441-2


with video inputs 128 – 191 

KTD-441-3


with video inputs 192 – 255 

KTD-440G 

KTD-441-4


with video inputs 256 – 319 

KTD-441-5


with video inputs 320 – 383 

KTD-441-6


with video inputs 384 – 447 

KTD-441-7


with video inputs 448 – 511 

Summary of Contents for Digiplex IV

Page 1: ...Digiplex IV Matrix Switching System ...

Page 2: ...rectly or indirectly of the use or application of any of the contents of this document For the latest product specifications visit GE Interlogix Video Systems Group online at www GE Interlogix com or contact your GE Interlogix Video Systems Group sales representative For technical support before and after installation call 800 469 1676 Technical support is available 24 hours a day 7 days a week Ca...

Page 3: ...16 4 SYSTEM PROGRAMMING 18 4 1 PROGRAMMING WITH THE OPTIONAL PROGRAMMING SOFTWARE 18 4 2 PROGRAMMING WITH THE INTERNAL MENUS 18 4 2 1 Menu Tree 19 4 2 2 Setting up the Programming Interface 20 4 2 3 Accessing Matrix Switcher Programming 21 4 2 3 1 Using a Keyboard 21 4 2 3 2 Using a Keypad 22 4 2 4 Programming the Matrix Switcher 23 4 2 4 1 Programming Site Titles 23 4 2 4 2 Programming BNC Input ...

Page 4: ...PENDIX F ASSIGNING THE GROUP FUNCTION TO A KTD 404 KEY 57 APPENDIX G SYSTEM CONFIGURATIONS 58 64 INPUTS BY 4 TO 32 OUTPUTS 58 64 INPUTS BY 36 TO 64 OUTPUTS 58 128 INPUTS BY 4 TO 32 OUTPUTS 59 128 INPUTS BY 36 TO 64 OUTPUTS 59 192 INPUTS BY 4 TO 32 OUTPUTS 60 192 INPUTS BY 36 TO 64 OUTPUTS 61 256 INPUTS BY 4 TO 32 OUTPUTS 62 256 INPUTS BY 36 TO 64 OUTPUTS 63 320 INPUTS BY 4 TO 32 OUTPUTS 64 320 INP...

Page 5: ...g maintaining and troubleshooting this product refer to this document and any other documentation provided If you still have questions please contact GE Interlogix Technical Support and Sales GE Interlogix Video Systems Group Call 800 469 1676 Fax 541 752 9096 Note You should be at the equipment and ready with details before calling Technical Support Conventions Used in this Manual Boldface or but...

Page 6: ...KTD 440 Master Switcher Chassis KTD 440G Gathering Panel KTD 440N Monitor Expansion Chassis KTD 441 Slave Chassis KTD 442 Expansion Chassis KTD 443 Video Input Card KTD 444 Monitor Output Card KTD 445 Video Loss Card KTD 446 Power Supply KTD 447 CPU Card KTD 449 Monitor Expansion Cable Note Not all system configurations contain all components 1 1 TECHNICAL NOTES Digiplex IV does not loop video inp...

Page 7: ... provides the DIP switch settings and ribbon cable connections Unpack equipment Keep box contents together Mount chassis and power supplies Connect coaxial cables between chassis cameras and monitors Make RS422 connections KTD 440 chassis only Connect ribbon cables between chassis Verify data termination settings KTD 447 cards in the KTD 440 and KTD 440N chassis Verify NTSC PAL format settings KTD...

Page 8: ...Installation Overview Digiplex IV User Manual 8 1034169B December 2003 2 1 DIP SWITCH SETTINGS Note The black squares represent the poles of the DIP switches Figure 1 DIP switch settings ...

Page 9: ...Digiplex IV User Manual Installation Overview 1034169B December 2003 9 2 2 BACK PANEL CONNECTIONS Figure 2 Back panel connections ...

Page 10: ...outlines the key components contained within these six basic hardware configurations Table 1 Basic hardware configurations Matrix Size Required Chassis Video Inputs x Monitor Outputs KTD 440 KTD 440G KTD 440N KTD 441 KTD 442 64 x 32 64 x 64 128 x 32 128 x 64 192 512 x 32 192 512 x 64 Note Systems are shipped with the correct configuration of chassis and preaddressed cards 3 1 INSTALLING THE KTD 44...

Page 11: ...ectors 4 Connect all monitor cables to their respective BNC monitor output connectors 5 Remove the terminal strip from the back of the chassis 6 While observing polarity connect the RS422 control cable s 7 Reinstall the terminal strip RS422 control in RS422 control out if used RS232 5 VDC Terminal strip Monitor outputs Video inputs Output bus Input bus Figure 4 KTD 440 back panel connections 8 For...

Page 12: ...ions 3 2 INSTALLING THE KTD 440G CHASSIS CAUTION Complete all instruction steps before supplying power to the unit 1 Mount the KTD 440G chassis into a 19 inch 48 26 cm rack directly under the KTD 441 2 KTD 441 3 or KTD 440N chassis Refer to your system configuration in Appendix G System Configurations 2 Mount a KTD 446 power supply near the KTD 440G chassis 3 Connect the ribbon cables between the ...

Page 13: ...ing power to the unit 1 Mount the KTD 440N chassis into a 19 inch 48 26 cm rack 2 Mount a KTD 446 power supply near the KTD 440N chassis See Figure 8 and perform the following 3 Connect all monitor cables to their respective BNC monitor output connectors 4 Remove the terminal strip from the back of the chassis 5 While observing polarity connect the RS422 control cable s 6 Reinstall the terminal st...

Page 14: ...through 64 Use the DIP switches on the KTD 447 cards in both the KTD 440N and KTD 440 chassis See Figure 9 a In the KTD 440N chassis set switch 1 to ON to control monitors 33 through 64 b In the KTD 440 chassis ensure that switch 1 remains OFF to control monitors 1 through 32 KTD 440N KTD 447 Black handle DIP Monitors 33 through 64 switch 1 ON KTD 440 KTD 447 Black handle DIP Monitors 1 through 32...

Page 15: ...40N Figure 10 KTD 440N power connections 3 4 INSTALLING THE KTD 441 CHASSIS CAUTION Complete all instruction steps before supplying power to the unit 1 Mount the KTD 441 chassis into a 19 inch 48 26 cm rack 2 Mount a KTD 446 power supply near the KTD 441 chassis 3 Connect all camera cables to their respective BNC video input connectors See Figure 11 4 Connect the ribbon cables between the KTD 441 ...

Page 16: ...ll instruction steps before supplying power to the unit 1 Mount the KTD 442 chassis into a 19 inch 48 26 cm rack 2 Mount a KTD 446 power supply near the KTD 442 chassis 3 Connect the ribbon cables between the KTD 442 and other chassis See Figures 13 and 14 below and refer to your system configuration in Appendix G System Configurations KTD 442 1 PORT 4 PORT 3 PORT 2 PORT 1 INPUT RANGE 64 127 To KT...

Page 17: ...0G From KTD 441 INPUT RANGE 448 511 INPUT RANGE 384 447 INPUT RANGE 320 383 Figure 14 KTD 442 2 back panel connections 4 Connect the KTD 446 power supply to the KTD 442 chassis then to a power source See Figure 15 Power source 115 VAC power cord KTD 446 5 VDC power cord KTD 442 Figure 15 KTD 442 power connections ...

Page 18: ...KTD 411 Digiplex IV programming software then refer to that manual for further instructions 4 2 PROGRAMMING WITH THE INTERNAL MENUS If you are programming the system using the internal menus you will need a keypad or computer keyboard see section 4 2 2 Setting Up the Programming Interface The internal menus will be displayed on a security monitor Note Programming should be performed by a qualified...

Page 19: ... CALL UP 1 COPY MONITOR MONITOR 2 SEQUENCE ROUTINES 3 TEXT DISPLAY 4 UNIVERSAL DWELL 5 ALARM HELP SEQ EXIT F 0 SITE TITLES 001 0000 FRONT ENTRANCE 0001 VISITOR PARKING 0002 RECEIVING 0003 WAREHOUSE NORTH 0004 RECEPTION DESK 0005 PARKING LEVEL 1 0006 PARKING LEVEL 2 RT LF CURSOR DN UP SCROLL ALARM HELP SEQ EXIT J 0 VIDEO LOSS CURRENT LOSS REPORT 1 CURRENT ALL CAMERAS 2 VIDEO LOSS SETUP 3 AUDIO ALAR...

Page 20: ...iplex IV programming software refer to that manual for the programming hardware setup Note If you are using a computer keyboard it must be a 101 key keyboard with a PS2 type Mini DIN connector RS422 in RS422 out KTD 440 back panel Keypad refer to the keypad manual for connection instructions Figure 16 Connecting to a keypad for programming Mini DIN port KTD 447 CPU card Keyboard 101 key keyboard w...

Page 21: ...ore entering the programming menus enter the two digit monitor number e g 02 for monitor 2 using the 10 key number pad Note Do not use the number keys that are located across the top of the keyboard The main programming menu Figure 18 appears on the monitor A 0 MAIN MENU MON 001 BNC INPUT MAPPING 1 GROUP SWITCHING 2 MEMORY MANAGEMENT 3 MONITOR SETUP 4 TITLES 5 VIDEO LOSS 6 ALARM HELP SEQ EXIT HELP...

Page 22: ...OME SEQ EXIT 4 At the equipment selection display press the 1 key Equipment selection display 1 KTD 440 2 OTHER SEQ PREV 5 At the component selection display press the 1 key For keypads other than the KTD 405 skip to step 7 If you are using a KTD 405 keypad continue to step 6 Component selection display ENTER MONITOR NUMBER _ _ 1 64 BACK 6 At the enter monitor number display press the two number k...

Page 23: ...splaying menus 4 2 4 1 PROGRAMMING SITE TITLES If you program site titles before you program other parameters the site titles will automatically appear in description fields when you enter camera numbers Note Example user content that has been added to menus is highlighted Note To receive context sensitive help at any point during programming press the alarm key 1 At the A 0 main menu press the 5 ...

Page 24: ... and will forward that command to the BNC input that that camera is mapped to See Figure 20 Program the B series menus to tell the matrix switcher which camera is mapped to which BNC input Figure 20 Example of BNC input mapping Note Example user content that has been added to menus is highlighted Note To receive context sensitive help at any point during programming press the alarm key 1 At the A ...

Page 25: ... 0000 FRONT ENTRANCE 000 0001 VISITOR PARKING 001 0002 RECEIVING 002 0003 WAREHOUSE NORTH 003 0004 RECEPTION DESK 065 0005 PARKING LEVEL 1 066 0006 PARKING LEVEL 2 067 ALARM HELP SEQ EXIT 3 If remote slaves are being programmed review the remote slave programming information in Appendix D Establishing Remote Slaves before continuing with the following steps 4 At the B 0 BNC input mapping menu pres...

Page 26: ...nnections for each remote slave established in step 5 See Appendix D Establishing Remote Slaves Use and to move between the fields and use the number keys to enter values a Determine which monitors are to display remote video from which cameras Note Each monitor must have a separate video coaxial cable run from the remote to a dedicated BNC input on the matrix switcher See Appendix D Establishing ...

Page 27: ...the E 0 menu to program monitor setup A 0 MAIN MENU MON 001 BNC INPUT MAPPING 1 GROUP SWITCHING 2 MEMORY MANAGEMENT 3 MONITOR SETUP 4 TITLES 5 VIDEO LOSS 6 ALARM HELP SEQ EXIT E 0 MONITOR SETUP MON 001 ALARM CALL UP 1 COPY MONITOR MONITOR 2 SEQUENCE ROUTINES 3 TEXT DISPLAY 4 UNIVERSAL DWELL 5 ALARM HELP SEQ EXIT 2 At the E 0 monitor setup menu press the 1 key to access the E 1 menu to program alar...

Page 28: ...u can sequentially press 9 9 9 and 9 to universally arm all sites or sequentially press 8 8 8 and 8 to universally disarm all sites An asterisk appears in the ARM column when a site is armed the ARM column is blank when a site is unarmed E 1 ALARM CALL UP MON 001 ALARM ARM DISARM 1 ALARM DWELL TIME 2 ALTERNATE ALARM MONITORS 3 LOCK MODE ON 4 ALARM HELP SEQ EXIT E 2 ALARM ARM DISARM MON 001 ARM SIT...

Page 29: ... to avoid missing alarms You can assign a spot monitor to the primary monitor listed in menu E 5 If the primary monitor is armed and assigned a spot monitor an alarming camera site must be called up on the spot monitor to clear the video displayed on the primary monitor even if the alarm itself is cleared Acknowledged alarms will display again after a few seconds if they are still active Note When...

Page 30: ...n still manually arm a monitor by pressing the alarm key The A appears on the monitor However any selection of another site will automatically disarm the monitor the A disappears and the monitor will ignore all active alarms Each time a site is selected the alarm key must be pressed to rearm the monitor 7 At the E 0 monitor setup menu press the 2 key to access the E 6 menu to copy programming from...

Page 31: ...gh 6 to select a sequence list to program A separate E 8 menu appears for each sequence list 1 through 6 selected Selection 7 from the E 7 menu is discussed in step 10 You can program up to 32 steps for a sequence Use and to move between the step site and dwell time fields then use the number keys to enter values Use the clear key to remove a site from the list E 7 SEQ ROUTINES MON 001 SEQUENCE LI...

Page 32: ...LIST 1 1 SEQUENCE LIST 2 2 SEQUENCE LIST 3 3 SEQUENCE LIST 4 4 SEQUENCE LIST 5 5 SEQUENCE LIST 6 6 ALL CAMERAS 7 ALARM HELP SEQ EXIT E 13 SEQUENCE 7 SETUP MON 001 SEQUENCE 7 IS DISABLED LOWEST CAMERA _ _ _ _ HIGHEST CAMERA _ _ _ _ WARNING WHEN SEQUENCE 7 IS ENABLED ALL USERS WILL BE ABLE TO SEQUENCE THROUGH ALL CAMERAS REGARDLESS OF KEYPAD ACCESS ALARM HELP SEQ EXIT 11 At the E 0 monitor setup men...

Page 33: ...SITION MON 001 1 USE TO POSITION THE TITLE VERTICALLY 2 USE TO POSITION THE SITE NUMBER 3 USE CLEAR KEY TO TOGGLE TITLING OFF ON 4 USE SET KEY TO TOGGLE SITE NUMBER OFF ON ALARM HELP SEQ EXIT 13 At the E 9 text display menu press the 2 key to access the E 11 menu to enable or disable the display of the time date stamp on the monitor screen and to position it if enabled Use the clear and set keys t...

Page 34: ... camera sites to user defined groups Note For a description and examples of group switching refer to Appendix E Group Switching Note If you will be using a KTD 404 keypad for calling up groups and group sequences refer to Appendix F Assigning the Group Function to a KTD 404 Key for the procedure for assigning a key to that function The KTD 405 keypad has built in functions for calling up groups an...

Page 35: ...g assigned groups then its first tier of groups is numbered 33 through 64 and its second tier is numbered 161 through 256 You cannot assign any other groups to the second chassis Note Group titles are limited to 20 characters Note Group titles are not required for matrix switcher programming they are a convenience for group menu programming C 1 GROUP SWITCHING MENU GROUP ALARM CALL UP 1 GROUP SEQU...

Page 36: ... toward the desired camera site number use the number keys to enter a camera site number for the associated monitor Note You can assign any camera to any monitor to any group C 7 GRP 02 PARKING LEVEL 2 MON SITE DESCRIPTION 001 0003 PAY BOOTH 002 003 004 0056 PARKING ENTRANCE 005 006 007 ALARM HELP SEQ EXIT 5 At the C 1 group switching menu press the 1 key to access the C 2 menu to program the alar...

Page 37: ...M 0016 GROUP GROUP TITLE ALARM 001 PARKING LEVEL 1 002 PARKING LEVEL 2 003 PARKING LEVEL 3 0023 004 005 006 007 ALARM HELP SEQ EXIT C 3 GROUP CALL UP ALARM 0016 ALARM 0016 HAS BEEN ASSIGNED TO GROUP 002 SEQ CONTINUE Note Press the seq key to return to the C 2 menu to enter another alarm number or or C 3 GROUP CALL UP ALARM 0016 GROUP GROUP TITLE ALARM 001 PARKING LEVEL 1 002 PARKING LEVEL 2 003 PA...

Page 38: ...ected You can program up to 32 steps for a sequence with a camera group assigned to each step Note If groups have been programmed for two chassis you cannot program sequences that combine the groups from the two chassis Steps must be sequentially programmed Use and to move the on screen arrow between the step group and dwell time fields of the next step to be programmed then use the number keys to...

Page 39: ... The video loss card also has an attached relay When the relay alarm is enabled and video loss is detected the relay closes and provides a secondary alert through an auxiliary alarm device e g strobe light or siren The auxiliary alarm device is connected to the terminal strip on the back of the KTD 440 chassis see Figure 21 The relay alarm can also be used to trigger a recording device Note The re...

Page 40: ...that is displayed if no loss is detected NO LOSS DETECTED ALARM HELP SEQ EXIT 3 At the J 0 video loss menu press the 2 key to access the J 2 menu to view the video loss report The report provides the current video loss status for all camera sites If a status field is blank then video loss was not programmed for the associated camera site Use and to move through the list Use the clear key to enable...

Page 41: ...t threshold MED medium light intensity Sends an alarm when the lighting conditions fall below the set threshold HIGH high light intensity Sends an alarm when the lighting conditions fall below the set threshold NONE No detection level is set for the associated camera site The low medium and high light intensity settings are for indoor applications where the lighting is consistent J 0 VIDEO LOSS CU...

Page 42: ...press the 3 key to access the D 0 menu to clear user defined settings and return to factory default settings A 0 MAIN MENU MON 001 BNC INPUT MAPPING 1 GROUP SWITCHING 2 MEMORY MANAGEMENT 3 MONITOR SETUP 4 TITLES 5 VIDEO LOSS 6 ALARM HELP SEQ EXIT D 0 MEMORY MANAGEMENT CLEAR MONITOR MEMORY 1 CLEAR TITLES 2 CLEAR BNC MAPS 3 CLEAR GROUPS 4 ALARM HELP SEQ EXIT 2 At the D 0 memory management menu press...

Page 43: ...01 ENTER PROGRAMMING ACCESS CODE TO CLEAR MEMORY CAUTION MONITOR MEMORY WILL BE RESET TO FACTORY DEFAULTS ALARM HELP SEQ EXIT 4 At the D 0 memory management menu press the 2 key to access the D 3 menu to clear the user defined titles The D 3 clear titles menu requires an authorization code before deleting the user defined settings Use the keypad or keyboard keys to enter the programming access cod...

Page 44: ...ORY BNC MAP ENTER PROGRAMMING ACCESS CODE TO CLEAR MEMORY CAUTION MAPPED INPUTS WILL BE RE TURNED TO FACTORY DEFAULTS ALARM HELP SEQ EXIT 6 At the D 0 memory management menu press the 4 key to access the D 5 menu to clear the user defined groups The D 5 clear groups menu requires an authorization code before deleting the user defined settings Use the keypad or keyboard keys to enter the programmin...

Page 45: ...sets for the Digiplex IV system see Figure 22 Press the reset switch on the KTD 447 CPU card to reset the software Unplug and plug the 5 VDC power cord on the back of specific chassis to cycle the power for that chassis and the cards contained within it 5 1 2 HARD RESET CAUTION Before performing a hard reset back up your system s programming with the KTD 411 Digiplex IV Matrix Switcher Programming...

Page 46: ...tion 3 1 Installing the KTD 440 Chassis and the keypad manual for the correct connections b Check the keypad Ensure that the keypad is in Digiplex mode connect it to a CyberDome and verify that it controls the dome If it doesn t replace the keypad 2 Ensure that the video is correctly mapped for the camera involved If your video inputs are not mapped verify that video from camera 1 is connected to ...

Page 47: ...e cable while observing polarity or replace the RJ45 cable No control of cameras Incorrect input mapping If wiring is verified ensure that all camera sites and positions have been correctly addressed and mapped Camera number distorted on monitor Defective cabling Ensure that the camera cable is connected and not worn Replace if necessary Red lines appearing on monitor KTD 444 cards might not be pr...

Page 48: ...on 4 2 4 3 Programming Monitors 3 Ensure that DIP switches 5 and 6 on the KTD 447 CPU card s are set to OFF and switch 7 is set to the correct signal format NTSC or PAL Verify the status indicated by the diagnostic LEDs 4 Swap the KTD 444 monitor cards two at a time and test for a defective card 5 If no cards are defective perform a hard reset and reprogram the sequencing See sections 5 1 2 Hard R...

Page 49: ...second in a repeating pattern example of a steady blink Fast blink On and off at five or more cycles per second Flash Very short on and off pulse with a pause between pulse cycles Flicker On and off in an extremely fast and random manner 5 3 1 KTD 443 VIDEO INPUT CARD LED State Indication On Card is operating correctly i e powered and processing Steady blink Card is receiving power but the power s...

Page 50: ...ed by a time date generator if present Steady blink Monitor is in an alternate mode e g programming Blink Monitor is receiving data from the KTD 447 e g time and date updated by a time date generator if present 5 3 3 OPTIONAL KTD 445 VIDEO LOSS CARD LED State Indication On Card is operating correctly i e powered and processing Steady blink Card is receiving power but the power supply or processor ...

Page 51: ...ace connection RS232 or PC keyboard port The LED appears to blink faster or slower relative to the data rate It actually illuminates once per data stream On Indicates that video has been detected on video input 0 This is used for synchronized switching On System is receiving valid RS422 Digiplex communication Flicker Valid RS422 Digiplex commands are driving equipment e g panning a camera Off Ther...

Page 52: ...e chassis 2 Leave the card s in the chassis and set the termination as shown in Figure 23 3 If installation is complete supply power to the chassis Termination ON If the RS422 control cable ends at the KTD 440 chassis set DIP switch 8 to ON Termination OFF If the RS422 control cable continues on to other Digiplex components set DIP switch 8 to OFF KTD 447 CPU card with black handle KTD 440 chassis...

Page 53: ...ir format Remove the KTD 444 and KTD 445 if present cards one by one set their format and return them to their correct slots 3 If installation is complete supply power to the chassis NTSC DIP switch 7 OFF PAL DIP switch 7 ON KTD 447 CPU card with black handle KTD 440 and KTD 440N chassis if present NTSC top two jumper prongs PAL bottom two jumper prongs NTSC right two jumper prongs PAL left two ju...

Page 54: ...s 1 through 16 and the second switches inputs for monitors 17 through 32 Even though two cards might be switching inputs for different monitors they share the same inputs so both must be addressed with the same setting Note It is not necessary to remove power from the system or remove the video input cards from a chassis to change the address settings 1 Use Table 4 to determine the DIP switch sett...

Page 55: ...onitors 50 cameras with address range 0 49 RM01 on BNCs 50 51 52 RM02 on BNCs 53 through 56 Location B RM 01 30 cameras with address range 64 127 MONs 1 2 3 on BNCs 1 3 4 Location C RM 02 20 cameras with address range 128 195 MONs 1 through 4 on BNCs 5 6 11 12 Location D RM 03 Figure 25 Connecting the monitors of remote slaves to the master matrix switcher see the following example Example Using m...

Page 56: ...be assigned to one camera of each group See Figure 27 To program group switching see section 4 2 4 4 Programming Group Switching Note To manually switch your groups refer to your keypad s manual for details on using the group and auto keys to select and start a group or group sequence Parking Garage Cameras Monitors Group Title 5 4 3 2 1 5 th Floor 4th Floor 3rd Floor 2 nd Floor 1st Floor Figure 2...

Page 57: ...t key and after the tone entering the 3 6 9 seq access code 8 Press 1 for yes in answer to the question Program Keys 9 Press and release any key except the number keys that you want to assign as the group function key 10 Use the joystick to scroll through the key function list to the GROUP function then press the set key to define the key selected in step 9 as the group function key 11 Press the s...

Page 58: ...ist between systems sized 64 x 32 and 512 x 64 These are the most common configurations of the Digiplex IV matrix switching system 64 INPUTS BY 4 TO 32 OUTPUTS RS422 control in KTD 440 with video inputs 0 63 and monitor outputs 1 32 64 INPUTS BY 36 TO 64 OUTPUTS RS422 control in KTD 440N providing 32 additional monitor outputs KTD 440 with video inputs 0 63 and monitor outputs 1 32 ...

Page 59: ...TD 440 with video inputs 0 63 and monitor outputs 1 32 KTD 441 1 with video inputs 64 127 128 INPUTS BY 36 TO 64 OUTPUTS RS422 control in KTD 440N providing 32 additional monitor outputs KTD 442 1 with two KTD 443 cards from chassis KTD 441 1 KTD 440 with video inputs 0 63 and monitor outputs 1 32 KTD 441 1 with video inputs 64 127 ...

Page 60: ... Digiplex IV User Manual 60 1034169B December 2003 192 INPUTS BY 4 TO 32 OUTPUTS RS422 control in KTD 440 with video inputs 0 63 and monitor outputs 1 32 KTD 440G KTD 441 1 with video inputs 64 127 KTD 441 2 with video inputs 128 191 ...

Page 61: ...36 TO 64 OUTPUTS RS422 control in KTD 440N providing 32 additional monitor outputs KTD 440G KTD 442 1 with four KTD 443 cards from chassis KTD 441 1 and KTD 441 2 KTD 440 with video inputs 0 63 and monitor outputs 1 32 KTD 441 1 with video inputs 64 127 KTD 441 2 with video inputs 128 191 KTD 440G ...

Page 62: ...Manual 62 1034169B December 2003 256 INPUTS BY 4 TO 32 OUTPUTS RS422 control in KTD 440 with video inputs 0 63 and monitor outputs 1 32 KTD 441 1 with video inputs 64 127 KTD 441 2 with video inputs 128 191 KTD 441 3 with video inputs 192 255 KTD 440G ...

Page 63: ...422 control in KTD 440N providing 32 additional monitor outputs KTD 440G KTD 442 1 with six KTD 443 cards from chassis KTD 441 1 through KTD 441 3 KTD 440 with video inputs 0 63 and monitor outputs 1 32 KTD 441 1 with video inputs 64 127 KTD 441 2 with video inputs 128 191 KTD 441 3 with video inputs 192 255 KTD 440G ...

Page 64: ... December 2003 320 INPUTS BY 4 TO 32 OUTPUTS RS422 control in KTD 440 with video inputs 0 63 and monitor outputs 1 32 KTD 441 1 with video inputs 64 127 KTD 441 2 with video inputs 128 191 KTD 441 3 with video inputs 192 255 KTD 440G KTD 441 4 with video inputs 256 319 ...

Page 65: ...440N providing 32 additional monitor outputs KTD 440G KTD 442 1 with eight KTD 443 cards from chassis KTD 441 1 through KTD 441 4 KTD 440 with video inputs 0 63 and monitor outputs 1 32 KTD 441 1 with video inputs 64 127 KTD 441 2 with video inputs 128 191 KTD 441 3 with video inputs 192 255 KTD 440G KTD 441 4 with video inputs 256 319 ...

Page 66: ... INPUTS BY 4 TO 32 OUTPUTS RS422 control in KTD 440 with video inputs 0 63 and monitor outputs 1 32 KTD 441 1 with video inputs 64 127 KTD 441 2 with video inputs 128 191 KTD 441 3 with video inputs 192 255 KTD 440G KTD 441 4 with video inputs 256 319 KTD 441 5 with video inputs 320 383 ...

Page 67: ...TD 440G KTD 442 1 with eight KTD 443 cards from chassis KTD 441 1 through KTD 441 4 KTD 442 2 with two KTD 443 cards from chassis KTD 441 5 KTD 440 with video inputs 0 63 and monitor outputs 1 32 KTD 441 1 with video inputs 64 127 KTD 441 2 with video inputs 128 191 KTD 441 3 with video inputs 192 255 KTD 440G KTD 441 4 with video inputs 256 319 KTD 441 5 with video inputs 320 383 ...

Page 68: ... OUTPUTS RS422 control in KTD 440 with video inputs 0 63 and monitor outputs 1 32 KTD 441 1 with video inputs 64 127 KTD 441 2 with video inputs 128 191 KTD 441 3 with video inputs 192 255 KTD 440G KTD 441 4 with video inputs 256 319 KTD 441 5 with video inputs 320 383 KTD 441 6 with video inputs 384 447 ...

Page 69: ...ht KTD 443 cards from chassis KTD 441 1 through KTD 441 4 KTD 442 2 with four KTD 443 cards from chassis KTD 441 5 and KTD 441 6 KTD 440 with video inputs 0 63 and monitor outputs 1 32 KTD 441 1 with video inputs 64 127 KTD 441 2 with video inputs 128 191 KTD 441 3 with video inputs 192 255 KTD 440G KTD 441 4 with video inputs 256 319 KTD 441 5 with video inputs 320 383 KTD 441 6 with video inputs...

Page 70: ...trol in KTD 440 with video inputs 0 63 and monitor outputs 1 32 KTD 441 1 with video inputs 64 127 KTD 441 2 with video inputs 128 191 KTD 441 3 with video inputs 192 255 KTD 440G KTD 441 4 with video inputs 256 319 KTD 441 5 with video inputs 320 383 KTD 441 6 with video inputs 384 447 KTD 441 7 with video inputs 448 511 ...

Page 71: ...om chassis KTD 441 1 through KTD 441 4 KTD 442 2 with six KTD 443 cards from chassis KTD 441 5 through KTD 441 7 KTD 440 with video inputs 0 63 and monitor outputs 1 32 KTD 441 1 with video inputs 64 127 KTD 441 2 with video inputs 128 191 KTD 441 3 with video inputs 192 255 KTD 440G KTD 441 4 with video inputs 256 319 KTD 441 5 with video inputs 320 383 KTD 441 6 with video inputs 384 447 KTD 441...

Page 72: ...1 Chassis 15 KTD 442 Chassis 16 Internal Menus 18 L Lock Mode 30 M Master Switcher Chassis 6 Matrix Switching System 6 Memory Before Clearing the Memory 42 P Primary Monitors 39 Programming 18 Access Code 22 Accessing Matrix Switcher Programming 21 Alarm Call up 37 Alarm Key 23 Alternate Monitors 29 39 Armed Camera Site 28 BNC Input Mapping 24 Context Sensitive Help 23 F5 Function 21 Group Sequenc...

Page 73: ...3 73 Soft Reset 45 Spot Monitors 29 39 System Configurations 58 T Technical Notes 6 Termination 52 Troubleshooting 45 Common Issues 46 Diagnostic LED Indications 49 Twisted Pair Cable 6 U Universal Dwell Time 34 V Video Loss 39 41 W What you need for 6 ...

Page 74: ......

Page 75: ......

Page 76: ......

Reviews: