background image


13   


GC AADVA


IOS 1 00 P


3. 

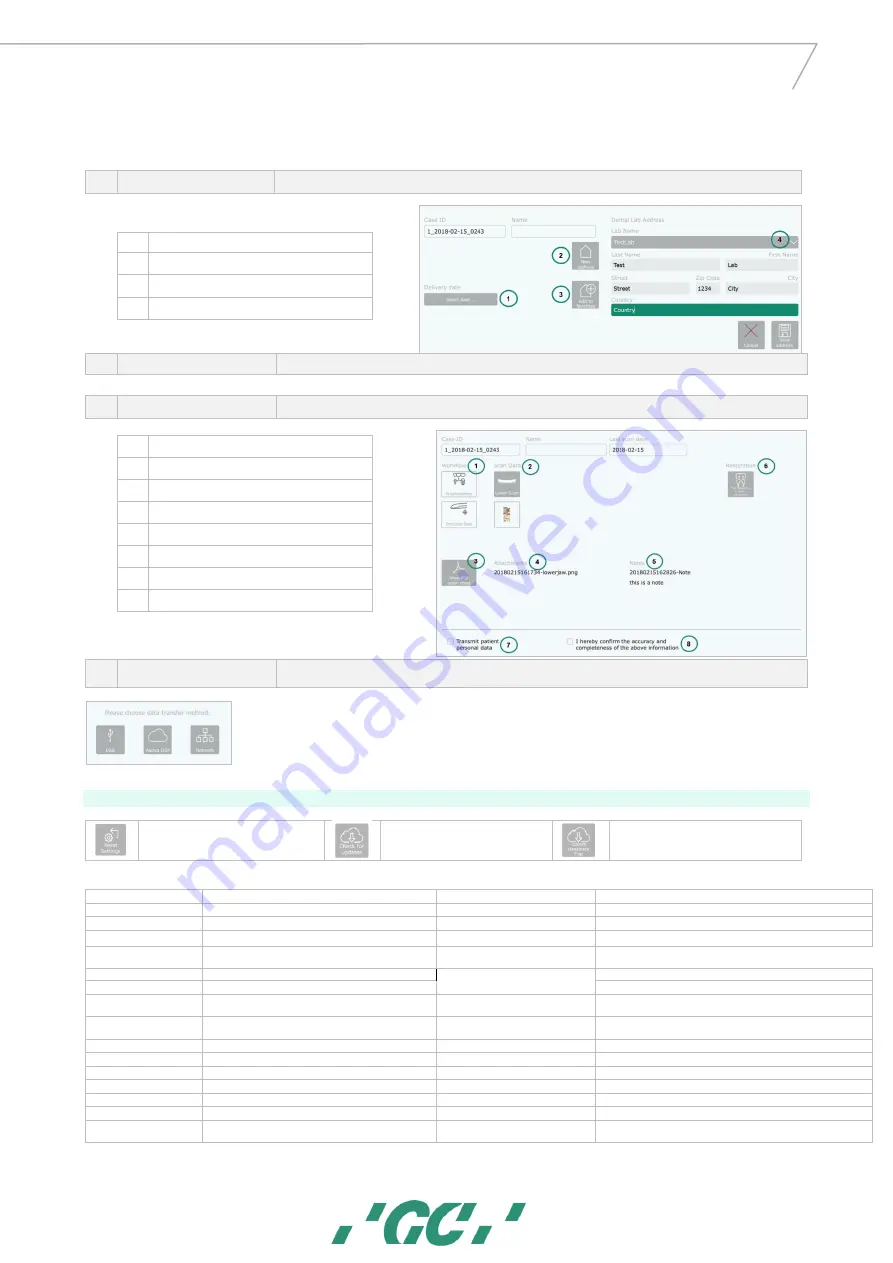
Delivery tab 

Choose a dental lab for delivery


1. 

Select the delivery date in the pop-up calendar 

2. 

Add a new lab address 

3. 

Add current address to favorites to show up in the drop-
down menu 

4. 

Drop-down menu with favorite lab addresses 


4. 

Attachments tab 

Add attachments and/or notes   


5. 

Summary tab 

See the summary of this case     


1. 

Shows the chosen workflow and scan type 

2. 

Shows the scanned data 

3. 

View the automatically generated PDF   

4. 

Shows all your added attachments 

5. 

Shows all your notes 

6. 

Shows all requested restorations   

7. 

Checked boxed : Patient data will be shown   

8. 

Confirmation of case completeness 


6. 

Data transfer tab 

Transfer the case     


USB

*

 :    Export case file to a USB   


Aadva Xchange

*

 : Export case file to the Aadva Xchange   


Network

*

 :


: Export case file to the network 

25


Settings


Reset Settings: Delete your settings and 
restore factory settings   


Check for updates: Check and 
download latest software updates 


Update Handpiece Files: Update the 
configuration for the scanner 


General   


Scan


Status 

Displays online or offline status of the Wi-Fi connection 

Acoustic Scan Feedback


Activate or inactivate the sound during scanning 


Hidden Network Name 

Activate to see hidden networks 

Pick-up Visualisation


Show/hide the support view window when scan focus is lost


Network Name 

Select the network you wish to connect with 

Maximum Zoom Value


Defines the zoom size of the model after pressing the ‘model’ button


Wi-Fi Password     

Enter the password of your chosen connection 

Default workflow

*


Define a specific workflow as your default workflow 


Dentist Information 

Enter Title, First Name, Last Name, Dental Office Street, 
ZipCode, City and Country. 

Model


Default Mesh Colour


Change the colour of the generated mesh 


Hand piece ID 

Displays the unique ID of the hand piece 

Maximum Zoom Value


Adjust the maximum zoom value of the model section


Dental Notation System 

Choose the dental notation type 

Mesh Color for invivo scans


Select the colored setting of the scan, bite registration, margine line 
and model maker view 


Adaptive grid 

Select unit of measure 

Margine Line 

Adjust the size of the added points and the line thickness in the margin 
line section 

Virtual keyboard 

Choose the keyboard layout   

Model Maker 

this setting is only relevant for the ortho workflow 

Language 

Choose the language (restart necessary) 

  Save as on mesh 

after the calculation the upper and lower jaw will be saved as one mesh 


  Full socket model 

the socket will be closed completely (no cavity) 


  Wall Thickness 


define the thickness of the socket


  Socket Height


define the height of the socket


Bite Registration (Ortho)


this setting is only available for the ortho workflow


  Save mesh with colorization 

After the bite registration was performed, the mesh will be saved with 
the bite colorization color. 

  Export   

Summary of Contents for AADVA IOS 100 P

Page 1: ...1 GC AADVA IOS 100 P Date of issue Jan 2019 IOS 100 P IFU v1 0 ...

Page 2: ...tion 5 17 GC Aadva IOS 100 P components 5 18 Installation 8 19 Log in 10 20 Patient Database section 10 21 Scanning 10 22 Bite section 11 23 Margin line section 12 24 Export section 12 25 Settings 13 26 Limitation of patients from intended use 14 27 Copyrights 14 28 Intellectual Property Rights IP 14 29 Warranty Inspection Service Repairs 14 30 Limitation of liability 14 31 Data protection 14 32 W...

Page 3: ...GC AADVA IOS 100 P 37 Information for electromagnetic compatibility EMC 17 38 Identification plate and labelling 19 39 Device specifications and classifications 19 40 Environment 19 41 Troubleshooting 19 ...

Page 4: ... the digital model and transfers the model data to an external tool not part of Aadva IOS 100 P Other possible uses and applications contrary to the intended use changes to the components and or the installation of unauthorized parts may considerably jeopardize safety reliability and function of the IOS Any of the above will cause the warranty provided by GC Europe N V to void with immediate effec...

Page 5: ...to the Aadva IOS 100 P general terms and conditions for further information The user health professional is solely responsible for the application and the intended use of the product For any damage to the product that occurs within the warranty period please refer to the Aadva IOS 100 P general terms and conditions Notice Any attempt to open the device or service it yourself may cause damage to th...

Page 6: ...esting position It contains a heating plate responsible for the maintenance of the temperature of the glass plate at the head of the hand piece in order to avoid fogging when used in the mouth It is connected to PC with the USB cable Figure 2 cradle Before mounting the hand piece into the cradle inlay part the cradle inlay needs to be mounted into the cradle When mounting the handpiece into the in...

Page 7: ...7 GC AADVA IOS 100 P Figure 5 Laptop PC Please note Do not connect the scanner device handpiece and cradle to any other PC than attached to this product ...

Page 8: ...C 2 Connecting the cradle Place the handpiece on the cradle Connect the micro B connector side of the USB cable to the micro USB port of the cradle Connect the Type A connector side of the USB cable to the USB A port on the left side of the PC 3 Connecting the scanner device handpiece Connect the scanner handpiece USB cable to the USB A port on the right side of the PC ...

Page 9: ... 100 P 4 Starting up the PC Switch on the PC 5 Starting up software There is an icon named Aadva IOS GUI on the screen please double click this icon When the software starts up the following login screen is displayed ...

Page 10: ...PIN number which will be provided at the installation of your GC Aadva IOS 100 P You are able to change your PIN number at any time in the user admin menu 20 Patient Database section 21 Scanning Scanning can be performed in your healthcare professional preferred o clock position A New patient tab Insert patient data press Create patient button and choose your workflow scan type B Search patient ta...

Page 11: ... out Scan abutment Add a scan of an abutment scan body to your existing loaded scan Save Saves your scan and lets you define which scan you just made 1 Bite Scan Note Bite scan is not available with pre scans To record the bite scan make sure the buccal surface of the upper and lower teeth are scanned around 4 teeth while the patient keeps maximum intercuspation Scan enough gingiva as this will al...

Page 12: ...n both 2 Press the Add Margin Line button in the top left corner multiple possible 3 Select the tooth number 4 Click Add points Add points Add points around the margins of preparation Undo With each click the last point is removed Delete points Points can be removed by clicking on them in the model view window Save Save to finish the margin line Add note To add comments TIP Place the first 4 point...

Page 13: ...Name Select the network you wish to connect with Maximum Zoom Value Defines the zoom size of the model after pressing the model button Wi Fi Password Enter the password of your chosen connection Default workflow Define a specific workflow as your default workflow Dentist Information Enter Title First Name Last Name Dental Office Street ZipCode City and Country Model Default Mesh Colour Change the ...

Page 14: ...e or service it yourself may cause damage to the device which may lead to personal injury Any attempt to open the device or service it yourself also voids the warranty with immediate effect Inspection Inspect the Aadva IOS 100 P with each use for integrity of cables integrity of the handpiece cradle and correct functioning If anything unusual is observed please contact your authorized dealer or lo...

Page 15: ... device handpiece or clean with abrasive to prevent damage Disinfect for each patient to prevent infection Do not use without disinfecting for another patient once used Infection possibility Do not touch the measuring part Storage Store in a place that is unlikely to be adversely affected by air containing atmospheric pressure temperature humidity sunlight dust salt sulfur etc WARNING MESSAGES To ...

Page 16: ...cement After 20 cycles of sterilization it is recommended to replace the GC Aadva Cradle Inlay with a new one The following signs are indications of wear and degradation Please replace the Cradle Inlay with a new one when noticing one of the following signs Delamination and or roughening of the surface Dimensional changes Cracks discoloration staining Structural damage Change in surface texture WA...

Page 17: ...ssential performance is degraded due to EM disturbances which does not lead to any health risks There is no photobiological risk for the dentist patient or third persons when looking into the scanner light The device is tested according IEC 62471 2006 and evaluated as class 0 which means no danger or risk for health However for precaution avoid looking directly into the light ENCLOSURE PORT Input ...

Page 18: ...static discharge e IEC 61000 4 2 8 kV contact 2 kV 4 kV 8 kV 15 kV air 385 380 390 Pulse modulation b 18Hz 27 Electrical fast transients bursts b f IEC 61000 4 4 1 kV 100 kHz repetition frequency 450 430 470 FM c 5 kHz deviation 1 kHz sine 28 Surges Line to ground a IEC 61000 4 5 2 kV 710 704 787 Pulse modulation b 217Hz 9 Conducted disturbances induced by RF fields b d g IEC 61000 4 6 3 V h 0 15 ...

Page 19: ...ntry for environmentally responsible recycling disposal Dispose all components in accordance with applicable regulations 41 Troubleshooting No power Is the power cable connected If the pilot lamp on the cradle is lighted is the screen switched off Are the fans of the PC working is the device making any noise No image appearing on screen Is the device heated up properly does the thermos indication ...

Page 20: ...FAT32 or NTFS formatted USB thumb drive Network path not specified Export to network failed because no export path was defined Please set the network export path in the settings No network export path was specified in the export settings Enter a network export path No space left on the USB drive Export to USB failed Not enough free memory available Not enough memory left on the USB thumb drive to ...

Page 21: ...ibuted by GC AMERICA INC ALSIP IL 60803 U S A TEL 1 708 597 0900 www gcamerica com Distributed by GC EUROPE N V Researchpark Haasrode Leuven 1240 Interleuvenlaan 33 3001 Leuven Belgium Tel 32 16 74 10 00 Fax 32 16 40 48 32 info gce gc dental Website www gceurope com ...

Reviews: