54
Chapter 3
Removing the Keyboard
IMPORTANT:
The keyboard is easily warped or damaged during the removal process. Take care not to use
excessive force when removing the keyboard and replace if any damage occurs.
1.
See “Removing the Dummy Card” on page 42.
2.
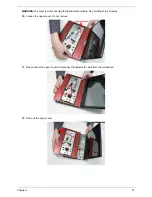
Push in the four (4) latches on the top edge of the keyboard.
3.
Lift the keyboard up and flip over.
Summary of Contents for EC14T Series
Page 6: ...vi ...
Page 10: ...x Table of Contents ...
Page 13: ...Chapter 1 3 System Block Diagram ...
Page 32: ...22 Chapter 1 ...
Page 48: ...38 Chapter 2 ...
Page 65: ...Chapter 3 55 4 Unlock the FPC 5 Remove the FPC and keyboard ...
Page 67: ...Chapter 3 57 4 Partially open the LCD module 5 Remove the hinge cap ...
Page 83: ...Chapter 3 73 6 Remove the CRT cable ...
Page 96: ...86 Chapter 3 7 Pry up the bezel bottom edge 8 Remove the bezel ...
Page 106: ...96 Chapter 3 4 Remove the hinge ...
Page 110: ...100 Chapter 3 11 Remove both antenna cables from the cover ...
Page 124: ...114 Chapter 3 6 Replace the screw covers 7 Insert the stylus ...
Page 153: ...Chapter 3 143 2 Replace the HDD in the bay 3 Adhere the black tape 4 Replace the HDD FPC ...
Page 158: ...148 Chapter 3 ...
Page 206: ...196 Appendix B ...
Page 208: ...198 ...
Page 211: ...201 ...
Page 212: ...202 ...

