


Chapter 1
19
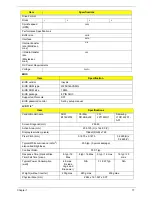
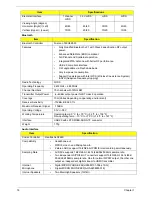
LAN Interface
Keyboard
Media Card Reader
Item
Specification
LAN Chipset
Atheros AR8131L
Package
48pin QFN
Features
•
It is an ultra-high performance, ultralow cost, and ultra-
low power fully integrated 10/100/1000 Mbps NIC/LOM
Ethernet.
•
The AR8131L combines a 10/100/1000BASE-T GbE
media access controller (MAC), a triplespeed Ethernet
physical layer transceiver (PHY), and a PCI Express bus
interface.
•
The AR8131L is compliant with IEEE 802.3u
specification for 10/100 Mbps Ethernet and IEEE
802.3ab specification for 1000 Mbps Ethernet.
•
The AR8131L device combines pulse shaping, Tx/Rx
PCS, echo canceller, NEXT canceller, equalizer,
decoder, and timing recovery functions to deliver robust
signal performance in noisy environments.
•
The AR8131L GbE controller supports checksum off-load
features for IP, TCP, and UDP, lowering CPU utilization
and optimizing network performance.
Item
Specification
Keyboard Controller
Winbond WPCE775LA0DG
Total number of keypads
US: 86
UK: 86
UI: 86
GERMAN: 86
Windows logo key
Yes
Internal & external keyboard work
simultaneously
Plug USB keyboard to the USB port directly: Yes
Features
•
Plug USB keyboard to the USB port directly: Yes
Item
Specification
Chipset
Alcor AU6433
Features
•
Fully compatible with USB2.0 High Speed and backward
compatible with USB1.1 specifications
•
Supports multiple flash card interfaces, including SD/
MMC/xD/MS.
•
Supports single LUN
•
48-pin LQFP
Summary of Contents for EC14T Series
Page 6: ...vi ...
Page 10: ...x Table of Contents ...
Page 13: ...Chapter 1 3 System Block Diagram ...
Page 32: ...22 Chapter 1 ...
Page 48: ...38 Chapter 2 ...
Page 65: ...Chapter 3 55 4 Unlock the FPC 5 Remove the FPC and keyboard ...
Page 67: ...Chapter 3 57 4 Partially open the LCD module 5 Remove the hinge cap ...
Page 83: ...Chapter 3 73 6 Remove the CRT cable ...
Page 96: ...86 Chapter 3 7 Pry up the bezel bottom edge 8 Remove the bezel ...
Page 106: ...96 Chapter 3 4 Remove the hinge ...
Page 110: ...100 Chapter 3 11 Remove both antenna cables from the cover ...
Page 124: ...114 Chapter 3 6 Replace the screw covers 7 Insert the stylus ...
Page 153: ...Chapter 3 143 2 Replace the HDD in the bay 3 Adhere the black tape 4 Replace the HDD FPC ...
Page 158: ...148 Chapter 3 ...
Page 206: ...196 Appendix B ...
Page 208: ...198 ...
Page 211: ...201 ...
Page 212: ...202 ...


