background image

Using a 4 mm key, tighten the M5 screws on the friction flange adapter and extender to 3 N-m (27 lbf-in.).

10 Connect the cable to your bike.

If necessary, consult the owner's manual for your bike for additional information on connecting devices.

11 Secure the cable so that it does not interfere with any moving parts of the bike.

Installing the Device on a Rear Rack

Before you can install the Varia eRTL615 tail light, you need 3 mm and 4 mm hex keys and a cable to connect 
your device.
Complete the required steps based on the configuration of your rear rack:

• If the rear rack can accommodate the friction flange adapter, complete steps 2 through 5.
• If the device can be attached directly to the rear rack, complete steps 6 through 9.

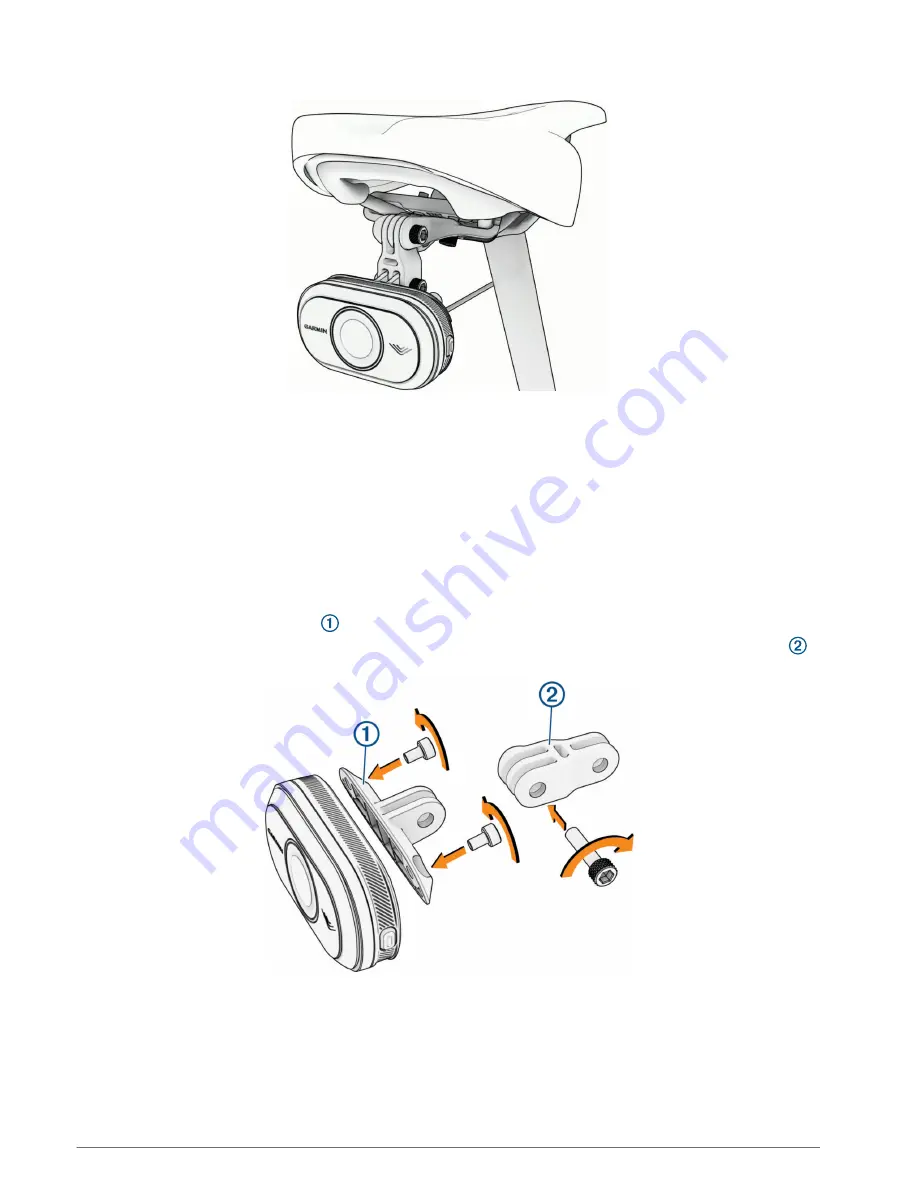
Attach the friction flange adapter   to your Varia eRTL615 tail light using two M4 screws.

TIP: For longer bike racks or if you have other attachments on the back of your bike, attach the extender 
to the friction flange adapter.

Using a 3 mm hex key, tighten the two M4 screws to 1 N-m (9 lbf-in.).
Align the hole in the friction flange adapter or extender with the hole in the rear rack of your bike.

Introduction

3

Summary of Contents for Varia eRTL615

Page 1: ...Varia eRTL615 Owner sManual...

Page 2: ...o ANT Edge f nix Forerunner Venu and v voactive are trademarks of Garmin Ltd or its subsidiaries registered in the USA and other countries Garmin Connect Garmin Express and Varia are trademarks of Gar...

Page 3: ...Radar Display Unit 9 Varia RDU Overview 10 Installing the Varia RDU 11 Pairing the Radar Device with the Varia RDU 11 Turning On the Varia RDU 12 Turning Off the Varia RDU and Radar Device 12 Other Co...

Page 4: ......

Page 5: ...evices The Varia eRTL615 and Your Edge 1040 page 5 If you are using your phone download the Garmin Varia app to your phone and pair the devices Pairing the Varia eRTL615 with Your Phone page 8 If you...

Page 6: ...your seat attach the extender to the friction flange adapter using an M5 screw 4 Align the hole in the friction flange adapter or the extender with the hole in the center of the seat mount bracket 5...

Page 7: ...your device 1 Complete the required steps based on the configuration of your rear rack If the rear rack can accommodate the friction flange adapter complete steps 2 through 5 If the device can be atta...

Page 8: ...devices 9 Secure the cable so that it does not interfere with any moving parts of the bike Device Overview Device button Press to change device and light modes Hold for 1 second to turn the device on...

Page 9: ...y Default Flash Behavior Function Solid default High None The tail light is on and the device detects vehicles Peloton group ride Moderate None The tail light flashes softly when the device detects ve...

Page 10: ...econds to exit pairing mode 5 Select your sensor and select Add When the sensor is paired with your Edge 1040 the sensor status is Connected The radar and bike light status icons appear solid on the t...

Page 11: ...ct Network Options Test Lights to verify that each light in your network is set up correctly Testing the Light Network page 7 Select a light to view device information and customize each light in your...

Page 12: ...he app displays a colored banner indicating the threat level posed by approaching vehicles You can enable phone vibration alerts so you can monitor those alerts while your phone is in your pocket inst...

Page 13: ...e vehicle also indicates the threat level A straight line changes to jagged with a red threat level Customizing the Varia App Alert Settings Before you can customize the radar alert settings with the...

Page 14: ...the device is searching for the radar device FRONT and REAR device status LEDs Appears solid red when there is a device error Threat level LED Changes color based on the potential level of threat Gre...

Page 15: ...place 3 Place the bike mount on the bike stem 4 Attach the bike mount securely using the two bands 5 Align the tabs on the back of the device with the bike mount notches 6 Press down slightly and turn...

Page 16: ...at the same time Hold the device button on the Varia RDU for 1 second Other Compatible Devices Pairing the Varia eRTL615 with a Compatible Edge Bike Computer This task is for the Edge 1040 830 and 53...

Page 17: ...cleaners solvents sunscreen and insect repellents that can damage plastic components and finishes Secure the weather cap tightly to prevent damage to the USB port Avoid extreme shock and harsh treatme...

Page 18: ...e range From 20 to 60 C from 4 to 140 F Charging temperature range From 0 to 45 C from 32 to 113 F Wireless frequency 2 4 GHz ANT 0 dBm nominal Water rating IEC 60529 IPX71 Troubleshooting Resetting t...

Page 19: ...tooth off on both devices and turn it back on If your devices are already paired remove the Varia eRTL615 from the Bluetooth settings on your phone and pair the devices again If your devices are not p...

Page 20: ...ia app WARNING If the radar device is not connected or sending radar data Garmin recommends that you stop riding and check the devices in a safe location Failure to do so could result in serious injur...

Page 21: ......

Page 22: ...support garmin com GUID FE2B50F1 79E3 4F6F 85B9 C3E5D5E56D92 v1 April 2023...

Reviews: