background image

This control is best used for situations when you want to control and suppress clutter or noise near the 
water surface. It also allows for the display of targets near the surface that are otherwise hidden or masked 
by surface noise.

Overlay Number Settings

You can customize the data shown on the sonar screen.
From a sonar screen, select 

 > Overlay Numbers.

Navigation Inset: Shows the navigation inset when the vessel is navigating to a destination.
Compass Tape: Shows the compass tape data bar.
Device Voltage: Shows the voltage of the device.
Depth: Shows the transducer's current depth.
Speed: Shows the vessel's current speed.
Water Temp.: Shows the current water temperature.
Time of Day: Shows the current time of day.

Garmin Quickdraw Contours Mapping

 WARNING

The Garmin Quickdraw Contours mapping feature allows users to generate maps. Garmin makes no 
representations about the accuracy, reliability, completeness or timeliness of the maps generated by third 
parties. Any use or reliance on the maps generated by third parties is at your own risk.

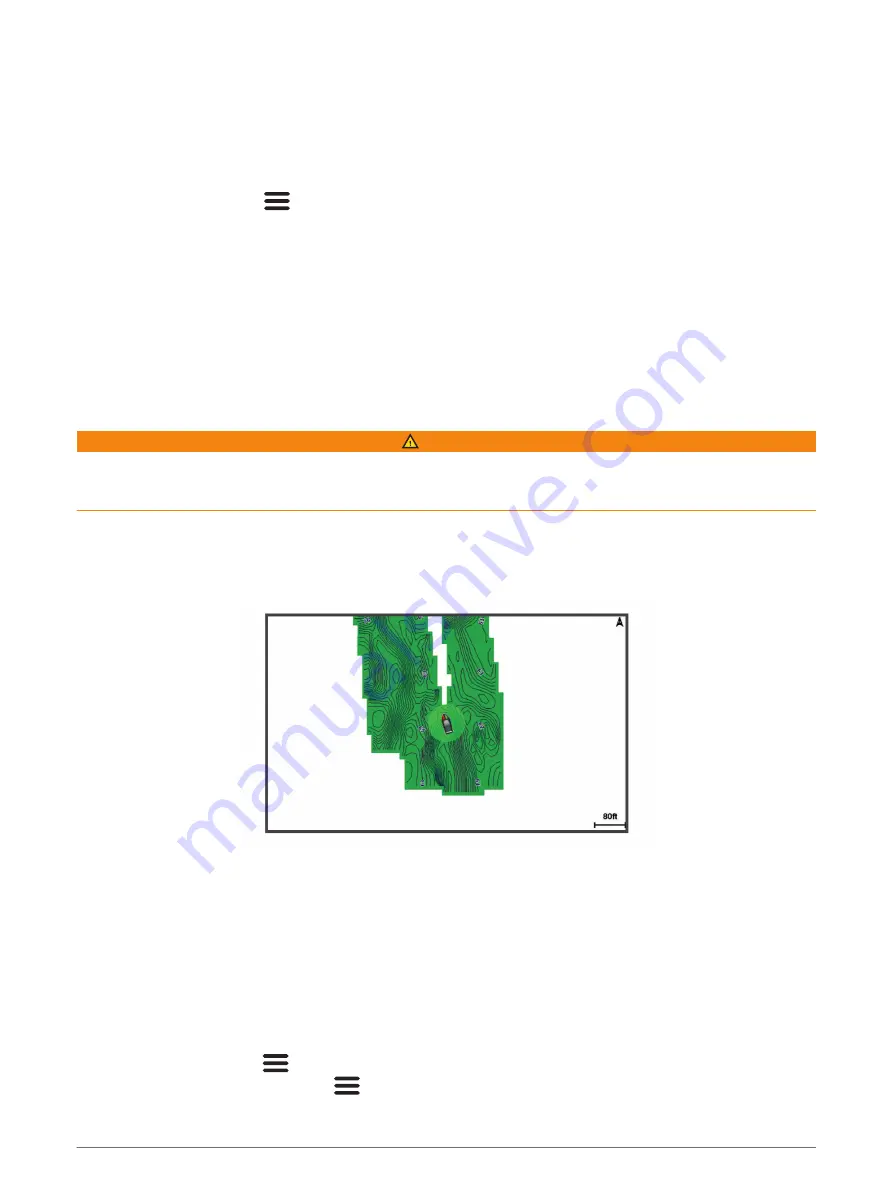
The Garmin Quickdraw Contours mapping feature allows you to instantly create maps with contours and depth 
labels for any body of water.
When Garmin Quickdraw Contours records data, a colored circle surrounds the vessel icon. This circle 
represents the approximate area of the map that is scanned by each pass.

A green circle indicates good depth and GPS position, and a speed under 16 km/h (10 mph). A yellow circle 
indicates good depth and GPS position, and a speed between 16 and 32 km/h (10 and 20 mph). A red circle 
indicates poor depth or GPS position, and a speed above 32 km/h (20 mph).
You can view Garmin Quickdraw Contours in a combination screen or as a single view on the map.
The amount of saved data depends on the memory available in the device, your sonar source, and the speed of 
your boat as you record data. You can record longer when you use a single-beam sonar. It is estimated that you 
might be able to record about 1,500 hours of data onto the device.

Mapping a Body of Water Using the Garmin Quickdraw Contours Feature

Before you can use the Garmin Quickdraw Contours feature, you must have sonar depth and your GPS position.
Select Quickdraw Map > 

 > Quickdraw Contours > Start Recording.

When recording is complete, select 

 > Quickdraw Contours > Stop Recording.

Garmin Quickdraw Contours Mapping

17

Summary of Contents for STRIKER VIVID 7sv

Page 1: ...User Manual of Product 1 Garmin Striker Vivid 7sv Easy to Use 7 inch Color Fishfinder and Sonar Transducer Vivid Scanning Sonar Color Palettes 010 02553 00...

Page 2: ...STRIKER VIVID Owner sManual...

Page 3: ...min com for current updates and supplemental information concerning the use of this product Garmin the Garmin logo and Ultrascroll are trademarks of Garmin Ltd or its subsidiaries registered in the US...

Page 4: ...he Water Bottom 13 Sonar Gain 13 Setting the Gain Automatically 13 Setting the Gain Manually 13 Adjusting the Range of the Depth Scale 14 Sonar Setup 14 Showing and Adjusting the Depth Line 14 Setting...

Page 5: ...the Track Log Memory During Recording 26 Configuring the Recording Interval of the Track Log 26 Device Configuration 26 System Settings 26 System Information 27 My Vessel Settings 27 Setting the Keel...

Page 6: ...n applicable Turns on and off the device when held Performs one or more of these actions when quickly pressed Adjusts the backlight Adjusts the color mode Enables and disables sonar Acknowledges messa...

Page 7: ...in Select to zoom out Panning on the STRIKER Vivid 4 You can move the sonar views and maps to view an area other than your present location 1 Select or to start panning 2 Use the arrow keys to pan TI...

Page 8: ...e optional devices you have connected to your STRIKER Vivid device You can edit the combination pages and create new combination pages Creating a New Combination Page with the STRIKER Vivid 5 7 9 You...

Page 9: ...reen select Change Function and select new information To resize the information areas shown on the screen select Resize Combination To customize the data shown on the screen select Overlay Numbers Ov...

Page 10: ...aring data registering updating the device software and receiving mobile device notifications 1 From the STRIKER Vivid device select ActiveCaptain 2 From the ActiveCaptain page select Wi Fi Network Wi...

Page 11: ...to install the update 3 When you are prompted by the STRIKER Vivid device select an option to install the update To update the software immediately select OK To delay the update select Cancel When yo...

Page 12: ...ull screen Traditional sonar view shows a large image of the sonar readings from a transducer The range scale along the right side of the screen shows the depth of detected objects as the screen scrol...

Page 13: ...sonar provides a detailed picture of the fishing environment around the boat in a detailed representation of structures the boat is passing over Traditional transducers emit a conical beam The Garmin...

Page 14: ...is as a search tool to find structures and fish Left side of the boat Right side of the boat The transducer on your vessel Logs Old tires Trees Water between the vessel and the bottom Distance from th...

Page 15: ...s a ring that starts at the top and progresses clockwise Depth is indicated by the scale inside the ring Sonar information flashes on the ring when it is received at the depth indicated The colors ind...

Page 16: ...r function properly Before connecting the transducer you should select the transducer type The transducer name should be listed on the label on the transducer cable near the connector This device is c...

Page 17: ...when using CHIRP frequencies Some sonar black boxes and transducers also provide the ability to customize preset frequencies for each transducer element which enables you to change the frequency quic...

Page 18: ...ea from the water bottom to 20 meters above the bottom The span appears on the right side 1 From a sonar view select Zoom Bottom Lock 2 Select a span Sonar Gain The gain setting controls the sensitivi...

Page 19: ...the screens 1 From a sonar screen select Sonar Setup Depth Line 2 Select 3 To adjust the Depth Line select or Setting the Scroll Speed You can set the rate at which the sonar image moves across the s...

Page 20: ...so be helpful for detecting fish that are close to the bottom NOTE This feature is not available on all sonar screens From the full screen page select Sonar Setup Appearance A Scope A Scope Diameter o...

Page 21: ...est interference setting that achieves the desired improvement to remove interference from the screen Correcting installation issues that cause noise is the best way to eliminate interference Surface...

Page 22: ...mapping feature allows you to instantly create maps with contours and depth labels for any body of water When Garmin Quickdraw Contours records data a colored circle surrounds the vessel icon This cir...

Page 23: ...raw Contours Maps with the Garmin Quickdraw Community Using ActiveCaptain page 18 Downloading Garmin Quickdraw Community Maps Using ActiveCaptain You can download Garmin Quickdraw Contours maps that o...

Page 24: ...ings For example if the last time you recorded had a sonar depth of 3 1 m 10 5 ft and today s sonar depth is 3 6 m 12 ft enter 0 5 m 1 5 ft for the a Recording Offset value User Display Offset Sets di...

Page 25: ...dangerous objects Failure to do so could result in an accident causing property damage personal injury or death You can set and follow a course to a destination using one of two methods Go To or Route...

Page 26: ...elect Navigate To 6 Select an option Stopping Navigation From the Navigation chart or Fishing chart select Stop Navigation Waypoints Waypoints are locations you record and store in the device Waypoint...

Page 27: ...he water temperature select Water Temp To change the comment select Comment To move the position of the waypoint select Position Deleting a Waypoint or an MOB 1 Select User Data Waypoints 2 Select a w...

Page 28: ...tion on the chart Browsing for and Navigating a Saved Route Before you can browse a list of routes and navigate to one of them you must create and save at least one route 1 Select User Data Routes 2 S...

Page 29: ...r of the magenta line is a thinner purple line that represents the corrected course from your present location to the destination The corrected course is dynamic and it moves with your boat when you a...

Page 30: ...ing a Recorded Track Before you can browse a list of tracks and navigate to them you must record and save at least one track Saving the Active Track page 25 1 Select User Data Tracks Saved Tracks 2 Se...

Page 31: ...User Data Tracks Active Track Options Record Interval Interval 2 Select an option To record the track based on a distance between points select Distance Change and enter the distance To record the tra...

Page 32: ...s and options require additional hardware Some settings are available only when you have valid depth data Select Settings My Vessel Transducer Type Displays the type of transducer connected to the dev...

Page 33: ...he true depth of the water measure the distance from the transducer to the water line Enter this value in as a negative number 2 Select Settings My Vessel Keel Offset 3 Select if the transducer is ins...

Page 34: ...nnect the device to a temperature capable transducer to use this alarm Fish Sets an alarm to sound when the device detects a suspended target sets the alarm to sound when fish of all sizes are detecte...

Page 35: ...y reliance on or use of such data is at your own risk You can share user data between compatible devices User data includes waypoints saved tracks routes and boundaries You can share data if two compa...

Page 36: ...Data You can remove saved user data from the device memory 1 Select User Data Manage Data Clear User Data 2 Select an option NOTICE If you select All all the data you have saved will be removed excep...

Page 37: ...tems to attempt to troubleshoot the cause of the power issue Make sure the power source is generating power You can check this several ways For example you can check whether other devices powered by t...

Page 38: ...to the next If you have manually entered a waypoint using coordinates and the location of the point does not appear where the point should be the map datum and position format of the device may not ma...

Page 39: ...18 deleting 18 settings 19 R registering the device 32 Route To 20 routes 22 creating 21 23 deleting 24 editing 23 navigating 21 23 navigating parallel to 24 sharing 30 viewing list of 23 S safe depth...

Page 40: ......

Page 41: ...support garmin com GUID C3C9935A 44AD 4A64 8690 B6176625C6BC v2 September 2021...

Reviews:

Related manuals for STRIKER VIVID 7sv