background image

EDGE® EXTERNAL BATTERY PACK

Installation Instructions

Important Safety Information

 WARNING

See the 

Important Safety and Product Information

 guide in the 

GPS device product box for product warnings and other 

important information.
A lithium-ion battery is used in this device.
If these guidelines are not followed, the battery may experience 

a shortened life span or may present a risk of damage to the 

device, fire, chemical burn, electrolyte leak, and/or injury.
• Do not disassemble, modify, remanufacture, puncture or 

damage the battery pack.

• Do not expose the battery pack to fire, explosion, or other 

hazard.

NOTICE

• Do not immerse the battery pack in water or other liquids.
• Do not leave the battery pack exposed to a heat source or in 

a high-temperature location, such as in the sun in an 

unattended vehicle. To prevent the possibility of damage, 

remove the battery pack from the vehicle or store it out of 

direct sunlight, such as in the glove box.

• Do not operate the battery pack outside of the temperature 

ranges specified in the printed manual in the product 

packaging.

• When storing the battery pack for an extended time period, 

store within the temperature ranges specified in the printed 

manual in the product packaging.

• Do not use a power and/or data cable that is not approved or 

supplied by Garmin

®

.

• Contact your local waste disposal department to dispose of 

the battery pack in accordance with applicable local laws and 

regulations.

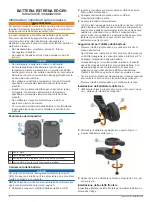
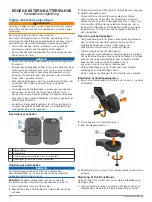
Device Overview

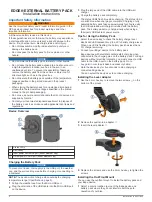
À

Status LEDs

Á

Device key

Â

Input power Micro-USB port (under weather cap)

Ã

Output power USB-A port (under weather cap)

Charging the Battery Pack

NOTICE

To prevent corrosion, thoroughly dry the USB port, the weather 

cap, and the surrounding area before charging or connecting to 

a computer.

NOTE: 

The device will not charge when outside the charging 

temperature range (

Specifications

, page 3

).

1

Pull up the weather cap from the Micro-USB port.

2

Plug the small end of the USB cable into the Micro-USB port 

on the device.

3

Plug the large end of the USB cable into the USB wall 

charger.

4

Charge the battery pack completely.
The status LEDs flash blue while charging. The status LEDs 

are solid blue when charging is complete. Charging a fully 

depleted battery pack takes approximately four hours using 

the USB cable and wall charger included with the battery 

pack. The battery pack may charge slowly when using a 

third-party USB cable or power source.

Tips for Using the Battery Pack

• Select the device key to check the battery charge level.

Each solid LED represents up to a 25% battery charge level. 

When one LED is flashing, the battery pack has less than a 

5% charge remaining.

• Connect your Edge

®

 device to the battery pack.

Edge devices with electrical contacts start charging when 

connected to the charging pins on the battery pack. For Edge 

devices without electrical contacts, you must connect a USB 

cable to the USB-A port on the battery pack. Go to 

buy.garmin.com

 to purchase an accessory cable.

• Hold the device key for five seconds to stop charging a 

connected Edge device.
You can select the device key to continue charging.

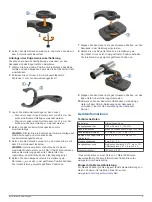
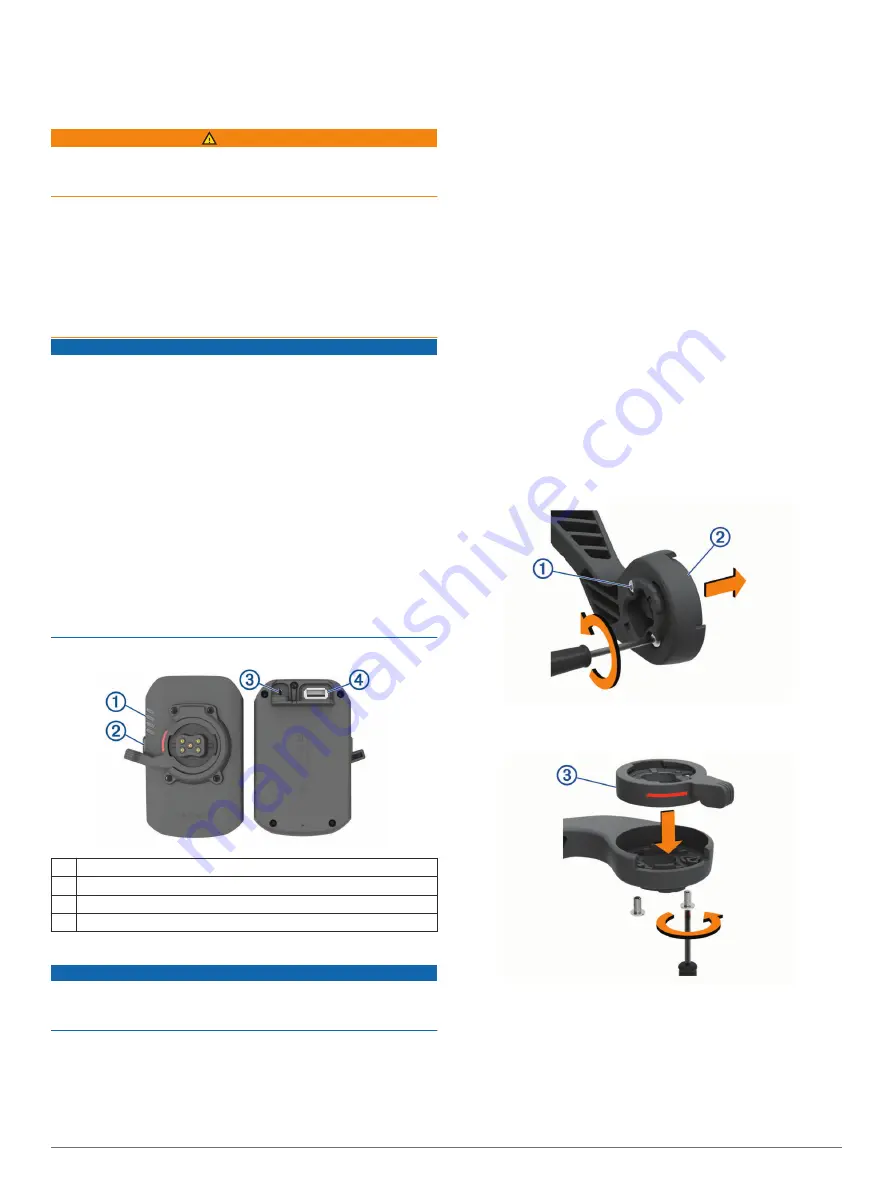
Installing the Lever Adapter

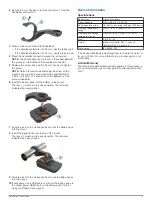
1

Use the 2 mm hex key to remove the two screws 

À

 on the 

bottom of the mount.

2

Remove the quarter-turn adapter 

Á

.

3

Insert the lever adapter 

Â

.

4

Replace the screws, and use the 2 mm hex key to tighten the 

screws.

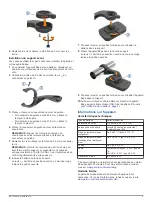
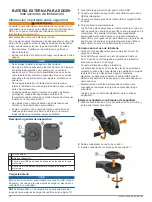
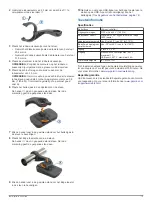
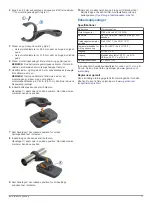
Installing the Out-Front Mount

You can use the out-front mount to install the battery pack and 

your Edge device.

1

Select a secure location to mount the Edge device and 

battery pack where they do not interfere with the safe 

operation of your bike.

2

Installation Instructions

Summary of Contents for Edge

Page 1: ...hjeet 18 Installeringsinstruksjoner 20 Installationsinstruktioner 22 Instrukcja instalacji 24 Pokyny pro instalaci 26 Navodila za namestitev 28 Upute za instalaciju 30 Garmin the Garmin logo and Edge...

Page 2: ...before charging or connecting to a computer NOTE The device will not charge when outside the charging temperature range Specifications page 3 1 Pull up the weather cap from the Micro USB port 2 Plug t...

Page 3: ...ge device into the top of the mount The lever must be in the open position The red mark indicates the open position 9 Snap the lever to the closed position to lock the Edge device into the mount 10If...

Page 4: ...uchon tanche Port de sortie USB A sous le capuchon tanche Chargement de la batterie AVIS Pour viter tout risque de corrosion essuyez soigneusement le port USB le capuchon tanche et la surface environn...

Page 5: ...e rouge indique la position ouverte 7 Poussez le levier en position ferm e pour verrouiller la batterie dans le support 8 Placez l appareil Edge dans le haut du support Le levier doit tre en position...

Page 6: ...rima di caricare l unit o collegarla a un computer NOTA il dispositivo si ricarica solo nell intervallo di temperature approvato Caratteristiche tecniche pagina 7 1 Sollevare il cappuccio protettivo d...

Page 7: ...nel supporto 8 Inserire il dispositivo Edge nella parte superiore del supporto La leva deve essere aperta Il segno rosso indica la posizione aperta 9 Far scattare la leva in posizione chiusa per bloc...

Page 8: ...e USB A Netzausgang unter der Schutzkappe Aufladen des Akkupacks HINWEIS Zum Schutz vor Korrosion sollten Sie den USB Anschluss die Schutzkappe und den umliegenden Bereich vor dem Aufladen oder dem An...

Page 9: ...g ein Der Hebel muss sich in der ge ffneten Position befinden Die rote Markierung zeigt die ge ffnete Position an 7 Klappen Sie den Hebel in die geschlossene Position um den Akkupack in der Halterung...

Page 10: ...de alimentaci n debajo de la tapa protectora Cargar la bater a AVISO Para evitar la corrosi n seca totalmente el puerto USB la tapa de goma y la zona que la rodea antes de cargar el dispositivo o con...

Page 11: ...abierta 7 Ajusta el bloqueo de seguridad a la posici n cerrada para que la bater a quede fija en el soporte 8 Introduce el dispositivo Edge en la parte superior del soporte El bloqueo de seguridad de...

Page 12: ...ertura de prote o Carregar o conjunto de baterias AVISO Para evitar corros o seque cuidadosamente a mini porta USB a capa contra intemp ries e a rea envolvente antes de carregar ou ligar o dispositivo...

Page 13: ...star na posi o aberta A marca vermelha indica a posi o aberta 7 Coloque a alavanca na posi o fechada para travar o conjunto de bateria no suporte 8 Insira o dispositivo Edge na parte superior do supor...

Page 14: ...het toestel oplaadt of aansluit op een computer OPMERKING Het toestel wordt alleen opgeladen binnen het goedgekeurde temperatuurbereik Specificaties pagina 15 1 Duw het beschermkapje van de micro USB...

Page 15: ...del moet in geopende stand staan De rode markering geeft de geopende stand aan 9 Klik de hendel vast in de gesloten stand om het Edge toestel in de steun te bevestigen 10Gebruik zo nodig een USB kabel...

Page 16: ...kyttelsesh tten og det omgivende omr de grundigt f r opladning eller tilslutning til en pc BEM RK Enheden oplades ikke n r den er uden for temperaturomr det for opladning Specifikationer side 17 1 Fje...

Page 17: ...den verst i holderen H ndtaget skal v re i den bne position Det r de m rke markerer den bne position 9 S t h ndtaget i den lukkede position for at l se Edge enheden fast i holderen 10Hvis det er n dve...

Page 18: ...S laite ei lataudu jos latausl mp tila on alueen ulkopuolella Tekniset tiedot sivu 19 1 Avaa Micro USB liit nn n suojus 2 Liit USB kaapelin pienempi liitin laitteen Micro USB liit nt n 3 Liit USB kaap...

Page 19: ...oltava avattuna Punainen merkki n ytt avoimen asennon 9 Lukitse Edge kiinnitykseen napsauttamalla vipu kiinni 10Liit Edge tarpeen vaatiessa USB kaapelilla akun l ht tehon USB A porttiin Akun k ytt vih...

Page 20: ...n eller kobler den til en datamaskin P denne m ten kan du forhindre korrosjon MERK Enheten lades ikke n r den er utenfor temperaturomr det for lading Spesifikasjoner side 21 1 Ta av gummihetten p mikr...

Page 21: ...pen stilling Det r de merket viser den pne posisjonen 9 Plasser spaken i lukket stilling for l se Edge enheten p plass i braketten 10Hvis n dvendig bruk en USB kabel for koble Edge enheten til utgang...

Page 22: ...omr det noggrant innan du laddar eller ansluter enheten till en dator Obs Det g r inte att ladda enheten utanf r laddningstemperaturomr det Specifikationer sidan 23 1 Lyft upp v derskyddet fr n micro...

Page 23: ...ansidan av f stet Spaken m ste vara i ppet l ge Den r da markeringen indikerar ppet l ge 9 S tt fast spaken i st ngt l ge f r att l sa Edge enheten i f stet 10Om det beh vs kan du anv nda en USB kabel...

Page 24: ...lne informacje o urz dzeniu Wska niki LED Przycisk urz dzenia Port wej ciowy zasilania micro USB pod os on zabezpieczaj c Port wyj ciowy zasilania USB A pod os on zabezpieczaj c adowanie baterii NOTY...

Page 25: ...twart 7 Zatrza nij blokad w pozycji zamkni tej aby zablokowa urz dzenie w uchwycie 8 Umie urz dzenie Edge w g rnej cz ci uchwytu Blokada musi by ustawiona w pozycji otwartej Czerwone oznaczenie wskazu...

Page 26: ...od ochrann m krytem Nab jen baterie OZN MEN P ed nab jen m nebo p ipojen m k po ta i d kladn vysu te z d vodu ochrany p ed koroz port USB ochrann kryt a okoln oblast POZN MKA Za zen se nebude nab jet...

Page 27: ...upevn te baterii v dr ku 8 Vlo te za zen Edge do horn sti dr ku P ka mus b t v otev en pozici erven zna ka ozna uje otev enou pozici 9 Posunut m p ky do zav en pozice upevn te za zen Edgev dr ku 10V p...

Page 28: ...Rjavenje prepre ite tako da pred polnjenjem ali priklopom na ra unalnik temeljito posu ite vrata USB za itni pokrov ek in okolico OPOMBA naprava se ne polni e je zunaj temperaturnega obsega za polnjen...

Page 29: ...polo aj da baterijski sklop pritrdite v nosilec 8 Napravo Edge vstavite v zgornji del nosilca Ro ica mora biti v odprtem polo aju Rde a oznaka prikazuje odprt polo aj 9 Ro ico premaknite v zaprt polo...

Page 30: ...o osu ite USB priklju ak za titni poklopac i okolno podru je NAPOMENA Ure aj se ne e puniti ako se nalazi izvan odobrenog raspona temperature za punjenje Specifikacije stranica 31 1 Izvucite za titni...

Page 31: ...osa a Poluga mora biti postavljena u otvoreni polo aj Crvena oznaka ozna ava otvoreni polo aj 9 Polugu vratite u zatvoreni polo aj kako biste Edge ure aj u vrstili na nosa 10Po potrebi pomo u USB kabe...

Page 32: ...2017GarminLtd oritssubsidiaries support garmin com...

Reviews: