


Skyview
: Shows the relative position of GPS satellites in the
sky.
GLONASS
: Turns on or off GLONASS usage (Russia satellite
system). When the system is used in situations with poor sky
visibility, this configuration can be used in combination with
GPS to provide more accurate position information.
WAAS/EGNOS
: Turns on or off WAAS (in North America) or
EGNOS (in Europe), which can provide more-accurate GPS
position information. When using WAAS or EGNOS, the
device may take longer to acquire satellites.
Speed Filter
: Averages the speed of your vessel over a short
period of time for smoother speed values.
Viewing the Event Log
The event log shows a list of system events.
Select
Settings
>
System
>
System Information
>
Event
Log
.
Viewing System Software Information
You can view the software version, the basemap version, any
supplemental map information (if applicable), the software
version for an optional Garmin radar (if applicable), and the unit
ID number. You may need this information to update the system
software or to purchase additional map data information.
Select
Settings
>
System
>
System Information
>
Software Information
.
My Vessel Settings
NOTE:
Some settings and options require additional charts or
hardware.
Select
Settings
>
My Vessel
.
Keel Offset
: Offsets the surface reading for the depth of a keel,
making it possible to measure depth from the bottom of the
keel instead of from the transducer location (
).
Temp. Offset
: Compensates for the water temperature reading
from a NMEA 0183 water-temperature sensor or a
temperature-capable transducer (
).
Calibrate Water Speed
: Calibrates the speed-sensing
Calibrating a Water Speed Device
Vessel Type
: Enables some chartplotter features based on the
boat type.
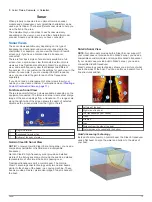
Setting the Keel Offset
You can enter a keel offset to compensate the surface reading
for the depth of a keel, making it possible to measure depth from
the bottom of the keel instead of from the transducer location.
Enter a positive number to offset for a keel. You can enter a
negative number to compensate for a large vessel that may
draw several feet of water.
1
Complete an action, based on the location of the transducer:
• If the transducer is installed at the water line
À
, measure
the distance from the transducer location to the keel of the
boat. Enter this value in steps 3 and 4 as a positive
number.
• If the transducer is installed at the bottom of the keel
Á
,
measure the distance from the transducer to the water
line. Enter this value in steps 3 and 4 as a negative
number.
2
Select
Settings
>
My Vessel
>
Keel Offset
.
3
Select or based on the location of the transducer.
4
Enter the distance measured in step 1.
Setting the Water Temperature Offset
Before you can set the water temperature offset, you must have
a NMEA 0183 water-temperature sensor or a temperature-
capable transducer to measure water temperature.
The temperature offset compensates for the temperature
reading from a temperature sensor.
1
Measure the water temperature using the temperature sensor
or temperature-capable transducer that is connected to the
chartplotter.
2
Measure the water temperature using a different temperature
sensor or a thermometer that is known to be accurate.
3
Subtract the water temperature measured in step 1 from the
water temperature measured in step 2.
This is the temperature offset. Enter this value in step 5 as a
positive number if the sensor connected to the chartplotter
measures the water temperature as being colder than it
actually is. Enter this value in step 5 as a negative number if
the sensor connected to the chartplotter measures the water
temperature as being warmer than it actually is.
4
Select
Settings
>
My Vessel
>
Temp. Offset
.
5
Enter the temperature offset calculated in step 3.
Calibrating a Water Speed Device
If you have a speed-sensing transducer connected to the
chartplotter, you can calibrate that speed-sensing device to
improve the accuracy of water-speed data displayed by the
chartplotter.
1
Select
Settings
>
My Vessel
>
Calibrate Water Speed
.
2
Follow the on-screen instructions.
If the boat is not moving fast enough or the speed sensor is
not registering a speed, a message appears.
3
Select
OK
, and safely increase the boat speed.
4
If the message appears again, stop the boat, and ensure the
speed-sensor wheel is not stuck.
5
If the wheel turns freely, check the cable connections.
6
If you continue to get the message, contact Garmin product
support.
Communications Settings
NOTE:
Some settings and options require additional charts or
hardware.
Select
Settings
>
Communications
.
22
Device Configuration
Summary of Contents for AQUAMAP 80 Series
Page 1: ...AQUAMAP 80 100 Series Owner s Manual November 2016 Printed in Taiwan 190 01657 00_0C...
Page 6: ......
Page 35: ......