


Select
Gauges
>
Trip Data
.
Resetting Trip Gauges
1
Select
Gauges
>
Trip Data
>
MENU
.
2
Select an option:
• To set all the readings for the present trip to zero, select
Reset Trip
.
• To set the maximum speed reading to zero, select
Reset
Maximum Speed
.
• To set the odometer reading to zero, select
Reset
Odometer
.
• To set all the readings to zero, select
Reset All
.
Viewing the Wind Gauges
Before you can view wind information, you must have a wind
sensor connected to the chartplotter.
Select
Gauges
>
Wind
.
Configuring the Speed Source
You can specify whether the vessel speed data displayed on the
gauge and used for wind calculations is based on water speed
or GPS speed.
1
Select
Gauges
>
Wind
>
MENU
>
Speed Display
.
2
Select an option:
• To calculate the vessel speed based on data from the
water-speed sensor, select
Water Speed
.
• To calculate the vessel speed based on GPS data, select
GPS Speed
.
Configuring the Heading Source of the Wind Gauge
You can specify the source of the heading displayed on the wind
gauge. Magnetic heading is the heading data received from a
heading sensor, and GPS heading is calculated by your
chartplotter GPS (course over ground).
1
Select
Gauges
>
Wind
>
MENU
>
Heading Source
.
2
Select
GPS Hdg
or
Magnetic
.
Selecting the Range of the Close-Hauled Wind Gauge
You can specify the range of the close-hauled wind gauge for
both the upwind scale and the downwind scale.
1
Select
Gauges
>
Wind
>
MENU
.
2
Select an option:
• To set the maximum and minimum values that appear
when the upwind close-hauled wind gauge appears, select
Change Upwind Scale
, and set the angles.
• To set the maximum and minimum values that appear
when the downwind close-hauled wind gauge appears,
select
Change Downwind Scale
, and set the angles.
Viewing the Environment Gauges
Select
Gauges
>
Environment
.
Configuring the Alignment of the Wind Gauge
You can specify the alignment of the wind gauge on the
environment gauges.
1
Select
Gauges
>
Environment
>
MENU
>
Alignment
.
2
Select an option:
• To set the top of the wind gauge to a North heading,
select
North Up
.
• To rotate the gauge so the direction in which you are
moving is at the top, select
Head Up
.
Configuring the Heading Source of the Environment
Gauge
You can specify the source of the heading displayed on the
environment gauge. Magnetic heading is the heading data
received from a heading sensor, and GPS heading is calculated
by your chartplotter GPS (course over ground).
1
Select
Gauges
>
Environment
>
MENU
>
Heading Source
.
2
Select
GPS Hdg
or
Magnetic
.
Setting the Barometer Reference Time
You can specify the reference time used to calculate the
barometer trend. The trend is indicated in the barometer field.
1
Select
Gauges
>
Environment
>
MENU
>
Pressure Ref.
Time
.
2
Select an option.
Tide, Current, and Celestial Information
Tide Station Information
You can view information about a tide station for a specific date
and time, including the tide height, and when the next high and
low tides will occur. By default, the chartplotter shows tide
information for the most recently viewed tide station and for the
present date and time.
Select
Nav Info
>
Tides & Currents
>
Tides
.
Current Station Information
NOTE:
Current station information is available with certain
detailed maps.
You can view information about a current station for a specific
date and time, including the current speed and level of the
current. By default, the chartplotter shows current information for
the most recently viewed current station and for the present date
and time.
Select
Nav Info
>
Tides & Currents
>
Currents
.
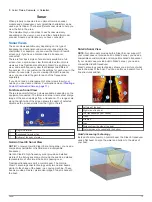
Celestial Information
You can view information about sunrise, sunset, moonrise,
moonset, moon phase, and the approximate sky view location of
the sun and moon. The center of the screen represents the sky
overhead, and the outermost rings represent the horizon. By
default, the chartplotter shows celestial information for the
present date and time.
Select
Nav Info
>
Tides & Currents
>
Celestial
.
Viewing Tide Station, Current Station, or Celestial
Information for a Different Date
1
Select
Nav Info
>
Tides & Currents
.
2
Select
Tides
,
Currents
, or
Celestial
.
3
Select an option.
• To view information for a different date, select
Change
Date
>
Manual
, and enter a date.
• To view information for today, select
Change Date
>
Current
.
• If available, to view information for the day after the date
shown, select
Next Day
.
• If available, to view information for the day before the date
shown, select
Previous Day
.
Viewing Information for a Different Tide or Current
Station
1
Select
Nav Info
>
Tides & Currents
.
2
Select
Tides
or
Currents
.
3
Select
Nearby Stations
.
4
Select a station.
Viewing Almanac Information from the Navigation
Chart
1
From a chart or 3D chart view, select a location.
2
Select
Information
.
12
Gauges and Almanac Data
Summary of Contents for AQUAMAP 80 Series
Page 1: ...AQUAMAP 80 100 Series Owner s Manual November 2016 Printed in Taiwan 190 01657 00_0C...
Page 6: ......
Page 35: ......


