background image

2

Turn on the collar (

page 2

).

3

Open BaseCamp.
BaseCamp recognizes and transfers the collar's internal 

track log automatically.

Deleting Files

NOTICE

If you do not know the purpose of a file, do not delete it. Your 

device memory contains important system files that should not 

be deleted.

1

Open the 

Garmin

 drive or volume.

2

If necessary, open a folder or volume.

3

Select a file.

4

Press the 

Delete

 key on your keyboard.

Disconnecting the USB Cable

If your device is connected to your computer as a removable 

drive or volume, you must safely disconnect your device from 

your computer to avoid data loss. If your device is connected to 

your Windows® computer as a portable device, it is not 

necessary to safely disconnect.

1

Complete an action:
• For Windows computers, select the 

Safely Remove 

Hardware

 icon in the system tray, and select your device.

• For Mac® computers, drag the volume icon to the 

Trash

.

2

Disconnect the cable from your computer.

Appendix

Accessories and Replacement Parts

Purchasing Accessories

Go to 

http://buy.garmin.com

.

Optional Maps

You can use additional maps with the device, such as BirdsEye 

satellite imagery, BlueChart® g2, and City Navigator® detailed 

maps. Detailed maps may contain additional points of interest, 

such as restaurants or marine services. For more information, 

go to 

http://buy.garmin.com

 or contact your Garmin dealer.

About Memory Cards

You can purchase memory cards from an electronics supplier, 

or purchase pre-loaded Garmin mapping software 

(

http://www.garmin.com/trip_planning

). In addition to map and 

data storage, the memory card can be used to store files such 

as maps, images, geocaches, routes, waypoints, and custom 

POIs.

Optional Fitness Accessories

You can use optional fitness accessories including a heart rate 

monitor or a cadence sensor with your device. These 

accessories use ANT+ wireless technology to send data to the 

device.
Before you can use the fitness accessory with your device, you 

must install the accessory according to the instructions included 

with the accessory.

Using Optional Fitness Accessories

1

Bring the device within range (3 m) of the ANT+ accessory.

2

Select 

 > 

Setup

 > 

Fitness

.

3

Select 

Heart Rate Monitor

 or 

Bike Cadence Sensor

.

4

Select 

Search for New

.

5

Customize the data fields to view the heart rate or cadence 

data (

page 13

).

Tips for Pairing ANT+ Accessories with Your Garmin 

Device

• Verify that the ANT+ accessory is compatible with your 

Garmin device.

• Before you pair the ANT+ accessory with your Garmin 

device, move 10 m (32.9 ft.) away from other ANT+ 

accessories.

• Bring the Garmin device within range 3 m (10 ft.) of the ANT

+ accessory.

• After you pair the first time, your Garmin device automatically 

recognizes the ANT+ accessory each time it is activated. 

This process occurs automatically when you turn on the 

Garmin device and only takes a few seconds when the 

accessories are activated and functioning correctly.

• When paired, your Garmin device receives data from only 

your accessory, and you can go near other accessories.

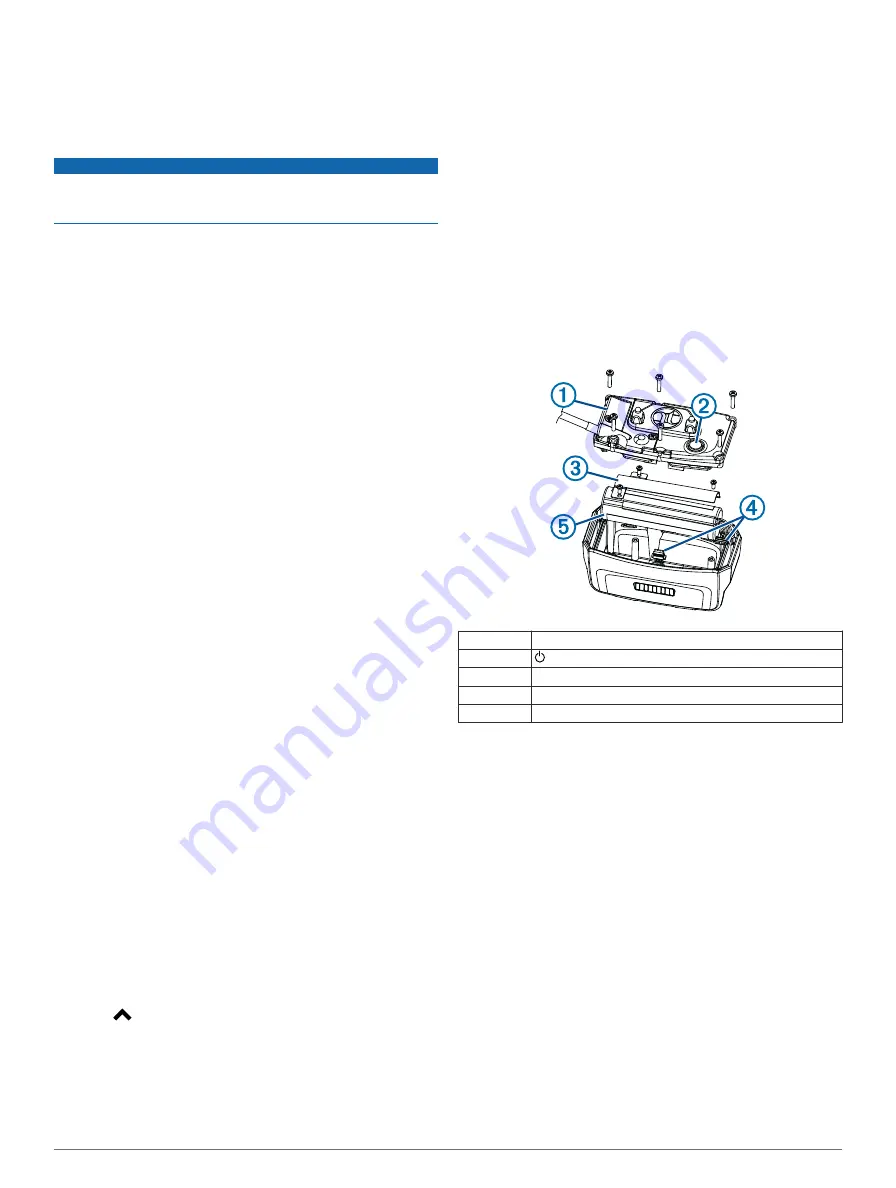
TT 10 Battery Replacement Instructions

TT 10 Components

À

Back plate

Á

 Power key

Â

Battery cover

Ã

Connectors

Ä

Battery

Removing the Old Battery

Before you replace the battery, you must remove all dirt, water, 

and debris from the device (

page 15

). Also, you need a small 

Phillips screwdriver.

1

Remove the six screws from the outer edges of the back 

plate.

TIP: 

You should leave the two inner screws in place.

2

Pry off the back plate.

3

Disconnect the four-pin and five-pin connectors.

4

Remove the three screws that secure the battery cover.

5

Remove the battery cover and the battery.
Remember the orientation of the battery. You must install the 

new battery the same way.

After you remove the old battery, contact your local waste 

disposal department to properly recycle the battery.

Installing the New Battery

Before you replace the battery, you must remove the old battery 

(

page 17

). You also need a small Phillips screwdriver. You may 

need a small flat screwdriver to connect the connectors.

1

Install the new battery with the connector on the end nearest 

the 

Power

 key.

2

Replace the battery cover.

3

Replace the three screws to secure the battery cover.

Appendix

17

Summary of Contents for Alpha 100

Page 1: ...Alpha 100 and TT 10 Owner s Manual July 2012 190 01500 00_0A Printed in Taiwan...

Page 2: ...ental information concerning the use of this product Garmin the Garmin logo BlueChart and City Navigator sD y T pe 1 v b V ZY N 8 c sD f 5 Q 9 5 O b Q I R f F 8 O a 7 Y Alpha ANT BaseCamp and TT sD y...

Page 3: ...Collar 8 Contact Tracking 8 Adding a Contact Over MURS VHF 8 Adding a Contact Using the ID 8 Sending a Message to Your Contacts 8 Tracking a Contact 8 Finding Your Contact ID 8 Changing Your Contact I...

Page 4: ...attery Information 15 Long Term Storage 15 Maximizing the Battery Life 15 Adjusting the Backlight Brightness 15 Adjusting the Backlight Timeout 15 Changing the Dog Collar Device Update Rate 16 Changin...

Page 5: ...t points Status LED and flashing beacon LEDs Getting More Information You can find more information about this product on the Garmin 4N R Go to www garmin com 4R y Go to www garmin com 4 w Go to www g...

Page 6: ...g or CuA I D 4 N p L 8 4 t c w u V You should charge the handheld device completely before using IuZ I v 8 Qt c w u T 4 L R O G oO KQd _ 9 6 d q w r HuA I M NOTE The device will not charge when it is...

Page 7: ...O9 G xO SKTd 6 6 3 dm p t Zr You should charge the collar completely before using it on a Hu I 4 d v 8 42t c w u J 4 L TR SOz G O KGd 6 4 1dm w Xr 1 Snap the charging clip Ou I S B 78 4 t C 2 Plug th...

Page 8: ...ore you put the collar on your dog both the collar and HuO I B C 8 4 t c w u P 4 L R CO G O TKTd 2 M 6 d SuO I K S L 88 42t c w uy Y U 4 L _R RO g 1 guA I S H q 8 43t c w u 4 L 2 Turn on both devices...

Page 9: ...cking the Touchscreen 1 Select the Power b h 2 Select b Dog Collar Device Setup Methods to Add a Dog to a Handheld Device If you purchased the collar and the handheld device separately b h D v 6 EA X...

Page 10: ...I n t U y R z K...

Page 11: ...another member of your hunting party s dog b hD D w b EA X Y f l Ii L I d t U r 7 z K b hX 3 b Sharing wirelessly over ANT Allows you to add a dog that b h D ET X Y i I t U x V R z K must determine i...

Page 12: ...he dog owner find the track and train codes b hX 3 b hS D q EL X Y b 2 4 M If you are not near the dog you want to add or you cannot put the collar into pairing mode you can add the dog using the trac...

Page 13: ...b hX D 6 EE X Y 6 F 3 n d 3 Select Share Wirelessly b 4 Select an option To allow the other person only to track your dog s location with the map and dog tracking compass select Track Only b To allow...

Page 14: ...U n _ Y 5 z K b h D c ET X Y 6 4...

Page 15: ...show more or less of the tracks on the b h Changing the Dog Name 1 Select Dog List b 2 b hX D ED X y 3 Select Show Info b 4 b hX D 6 EE X Y 5 1 f o 5 Enter the name and select OK b Changing the Color...

Page 16: ...iC Z I f t U r v C z K 5 ok 1 Select Dog List b 2 b hX D ED X y 3 Select Show Info b 4 b hX D 6 EE X Y 0 4 2...

Page 17: ...iC W I t U z 7 R _L Dog Collar Device Setup 3...

Page 18: ...DY j J d If another handheld device is tracking this dog for best results remove the dog from the device and use the track and train codes ioL e D 3 or share wirelessly over ANT ioL e D 3 to add moE e...

Page 19: ...L e D 2 0o 1 Select an option If you are training your dog with the collar select and install the appropriate contact points ioL e D 6 0o If you are not training your dog with the collar install the c...

Page 20: ...an be positioned xoC e DDRd 8m H W iG Y j N m 2_P ua _ 7 5e w A cw x zoB e DMRb m HH R sG Y jb F D 2 p 6 Tup X r 5b 4 MoD e DXRd m HL H tG ZY jb E 9 2 p uq 3 5g 4 Ah c8 Z 1 5 If the strap is too long...

Page 21: ...8 2 p up _ 7 5 A c0 t r1 V O t u6 o I 1lS nV 7 A G N 9 jO o0 6 Zr po e D R m H nG MY JO MoE e DORn m HY iG Y j K B 8 2 p u 6 5z s A c 9 h1 9 V4 m Q t o c6 K 0 yl nb 2 7 Q G N 95 5jX f0 Z7 H A M0 A jo...

Page 22: ...R 8m HY hG Y j B Z f n 9 2 p u r 5 x Best 4 Dog Collar Device Setup...

Page 23: ...Good Poor Dog Tracking The Alpha system allows you to track your dog up to 9 miles i Q N 3 Q X R X 0 w c jp 9 L J ZS Y y d m S u u G...

Page 24: ...eT i Q r Q I X T X8 w c gp L JnZG 6 z m S u G 1...

Page 25: ...and Alpha i Q v F I X O Xr Z NOTE Both the collar and the handheld device must have acquired satellites before you can track the dog on the handheld i Q v Tracking Your Dog on the Map Before you can...

Page 26: ...IP If necessary select to track the dog using the dog tracking compass i Q 5 i Q Dog Status Icons Sitting Running On point Treed Unknown The unknown status icon indicates that the collar has not acqui...

Page 27: ...V X C X8 w c p 6 xL J z Dog Tracking Compass To open the dog tracking compass select i q The dog tracking compass to view the direction and distance to i Q B w E G X N X4 w w c mp 7L JrZS z e m S u G...

Page 28: ...zr status such as running or on point i Q 5 i Q 6 X T X i Q v X C X5 w c fp 4L nJnZF s m S u G The dog tracking compass is most accurate when the dog is i Q B g C V X xV w 1v c p 9L CJ Zw B x 6 m S 2...

Page 29: ...lp L JfZ 5 If necessary select to track the dog using the dog tracking compass i Q 5 i Q Tracking with BaseCamp BaseStation Before you can track your dogs and contacts using BaseCamp you must download...

Page 30: ...sing BaseCamp see the help file in the i Q p V X 1 Select Setup System BaseCamp BaseStation Prompted i q 2 Open BaseCamp i q 3 i Q d V X H X 2 w c qp 1L J z Pausing Dog Tracking i Q r X C X w c dp 1 x...

Page 31: ...T yz R K i Q v J...

Page 32: ...X S X w c p L JoZG 6 t m S 1 Select Dog List i q 2 i Q g C I X 3 Select Show Info Stop Tracking i q Dog Tracking 5...

Page 33: ...g a hunt and you do not want to record the transportation of the dogs you can pause the Y S u 4m o O 3C v 1 Select Y 2 Select Pause All Tracking Y Location Alerts Location alerts notify you when your...

Page 34: ...m 3 E F a m asi n lKU _ Y_ F x 4 o O C V 5 i A A geofence is an invisible fence around an area and is created Y_ 2 r H v 4m o O QC V5 59 k i r...

Page 35: ...z C a m sk n gKX Y YK R l 4m o O C V 5 g i G...

Page 36: ...a a m csb n4 perform optimally when sized to cover an area encompassing YK F v c 4 o O 8C V 5 3 i 6...

Page 37: ...o a C SAC Setting a Geofence Alert You can set up an invisible fence around an area and receive YK S S q 9 4m o O 3C V3 5 4 k i O s...

Page 38: ...e g U a m gs ni 1 Select Setup Location Alerts Add Alert Geofence Y 2 Select a point on the map and select Use Y 3 Yx y T 9 4 o O C V 5l i 6...

Page 39: ...c 3 a m rs J 4 Select Done Y Setting a Radius Alert You can receive an alert when a dog or contact gets within or YE o z 4 o O C V5 5l 5 i c...

Page 40: ...et Alert Type to set the way the device notifies YS x 4 O Select Set Alert Mode to set the notification to sound on YO 2 h I 4m o O Q Select Delete Y n Q z 9 4 o Dog Training In addition to tracking y...

Page 41: ...d z U a m js n tK_ some basics about training but you are encouraged to research YG y H m x 4 o When used properly the collar is a very effective training tool to YK U S p 4m o O C Vp 5 3 i z...

Page 42: ...3 r an m sc n3 jKS f YY 4 i E m m 4 A o O C Vp 5 k 9 i d...

Page 43: ...a Yh u U q 44 o O 3C Vp 5 0 i b...

Page 44: ...x C a m ts i n mKC YY 4 i S 48 A o O C Vp 5l e i r...

Page 45: ...o K V a m isy J ng CKP N the dog shows a grasp of the concepts of these three basic YI 6 q T _ j 9 4 o O 2C Vp 58 k i w...

Page 46: ...ash and collar you can remove the leash to train with only the YI 7 p Selecting and Installing the Contact Points For best results select the correct contact points based on your YN H 1 Select the cor...

Page 47: ...G a m ise n4 k For dogs with shorter coats use the shorter contact YZ 2 r 2 If necessary use the included wrench to remove the contact YZ 2 r 3 Y 2 o O q m 4 A o O C V 5 i b 4 Y t m 4 o O 8C V5 5 3 k...

Page 48: ...the collar on the dog make sure that the contact points are tight against the neck YZ y 4 Y V Removing the Contact Points When you are not training the dog using the training keys YX 6 s S p w 4 o O...

Page 49: ...r One Intensity Level Before you can assign the training keys to a dog you must add the dog to the handheld device YZ y 3 Y V By default the training keys are set to the lowest stimulation setting wit...

Page 50: ...i 3 R A a m as n4 vK U YN 2 O p l 49 o O 9C V1 5l e i 6...

Page 51: ...ning key for a dog and intensity level YZ y 6 Y V 1 Select Setup Training Y 2 Yy 7 y S p i 4 A o O C V 3 Yy 7 y S q m 4 o O 9C V 5l 2 I 4 If in Traditional stimulation mode select Lo Med or Hi Y 5 Sel...

Page 52: ...u 3 U Z a m osc NJ Kb R YI 5 h L m v 4 o O 5C V 5 i e...

Page 53: ...Keys Before you can assign the training keys to a dog you must add a dog to the handheld device YZ y 3 Y V You can change the mode of the training keys to customize each key for a specific stimulation...

Page 54: ...training one dog it might be easier to only set the intensity level YZ y 6 Y V 1 Select Setup Training Training Buttons Change Mode Y 2 Select the top of the screen directly under the key you are YI...

Page 55: ...i j 4 Yy 7 y F k 4 o O 0C V 5 e D 5 If in Traditional stimulation mode select Lo Med or Hi Y 6 Select momentary M continuous C or tone Tone Y V 7 Yx y P u 4m o O C 6 Dog Training...

Page 56: ...y s wd bX R X P Gfr Y J k 6 A Q fu 2 Q C G a 4 nLY M _ b likely to become confused and training should progress more s wn b L r Q fa Y 7 C ou W G 7 n Y Mr E b C g begin to learn when to go faster or s...

Page 57: ...rd while gently pulling on the s w 2 If the dog gets in front of you repeat the command heel s w bS T d F fd Y _ lu e _ G 5 nXY m_ 3 If the dog starts to lag behind you lightly tug on the leash to s w...

Page 58: ...d command the dog to s wy 3 Maintain steady pressure on the leash until the dog obeys s w b 8 4 If the dog does not obey and seems confused gently push s wc b Q R V Sfc Y I u e G p nDY M U G BP s wl b...

Page 59: ...G 5 n Y M X b V Teaching your dog to come here is the most important s w b U P s Q f Y 3 X...

Page 60: ...tting position move away to the end of s w bE s w b Y U r Q fa Y k 7 hu F G 9 n Y M7 N V BP 2 Command the dog to come here while gently tugging on s w bE s w b U A h G Ff Y P c 1 r zu G p nEY s wd bS...

Page 61: ...P sit and here you can begin training with the collar and the s w During the initial stage of collar introduction the dog learns that s wa bE H Y o _fe Y J 2 iu e Q G p nCY M Y R b5 s wk bB U P Y Sfy...

Page 62: ...G a nBY M G b2...

Page 63: ...nds you can begin to introduce distractions such as rolling a ball in front of the dog or walking him in the presence of s wh B After the dog begins to respond consistently to the command during colla...

Page 64: ...X Af Y a bu e C G n Y Mr b F f s wh b_ X T U d E Gfe Y Q The second method Traditional contains 6 numbered levels that each have a high Hi medium Med and low Lo s U wh bX Level 1 Lo is going to produc...

Page 65: ...Y J F Hi produces a very strong stimulation equivalent to level 18 in the Linear s we B H should find the correct training intensity level and then use Lo Med Hi s wh bW X P g f Y J 6 A Q Dog Trainin...

Page 66: ...N I B 3Y _ Sw p g K X R p5 H P C 1 k o a d c n v i x S 5 when you press the key regardless of how long the key is m T R _ 0Y _ w r 8 f e Ugp4 E P9C 5 R i c u h K _ 5 m D Y _ Mw m b s p I P8Cg 7 s 2 o...

Page 67: ...Y _ v _w l y Hgp X PuC4 5 o r h U 5 You can also train using a tone Tm m Y _ 9 w y 9 T for a key the key press activates an audible tone instead of m C C O Y _ 8 3w I a E p P4Cg 0 h 4...

Page 68: ...g keys to the lowest level m V 6m 2 m E I B uY _ 7 Pw r p h 3 Observe the dog for a reaction such as a head shake neck m X W Y _ 9 w i r p A P C 7 F Sometimes dogs will vocalize due to the surprise of...

Page 69: ...ere is no reaction increase the intensity level by one level until the dog has a slight but recognizable reaction to m D _ I 8Y _ 7 Ww r The intensity level that causes a slight but recognizable react...

Page 70: ...R uY _ 7 Yw m e 5 H p _ P C 6 k a h h u N 5 Training the Dog to Heel and Sit with the Collar Before you begin training your dog using the collar your dog must show a grasp of the heel sit and come co...

Page 71: ...Y 1 With the dog at your side on a leash pull up on the leash m S X...

Page 72: ...uY _ 3 Zw m...

Page 73: ..._ 2 w s g a N p P C 5 6L o c u h indicate that it is time to make this transition by trying to sit before being commanded in an effort to avoid the m C C O Y _ 8 _w o N pg R P4C 2 With the dog at your...

Page 74: ...Y _ v Qw f C pg E P1C k 8 R n t h 2 Training the Dog to Come Here with the Collar Before you begin training your dog to come using the collar your dog must a strong grasp of the heel and sit commands...

Page 75: ...T 4Y _ Zw r E a I pi P C4 x c V l 0 5 m E _ Y 1 With the dog in a sitting position move away to the end of m D _ V Y _ m i X W uY _ 3 w s E G4p P0C g 7 1 s _ 2 Command the dog to come here gently tug...

Page 76: ...select Contacts Pairm 4 On your handheld device enter the name of the contact and select OKm m d _ Y Y _ Ww m l N p U P1Cg m N4 If you would like to be added to the hunter s handheld device m B R T Y...

Page 77: ...Sending a Message to Your Contacts m i X Y uY _ 8 w r j...

Page 78: ...The message is sent to your contacts with your name before the m R y _ Gw r h r Tgp P P0C x V s s o 4 _ m R y Tracking a Contact m i X Y uY _ 3 w n m f E U pg P C 7 k 2 z l Select m Finding Your Cont...

Page 79: ...r handheld devices in the area you might need to change the Y W 8 7 f p 6 b I Ur V MU T A 1 Select Setup Contacts Pairing Setup ID 2 Select a contact ID that is not yet assigned to another device W t8...

Page 80: ...are hunting with the Alpha D W y8 Mark your truck s location P F 9 Track your dogs P F 5 Track your fellow hunters P F 8 Mark the location of a covey P F 9 Send messages to your fellow hunters P F 8...

Page 81: ...U ux 4 C F n8 7 6 j...

Page 82: ...U9 5 Select OK Turning On the Collar Light You can turn on the LEDs on the collar at night to help locate a P s8 7 1 m 6 5 p...

Page 83: ...low or Blink Fast TIP Select different light setting for each dog to help you R M h8 7 S r n 6 g w J U Turning On Rescue Mode You can turn on rescue mode to conserve battery power at the S s8 7 S 5 h...

Page 84: ...Q L n8 7 f 3 l 6 U AUT _ I C A A vf 90QB w v 1 Select Waypoint Manager 2 F 8 7 S g 3 F 8 7 7 6 w Y Ur FU T K 4 C F n8 7 h g 6 w E 5 Select Repositioning a Waypoint to Your Current Location B 8 7 5 6...

Page 85: ...U1 G UUT X W X T A bf n B I v averaging the device takes several readings at the same T B h8 7 S r l 6 U7 E U T 8 E W E G A...

Page 86: ...df 0BB k 4v Q 1 Select Waypoint Manager 2 F 8 7 S g 3 Select Average Location 4 A F 8 7 y 6 g o X U Hunting with the Alpha System 9...

Page 87: ...5 Select Starta C P 6 a 2 J i Ho U X L X q O F y b i 9 Cc78 x0 7 When the confidence status bar reaches 100 select Savea C P For best results collect 4 to 8 samples for the waypoint waiting a...

Page 88: ...oute Plannera C P 2 a 8 J j Hz U X 3 Select Reverse Routea C P Viewing a Route on the Map 1 Select Route Plannera C P 2 a 8 J j Hz U X 3 Select View Mapa C P Viewing the Active Route 1 Select Active R...

Page 89: ...X E u r a 8 J k H U X L X q O F i c o Nc 8 _ Q x _ B X E u R 1 Select Track Manager Current Track View Mapa C P 2 Select TracBacka C P 10 Waypoints Routes and Tracks...

Page 90: ...et Color 7 tRY 4 7 r1rn nT 81 N E Saving the Current Track 1 Select Track Manager 7 tRY 2 7 r1rn nT 8 B E 3 Select an option To save the entire track select Save Track 7 tRY To save part of the track...

Page 91: ...RY Clearing the Current Track Select Track Manager Current Track Clear Current Track 7 tRY Deleting a Track 1 Select Track Manager 7 tRY 2 7 r1rn nT 8 B E 3 Select Delete Yes 7 tRY Archiving a Saved T...

Page 92: ...nager 7 tRY 2 7 r1rn nT 8 D e t F 3 Select Archive 7 tRY Archiving Tracks Automatically 1 Select Setup Tracks Auto Archive 7 tRY 2 7 r1rn T 8 U iez T Sending and Receiving Data Wirelessly 7 r1rd T G8...

Page 93: ...L6p 9 su N Je 3 m of a compatible Garmin 7 r1rt You can share waypoints geocaches routes and tracks 7 r rp T I P ief t...

Page 94: ...F c d T b Xe...

Page 95: ...sly see 7 r5re g3 7 tRY 1 Select Share Wirelessly 7 tRY 2 Select Send or Receive 7 tRY 3 7 r rn T G82 O M uew t F Navigation You can navigate a route a track to a waypoint to a geocache 7 r rm T 83 X...

Page 96: ...Z6w 9 6 xu eI 7 5r r T 8 R e t...

Page 97: ...F z F 3 v 3 T b Xv S c Map The 7 8r8rw T 81 D teq t F i g T b Xv R...

Page 98: ...669 9 e du 7 r rc T 8 H iez t F i F 9 2 T b Xn U...

Page 99: ...R6u 9 H u e y 7 4r5ro T 8 L iex t F d T b X C x...

Page 100: ...navigating to a destination your route is marked with a magenta 7 6r rl T 8 L ve When the map orientation is Track Up objects on the map 7 r rr T 82 U req t F y 7 J T b X C x...

Page 101: ...M6 9 e iu e 7 7r5rr T 8 R oez t F 3 s g T b Xk T...

Page 102: ...N69 9 u e w the objects by setting the orientation to North Up 7 r5re g13 7 srzR To open the map select 7 tRY Compass 7 r rg T 89 ceb t F d U 7 j T b Xr _...

Page 103: ...6z 9 5 u...

Page 104: ...g You can use a bearing pointer or a course pointer to navigate to 7 r rw T 8 U iez T Calibrating the Compass NOTICE 7 r5rn T 85 D cex t F c 7 f T b x b...

Page 105: ...I6v 9 e uu e accuracy do not stand near objects that influence magnetic 7 r rg T 85 ue4 t F o 5 T b Xt _ e...

Page 106: ...K6v 9 7 u e You should calibrate the compass after moving long distances 7 r rr T 8 cey t F x 2 7 T b Xk T...

Page 107: ...1 Select Compass Calibrate Compass Start 7 tRY 2 7 r rn T G82 O M uew t F Navigating with the Bearing Pointer When navigating to a destination the bearing pointer points to 7 r rw T 8 U iez t F k d 2...

Page 108: ...Z6k 9 ru eG 1 While navigating to a destination select Compass 7 tRY 2 Turn until points toward the top of the compass and 7 9r rl nT 8 H ae4 t BF d T b Xg I d...

Page 109: ...T6w Course Pointer The course pointer is most useful if you are navigating on water 7 5r r nT 88 S eu t BF c 3 0 w T b Xm O...

Page 110: ...9 1 u eI a...

Page 111: ...urse such as shoals 7 5r r T 89 iew t Lf To enable the course pointer from the compass select Setup Heading Go To Line Pointer Course CDI 7 tRY The course pointer indicates your relationship to the co...

Page 112: ...e course deviation indicator which tell you how far off course 7 r rw C Where To Menu You can use the Where To menu to find a destination to 7 4r5rt nT 8s He t F Where To categories are available in a...

Page 113: ...j P 4 dLC 3 Select Lock Direction Set Course 4 Navigate using the compass 11 or map 11 Elevation Plot By default the elevation plot displays the elevation for an 6 d aqy p _ hJ q3 4 y j5P 8 d cn 6J e...

Page 114: ...ion Plot Change Plot Type 2 6 6Pd adyF j Resetting the Elevation Plot Select Elevation Plot Reset Clear Current Track Yes Trip Computer The trip computer displays your current speed average speed 7 6d...

Page 115: ...Q 7 Select When you enter an area with a proximity alarm the device 1 6 d azyW S r Calculating the Size of an Area 1 Select Area Calculation Start 2 6 d a4yF wJ q9 4 y jfP 1 d c 6J e z Li oE 5 I O VM...

Page 116: ...ct Sun and Moon To view the predicted best times for hunting and fishing select Hunt and Fish 3 If necessary select or 6Pd a yT bJ qp Q4 Y Setting an Alarm 1 Select Alarm Clock 2 Select and 6 6 d a y...

Page 117: ...The satellite page shows your current location GPS accuracy 6Pd a yQ hJ q F4 y j5P 0 d cx sJ e u y I Changing the Satellite View 6 d a4yF tJ q5 A4 y jfP9 d c4 J k e o v Viy lE 5GI O V b q 2 7 Rbk Wm...

Page 118: ...Turning Off GPS Select Satellite Use With GPS OffbY Simulating a Location 1 Select Satellite Use With GPS OffbY 2 Select Set Location On MapbY 3 bY l d C...

Page 119: ...Q z6T 0 3 Select Remove bY l d C M kL o6R q SiS a 9 Select Add Page to place an item on the list after you bY l q d C M kL Select Restore Defaults to reset the order of all bY lC d C M oL Customizing...

Page 120: ...riptions see bY n18bY Enabling the Map Data Fields Select Setup Map Dashboard Small Data FieldsbY System Settings Select Setup SystembY GPS Sets the GPS to Normal WAAS EGNOS Wide Area Augmentation Sys...

Page 121: ...6 l i 9 o _ yLWH 8 BL T 5 m Rl Z Zoom Map To Dogs Automatically zooms the map to show all of the dogs locations and your location unless you manually bY l Y s d C L K 6F _i 9 9 Y yRW 1 L T v m Ro Z w...

Page 122: ...Y l t Battery Save Saves the battery power and prolongs the battery life by turning off the screen when the backlight times out bY n16bY Calibrate Screen Aligns the screen to properly respond to touch...

Page 123: ...Color Sets the color for selections made when bY l d C l Setting the Device Tones You can customize tones for messages keys warnings and bY l t 1 Select Setup TonesbY 2 bY l d C L l6A ViS t p o H Map...

Page 124: ...ts when the guidance text on the map is bY lM DashboardbY l m d C cL W h6R z i z p E v yVW w FL t 5 m R W dashboard shows different information about your route or bY l d C l Map Information Enables o...

Page 125: ...Advanced Map Settings Select Setup Map Advanced Setup Auto Zoom Automatically selects the appropriate zoom level N S N O X S...

Page 126: ...vl 7 P V U g gyH X i Off is selected you must N S N V X p...

Page 127: ...ql 7 I t 6 Detail S N Z X K w...

Page 128: ...l 7 J k _ U L gbH6X i 211 s LGz m...

Page 129: ...X a 0 Showing more detail may cause the map to redraw more M S7N F fx Shaded Relief Shows detail relief on the map if available or T S N X L w...

Page 130: ...al 7 Vehicle Selects the position icon which represents your N S N V X Q...

Page 131: ...ml 7 u Zoom Levels Adjusts the zoom level at which map items will Q S N M fx W z...

Page 132: ...hl 7 V R U K g1H X i 91p Gf m X a o P D S N X V x...

Page 133: ...l 7 5 Q e U gtH X i 91g 1 q Bg Text Size S N Z X K w...

Page 134: ...l 7 _ h U H g1H7X i 11b z Track Settings Select Setup Tracks Track Log S5N Q X...

Page 135: ...l 7 K j T Uo W g gwH8X I Record Method S N Z X...

Page 136: ...wl 7 J R U H gyH1X i Q11Auto records the tracks at a variable rate to create an optimum D S2N L X K v...

Page 137: ...kl 7 4 W I U V i Interval S N Z X...

Page 138: ...wl 7 4 X U L g1H X i 91 Y Gk X a y o 1 more frequently creates a more detailed track but fills the S S N X Y...

Page 139: ...ql 7 Auto Archive Selects an automatic archive method to organize N S2N K X L 1 l 7 D U gpH0X i 1 1 Gk X a s o D S N X W z...

Page 140: ...pl 7 Q d YuB Color S N Q X K w...

Page 141: ...l 7 C S Uo W gzH X i 21t t r G AX a n Routing Settings The device calculates routes optimized for the type of activity N S N M X V q...

Page 142: ...L 7 J x R U V geH7X i 11 5 k Gg X a h o 1 X TKmt t B S N V X Z s...

Page 143: ...fl 7 Select Setup Routing Activity S N Z X q...

Page 144: ...dl 7 k I WU P 3 g H9X I 1E x LGj X a 1o 6 X N S4N L hX V r...

Page 145: ...l 7 Q e U6 g gwH X i 1x t Gw X a l 6o Route Transitions Sets how the device routes from one point O S4N Z hX K z...

Page 146: ...ql 7 u zUo M g1H X i 1x z LGg X a r o Q TKdt N S N X V k...

Page 147: ...l 7 Distance routes you to the next point on the route when you are within a specified distance of your T S2N Q X V q...

Page 148: ...L Lock On Road Locks the position icon which represents your N S N V X Q...

Page 149: ...ml 7 w J c T WU g gtH X i 1e t o Go Changing the Units of Measure You can customize units of measure for distance and speed M S6N K X...

Page 150: ...ul 7 U h Z U k gpH0X i 1c 1 n G c l 1 Select Setup Units 2 D S N K hX Z...

Page 151: ...pl 7 Q t YuB 3 D S N K hX Q v...

Page 152: ...l 7 P U 3 gtH X i 1e s G Time Settings Select Setup Time Time Format Sets the device to show time in a 12 hour or 24 N S2N Y X K 1 Time Zone S N L hX k...

Page 153: ...hl 7 C b U ggH7X i r tAutomatic sets I S N V X P q...

Page 154: ...l 7 L n W U6 G gtH X i 211 r G 2X a q o l 0 Position Format Settings NOTE Do not change the position format or the map datum coordinate system unless you are using a map or chart that Q S N Y X...

Page 155: ...ll 7 5 H U J gwH1X i 1e z Select Setup Position Format Position Format Sets the position format in which a given N S N V X Z...

Page 156: ...ll 7 D z Map Datum Sets the coordinate system on which the map is U S5N K X Map Spheroid Shows the coordinate system the device is R S N EX Z...

Page 157: ...l 7 J b _ U Q gbH X i 91 t t G AX a 0 Heading Settings N S N X L k...

Page 158: ...heading shown on the N S0N L X North Reference Sets the north reference used on the N S0N L X Go To Line Pointer Allows you to use the Bearing pointer that points in the direction of your destination...

Page 159: ...dl 7 V Compass Automatically switches from an electronic compass to a GPS compass when you are traveling at a higher rate of Q S N X...

Page 160: ...l 7 4 y V Ua Calibrate Compass See S N 11 Altimeter Settings Select Setup Altimeter Auto Calibration Automatically calibrates the altimeter each H S N K X Z i...

Page 161: ...fl 7 W c _ WU J Barometer Mode Variable Elevation allows the barometer to D S3N M X q...

Page 162: ...l 7 O U 0 gxH2X i 1 G X a p _o Fixed Elevation assumes the device is stationary at a fixed M S6N K X 2...

Page 163: ...ml 7 S Uo D 5 g H X i 51r t m Gk 8 X a m o S I S N Z hX k...

Page 164: ...l 7 Pressure Trending Sets how the device records pressure S N 2 hSave Always can be useful when you are watching for S S3N J X M p...

Page 165: ...ql 7 Plot Type Records elevation changes over a period of time or distance records barometric pressure over a period of time S S2N X...

Page 166: ...gl 7 N U F g H9X i 1 x G X a q o P Zk Calibrate Altimeter See S N 12 Marine Map Settings Select Setup Marine Marine Chart Mode S N Z X...

Page 167: ...dl 7 7 F e I Uo W g g1H8X i 41x z LGm X A Nautical displays various map features in different colors so the marine POIs are more readable and so the map reflects I S N M X X...

Page 168: ...fl 7 4 K U F gcH X i Q11Fishing requires marine maps displays a detailed view of bottom contours and depth soundings and simplifies map presentation for Q S N X Z...

Page 169: ...s the appearance of marine navigation aids on I S N 8X Marine Alarm Setup Sets alarms for when you exceed a specified drift distance while anchored when you are off course by a specified distance and...

Page 170: ...ul 7 14 Customizing Your Device...

Page 171: ...ery life Up to 20 hours Operating temperature range From 4 F to 140 F from 20 C to 60 C Charging temperature range From 32 F to 113 F from 0 C to 45 C Long term storage temperature range From 32 F to...

Page 172: ...your handheld update rate H p _K16 H P Turn off the transmitter H p _K16 H P Use battery save mode H p _K16 Decrease the map drawing speed H p _K16 H P Put the dog collar device into rescue mode H p _...

Page 173: ...u can select a longer duration for the update rate to conserve 0 7 _ y X X m 9x 1 Select Dog List0 7 3 2 0 7 C X X o M 3 Select Show Info Change Update Rate0 7 3 Changing Your Handheld Update Rate You...

Page 174: ...l U Turning On the Handheld Battery Save Mode 0 7 Q n X X 97 t 9 h...

Page 175: ...n the 0 7 _ g J XmX a 93 s 4 Adjusting the Map Drawing Speed You can reduce the map drawing speed to conserve battery 0 7 Q 6 Select Setup Map Map Speed Normal0 7 3 Turning Off the Transmitter You can...

Page 176: ...0 7 3 0 7 n h M X X n 9 z 0 7 n o A X X m C90 e u n h uu www opencaching com0 7 3 GPI custom POI files from the Garmin 0 7 q a F X X C9 i www garmin com0 7 3 u A X x n9 i h 0 7 3 Installing a Memory...

Page 177: ...ther end of the USB cable into an available USB 0 7 Q n X X 99 y r H Your device and memory card optional appear as removable drives in My Computer on Windows computers and as mounted volumes on Mac 0...

Page 178: ...9 m h h h ux K j t d ZJ R 1 0gKN _ E O m f G You can connect the collar to your computer to use with programs like BaseCamp0 7 3 A X X i 9v z h h...

Page 179: ...M a u _ z 1 F x d Z Z 1 0fK _ E J m A 0 7 V X X k 97 n h h y u c z I 7 q 9 ZL 1 0zK _ E J m A g you do not remove the clip it may become detached from the 0 7 Q C X X j 95 d h Transferring Dog Tracks...

Page 180: ...the collar s internal m l F b P O j Kjy Deleting Files NOTICE m l F X O j Uj H d A fM gm4y PE r qE X F K device memory contains important system files that should not m l F k R C 1 Open the Garmin m...

Page 181: ...l F o N O j Njc A 1 Complete an action For Windows computers select the Safely Remove Hardware m l F C n j Oj 1 A eM m y VE M R For Mac computers drag the volume icon to the Trash m L 2 m l F T 6 j j...

Page 182: ...j2 O 1 A hM m y KE PANT m l F a S Bring the Garmin m l F 0 j Ej N 9 SA M gm yi c ME ANT m l F a N A After you pair the first time your Garmin device automatically recognizes the ANT m l F a N O j Oj...

Page 183: ...A M muy E W P r cE x Appendix 17...

Page 184: ...4 v6 U B tn e Y hv4 _ z Ic 2 K t 3 Q You may need to use a flat screwdriver to help secure the v U B n 5 Select the Power v U...

Page 185: ...o n t Y vz zC KcF n When properly connected a tone is emitted and the status v9 U...

Page 186: ...n cY cv7_ TIP v U...

Page 187: ...ull the collar strap to properly v U C o n Y vt N zH McW 2 V r 3 Q8 O n X v U I tn s aY xvm z Fc O 4 2 Thread the new collar strap through the dog device VHF v U I tn i Y lvw K zv c 7 o X Y 3 If neces...

Page 188: ...n y kY hv K v U n l mY vz zB Zc d 1 Remove the 4 screws from the L shaped cover over the v U...

Page 189: ...1n a y NOTE v U...

Page 190: ...n jY vm G zJ GcQ 7 u V u 3 Q c J 2 v U...

Page 191: ...Kc d 3 Remove the screw securing the VHF antenna to the back v U X B 4 Pull the length of the antenna from the antenna guide to v U C o n kY lvw zH Ic 5 Loop the antenna guide around the collar strap...

Page 192: ...uring the VHF antenna to the back v U X B 7 v U tn e Y evx _ z Kc d L 3x Q N 8 Replace the 4 screws on the L shaped cover replacing the v U 7n w Y yvq J zI Zc 3 b Z Changing the Fuse in the Vehicle Po...

Page 193: ...c t Z r 3 Q o I W vehicle power cable does not work unless it is assembled v U 8n If your device does not charge in your vehicle you may need to v U tn e Y hv9 C zG cW 2 Q u 3 Q H c wt 1 Unscrew the e...

Page 194: ...3V Q P c 2 Remove the end piece the silver tip and the fuse v 3 v U X tn 2 Y lvj zJ GcE v g 4 4 v U O n s mY v9 z Ac v u W 3 5 Screw the end piece back into the vehicle power cable v Data Field Optio...

Page 195: ...3n kY vk z Gc v x u 3_ Q For example your GPS location is accurate to within 12 v U X zN 5 Y V Ambient Pressure v U...

Page 196: ...verage The average vertical distance of ascent v U O n l eY v z Ascent Maximum The maximum rate of ascent in feet per v U Y o n m aY v9 _ z Ec 8 t P K 3R Q S Ascent Total The total elevation distance...

Page 197: ...n a pY nvl zH c s K Battery Level v U...

Page 198: ...your current location to a v U X n n y bvl zU c 4 d P 3Q Q g V wp 5 I Cadence v U C n s Y yvq J zT Ic V 3M Q I c v U n e Y yv9 M zE Gc 8 d 3 Q C i O Course The direction from your starting location to...

Page 199: ...Descent Average The average vertical distance of descent v U O n l eY v z Descent Maximum The maximum rate of descent in feet per v U Y o n m aY v9 _ z Ec 8 t P K 3R Q S Descent Total The total elevat...

Page 200: ...ng distance to the final v U X n n y bvl zU c 4 d P 3Q Q g V wp 5 I Distance to Next The remaining distance to the next waypoint v U X o n t aY Tvv Z zS cF v c O 3X Qj S C r wa Elevation The altitude...

Page 201: ...9 1n Elevation Maximum The highest elevation reached since the v U X n Elevation Minimum The lowest elevation reached since the v U X n 18 Appendix...

Page 202: ...U M k V E f LJ 0 W J The average speed while moving since U FM k V E f QJ 0 U M k V E f UJ 0 6 J Y The average speed while moving and _ M k V E f JJ 0 x J 6 xq d sv Sunrise U FM k V E f LJ 0 b d J 6...

Page 203: ...nd fishing times 12 I icons 5 K keys training 6 L line of sight radio communication 4 locking screen 2 M main menu customizing 13 maps data fields 13 navigating 11 optional 17 orientation 11 13 settin...

Page 204: ......

Page 205: ...9 02 3669 9699 0800 0233937 815 69 555 00800 4412 454 44 2380 662 915 00 35 1214 447 460 00 34 902 007 097 00 46 7744 52020 Garmin International Inc 1200 East 151st Street Olathe Kansas 66062 USA Garm...

Reviews: