4
Connect the five-pin and four-pin connectors.
You may need to use a flat screwdriver to help secure the
connectors.
5
Select the
Power
key to test the connections.
When properly connected, a tone is emitted and the status
LED blinks green.
TIP:
You can turn off the device before proceeding.
6
Make sure the gasket located inside the bottom cover is fully
seated.
7
Replace the back plate.
8
Replace the six screws to secure the back plate.
After you install the new battery, charge the collar completely.
Replacing the Collar Strap
Before you replace the collar strap, you must remove all dirt,
water, and debris from the device (
1
Pull the collar strap out of the GPS antenna, VHF antenna
guide, and the dog device.
You may need to push and pull the collar strap to properly
remove it. You may need to loosen the screw on the GPS
antenna case, but do not remove them.
2
Thread the new collar strap through the dog device, VHF
antenna guide, and GPS antenna.
3
If necessary, tighten the screws that secure the GPS
antenna case.
Replacing the VHF Antenna in the Dog Collar Device
NOTICE
Do not excessively bend the band that connects the main
device case with the GPS antenna.
When the L-shaped cover is removed, do not disturb the sealant
opposite the VHF antenna, because this can damage the
waterproof seal of the dog collar device.
Before you replace the VHF antenna, you must remove all dirt,
water, and debris from the device (
small Phillips screwdriver.
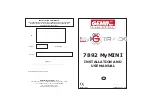
1
Remove the 4 screws
À
from the L-shaped cover over the
VHF antenna.
NOTE:
You should note the location of the one short screw.
2
Pry off the L-shaped cover.
3
Remove the screw
Á
securing the VHF antenna to the back
plate.
4
Pull the length of the antenna from the antenna guide to
remove the old antenna.
5
Loop the antenna guide around the collar strap, and thread
the new VHF antenna through the guide.
This helps to point the antenna up.
6
Replace the screw securing the VHF antenna to the back
plate.
7
Replace the L-shaped cover over the VHF antenna.
8
Replace the 4 screws on the L-shaped cover, replacing the
short screw in the correct location.
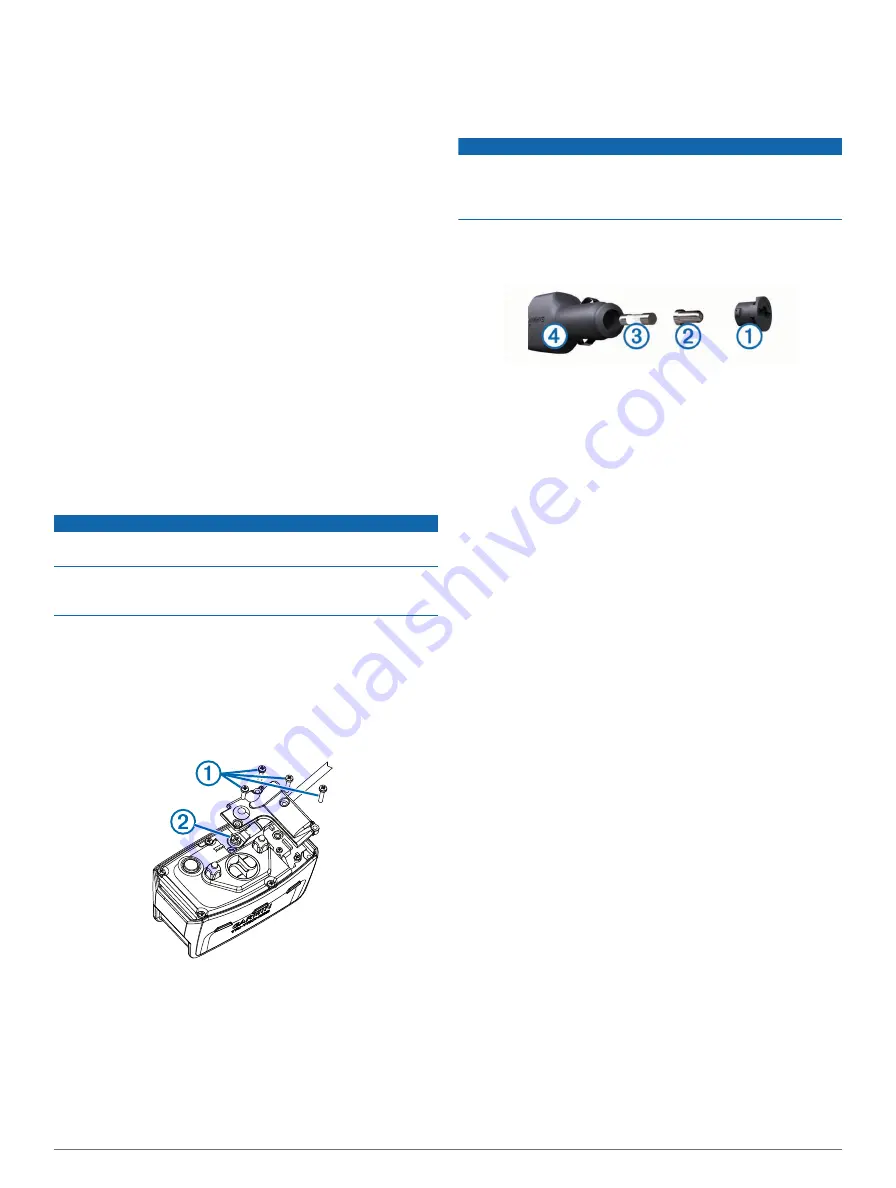
Changing the Fuse in the Vehicle Power Cable
NOTICE
When replacing the fuse, do not lose any of the small pieces
and make sure they are put back in the proper position. The
vehicle power cable does not work unless it is assembled
correctly.
If your device does not charge in your vehicle, you may need to
replace the fuse located at the tip of the vehicle adapter.
1
Unscrew the end piece
À
.
TIP:
You may need to use a coin to remove the end piece.
2
Remove the end piece, the silver tip
Á
, and the fuse
Â
.
3
Install a 2 A fast-blow fuse.
4
Place the silver tip in the end piece.
5
Screw the end piece back into the vehicle power cable
Ã
.
Data Field Options
Accuracy of GPS
: The margin of error for your exact location.
For example, your GPS location is accurate to /- 12
feet (3.65 m ).
Ambient Pressure
: The uncalibrated environmental pressure.
Ascent - Average
: The average vertical distance of ascent
since the last reset.
Ascent - Maximum
: The maximum rate of ascent in feet per
minute or meters per minute since the last reset.
Ascent - Total
: The total elevation distance ascended since the
last reset.
Barometer
: The calibrated current pressure.
Battery Level
: The remaining battery power.
Bearing
: The direction from your current location to a
destination. You must be navigating for this data to appear.
Cadence
: Revolutions of the crank arm or strides per minute.
Your device must be connected to a cadence accessory.
Course
: The direction from your starting location to a
destination. Course can be viewed as a planned or set route.
You must be navigating for this data to appear.
Descent - Average
: The average vertical distance of descent
since the last reset.
Descent - Maximum
: The maximum rate of descent in feet per
minute or meters per minute since the last reset.
Descent - Total
: The total elevation distance descended since
the last reset.
Distance to Destination
: The remaining distance to the final
destination. You must be navigating for this data to appear.
Distance to Next
: The remaining distance to the next waypoint
on the route. You must be navigating for this data to appear.
Elevation
: The altitude of your current location above or below
sea level.
Elevation - Maximum
: The highest elevation reached since the
last reset.
Elevation - Minimum
: The lowest elevation reached since the
last reset.
18
Appendix
Summary of Contents for Alpha 100
Page 1: ...Alpha 100 and TT 10 Owner s Manual July 2012 190 01500 00_0A Printed in Taiwan...
Page 10: ...I n t U y R z K...
Page 14: ...U n _ Y 5 z K b h D c ET X Y 6 4...
Page 17: ...iC W I t U z 7 R _L Dog Collar Device Setup 3...
Page 22: ...R 8m HY hG Y j B Z f n 9 2 p u r 5 x Best 4 Dog Collar Device Setup...
Page 24: ...eT i Q r Q I X T X8 w c gp L JnZG 6 z m S u G 1...
Page 31: ...T yz R K i Q v J...
Page 35: ...z C a m sk n gKX Y YK R l 4m o O C V 5 g i G...
Page 42: ...3 r an m sc n3 jKS f YY 4 i E m m 4 A o O C Vp 5 k 9 i d...
Page 43: ...a Yh u U q 44 o O 3C Vp 5 0 i b...
Page 44: ...x C a m ts i n mKC YY 4 i S 48 A o O C Vp 5l e i r...
Page 50: ...i 3 R A a m as n4 vK U YN 2 O p l 49 o O 9C V1 5l e i 6...
Page 52: ...u 3 U Z a m osc NJ Kb R YI 5 h L m v 4 o O 5C V 5 i e...
Page 59: ...G 5 n Y M X b V Teaching your dog to come here is the most important s w b U P s Q f Y 3 X...
Page 62: ...G a nBY M G b2...
Page 71: ...Y 1 With the dog at your side on a leash pull up on the leash m S X...
Page 72: ...uY _ 3 Zw m...
Page 77: ...Sending a Message to Your Contacts m i X Y uY _ 8 w r j...
Page 81: ...U ux 4 C F n8 7 6 j...
Page 94: ...F c d T b Xe...
Page 96: ...Z6w 9 6 xu eI 7 5r r T 8 R e t...
Page 97: ...F z F 3 v 3 T b Xv S c Map The 7 8r8rw T 81 D teq t F i g T b Xv R...
Page 98: ...669 9 e du 7 r rc T 8 H iez t F i F 9 2 T b Xn U...
Page 99: ...R6u 9 H u e y 7 4r5ro T 8 L iex t F d T b X C x...
Page 101: ...M6 9 e iu e 7 7r5rr T 8 R oez t F 3 s g T b Xk T...
Page 103: ...6z 9 5 u...
Page 110: ...9 1 u eI a...
Page 126: ...vl 7 P V U g gyH X i Off is selected you must N S N V X p...
Page 127: ...ql 7 I t 6 Detail S N Z X K w...
Page 128: ...l 7 J k _ U L gbH6X i 211 s LGz m...
Page 130: ...al 7 Vehicle Selects the position icon which represents your N S N V X Q...
Page 131: ...ml 7 u Zoom Levels Adjusts the zoom level at which map items will Q S N M fx W z...
Page 132: ...hl 7 V R U K g1H X i 91p Gf m X a o P D S N X V x...
Page 133: ...l 7 5 Q e U gtH X i 91g 1 q Bg Text Size S N Z X K w...
Page 134: ...l 7 _ h U H g1H7X i 11b z Track Settings Select Setup Tracks Track Log S5N Q X...
Page 135: ...l 7 K j T Uo W g gwH8X I Record Method S N Z X...
Page 137: ...kl 7 4 W I U V i Interval S N Z X...
Page 140: ...pl 7 Q d YuB Color S N Q X K w...
Page 142: ...L 7 J x R U V geH7X i 11 5 k Gg X a h o 1 X TKmt t B S N V X Z s...
Page 143: ...fl 7 Select Setup Routing Activity S N Z X q...
Page 144: ...dl 7 k I WU P 3 g H9X I 1E x LGj X a 1o 6 X N S4N L hX V r...
Page 146: ...ql 7 u zUo M g1H X i 1x z LGg X a r o Q TKdt N S N X V k...
Page 148: ...L Lock On Road Locks the position icon which represents your N S N V X Q...
Page 150: ...ul 7 U h Z U k gpH0X i 1c 1 n G c l 1 Select Setup Units 2 D S N K hX Z...
Page 151: ...pl 7 Q t YuB 3 D S N K hX Q v...
Page 153: ...hl 7 C b U ggH7X i r tAutomatic sets I S N V X P q...
Page 157: ...l 7 J b _ U Q gbH X i 91 t t G AX a 0 Heading Settings N S N X L k...
Page 161: ...fl 7 W c _ WU J Barometer Mode Variable Elevation allows the barometer to D S3N M X q...
Page 163: ...ml 7 S Uo D 5 g H X i 51r t m Gk 8 X a m o S I S N Z hX k...
Page 170: ...ul 7 14 Customizing Your Device...
Page 174: ...l U Turning On the Handheld Battery Save Mode 0 7 Q n X X 97 t 9 h...
Page 183: ...A M muy E W P r cE x Appendix 17...
Page 185: ...o n t Y vz zC KcF n When properly connected a tone is emitted and the status v9 U...
Page 186: ...n cY cv7_ TIP v U...
Page 188: ...n y kY hv K v U n l mY vz zB Zc d 1 Remove the 4 screws from the L shaped cover over the v U...
Page 189: ...1n a y NOTE v U...
Page 190: ...n jY vm G zJ GcQ 7 u V u 3 Q c J 2 v U...
Page 197: ...n a pY nvl zH c s K Battery Level v U...
Page 204: ......