background image

10

nüvi95WQuickStartManual

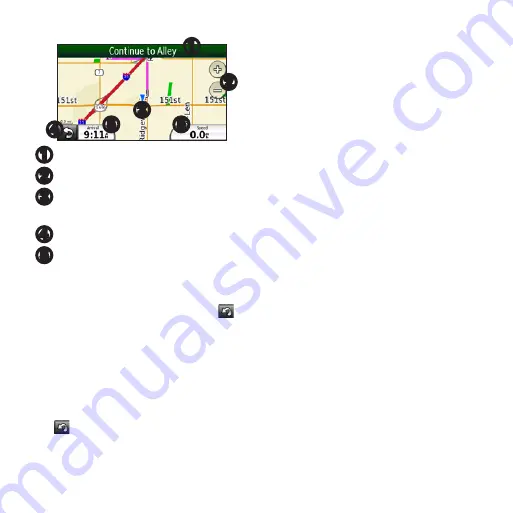
  Touch to view the route details.

  Touch to zoom in and zoom out.

  Touch for current location 

information.

  Touch to return to the Home screen. 

➎ 

Touch to view the trip computer.

adding Via Points to the active 

route

1.  While navigating a route, touch   > 

Where To?

.

2.  Search for the extra via point.
3.  Touch 

Go! >


Add As a Via Point

.

Taking a Detour

While navigating a route, touch 

 > 

Detour

.

Transferring Files

You can transfer files, such as MP3s and 

JPEGs, to your device.
1.  If necessary, insert a microSD card 

into the memory card slot.

2.  Connect the mini-USB cable to the 

device.

3.  Connect the other end of the cable to 

your computer.

4.  Touch 

Yes

 to change to mass storage 

mode.
Two additional drives (volumes) 

appear in the list of drives on your 

computer. One is the available 

storage in the internal memory of the 

device. The other is the memory card 

inserted into the device.

5.  Double-click the My Computer 

icon (Windows

®

 computers) or 

the mounted-volume icon (Mac

®


computers) on your computer.

Summary of Contents for 295W

Page 1: ...n vi 295W quick start manual...

Page 2: ...uct box for product warnings and other important information microSD card slot under cap Contacts for the cradle Mini USB connector Power key Headphone audio out connector NOTE The connector must be u...

Page 3: ...metal contacts inside the battery compartment Battery 5 Slide the battery cover onto the back of the device Charging the Battery Notice Your device will not charge if the temperature has exceeded 113...

Page 4: ...min com Mounting the Device Notice Before mounting the device see the Important Safety and Product Information guide for information about laws pertaining to windshield mounting 1 Plug the vehicle pow...

Page 5: ...dle 8 Tilt the device back until it snaps into the cradle 9 Plug the other end of the vehicle power cable into a power outlet in your vehicle Using the Home Screen Touch a shortcut icon in the scrolli...

Page 6: ...quickly remove your finger flick the screen to quickly scroll the screen Touch the screen to stop scrolling Orienting the Screen Rotate the device to view in horizontal wide screen or vertical portrai...

Page 7: ...utdoors to an open area away from tall buildings and trees Acquiring satellite signals can take a few minutes Finding an Address NOTE Depending on the version of the built in map data on your device t...

Page 8: ...e A list of items near your current location appears 4 Touch an item Finding by Spelling the Name 1 From the Home screen touch Where To Points of Interest Spell Name 2 Enter all or part of the name 3...

Page 9: ...ust acquire satellites page 7 After you find a location page 7 touch Go The device creates a route to the location and opens the map Your route is marked with a magenta line Using the Map As you trave...

Page 10: ...ur Transferring Files You can transfer files such as MP3s and JPEGs to your device 1 If necessary insert a microSD card into the memory card slot 2 Connect the mini USB cable to the device 3 Connect t...

Page 11: ...an option Select a song or playlist The selected song or playlist begins playing Touch All Songs All the songs in the selected category are added to the current playlist Taking a Picture 1 Press the...

Page 12: ...ew information about using your device Product Registration Help us better support you by completing our online registration today Go to http my garmin com Keep the original sales receipt or a photoco...

Page 13: ...e device that is turned on Store the device on the opposite side of the pacemaker Do not carry the device in a breast pocket If you think that interference may be occurring turn off the mobile device...

Page 14: ...ines to reduce the risk of blackouts seizures and eyestrain Avoid prolonged use of and take frequent breaks from using the device Hold the device away from your eyes Use the device in a well lit room...

Page 15: ...operation For countries where this product is sold outside the United States this product has been tested and is compliant to the applicable RF exposure requirements of the local regulatory authority...

Page 16: ...Replace the battery See your owner s manual for more information The device will not charge The battery might have exceeded the maximum charging temperature If the device is mounted remove it from th...

Reviews: