background image


4

2. Configuring Your 

System 

2.1. Entering Programming 

Mode 

If the system is in Disarmed (Alarm off) mode, 
to enter the Programming mode, follow the 
steps below.   

Step 1.

 Press 

key.


The screen will prompt you to enter the 
User1 PIN code. 


    P - M o d e    E n t e r
     P - C o d e   . . . .


Step 2.

 Key in 

1234

 (default 

User1

 PIN code) 

within 30 sec and press 

OK

 key. 

The screen will prompt you to enter 
the Master PIN code. 


    P -  M o d e   E n t  e r    
   M 

- C 

e  . . . .   


<

<

N

N

O

O

T

T

E

E

>

>


)


During keying in the PIN code, press 

 key will clear the code field (making 

all the 

¿

 dots again).  If the code field 

is empty, press    key, the screen will 
exit and return to

 Alarm Off 

screen.  

Step 3.

 Key in

 1111

 (default

 Master 

Code) 

within 30 sec. 

Step 4. 

Press

 OK

 key 

The following message is displayed 
for 2 sec. 


    P r  o g r  a m   M e n u    
M a k e   a   S e l  e c t  i o n


Step 5. 

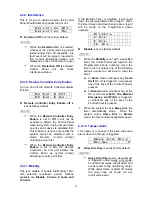
Then the Programming Main menu will 

be displayed. 


    Wa l  k   T e s t           
    T e l . S e t t i n g      


<

<

N

N

O

O

T

T

E

E

>

>


)


The cursor is indicated by a flashing 
dot on the left upper corner.  It can be 
move up & down by pressing 

S

&

T


keys respectively.


Step 6.

 Press 

S

&

T

 keys to move the cursor 

downward or upward.  The screen is 
also scrolled down or up respectively.  
The following items can be selected. 

    Wa l k  T 

e s t      

    T e l . S  e  t  t  i  n  g      
    G e n . S e t t i n g s    
    S p c . S e t t i n g s    
  D e v i c e s + 

/ -     

    S M S   E d i t o r        
    S M S   K e y w o r d      
    C o u n t r y   C o d e    
  G S M  S 

i g 

a l     

    R e s e t    G S M          

Step 7.

 After making a selection by moving the 

cursor to the desired item,


press

 OK


key to confirm the selection.  The 
display will show you the individual 
programming screen accordingly. 

<

<

N

N

O

O

T

T

E

E

>

>


)


If a down-arrow symbol


V


appears on 

the last column of the screen, it 
indicates the selection list can be 
downwards scrolled.  If the lowest 
position is reached, the down-arrow 
symbol disappears.  

)


If an up-arrow symbol


Λ

 appears on 

the last column of the screen, it 
indicates the selection list can be 
upwards scrolled.  If the upper 
position is reached, the up-arrow 
symbol disappears. 

)


Pressing   key, the screen will also 
return to

 Alarm Off

 screen. 

)


After User1, 2, 3 & 4 PIN codes and 
Master code are programmed with 
new numbers, remember to enter the 
newly programmed codes when 
accessing Programming mode 
afterwards.     

)


In Programming mode, if no key is 
pressed within 5 minutes, the Control 
Panel will automatically exit 
Programming mode to Alarm Off 
mode. 


Summary of Contents for CTC-1132

Page 1: ...Installation Programming Operating D D 29 APR 2009...

Page 2: ......

Page 3: ...Home Entry Time ____________________________________________________ 12 2 3 8 H Exit Time Home Exit Time _______________________________________________________ 13 2 3 9 Door Chime __________________...

Page 4: ...______ 27 2 11 Reset GSM ___________________________________________________________________ 27 3 Operation _________________________________________________________________ 28 3 1 Entering User Menu...

Page 5: ...s this key to move the cursor and scroll the display upwards T Key Programming mode press this key to move the cursor and scroll the display downwards Key Programming mode use this key to delete a dig...

Page 6: ...ion the AC power adapter is used to supply power to the Control Panel and at the same time recharge the battery z When the battery is fully charged it can provide back up power for a period of at leas...

Page 7: ...location for the Control Panel to be installed Step 2 Apply the AC Power You will hear a long beep Alarm On will be displayed on the first line and 00 01 01 Jan displayed on the second line of the scr...

Page 8: ...the cursor downward or upward The screen is also scrolled down or up respectively The following items can be selected Wa l k T e s t T e l S e t t i n g G e n S e t t i n g s S p c S e t t i n g s D...

Page 9: ...ne set phone number must be entered or the Panel will not dial out at the Alarm situation Step 3 Key in your phone number Step 4 Press OK key The screen will then prompt you to choose V o i c e R e p...

Page 10: ...er will be deleted 2 2 2 Record Message z This menu is for you to record your voice messages P l a y M e s s a g e R e c o r d M s g S t o p z With a total capacity of 20 sec you are allowed to record...

Page 11: ...nt to change any part of the recorded message just follow the same procedure to record a new message for that part The new message will overwrite the previous one 2 2 3 Test Report Control unit allows...

Page 12: ...r 85 sec before returning to selection menu Pressing will return to the menu with the list of numbers 2 3 General Settings In General Settings menu the following parameters can be programmed at your d...

Page 13: ...structed from Steps 2 7 When done press key and the screen returns to General settings menu setting the PIN code is completed N NO OT TE E In Step 5 if the code is not correct a Code is not correct pr...

Page 14: ...C o d e O k Step 3 Press key the next screen will ask you to enter your new PIN code and repeat it for double confirmation Step 4 Follow the same steps as described in Set your own pin code to edit 2...

Page 15: ...ay Emergency alarm voice message for Voice Reporting refer 2 2 1 Telephone Numbers z The Duress Code consists of 4 digits and is not activated as default by the factory To Set Duress Code Step 1 Use t...

Page 16: ...Control Panel raises an alarm and sends an alarm report z Options available are Disable alarm immediately 10 sec 20 sec up to 70 sec in 10 sec increments z Press OK on A Entry Timer and the following...

Page 17: ...e no door chime when Entry or Away Entry point DC or PIR is triggered at Disarmed mode When Door Chime is enabled the system will make a Ding Dong sound to inform user that a DC or PIR at Entry Point...

Page 18: ...Min in 1 Min increments A l a r m L e n g t h 3 mi n V O K z 3 minutes is set as factory default z If Disable is selected when the Control Panel receives an alarm signal the panel siren and internal...

Page 19: ...cted 9 Fire alarm 9 Water alarm 9 Personal panic alarm 9 Medical emergency 9 Tamper alarm 9 GSM failure The alarm reporting will be sent immediately even if the audible alarm is delayed 2 4 7 Verifica...

Page 20: ...Mobility Timer with selected countdown period Options available are Disable 4 hours 8 hours and 12 hours If the Mobility Timer is enabled it will count down the pre programmed time length When the tim...

Page 21: ...chosen ON CTC 1132 will be able to receive the check in signals from its system devices to indicate their proper functioning D i s a b l e o 8 H o u r s 1 2 H o u r s 2 4 H o u r s z 8 Hours is set as...

Page 22: ...r device Pressing key will abort the procedure and will not learn in the device Depending the type of the device different screens will then be displayed accordingly for further configuration purpose...

Page 23: ...y Door Contact is triggered the Control Panel will start an entry period to give enough time to disarm the system z After the delay period is expired and no correct PIN code is entered to disarm the s...

Page 24: ...ctor P for Away Entry PIR Detector StepB8 Use the S T keys to make your selection and confirm by pressing OK key You are now invited to give a name or location description to the device to help unders...

Page 25: ...s to Device menu Other Devices For Smoke Detector Remote Keypad Water Sensor and Night Switch no further option needs to be specified hence after it is detected a zone is assigned and the zone name en...

Page 26: ...ng OK key The screen will show Z o n e T y p e O k D C B a c k d o o r E Step3A Press OK key to confirm The next screen will ask if you want to change the name P r o g r a m N a me B a c k d o o r Ste...

Page 27: ...xiliary devices Before adding these auxilary devices any least one other type of device must be learnt in already e g a Door Contact or PIR but not Siren Bell Box or PSS To program these auxiliary dev...

Page 28: ...irmation where beeps are emitted from the Siren to validate that the system has been armed and disarmed z Disable the Siren Confirmation by selecting Confirmation Off and press OK key z Enable the Sir...

Page 29: ...larm is restored the Power Switch will turn off 2 6 SMS Editor For sending a SMS alarm reporting to your mobile phone edit your SMS message by selecting SMS Editor in Programming Main menu E d i t S c...

Page 30: ...your local Telecom provider for the correct format Or follow the steps below for checking your phone number format and setting the system to correct the format Step 1 Remove the SIM card from the Pane...

Page 31: ...S i g n a l G S M R S S I 7 2 10 Walk Test z When Walk Test is selected the Green Yellow LED s will flash 3 times with 3 beeps and the following two test patterns are displayed for 2 sec each z Then t...

Page 32: ...essage saved the screen will display SMS for SMS message reading If you press key while the Alarm off is displayed a Enter Code promp screen will be displayed After you enter your pin Code the above s...

Page 33: ...the system please see the section Forced Arming below 3 3 Forced Arming z While you try to arm the system by entering the PIN Code if there is any fault situation has occurred before the display will...

Page 34: ...lowing the Steps described above to execute Forced Arming 3 4 Disarm Alarm off mode Disarming the system To disarm the system If the system is in either the Away Arm mode or Home Arm mode Alarm ON ent...

Page 35: ...Or you can do forced arming to enter Home mode compulsorily Please follow the instructions described in Forced Arming in Section 3 3 3 6 Partial By pass Arm Mode The Partial By pass Arm mode allows th...

Page 36: ...ssed then the Contorl Panel will not respond to its triggering in Arm mode The by pass setting is effective for only one time once the system is disarmed the by pass setting is cleared automatically W...

Page 37: ...nse Instant Burglar Alarm Start Entry Timer No Response No Response No Response Delay D No Response Instant Burglar Alarm Instant Burglar Alarm No Response No Response No Response Entry E Door Chime S...

Page 38: ...ns to Alarm off N NO OT TE E Press key or no key is pressed within 5 sec the screen returns to 1st device display You can repeat from the beginning to view the alarm event one more time No alarm repor...

Page 39: ...displayed then the screen returns to Alarm off 3 9 Event Log The alarm log memorises the last 20 system events including 9 All Alarm Events with Device ID 9 All Fault Warning Events 9 All Arming And D...

Page 40: ...arning z This is to warn the user that an alarm report to the Emergency Phone Numbers is about to be made z When a zone that is not programmed for delay is violated during the Entry Delay or the corre...

Page 41: ...emote Keypad Water Sensor Remote Controller or Smoke Sensor is low a Sensor Low Battery message will be detected z Sensor out of order The PIR Sensor Door Contact Water Sensor and Smoke Detector will...

Page 42: ...move the cursor downwards or upwards The screen is also scrolled down or up respectively Step 5 After viewing all the fault events press key a prompt message is displayed C l e a r F a u l t D s p O...

Page 43: ...on the panel will report the fault event by SMS to the first telephone number in all modes Sensor Sabotaged If the Tamper switch on the PIR Sensor Door Contact Remote Keypad or Bell Box BX 8 is trigge...

Page 44: ...ontact triggered DC w Zone Name open PIR triggered IR w Zone Name Active 3 13 Remote Commanding The Unit can be controlled by Remote Control Commands sent via SMS messages 3 13 1 From Regular Phone Li...

Page 45: ...1 51199 8th Power Switch Open for 1 Hour to 99 Hours N NO OT TE E 5 digit Control Command Format C C C D D The Number of the Power Switch Open period for hour CCC The Number of the Power Switch E g 51...

Page 46: ...h 1 for 1 Hour and than turn off without a confirmation SMS back to your mobile phone The format is J O Y 1 2 3 4 5 1 1 0 1 The programmed SMS keyword User PIN Code Power Switch Number Time N NO OT TE...

Page 47: ...all will automatically hang up Acknowledging with signal 0 If the recipient presses 0 on his phone set as the acknowledging signal The Control Panel will then take the following actions 9 The Control...

Page 48: ...nter Code will be displayed 4 Enter the following keys sequence STSTSTST OK key 5 Press the key 6 All programmed parameters are reset to factory default setting 7 If more than 17 incorrect keys entere...

Reviews: