background image

29

  Wireless cooking sensor   

en-us

Wireless cooking sensor

Wireless cooking sensor

You will need to connect the wireless cooking sensor to 

the cooktop before using Cooking Sensor mode for the 
first time.

Preparing and caring for the wireless 
cooking sensor 

This section provides information on:

ʑ

Attaching the silicone patch

ʑ

Attaching the wireless cooking sensor

ʑ

Cleaning

ʑ

Replacing the battery

The silicone patch and temperature sensor can be 
purchased from specialist retailers or through our 
technical after-sales service or our official website. To do 
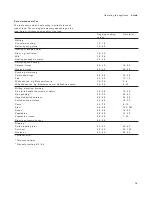
this, quote the relevant reference number:

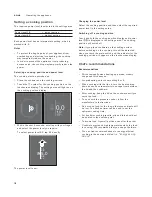
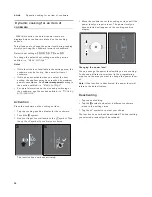
Gluing on the silicone patch

The silicone patch secures the cooking sensor to the 
cookware.

When using a piece of cookware with Cooking Sensor 
mode for the first time, the silicone patch must be 
attached directly to this piece of cookware. Proceed as 
follows:

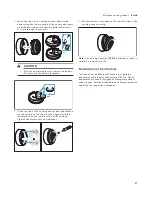
1.

The part of the cookware to which the patch is to be 
adhered must be free of grease. Clean the pan, dry it 
thoroughly and wipe the area where the patch is to be 
adhered with an all purpose degreasing agent.

2.

Remove the protective film from the silicone patch. 
Adhere the silicone patch in the correct place on the 
outside of the pot using the supplied template as a 
guide. 

3.

Press down all over the surface of the silicone patch, 
including in the center. 

The adhesive requires 1 hour to fully cure. Do not use or 
clean the pot during this time.

Notes

ʑ

Do not leave the pot with the silicone patch to soak in 
soapy water for long periods of time.

ʑ

If the silicone patch comes off, replace it with a new 
one.

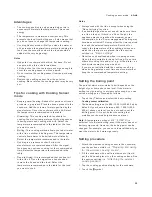
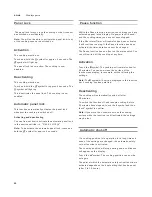
Attaching the wireless cooking sensor

Place the cooking sensor squarely onto the silicone 
patch.

Notes

ʑ

Make sure that the silicone patch is completely dry 
before attaching the cooking sensor.

ʑ

Fill the pan so that the contents reach high enough to 
cover the cooking sensor's silicone patch.

ʑ

To prevent overheating, do not attach the cooking 
sensor to other hot cookware.

ʑ

Remove the cooking sensor from the saucepan after 
cooking. Store it in a clean, safe place away from 
sources of heat.

ʑ

You can use up to three cooking sensors at the same 
time.

Connecting the wireless cooking sensor 
to the control panel

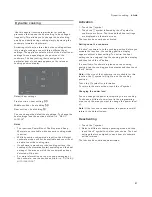
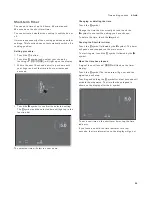
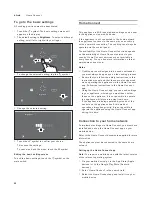
To connect the wireless cooking sensor to the control 
panel, follow the instructions below:

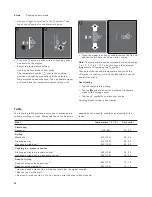
1.

Touch the 

W

 symbol on the main screen. 

2.

Select the 

Cooking sensor pairing

 option and then 

touch the 

*

 symbol to confirm your choice.

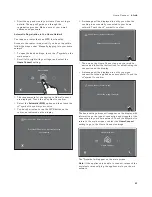
3.

Briefly touch the 

Ž

 symbol on the wireless cooking 

sensor within the next 30 seconds.

After a few seconds, the result of the connection 
between the cooking sensor and the control panel will 
appear on the display.

Then touch the 

*

 symbol to confirm.

00577921

Set of 5 silicone patches

CA060300 Temperature sensor and set of 5 silicone 

patches

Summary of Contents for CX492610

Page 1: ... DJJHQDX Use and care manual CX492610 Full surface induction cooktop ...

Page 2: ...1 ˆ Professional cooking 22 Activation 22 Deactivating 23 O Time setting options 23 Cook Timer 23 Stopwatch function 24 Short term Timer 25 v Power Boost function 26 Activating 26 Deactivating 26 x Pan Boost function 27 Recommendations for use 27 Activating 27 Deactivating 27 z Keep warm function 28 Activating 28 Deactivating 28 s Transfer function 28 Activation 28 Wireless cooking sensor 29 Prepa...

Page 3: ...aning guidelines 51 Cleaning chart 51 Maintenance 52 Frequently asked questions and answers FAQ 53 3 Faults what to do 56 Warnings and fault messages 56 Tips 56 Demo mode 57 4 Customer Service 58 Safety Definitions SafetyDefinitions WARNING This indicates that death or serious injuries may occur as a result of non observance of this warning CAUTION This indicates that minor or moderate injuries ma...

Page 4: ...r the burners or elements They could catch on fire Always have a working smoke detector near the kitchen Never leave the cooktop unattended when in use Boilovers cause smoking and greasy spillovers may ignite WARNING TO REDUCE THE RISK OF A GREASE FIRE 1 Never leave surface units unattended at high settings Boilovers cause smoking and greasy spillovers that may ignite Heat oils slowly on low or me...

Page 5: ...perate the ventilation system during a cooktop fire However do not reach through fire to turn it off Cooking Safety WARNING Use this appliance only for its intended use as described in this manual NEVER use this appliance as a space heater to heat or warm the room Doing so may result in overheating the appliance Never use the appliance for storage When using the timer always supervise the cooktop ...

Page 6: ...ontact Customer Support for service Burn Prevention DO NOT TOUCH SURFACE UNITS OR AREAS NEAR UNITS Surface units may be hot even though they are dark in color Areas near surface units may become hot enough to cause burns During and after use do not touch or let clothing potholders or other flammable materials contact surface units or areas near units until they have had sufficient time to cool Amo...

Page 7: ...g on any part of an appliance especially a door warming drawer or storage drawer This can damage the appliance and the unit may tip over potentially causing severe injury Do not allow children to use this appliance unless closely supervised by an adult Children and pets should not be left alone or unattended in the area where the appliance is in use They should never be allowed to play in its vici...

Page 8: ...om dry Proper Installation and Maintenance Have the installer show you the location of the circuit breaker or fuse Mark it for easy reference This appliance must be properly installed and grounded by a qualified technician Connect only to properly grounded outlet Refer to Installation Instructions for details This appliance is intended for use up to a maximum height of 13 100 feet 4 000 meters abo...

Page 9: ...fferent than the cooktop It is the user s responsibility to correct any interference CAUTION Persons with a pacemaker or similar medical device should exercise caution when standing near an induction cooktop while it is in use Consult your doctor or the manufacturer of the pacemaker or similar medical device for additional information about its effects with electromagnetic fields from an induction...

Page 10: ...tate of California Proposition 65 Warnings WARNING This product can expose you to chemicals including vinyl chloride which is known to the State of California to cause cancer and birth defects or other reproductive harm For more information go to www P65Warnings ca gov ...

Page 11: ...Overview You will find the most frequently caused damage in the following table Damage Cause Remedy Stains Boiled over food Remove boiled over food immediately with a glass scraper Unsuitable cleaning agent Only use cleaning agents that are suitable for this type of cooktop Scratches Salt sugar and sand Do not use the cooktop as a work surface or storage space Cookware with rough bases scratch the...

Page 12: ...g Induction cooking is fundamentally different from traditional cooking methods as heat builds up directly in the cookware This offers numerous advantages ʑ Saves time when boiling and frying ʑ Saves energy ʑ Easier to care for and clean Spilled food does not burn on as quickly ʑ Heat control and safety the cooktop increases or decreases the amount of heat supplied as soon as the user changes the ...

Page 13: ...okware or try again with a different pot or pan If the active cookware is lifted from the cooking surface for longer than 30 seconds the cooking zone automatically switches off Empty cookware or cookware with a thin base Do not heat empty cookware and do not use cookware that has a thin base The cooktop is equipped with an internal safety system However an empty item of cookware can heat up so qui...

Page 14: ...tons are touch sensitive To select a function touch the relevant symbol The available functions will appear on the display Notes ʑ Always keep the control panel clean and dry Moisture can prevent it from working properly ʑ Never place hot cookware on the touchscreen display There is a risk that the electronics will overheat Cooktop 1 Usable cooking surface 2 Control panel Touch buttons Main switch...

Page 15: ... The info menu provides you with information about the appliance or the functions that are currently active To access the info menu touch the symbol on the function bar The sensor will show when the function is available Notifications and alerts Notifications let the user know that the appliance s status has changed or tell them when they need to confirm something To return to the main screen touc...

Page 16: ... frying in a pot º Teppan Yaki This enables the Teppan Yaki sur face to be divided into two sec tions This means you can fry food on one section and keep food warm on the other section or use the entire area to fry food at the same power level Detected cooking position The cookware on the cooking sur face has been detected The cook ing position display will light up Touch the symbol to select the ...

Page 17: ... have confirmed these settings the main screen will appear Note You can change the settings at any time For information on how to select these settings see the section entitled a Basic settings Switching the cooktop on and off The main switch is used to switch the cooktop on and off To switch the cooktop on Touch the symbol The indicator above the main switch will light up After a short time the c...

Page 18: ...y is displayed in the settings area The cooking position will switch off Note If you place cookware on the cooking surface before switching on the cooktop this will be detected when you touch the main switch and the indicator for the cooking position will appear on the touchscreen display Chef s recommendations Recommendations ʑ Stir occasionally when heating up purees creamy soups and thick sauce...

Page 19: ...0 35 55 Poaching simmering Potato dumplings 1 4 5 5 5 20 30 Fish 1 4 0 5 0 10 15 White sauces e g Béchamel sauce 1 0 2 0 3 6 Whisked sauces e g Béarnaise sauce Hollandaise sauce 3 0 4 0 8 12 Boiling steaming braising Rice with double the volume of water 2 5 3 5 15 30 Rice pudding 3 2 0 3 0 30 40 Unpeeled boiled potatoes 4 5 5 5 25 35 Peeled boiled potatoes 4 5 5 5 15 30 Pasta 1 6 0 7 0 6 10 Stew 3...

Page 20: ...imp and scampi 7 0 8 0 4 10 Sautéeing fresh vegetables and mushrooms 7 0 8 0 10 20 Asian stir fries vegetables and pieces of meat 7 0 8 0 15 20 Stir fries frozen 6 5 7 5 6 10 Pancakes cooked one after the other 6 5 7 5 Omelette cooked one after the other 3 5 4 5 3 10 Fried eggs 5 0 6 0 3 6 Deep fat frying 1 5 7 oz 150 200 g per portion in 2 4 pints 1 2 liters oil fried in portions Frozen products ...

Page 21: ...the cookware has been detected will be set ʑ For more information on the size and positioning of the cookware see the section entitled a Cooking with induction Activation 1 Touch the J symbol 2 Touch the symbol followed by the symbol to confirm your choice The three default heat settings are displayed on the main screen The function has now been activated Setting down the cookware If active cookwa...

Page 22: ...l not be able to set the cooking time Activation 1 Touch the J symbol 2 Touch the symbol followed by the symbol to confirm your choice The default heat settings are displayed on the main screen The function has now been activated Setting down the cookware If active cookware is on the cooking position before you activate the function the cooking position display appears without a heat setting To co...

Page 23: ...ned to each item of cookware will be retained The function has now been deactivated O Time setting options Time settingoptionsThe cooktop has three timer functions ʑ Cooking timer ʑ Stopwatch ʑ Short term timer Cook Timer The cooking position will switch off automatically once the time that is set has elapsed You can set a cooking time of up to 12 hours 59 minutes Setting procedure 1 Select the co...

Page 24: ...ndicators will go out and the signal tone will stop Stopwatch function The Stopwatch function displays the time that has elapsed since activation This works independently from the cooking positions and from other settings This function does not automatically switch off a cooking position Activating Touch the 0 button and select the S symbol Then touch the Õ symbol to confirm your choice yy yy and ...

Page 25: ...cted time will start to count down Changing or deleting the time Touch the É symbol Change the time that is currently set and touch the Õ symbol to confirm the setting you have chosen To delete the time touch the symbol Pausing the Short term timer Touch the É symbol followed by the symbol The timer will pause and reappear on the main screen To start it again touch the É symbol followed by the Õ s...

Page 26: ...e deactivated The cooking position is automatically set to heat setting 9 0 If the Power Boost function in the center of the cooking surface is active settings can be implemented for other items of cookware on the left and right hand side of the cooktop Activating Select the cooking position and scroll up with your finger until the Ü symbol appears The function has now been activated Deactivating ...

Page 27: ...king surface is active settings can be implemented for other items of cookware on the left and right hand side of the cooktop Recommendations for use ʑ Always use cookware that has not been preheated ʑ Use cookware with a completely flat base Do not use cookware with a thin base ʑ Never leave empty cookware oil butter or lard unattended when it is being heated ʑ Do not place a lid on the cookware ...

Page 28: ...d power level or temperature setting and the cooking time from one cooking position to another If you remove an item of cookware from the cooking surface or move it the cooking position it was previously on stops heating The settings for the cooking position will be retained for 30 seconds When you place the cookware back in this position the same settings will be used Activation 1 Place an item o...

Page 29: ...f the silicone patch including in the center The adhesive requires 1 hour to fully cure Do not use or clean the pot during this time Notes ʑ Do not leave the pot with the silicone patch to soak in soapy water for long periods of time ʑ If the silicone patch comes off replace it with a new one Attaching the wireless cooking sensor Place the cooking sensor squarely onto the silicone patch Notes ʑ Ma...

Page 30: ... symbol when this happens When the LED goes out this means that the wireless cooking sensor has been reset 2 Repeat the connection procedure Cleaning Do not clean the wireless cooking sensor in the dishwasher Wireless cooking sensor Clean with a damp cloth Never put in the dishwasher never get wet If the wireless cooking sensor is not used remove it from the cookware and keep it in a clean safe pl...

Page 31: ... the screws on the cap must be aligned with the indentations on the lower section of the casing Tighten the screws with a screwdriver 4 Put the silicone cover back on the lower section of the cooking sensor casing Note Use only high quality CR2032 batteries in order to maintain a long service life Declaration of Conformity The logos and the Bluetooth brand are registered trademarks and property of...

Page 32: ...rchased from specialist retailers or through Customer Service or our online shop You can use up to three cooking sensors at the same time Note You can order it by specifying the reference number CA060300 For more information about the cooking sensor see the section entitled a Wireless cooking sensor Cooking processes with the cooking sensor Cooking Sensor mode is used to select the best cooking me...

Page 33: ...re recommended in the table for the food you want to cook Notes ʑ Always cook with the lid on except when using the Deep fat frying function ʑ If an audible signal does not sound make sure there is a lid on the pot If there is a lid on the pot the appliance may have reached its maximum power consumption or the Power management setting may have been activated This may affect the time required to re...

Page 34: ...cancel and exit the menu Deactivating 1 Tap the temperature setting 2 Tap the L symbol and select a different cookware mode in the settings area 3 Tap the symbol to confirm your choice Cooking Sensor mode is deactivated Table The following table provides a selection of dishes and is sorted according to foods Temperature and cooking time depend on the quantity condition and quality of the foods Mea...

Page 35: ...Lentils 2 212 100 45 60 Cooking in a pressure cooker Vegetables in a pressure cooker 2 240 115 3 6 Chickpeas in a pressure cooker2 240 115 25 35 Beans in a pressure cooker 2 240 115 25 35 Lentils in a pressure cooker 2 240 115 10 20 Deep fat frying Deep fat frying breaded vegetables 3 340 170 4 8 Deep fat frying vegetables in beer batter 3 340 170 4 8 Deep fat frying breaded mushrooms 3 340 170 4 ...

Page 36: ...olina pudding3 185 85 5 10 Parboiled rice1 195 90 25 35 Brown rice2 195 90 45 55 Exotic rice e g basmati Thai 2 195 90 8 12 Wild rice2 195 90 20 30 Quinoa1 195 90 10 12 Polenta3 185 85 3 8 Boiling Durum wheat pasta3 212 100 7 10 Fresh pasta3 212 100 3 5 Whole grain pasta3 212 100 7 10 Durum wheat pasta stuffed3 212 100 15 20 Fresh pasta stuffed3 212 100 5 8 Cooking in a pressure cooker Rice in a p...

Page 37: ...food at the start 2 Heat the oil with the lid on Fry one portion after the other without the lid 3 Stir frequently Frozen products Temperature F C Time min Keeping warm heating Vegetables in cream sauce4 155 70 15 20 Boiling Green beans frozen1 212 100 15 30 Deep fat frying Deep fat frying French fries3 350 180 4 8 1 Heat and cook with the lid on Add the food after the signal sounds 2 Add the food...

Page 38: ...ioning of the cookware see the section entitled a Cooking with induction Activation Place the cookware on the cooking surface 1 Tap the cooking position display for the cookware 2 Touch the L symbol 3 Use your finger to scroll down to the Ì symbol Then touch the symbol to confirm your choice The function has now been activated 4 Move the cookware over the cooking surface until the power level you ...

Page 39: ... Only the available symbols for the size of the Teppanyaki griddle and its position on the cooking surface are displayed Touch the symbol to confirm your choice 4 Select the heat setting you require from the settings area The display will show the orientation of the teppanyaki griddle with the power level selected for the cooking position or the entire area the cookware is taking up The symbol for...

Page 40: ...e Short term Timer or Stopwatch has been activated it will continue running If the Pause function has been activated the timer duration cannot be changed The Pause function has no effect on the main switch You can still switch off the cooktop at any time Activation Touch the symbol The cooktop will remain locked for 30 minutes You can now clean the surface of the touchscreen display for example wi...

Page 41: ...eas for single dynamic cooking mode CAL Cooking sensor calibration Set your height above sea level to adjust the boiling point Cooking sensor pairing Connect the wireless cooking sensor to the cooktop U Temperature format You can change the temperature format Language You can change the language used on the display k Start mode Select the cooking mode that you want the cooktop to start with l Appl...

Page 42: ...ed to be used unattended you must always keep an eye on the cooking process ʑ Ensure that you follow the safety instructions in this instruction manual and that these are also observed when operating the appliance via the Home Connect app Follow the instructions in the Home Connect app ʑ Using the Home Connect app you can send settings to your appliance whereby you must then confirm these on the a...

Page 43: ...o notify you when the cooktop is successfully connected to your home network Touch the symbol to confirm 7 Then open the Home Connect app on your mobile device and follow the instructions for establishing the connection on the display 8 A message will be displayed to notify you when connection to the app has been successful Touch the symbol to confirm The basic settings menu will reappear on the d...

Page 44: ...to confirm 9 Then open the Home Connect app on your mobile device and follow the instructions for establishing the connection on the display 10 A message will be displayed to notify you when connection to the app has been successful Touch the symbol to confirm The basic settings menu will reappear on the display with information on the type of connection and strength of the connection to your home...

Page 45: ...m your home network You can disconnect the cooktop from the network at any time Note If the cooktop is disconnected from the network it is not possible to operate it using Home Connect 1 To open the basic settings touch the W symbol on the main screen 2 Scroll left or right with your finger and select the Home Connect setting Settings Description g Connection Enables the Wi Fi network to be switch...

Page 46: ...e basic settings touch the W symbol on the main screen 2 Scroll left or right with your finger and select the Home Connect setting 3 Touch Connect to app An additional Home Connect account can be connected to the cooktop To do this touch Connect to another app 4 Follow the instructions in the app to complete the connection process Settings via app Using the Home Connect app you can easily access t...

Page 47: ...i Fi communication module ʑ Security certificate of the Wi Fi communication module to ensure a secure data connection ʑ The current software and hardware version of your domestic appliance ʑ Status of any previous resetting to factory settings This initial registration prepares the Home Connect functions for use and is only required when you want to use these Home Connect functions for the first t...

Page 48: ...ooktop ʑ If the appliance is being operated by means of the controls on the hood this mode of operation always has priority It is not possible to use the hood controls on the cooktop during this time ʑ In networked standby mode your appliance requires a maximum of 2 W Setting up a connection To set up the connection between the cooktop and the hood the cooktop must be switched on Connecting direct...

Page 49: ...wo appliances initiate the connection process again Disconnecting from the network The connection to your home network can be deleted 1 To open the basic settings touch the W symbol on the main screen 2 Scroll left or right with your finger and select the Hood control setting 3 Select the Disconnect hood control option and then touch the symbol to confirm your choice The connections have now been ...

Page 50: ...tings will only be displayed if the appliance is connected to a hood Settings Description Automatic control You can choose the fan setting at which the hood runs when the cooktop is switched on Ý Delay shut off function The Delay shut off function keeps the fan running for a certain amount of time after the cooktop is switched off Ý Light Brightness You can choose the brightness setting at which t...

Page 51: ...n the cooktop ʑ Caustic cleaners cleaners such as Easy Off may stain the cooktop surface ʑ Abrasive cleaners ʑ Metal scouring pads and scrub sponges such as Scotch Brite can scratch and or leave metal marks ʑ Soap filled scouring pads such as SOS can scratch the surface ʑ Powdery cleaners containing chlorine bleach can permanently stain the cooktop ʑ Flammable cleaners such as lighter fluid or WD ...

Page 52: ... before the next heating makes removal very difficult Hard water spots Hot cooking liquids dripped on surface Minerals in some water can be transferred onto the sur face and cause stains Use undiluted white vinegar rinse and dry Recondition with glass ceramic cooktop cleaner Remove boilovers and stains before using the cooktop again Surface scratches Small scratches are common and do not affect co...

Page 53: ... when the heat setting is reduced Quiet humming The cookware may be too small for the cooking position or not suitable for induction cooking Use larger cookware or move it to a different position on the cooking surface Quiet whistling This occurs when the cookware is empty The noise disappears when water or food is added to the cookware High pitched whistling noises These may occur if two cooking ...

Page 54: ...on the cooking surface However the touchscreen display displays this as just one item of cookware If two pots or pans are placed very close together on the cooking surface the touchscreen display may show them as one item of cookware Move the two items away from each other until the touchscreen display depicts them separately There is one item of cookware on the cooking surface However the touchsc...

Page 55: ...en distribution within the cookware Depending on the power level that is selected the type of cookware or the combination with other cook ware bubbles may form unevenly This does not affect the temperature or the cooking process For information on the type size and positioning of the cookware see the section entitled a Cooking with induction Cleaning How do I clean the cooktop You can achieve the ...

Page 56: ... not switch on Use other electrical appliances to check whether a short circuit has occurred in the power supply Make sure that the appliance has been connected as shown in the circuit diagram If the fault cannot be rectified inform Customer Support The touchscreen display is not responding or has frozen The control panel is damp or there is something on it Dry the con trol panel or remove the obj...

Page 57: ...u are not using the cooking sensor remove it from the cook ware and keep it away from the other cooking positions and sources of heat Switch the cooking positions back on The battery in the cooking sensor is almost drained µ Replace the 3 V CR2032 battery See the section entitled Wire less Cooking Sensor The connection to the cooking sensor has been broken µ Switch the function off and then on aga...

Page 58: ...e a note of the number of your appliance and the telephone number for Customer Service in the space below in case you need them Please note that a visit from a Customer Service engineer is not free of charge in the event that the appliance has been misused even during the warranty period Please find the contact data of all countries in the enclosed customer service list To book an engineer visit a...

Page 59: ......

Page 60: ... DJJHQDX 6 RPH SSOLDQFH RUSRUDWLRQ 0DLQ 6WUHHW 6XLWH UYLQH ZZZ JDJJHQDX FRP XV 6 RPH SSOLDQFHV DJJHQDX DXVJHUlWH PE DUO HU 6WUD H 0 QFKHQ 50 1 9001349120 9001349120 980604 en us ...

Reviews: