background image

               TeamPad 500 User’s Guide

Copyright 2001 by Fujitsu-ICL Systems Inc.
35 of 47

3.8


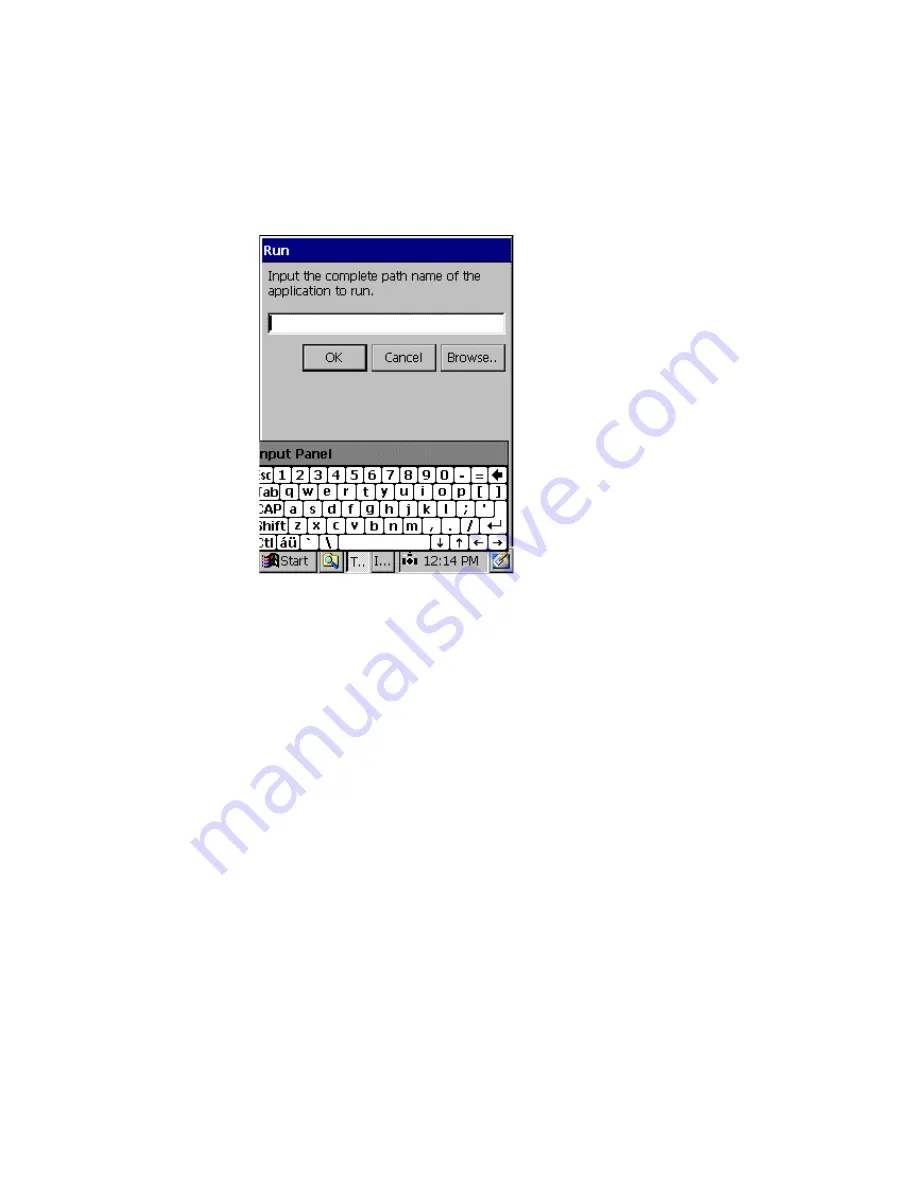
Run a Program

To Run a Program, press “7” at the “Setup Menu”.  The following selection window will then open.
You can drag the Screen by touching the display and moving in the direction you wish.

[1] Entry Box

Enter the file name of the program to be run.

[2] Browse button

Opens a file browser dialog box.  A program name can be selected from the dialog box.

[3] OK button

Run the program whose file name was entered.

[4] Cancel button

Cancel the Run program selection.  Return to the “Setup Menu”.

Summary of Contents for TeamPad500 System

Page 1: ...TeamPad500 System User s Guide Revision 1 00 00 March 27 2001 P N 90000455 ...

Page 2: ...TeamPad 500 User s Guide Copyright 2001 by Fujitsu ICL Systems Inc 2 of 47 Revision History Revision Number Date Description of Change 1 00 00 2 1 2001 Original Release ...

Page 3: ... of this product be sure to read this manual thoroughly before using this equipment Intention of the User s Guide To document the functionality of the display screens that are unique to the equipment This document is not intended to document Windows CE 2 12 It is assumed that the user has knowledge of the features and functionality of Windows CE Windows Windows CE Visual C and Visual Basic are reg...

Page 4: ...4 Date and Time Properties 16 3 2 5 Screen Input Panel SIP Keyboard Size 17 3 3 Application Installation 19 3 4 TeamPad Configuration 21 3 4 1 Initialize Settings 21 3 4 2 Launcher Keys 23 3 4 3 Registry Backup and Restore 25 3 4 4 Combination Keys 27 3 5 Application Backup and Restore 28 3 6 Registry Editor 30 3 7 TeamPad Explorer 32 3 8 Run a Program 35 3 9 Debug Mode 36 4 Basic Operations 37 4 ...

Page 5: ...ly as examples and apply to individual situations Keep in mind that the actual screens may differ The data in the entry examples is given purely as example and applies to individual situations Keep in mind that the actual data required for entry may differ Key notations Key Meaning PWR key Use this key to turn the power to the equipment on or off this key is called the power key in this document N...

Page 6: ...ow Notation Meaning Tap Similar to left tapping a mouse Denotes touching a point on the screen This is done to execute an operation Double tap Corresponds to double tapping a mouse Denotes double touching a point on the screen This is done to run a program When tapping the screen use your finger or a dedicated accessory stylus a pen for tapping Do not use a tool with a sharp edge in place of the d...

Page 7: ...n follow the steps in Equipment Startup see section 2 to initialize the equipment 1 4 Application Setup and Configuration Configure the equipment through the Setup Menu For details refer to Section 3 Follow the installation instructions provided by the application provider 1 5 Run Installed Applications Start the equipment to verify that the unit is properly configured The main battery is not char...

Page 8: ... ICL Systems Inc 8 of 47 2 Equipment Startup 2 1 Startup check To begin the startup procedure Hold down the ENT SYS key then press the 1 Key to Start the Touch panel calibration To stop the startup procedure Turn off the power by pressing the power key ...

Page 9: ...g When all the positions have been successfully tapped the target ceases to be displayed and the following message appears Press the ENT key to accept the new setting Press the ENT key to register the calibration data and terminate the function Proceed to Date and Time Settings Do not use an item with a sharp edge such as a pencil or ballpoint pen for tapping the screen as this may damage or break...

Page 10: ...he calendar to current year month and day Use either the arrow s next to the month and year to scroll to the desire month and year or tap on the month or year to change them 3 Current time Set the time based on a 24 hour clock After either selecting the hours minutes or seconds use the arrow keys or keyboard to change to the desire time 4 OK and Apply Button Register the date and time that you hav...

Page 11: ...ss The following Setup Menu is presented to the user for the equipment s configuration and software installation 3 1 Setup Menu 1 Configure the operating environment via the Control Panel For details refer to Section 3 2 2 Application Installation from a storage card For details refer to Section 3 3 3 TeamPad Configuration For details refer to Section 3 4 4 Application Backup and Restore For detai...

Page 12: ...ing memory and program running memory is to be increased or decreased For details refer to Section 3 2 1 2 Power management Automatic power off can be configured For details refer to Section 3 2 2 3 Display Properties Automatic backlight can be configured For details refer to Section 3 2 3 4 Date time Properties The date and time can be updated For details refer to Section 3 2 4 5 Input Panel Prop...

Page 13: ...the bar will automatically grow to the right as an application needs more memory the bar will never automatically move to the left if more storage area is needed The primary purpose of this function is to provide a method to guarantee a minimum amount of executable memory 2 OK Button Apply the new RAM area memory allocation and return to the Control Panel 3 X Button Cancel the RAM area memory allo...

Page 14: ...ry is used and the AC power is not connected It is set to three minutes at factory shipment 2 Enable suspend mode when an external power supply is used Specify whether automatic power OFF is to be executed when the AC adapter is connected or in the CIU or Vehicle Holder By checking box the automatic power OFF feature is activated The automatic power OFF feature is disabled at factory shipment 3 Id...

Page 15: ...he main battery is used when the AC adapter is not connected By pressing the the automatic backlight OFF feature is enabled The feature is enabled at factory shipment and configured for 1 minute 2 Turn off the backlight automatically when an external power supply is used Specify whether the automatic backlight OFF feature is to be activated when an AC adapter is connected or in the CIU or Vehicle ...

Page 16: ...endar to current year month and day Use either the arrow s next to the month and year to scroll to the desire month and year or tap on the month or year to change them 3 Current time Set the time based on a 24 hour clock After either selecting the hours minutes or seconds use the arrow keys or keyboard to change to the desire time 4 OK and Apply Button Register the date and time that you have set ...

Page 17: ...keyboard size double tap the Input Panel icon on the control panel and the following Screen will be displayed Both keyboards require the use of a stylist 1 Options button Change the Screen Input Panel keyboard size When tapped the following window will be displayed 2 OK button Register the Input Panel Changes and return to the Control Panel 3 X button Cancel the Input Panel process and return to t...

Page 18: ...s are pressed the SIP will be displayed with the larger keys 2 Small keys Radio Button Change the Screen Input Panel keyboard size to Small Keys When the SFT F5 keys are pressed the SIP will be displayed with the smaller keys 3 OK button Register the Input Panel Changes and return to the previous Window 4 X button Cancel the Input Panel process and return to the Previous Window ...

Page 19: ...ccur Select Storage Card1 if the application is to be loaded from a compact flash card located in the side of the unit Select Storage Card2 if the application is to be loaded from a Type II flash card located in the top of the unit For information regarding the CONFIG HHT process please refer to the TeamPad 500 Programmer s Reference Guide 1 Next Button Continue the Application Installation proces...

Page 20: ... a status box is displayed At completion a screen similar to the following will be displayed 1 Apply Button Finishes the Application Installation process and returns to the Setup Menu When installing an application program it s best to initialize the system to a known state See Section 3 4 1 for more details Important ...

Page 21: ...llows the user to configure the equipment back to default settings or to Initialize only certain settings Flash ROM or RAM To access this function press the Initialize tab 1 Select Type Of Initialize Select Initialize all setting to initialize ROM and RAM Select Initialize selected items to initialize only ROM or RAM Once this is selected you will then be able to select either ROM or RAM 2 Initial...

Page 22: ...wing display will appear if the Initialize was selected 1 Yes Button Initialize to default settings A progress bar will be displayed while the function is running and at completion will return to the previous Window 2 No Button Cancel the Initialize Process Return to the Previous Window ...

Page 23: ...can be defined to have a special meaning When the key is pressed the application defined to the function key is started The Launcher keys can be used to start additional functions without providing the end user access to the Task Bar 1 Edit Button Add or Modify a Launcher key Go to the next Window 2 Delete Button Deletes an existing Launcher key definition 3 OK button Return to the Setup Menu 4 X ...

Page 24: ...tart by either browsing to the program or the popup keyboard SFT F5 2 OK Button Accept the Launcher key definition When complete return to the previous Window 3 Browse Button Browse the system to locate an application to assign to the selected launcher key 4 Cancel Button Cancel the Launcher Edit key process Return to the previous Window ...

Page 25: ...tore To Backup or Restore the Registry press the Registry Tab after selecting 3 for TeamPad Configuration from the Setup Menu 1 Select BackUp or Restore box Continue the Backup or Restore Registry function Continue to the next Window 2 OK button Return to the Setup Menu 3 X button Return to the Setup Menu ...

Page 26: ...up or Restore Tab Select which process to perform 2 Browse Button Browse the system to locate destination of Backup or Restore File 3 OK Button Accept the Registry Backup or Restore file destination When complete return to the previous Window 4 X button Return to the previous Window ...

Page 27: ...es whether to perform an operation that is selected by pressing a combination of keys By pressing the the operation specified by the keys can be executed The following items can be specified Task bar display control SFT 00 BKS Battery Volume Calibration display control SFT ENT SYS Screen keyboard display control SYS F5 Integrated Printer Paper Feed SFT F1 2 OK button Return to the Setup Menu 3 X b...

Page 28: ...ation from one RAM Object Store based system to another clone an application To save or restore an application environment press 4 at the Setup Menu The following selection window will then open 1 Backup the Application radio button Perform a Backup operation if the OK box is pressed 2 Restore the Application radio button Perform a Restore operation if the OK box is pressed 3 Browse button Locate ...

Page 29: ...layed At completion the following screen is displayed 1 OK button Return to the Setup Menu 2 ENT Key Return to the Setup Menu On a restore operation instead of returning to the Setup Menu the equipment powers off On the next power on the application will restart The application is restored to the settings from the last backup operation Remember ...

Page 30: ...a file if desired These Registry update files can be automatically loaded during the Install process An individual registry update file must be created for each new key tree structure created Use extreme caution since accidental changes to the Registry could cause unpredictable results 1 Used to expand the sub keys 2 X button Close the Registry Editor and return to the Setup Menu 3 File Dropdown M...

Page 31: ...t or Import a Registry key 2 Create key value Create a registry key or modify an existing registry value 3 Delete Delete a Registry key 4 Register or Un register Register or Un register a DLL to the system 5 Version Display the version number of the Registry Editor 6 Close Close the Registry Editor ...

Page 32: ...der units Deleting files and folders Creating new folders Displaying the available memory Use extreme caution since accidental changes made by the Explorer could cause unpredictable results To start the TeamPad Explorer press 5 at the Setup Menu The following selection window will then open 1 Listing Folders and files are listed Double tap the folder name to display the folder list Double tap a fi...

Page 33: ...n Close the TeamPad Explorer and return to the Setup Menu File copy button Copies a selected file and folder in a specified list to the adjacent list File delete button Deletes a selected file and folder in a specified list Return button Displays the contents of a folder that is located one hierarchy level above a specified list New folder creation button Creates a new folder in a specified list ...

Page 34: ...elete Deletes a file in the selected Pane 3 Copy Copies a file in the selected Pane 4 Properties Displays the file properties of a selected file 5 Free Space Displays the available free space in the Object Store and Storage Card s 6 Version Displays the Version of the TeamPad Explorer 7 Exit Exit TeamPad Explorer Return to the Setup Menu ...

Page 35: ...n open You can drag the Screen by touching the display and moving in the direction you wish 1 Entry Box Enter the file name of the program to be run 2 Browse button Opens a file browser dialog box A program name can be selected from the dialog box 3 OK button Run the program whose file name was entered 4 Cancel button Cancel the Run program selection Return to the Setup Menu ...

Page 36: ... is active so you can enter the Start Menu When the debug mode is entered if an auto start application is defined it will be started and the Task Bar will be made accessible 1 Yes button Select this button to enter Debug Mode Unit will restart If a startup program is defined that program will launch otherwise equipment will go to the Windows CE desktop 2 No button Select this button to return to t...

Page 37: ...urned ON and OFF by holding the SFT key down and pressing the F2 key 4 2 Battery Status The equipment has a main and sub battery which charge automatically when either an AC adapter is connected or the unit is placed in a CIU or Vehicle Holder To check the Battery Status press and hold the SFT key down and then press the ENT SYS key The following Window will be displayed 1 Main Battery a Status Ex...

Page 38: ...he keyboard will start blinking red A very short time after the LED starts blinking the unit will automatically power off The battery must be charged or replaced in this case If the main battery is disconnected in a situation in which the sub battery is low on power the data stored in the memory may be lost If the sub battery must be replace make sure the main battery has sufficient power to hold ...

Page 39: ...key down press the ENT SYS key The following Volume and Battery panel will be displayed To adjust the Volume press the 1 key The sound volume can be adjusted to one of four levels Tap the desired sound volume level A sample sound will be emitted on the tap 1 OK button Register the Sound Volume Return to the Battery Status Window ...

Page 40: ...process to start The following calibration screen will open Follow the instructions on the screen Tap the target with a stylus as it moves from the center to the four corners of the screen If the system detects the touch too far from the target the calibration must be re done from the beginning When all the positions have been tapped the target ceases to be displayed and the following message appe...

Page 41: ...entering characters that are not available on the keypad use the Alpha Keyboard popup Hold down the SFT key and press the F5 key to open the screen keyboard It will open in the lower portion of the LCD display Tap the desired character To close the screen keyboard hold down the SFT key and press the F5 key ...

Page 42: ...ator s Guide for details on Main Battery replacement 1 X button Close the Low Main Battery Window When the battery is very low on power the LED just below the keyboard will start blinking red A very short time after the LED starts blinking the unit will automatically power off The battery must be charged or replaced in this case If the main battery is disconnected in a situation in which the sub b...

Page 43: ...ery and the Sub battery will slowly recharge If the unit has been in constant operations then the Sub battery should be checked to see if it is disconnected and if not it should be replaced 1 X button Close the Low Sub Battery Window When the battery is very low on power the LED just below the keyboard will start blinking red A very short time after the LED starts blinking the unit will automatica...

Page 44: ...Note that files that were copied to their location via Explorer are not restored The state of the unit is returned to that at Install time The Restore process starts up automatically when data is erased in memory because of a dead battery When the unit is restarted powered on the following Window will be displayed To begin the restore procedure Hold down the ENT SYS key then press the 1 Key to sta...

Page 45: ...ginning When all the positions have been tapped the target ceases to be displayed and the following message appears Press the ENT key to accept the new setting Press the ENT key to register the calibration data and terminate the function Proceed to Date and Time Settings Do not use an item with a sharp edge such as a pencil or ballpoint pen for tapping the screen as this may damage or break the sc...

Page 46: ...then select one 2 Calendar Switch the calendar to current year month and day Use either the arrow s next to the month and year to scroll to the desire month and year or tap on the month or year to change them 3 Current time Set the time based on a 24 hour clock After either selecting the hours minutes or seconds use the arrow keys or keyboard to change to the desire time 4 OK and Apply Button Regi...

Page 47: ...re install the application from scratch 1 Restore the Application When restore is complete an end of operation message is displayed and the equipment will re start and run the configured Startup Program 2 Re install the Application When restore is complete an end of operation message is displayed and the equipment will re start and run the Setup Menu and Configuration procedure For details see Sec...

Reviews: