


230
Upgrade and Maintenance Manual
RX2530 M4
Expansion cards and backup units
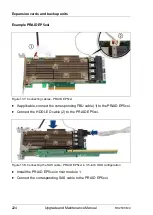
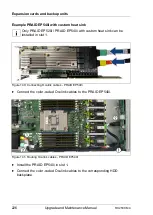
Figure 148: Example - Retimer controllers in riser module 2 and 3
Ê
Connect the VPP cable from the first Retimer controller in riser module 2 to
connector "VPP CPU1" on the system board.
Ê
Connect the color-coded Oculink cables to the corresponding HDD
backplane (see section
"Replacing a 10x 2.5-inch HDD backplane" on
).
9.5.1.4
Concluding steps
Ê
Install the corresponding riser module, see section
.
Ê
Ê
"Connecting the power cord" on page 63
Ê
"Switching on the server" on page 66
Ê
If applicable, update the system information of your server using the Chassis
ID Prom Tool, see section
"Using the Chassis ID Prom Tool" on page 103
.
Select the corresponding system name (for example "at EP5x0i").
Ê
"Updating expansion card firmware" on page 85
Ê
"Enabling Option ROM scan" on page 86
Ê
Summary of Contents for PRIMERGY RX2530 M4
Page 22: ...Upgrade and Maintenance Manual RX2530 M4 Contents ...
Page 34: ...34 Upgrade and Maintenance Manual RX2530 M4 Before you start ...
Page 108: ...108 Upgrade and Maintenance Manual RX2530 M4 Basic software procedures ...
Page 128: ...128 Upgrade and Maintenance Manual RX2530 M4 Power supply unit PSU ...
Page 192: ...192 Upgrade and Maintenance Manual RX2530 M4 Hard disk drive HDD solid state drive SSD ...
Page 200: ...200 Upgrade and Maintenance Manual RX2530 M4 Fans ...
Page 358: ...358 Upgrade and Maintenance Manual RX2530 M4 Front panel ...
Page 436: ...436 Upgrade and Maintenance Manual RX2530 M4 Appendix A ...
Page 438: ...438 Upgrade and Maintenance Manual RX2530 M4 Appendix B ...
Page 465: ...List of all used screws for PRIMERGY Servers Assembled in Germany and Japan January 2017 ...