


300
Upgrade and Maintenance Manual
RX2530 M4
Processor (CPU)
2. Loosen the captive screws 4 and then 3 rotating them two or three turns
each.
3. Repeat the step 2 until the screws 4 and 3 are completely loosened.
4. Loosen the captive screws 2 and then 1 rotating them two or three turns
each.
5. Repeat the step 4 until the screws 2 and 1 are completely loosened.
Ê
Lift the heat sink together with the CPU frame out of the chassis.
V
CAUTION!
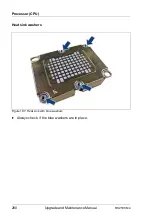
Pay special attention not to damage any system board components
surrounding the CPU socket.
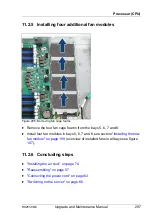
11.3.3 Removing the CPU
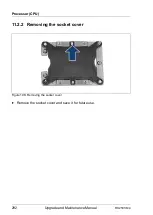
Figure 207: Removing the CPU frame
Ê
Release the four hooks (see circles).
Ê
Carefully twist the CPU back and forth to detach the CPU frame from the
heat sink (see arrows).
I
This may be necessary due to the adhesive quality of the thermal
paste located between the heat sink and CPU.
Summary of Contents for PRIMERGY RX2530 M4
Page 22: ...Upgrade and Maintenance Manual RX2530 M4 Contents ...
Page 34: ...34 Upgrade and Maintenance Manual RX2530 M4 Before you start ...
Page 108: ...108 Upgrade and Maintenance Manual RX2530 M4 Basic software procedures ...
Page 128: ...128 Upgrade and Maintenance Manual RX2530 M4 Power supply unit PSU ...
Page 192: ...192 Upgrade and Maintenance Manual RX2530 M4 Hard disk drive HDD solid state drive SSD ...
Page 200: ...200 Upgrade and Maintenance Manual RX2530 M4 Fans ...
Page 358: ...358 Upgrade and Maintenance Manual RX2530 M4 Front panel ...
Page 436: ...436 Upgrade and Maintenance Manual RX2530 M4 Appendix A ...
Page 438: ...438 Upgrade and Maintenance Manual RX2530 M4 Appendix B ...
Page 465: ...List of all used screws for PRIMERGY Servers Assembled in Germany and Japan January 2017 ...