background image

System expansions for rack server

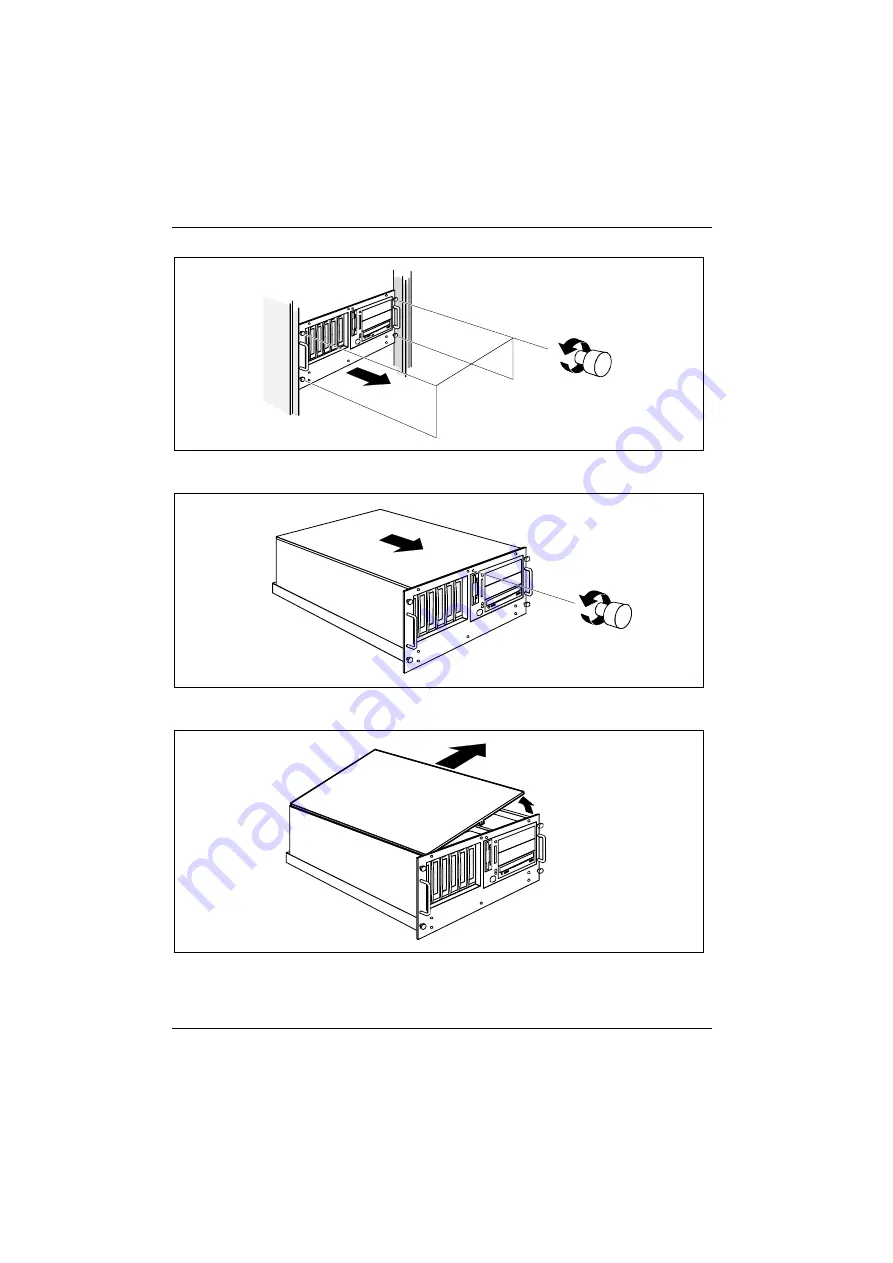
Opening the server

68

A26361-K632-Z100-1-7619

1

2

Ê 

Release the four knurled screws (1) and withdraw the server from the rack as far as it will go
(2). The slide stops of the extending rails left and right must engage.

1

2

Ê 

Remove the knurled screw behind the front panel (1) and push the cover forward as far as
possible (2).

1

2

Ê 

Lift the cover on the right-hand side (1) and remove it (2).

Summary of Contents for PRIMERGY 200

Page 1: ...SERVER SERVER SERVER SERVER PRIMERGY 400 200 PRIMERGY 400 200 PRIMERGY 400 200 PRIMERGY 400 200 SERVER SYSTEMS OPERATING MANUAL OPERATING MANUAL OPERATING MANUAL OPERATING MANUAL ...

Page 2: ... our service partners your sales partner your sales outlet The addresses of your service partners are contained in the guarantee booklet or in the service address booklet The latest information on our products tips updates etc can be found on the Internet under http www fujitsu siemens com ...

Page 3: ......

Page 4: ...o stampato su carta da riciclaggio Denna handbok är tryckt på recyclingpapper Dit handboek werd op recycling papier gedrukt Herausgegeben von Published by Fujitsu Siemens Computers GmbH Bestell Nr Order No A26361 K632 Z100 1 7619 A26361 K632 Z100 1 7619 A26361 K632 Z100 1 7619 A26361 K632 Z100 1 7619 Printed in the Federal Republic of Germany AG 0400 04 00 A26361 K632 Z100 1 7619 PRIMERGY 400 200 ...

Page 5: ...ntroduction Important notes Installation Preparation for use and operation Property and data protection Troubleshooting and tips System expansions for tower server System expansions for rack server Technical data Index April 2000 edition ...

Page 6: ...eferenced are trademarks or registered trademarks of their respective owners whose protected rights are acknowledged Copyright ã Fujitsu Siemens Computers GmbH 2000 All rights including rights of translation reproduction by printing copying or similar methods even of parts are reserved Offenders will be liable for damages All rights including rights created by patent grant or registration of a uti...

Page 7: ...er to the line voltage 25 Preparation for use and operation 27 Unlocking tower server 27 Controls and indicators 29 Switching the server on and off 31 Configuring the server and installing the operating system 33 ServerStart 33 Locking tower server 34 Service compartment in tower server 35 Cleaning the server 35 Property and data protection 37 BIOS Setup security functions 37 Troubleshooting and t...

Page 8: ...essible 5 inch drive 55 Removing an accessible 5 inch drive 57 Changing the floppy disk drive 58 Boards 58 Installing a board 59 Removing a board 60 Power supply module 60 Installing the power supply module 61 Removing the power supply module 63 Exchanging the fan 65 Extensions on the system board 66 System expansions for rack server 67 Opening the server 67 Assembling the server 69 Accessible dri...

Page 9: ...h rack Rack Server in the manual for the monitor in the manual for the ServerView server management in the manual for the Remote Test and Diagnosis System RemoteView in the documentation for the boards and drives in the documentation of your operating system in the information files of your operating system Features System board System boards with various features are available for the PRIMERGY 40...

Page 10: ... thus enabling early detection of overload situations and appropriate counter measures ServerView enables the management of all PRIMERGY servers in the network via a central console Here ServerView supports the following functions Temperature monitoring of the CPU and the surrounding area Timer controlled switch on Timer Remote switch on Ring Indicator Watchdog timer for Automatic Server Reconfigu...

Page 11: ...ith this symbol Failure to observe this warning endangers your life destroys the system or may lead to loss of data i Supplementary information remarks and tips follow this symbol Ê Texts which follow this symbol describe activities that must be performed in the order shown Texts in italics indicate commands or menu items Quotation marks indicate names of chapters and terms that are being emphasiz...

Page 12: ......

Page 13: ...ll as the instructions in the chapter Installation The ON OFF switch and the main switch do not disconnect the server from the line voltage To disconnect the line voltage completely remove the power plug from the grounded power outlet When cleaning the Server observe the relevant notes in the chapter Preparation for use and operation When connecting and disconnecting cables observe the relevant no...

Page 14: ...ouching a grounded object before working The equipment and tools you use must be free of static charges Pull out the power plug before inserting or pulling out boards containing ESDs Always hold boards with ESDs by their edges Never touch pins or conductors on boards fitted with ESDs Manufacturer s notes CE certificate The shipped version of this device complies with the requirements of the EEC di...

Page 15: ...ccur in a particular installation If this equipment does cause harmful interference to radio or television reception which can be determined by turning the equipment off and on the user is encouraged to try to correct the interference by one or more of the following measures Reorient or relocate the receiving antenna Increase the separation between equipment and the receiver Connect the equipment ...

Page 16: ...ith a maximum length of 15 feet For units that stand on a desk or table type SVT or SJT cord sets shall be used For units that stand on floor only SJT type cord sets shall be used The cord set must be selected according to the current rating for your unit Please consult Table A for the selection criteria for power cords used in the United States and Canada Table A Cord Type Size of Conductors in C...

Page 17: ...supply cord and fit a suitable plug WARNING THIS APPLIANCE MUST BE EARTHED IMPORTANT The wires in this mains lead are colored in accordance with the following code Green and Yellow Earth Blue Neutral Brown Live As the colors of the wires in the mains lead of this appliance may not correspond with the colored markings identifying the terminals in your plug proceed as follows The wire which is color...

Page 18: ...table manner Do not throw lithium batteries or accumulators into the trashcan They must be disposed of in accordance with local regulations concerning special waste If you have any questions on disposal please contact your local office our customer service center or Fujitsu Siemens Computers GmbH Recyclingcenter D 33106 Paderborn Tel 49 5251 818010 Fax 49 5251 818015 Transporting the server Transp...

Page 19: ...ier immediately Instructions on connecting and disconnecting cables Be sure to read the documentation on the external devices before connecting them Do not connect or disconnect cables during a thunderstorm Always take hold of the actual plug body Never unplug a cable by pulling the cable itself Connect and disconnect the cables in the order described below Connecting cables Turn off all power and...

Page 20: ... data Protect it from dust humidity and heat There must be a clearance of at least 200 mm in front of and behind the server to ensure adequate ventilation Do not cover the ventilation areas of the monitor and the server Prepare the keyboard Ê Plug the appropriate connector of the keyboard cable into the socket on the underside of the keyboard as shown in the illustration above ...

Page 21: ...port 4 Parallel port 5 Serial port 2 6 PS 2 mouse port 7 CAN bus port 8 Slots for additional ports 9 Slots for additional ports Ê Connect the data cables at the server and peripherals i Some of the devices that you connect require special drivers see the documentation for the connected device If a separate graphics card is used in a slot then the graphics controller on the system board is automati...

Page 22: ... Manual for the monitor Connecting the server to the line voltage The server can be equipped with a permanently installed power supply standard or with a plug in power supply hot plug consisting of one or two modules With two power supply modules the server is equipped with a redundant power supply If a defect occurs in one module the respective other module ensures unimpaired further operation Th...

Page 23: ...361 K632 Z100 1 7619 15 230 115 a Ê If the wrong line voltage range is set lift out the plug in unit with a screwdriver a turn it and replace it 1 2 Ê Connect the power cable to the server s power connector 1 and to a free grounded power outlet 2 ...

Page 24: ...A server may only be equipped with one type of power supply module Mixed equipping will cause the modules to be destroyed 1 2 a 1 2 a a yellow and green status indicator Ê Connect each power supply module to a grounded power outlet with the power cable supplied 1 2 The yellow status indicator glows when line voltage is connected to the power supply module The green status indicator glows when the ...

Page 25: ...e Routing cables Fit assembly kit and rack mount the server Ê Using the mounting aid stencil mark the position of the attachment points on the support upright of the server Refer to the information on the mounting aid The server requires five height units i One height unit corresponds to 4 445 cm and is defined by the hole sequence on the support upright round hole oblong hole round hole The oblon...

Page 26: ...g units with the beveled corners a must face toward the front Ê Screw the hooked in extending units into the rack 1 with the No 5 allen key provided Please note that the guide nubs of the extending rails next to the spring nuts must fit into the holes in the support uprights Ê Pull out the mounted extending units completely a 1 b Ê Press the locking spring a at the back of the pulled out extending...

Page 27: ...619 19 1 Ê Screw the two inner rails onto the server at the left and right with four countersunk screws 1 1 a Ê Insert the server with the mounted inner rails into the extending rails of the extending unit 1 until the locking spring a of both inner rails engages ...

Page 28: ...ation Installing the rack server 20 A26361 K632 Z100 1 7619 2 1 Ê Press the locking spring 1 on both sides and push the server into the rack 2 1 Ê Secure the server in the rack 1 using the four knurled screws ...

Page 29: ...unting the cable routing using a cable chain proceed as follows 1 2 2 2 a Ê Lay the cables inside 1 and outside 2 in die cable chain Make sure that sufficient cable length is available for each cable on the slide in module side for connection to the server Ê Secure the cables on the cable chain termination a with cable ties Ê Route the cable chain equipped with the cables into the cable tray i Whe...

Page 30: ...Installation Installing the rack server 22 A26361 K632 Z100 1 7619 1 Ê Insert two spring nuts in the rear right mounting rail at the level of the cable tray and screw the rack angle piece onto these 1 ...

Page 31: ...ed in again easily Limited cable routing When operating in the single ended SCSI mode the maximum cable length for external SCSI cables of 1 50 m or 1 80 m limits the way you can lay cables in the rack Therefore the SCSI cables cannot be routed in the cable chain Ê With limited cable routing lay the cables loose in the slide in module bottom tray When pulling the slide in module make sure that the...

Page 32: ...f a separate graphics card is used in a slot then the graphics controller on the system board is automatically deactivated The related monitor port 1 cannot be used Instead connect the data cable of the monitor or of the channel switch to the monitor connection of the graphics card Ê Mark the lines so that you can always identify them For a server with default power supply you may only plug the mo...

Page 33: ...aced during operation Standard power supply The power supply of the server can be set to the following line voltage range 100 V to 125 V or 200 V to 240 V Before connecting the server to the line voltage you must always check that the line voltage range set on the server corresponds to the local line voltage The marker arrow on the plug in unit points to the voltage range set 100 V 125 V 200 V 240...

Page 34: ...ne type of power supply module Mixed equipping will cause the modules to be destroyed 2 a 1 2 a 1 a yellow and green status indicator Ê Connect each power supply module to a free electrical outlet of the multi outlet assembly in the rack 1 2 with the power cable provided see technical manual for rack The yellow status indicator glows when line voltage is connected to the power supply module The gr...

Page 35: ... 3 2b 2a 2 Ê Unlock the lock with the key 1 The door remains engaged Ê If you only require access to the ON OFF switch and the operable drives then pull the drive cover somewhat forward by the handle 2a and then push it downward 2b The key can be left in the lock Ê If you require access to the hard disk drive plug in modules of the server then open the door 3 ...

Page 36: ...361 K632 Z100 1 7619 It is also possible to open the drive cover however keep the door locked Proceed as follows Ê Unlock the lock 1 2 3 Ê Pull the lower section of the drive cover forward by the handle 1 Ê Lock the lock again 2 Ê Slide the drive cover downwards 3 ...

Page 37: ...ntrols and indicators 1 2 7 4 8 6 5 3 Tower server 1 Indicator CD ROM drive active 2 Indicator SCSI bus active 3 Power on indicator 4 ON OFF switch 5 Indicator chipcard reader active 6 Indicator floppy disk drive active 7 Indicator hard disk drive active 8 Indicator hard disk drive error ...

Page 38: ...100 1 7619 1 2 3 4 6 5 8 7 Rack server 1 Indicator hard disk drive error 2 Indicator hard disk drive active 3 Indicator floppy disk drive active 4 Indicator chipcard reader active 5 Indicator SCSI bus active 6 Power on indicator 7 Indicator CD ROM drive active 8 ON OFF switch ...

Page 39: ...a rebuild is carried out by the DAC after changing a hard disk drive Indicator CD ROM drive active The indicator lights up when the CD ROM drive is accessed Indicator floppy disk drive active The indicator lights up when the floppy disk drive is being accessed Indicator chipcard reader active optional lights up when the chipcard reader is being accessed Switching the server on and off If after swi...

Page 40: ...he screen socket on the server is dead Server is ready for operation stand by state The main switch a is in position 1 and the power on indicator c glows orange or does not light P270 The server can be switched on with the ON OFF switch b or a signal The screen socket on the server is live Server is switched on The main switch a is in position 1 and the power on indicator c lights up green The ser...

Page 41: ...ll the operating system in a convenient manner The menu guided configuration includes server configuration with SCU ISA configuration with ICU and the disk array controller configuration with DACCF To find out how to operate ServerStart and for further information see the corresponding CD booklet i Note on SCSI ID Please note that the SCSI IDs of the hard disk drives are permanently specified in t...

Page 42: ...Preparation for use and operation Locking tower server 34 A26361 K632 Z100 1 7619 Locking tower server 3 2 2 1 Ê Close the drive cover 1 and or the door of the server 2 Ê Turn the key counterclockwise 3 ...

Page 43: ...nd pull the power plug out of the grounded contact power socket Do not clean any interior parts yourself leave this job to a service technician Do not use any cleaning agents that contain abrasives or may corrode plastic Ensure that no liquid enters the system Ensure that the ventilation areas of the server and the monitor are free Wipe the server and monitor casing with a dry cloth If particularl...

Page 44: ......

Page 45: ...an suppress the Press F2 for Setup message in the Security menu This message is then no longer displayed while the server s startup routine is in progress Preventing unauthorized system access You can activate this protection by setting a system password in the Security menu Preventing unauthorized access to the settings of boards with their own BIOS You can activate this protection by selecting t...

Page 46: ......

Page 47: ... Switch the server off Ê Contact your customer service center Power on indicator remains dark after you have switched on your device Power cord incorrectly connected Ê Make sure that the power cable is correctly connected to the server and to the grounded power outlet Power supply overloaded Ê Pull the power plug of the server out of the power outlet Ê Wait a few seconds and plug the power plug in...

Page 48: ...erver immediately Monitor does not support the set horizontal frequency Ê Find out which horizontal frequency your monitor screen supports You will find the horizontal frequency also known as line frequency or horizontal deflection frequency in the documentation of your monitor Ê Refer to the documentation for your operating system or the corresponding driver software for the screen controller for...

Page 49: ...he entry for the floppy disk drive Ê Check in the BIOS Setup whether the diskette drive controller and write permission are enabled see the Technical Manual for the system board Ê Check that the cables of the floppy disk drive are properly connected refer to chapter System expansions for tower server Time and or date is not correct Ê Set the time and or date in the operating system or in the BIOS ...

Page 50: ...oller Added drive is reported as defective This error message may occur when the server has a disk array controller Disk Array Controller is not configured for this hard disk drive The drive was probably installed with the system switched off Ê Reconfigure the disk array controller for the hard disk drive Information is contained in the documentation on the disk array controller or Ê Re install th...

Page 51: ...find an overview and a brief description of the installed system boards on the left hand housing side cover of the server A detailed description of the system board is provided in the corresponding Technical Manual Opening the server Please take note of the safety information in the chapter Important notes Ê Switch the server off Pull all power plugs out of the power outlets If you want to fully o...

Page 52: ...rew 1 and push the side cover forward as far as it will go 2 1 2 Ê Fold out the housing side cover in the direction of the arrow 1 and remove it 2 Ê If you wish to install or remove an accessible drive in the center or upper slot then also remove the right hand housing side cover in the same manner However remove the door beforehand ...

Page 53: ...or completely 1 Ê Lift the door slightly 2 and remove it to the front 3 Removing control panel trim plate To install or remove an accessible drive first remove the control panel trim plate 1 2 1 2 1 2 3 Ê Press down the two retaining clips of the control panel trim plate 1 and fold out the control panel trim plate forward 2 3 ...

Page 54: ...ccessible drives you must refit the control panel trim plate 1 2 Ê Mount the control panel trim plate as shown 1 2 The retaining clips of the control panel trim plate must engage in the front of the housing Mounting door Ê Before mounting the door remount the right hand side cover if it has been removed see Mounting side cover 1 2 2 1 Ê Replace the door as shown above 1 2 ...

Page 55: ... bottom of the server 1 push it forward as far as possible 2 and fold it up onto the server 3 1 2 1 2 Ê Push the side cover to the back as far as the stop 1 Ê Screw the housing side cover into place with the knurled screws removed previously 2 Ê If you have also removed the right hand side cover replace it by following the same procedure Ê Plug in at the mains ...

Page 56: ...ed several prefabricated stickers with the storage capacities are provided with the server Each hard disk slide in module should bear a sticker indicating its capacity on the front Should no suitable sticker be available blank stickers for labeling are also provided The stickers are color coded for easier identification If you want to swap several defective SCSI hard disk drives during operation p...

Page 57: ... right on the blank insert together 1 until the detent is released and pull the blank insert out of the bay 2 Keep the blank insert for future use If the hard disk drive is removed again and not replaced with a new drive then the blank insert must be reinstalled due to cooling the applicable EMC regulations regulations on electromagnetic compatibility and fire protection 1 2 2 1 Ê Push the hard di...

Page 58: ...he hard disk carrier out of the installation bay 2 If a hard disk drive has been removed and no new drive is installed in its place then a blank insert must be installed in the empty bay 2 1 1 Ê Press the two tabs at the left and right on the blank insert together somewhat 1 and insert the blank insert in the empty bay 2 Make sure that the blank insert engages properly in the bay ...

Page 59: ...tware is available as an option for using RemoteView on the server The RemoteView chipdisk is equipped with an IDE interface and is installed in the server mounted on the ventilation plate Installing a RemoteView chipdisk Ê Remove the left hand side cover see Opening the server 1 1 2 2b 2a 2c Ê Unscrew the ventilation plate 1 and remove it 2 ...

Page 60: ...lation plate from below 1 2 1 2 1a 2 1b 1c Ê Insert the ventilation plate with the chipdisk mounted on it in the server 1 and screw it in place 2 Ê Connect the data line to the hard disk drive and to the IDE interface of the system board see Technical Manual of the system board Ê Connect a free power line to the chipdisk ...

Page 61: ...n the BIOS Setup manual Ê Save the setting and terminateBIOS Setup The server boots MS DOS and RemoteView from the chipdisk i If the RemoteView software is not yet installed on the chipdisk install the software as described in the manual for RemoteView Ê To terminate RemoteView use the menu item Boot Original OS The server boots the standard operating system How to operate RemoteView is described ...

Page 62: ... chipdisk 54 A26361 K632 Z100 1 7619 1 2 Ê Unscrew the chipdisk from the ventilation plate 1 1 2 1a 2 1b 1c Ê Insert the ventilation plate in the server again 1 and screw it into place 2 Ê Replace the left hand side cover see Assembling the server ...

Page 63: ...rive fitted by default is connected at the end of the SCSI cable the termination is enabled Ê Please read the drive documentation Ê Assign an as yet unassigned SCSI ID to the new drive and disable the terminating resistor Installing an accessible 5 inch drive Ê Remove the control panel trim plate the left hand side cover and it you wish to install an accessible drive in the upper or middle bay als...

Page 64: ...ting points are shown as filled in circles or ovals Ê If you install a half height drive then push it into the bay 1 and secure it on both sides with two screws each 2 Ê If you install a DLT drive then place it on the carrier plate provided a push it with the plate into the center and upper bay 1 and secure it on both sides with two screws each 2 i The accessible 5 inch drive in the bottom bay is ...

Page 65: ... and if you wish to install an accessible drive in the upper or center bay also the right hand side cover see Opening the server Ê Pull the cables from the drive 1 2 1 1 2 Ê Remove the four screws 1 and withdraw the drive from the bay 2 2 1 Ê Place an EMC insert in the empty bay 1 and a plastic cover in the control panel trim plate 2 Ê Close the server see Assembling the server ...

Page 66: ...1 2 Ê Remove the four knurled screws 1 and withdraw the floppy disk drive from the drive carrier 2 1 2 Ê Push the new floppy disk drive into the bay 1 and secure it with the screws 2 you removed earlier Ê Connect the cables to the floppy disk drive again Ê Remount the control panel trim plate and the left hand side cover see Assembling the server Boards Before installing or removing a board please...

Page 67: ...For cooling protection against fire and in orde to comply with EMC regulations you must refit the rear slot cover plate if you remove the board 2 a 1 2 1 Ê Insert the board in the required slot on the system board and push it carefully into place 1 Make sure that the rear slot cover plate of the board is positioned in the groove a Ê Insert the clips for securing the board as shown 2 Ensure that th...

Page 68: ...e sure that the rear slot cover plate is positioned in the groove a Ê Insert the clips for securing the rear slot cover plate as shown 2 Ensure that the clip engages in the casing Ê Replace the left hand side cover see Assembling the server Power supply module The servers with a modular hot plug power supply can be equipped with one or two power supply modules With two power supply modules the ser...

Page 69: ...ion side see following illustration Both versions automatically adjust to the proper voltage range A server may only be equipped with one type of power supply module Mixed equipping will cause the modules to be destroyed Installing the power supply module 1 2 3 1 3 2 Ê Unscrew the screws on the lock of the blind insert 1 slide the latch upward somewhat 2 and take out the blind insert 3 ...

Page 70: ...100 1 7619 1 1 4 3 2 1 1 2 3 4 Ê Slide the latch on the power supply module upward somewhat 1 and insert the power supply module in the installation bay 2 Ê Lock the power supply module in place with the latch in the casing 3 and screw the latch in place in this position 4 ...

Page 71: ... tower server A26361 K632 Z100 1 7619 63 Removing the power supply module 3 3 1 2 1 2 Ê Unscrew the screw on the lock of the power supply module 1 slide the latch upward somewhat 2 and pull the power supply module out of the installation bay 3 ...

Page 72: ... A26361 K632 Z100 1 7619 3 1 2 1 3 2 Ê Slide the locking slide on the blind insert upward somewhat and insert the blind insert in the installation bay 1 Ê Secure the blind insert with the locking slide in the housing 2 and screw it in place in this position 3 ...

Page 73: ...eft hand side cover see Opening the server 1 1 2 1 2 2 3 4 Ê Pull the connecting cable off the fan 1 press on the retaining clips 2 and take out the fan to the side 3 4 1 1 2 1 2 2 3 Ê Place the new fan in the bay 1 When doing so make sure the fan retaining clips engage properly 2 Ê Connect the cable to the fan 3 Ê Replace the left hand side cover see Assembling the server ...

Page 74: ...processor or make certain settings are provided in the Technical Manual of the system board Ê Remove the left hand side cover see Opening the server Ê Remove the ventilation plate see RemoteView chipdisk Ê Make the desired expansions or settings see the Technical Manual for the system board Ê Install the ventilation plate again see RemoteView chipdisk Ê Replace the left hand side cover see Assembl...

Page 75: ...moteView hard disk drive Installing and removing boards Exchanging the fan Installing extensions on the system board Installing and removing the power supply module i You will find an overview and a brief description of the installed system boards in the server lid A detailed description of the system board is provided in the corresponding Technica Manual Opening the server Please take note of the...

Page 76: ...urled screws 1 and withdraw the server from the rack as far as it will go 2 The slide stops of the extending rails left and right must engage 1 2 Ê Remove the knurled screw behind the front panel 1 and push the cover forward as far as possible 2 1 2 Ê Lift the cover on the right hand side 1 and remove it 2 ...

Page 77: ...e front panel firmly downward 1 fold out the control panel trim plate 2 and remove it 3 Assembling the server If you have inserted or removed an accessible drive you must refit the control panel trim plate 1 2 Ê If you have installed an accessible drive then remove the corresponding plastic trim plate from the control panel trim plate 1 Ê If you have removed an accessible drive then remount the co...

Page 78: ...e that the retaining clips of the control panel trim plate engage in the front panel 3 1 2 Ê Insert the cover in the casing on the left hand side 1 slide it forward as far as possible 2 and fold it onto the casing at the right 3 1 2 Ê Slide the cover back as far as possible 1 and screw it in place with the knurled screw behind the front panel 2 ...

Page 79: ...s and push the server back into the rack 2 1 Ê Secure the server in the rack 1 using the four knurled screws Ê If the cables of the server are laid in a limited cable guide place the SCSI cables back in the cable guides see Mounting cable guides and routing cables section Installing the rack server Ê Plug in the power plug again ...

Page 80: ... is assigned a unique SCSI ID 0 6 and that the matching resistor terminator is only connected and enabled on the drive at the end of the SCSI cable As the CD ROM drive fitted by default is connected at the end of the SCSI cable the termination is enabled Ê Read the documentation supplied with the drive and make the required settings SCSI ID termination at the drive Installing an accessible 5 inch ...

Page 81: ... from the side The respective mounting points are shown as filled in circles or ovals Ê If you install a half height drive then remove the EMC cover from the corresponding bay 1 insert the drive in this bay 2 and secure it on both sides of the drive cage with two screws 3 Ê If you install a DLT drive then remove the EMC covers from the two upper bays 1 insert the drive on the carrier plate provide...

Page 82: ...e server 1 and fasten it using the screws you removed earlier 2 Ê Connect the cables to the drives Ê Close the server see Assembling the server Removing an accessible 5 inch drive Ê Open the server see Opening the server Ê Pull the cables from the drives 1 2 Ê Remove the four screws 1 and withdraw the drive cage 2 ...

Page 83: ...emove the four screws 1 and withdraw the drive from the drive cage 2 Ê Insert an EMC cover 3 2 1 Ê Insert the drive cage into the server 1 and fasten it using the screws you removed earlier 2 Ê Connect the cables to the remaining floppy disk drive Ê Close the server see Assembling the server ...

Page 84: ...Opening the server Ê Disconnect the cables from the floppy disk drive 1 2 Ê Remove the two screws 1 and withdraw the floppy disk drive from the bay 2 2 1 Ê Push the new floppy disk drive into the bay 1 and secure it with the two screws 2 Ê Connect the cables to the floppy disk drive again Ê Close the server see Assembling the server ...

Page 85: ...0 V 240 V 1 5 A Protection class I Regulations complied with EN 60950 VDE 0805 UL 1950 CSA 22 2 No 950 Dimensions of tower server including door and feet Width Depth Height Weight 288 mm 685 mm 480 mm approx 18 35 kg Dimensions of rack server including rails and installed in rack Width Depth Height Weight 483 mm 754 mm 266 mm approx 18 35 kg Environmental conditions Environment class 3K2 Environme...

Page 86: ......

Page 87: ...2 BIOS protecting boards with own BIOS 37 Blank insert inserting 50 removing 49 Board 58 installing 59 removing 60 safety 6 C Cable connecting 11 disconnecting 11 Cable laying limited 23 Cable routing unlimited 21 with cable chain 21 CD ROM drive indicator 31 installing 55 72 removing 57 74 CE certificate 6 Chipcard reader indicator 31 Chipdisk 51 installing 51 removing 53 Class A Compliance State...

Page 88: ...13 24 interface 13 Dimensions 77 Disk Array Controller 1 48 Display cleaning 35 Disposal and recycling 10 DLT drive installing 55 72 Door mounting 46 removing 45 Drive changing floppy disk drive 58 76 defective 42 indicator 31 installing accessible 5 1 4 inch drive 55 72 installing SCSI hard disk drive 48 removing accessible 5 1 4 inch drive 57 74 removing SCSI hard disk drive 48 reported as dead ...

Page 89: ...tem board 66 External devices connecting 13 ports 13 F Fan exchanging 65 FCC statement 7 Features 1 Flickering stripes on the monitor screen 40 Floppy disk drive changing 58 76 indicator 31 write protection 37 Floppy disk cannot be read or written 41 Further information 1 G General information 1 Guarantee coupon booklet 11 H Hard disk drive indicator 31 installing 48 removing 48 Hard disk subsyste...

Page 90: ...7 RemoteView chipdisk 51 tower server 12 Interfaces 13 24 ISA configuration 33 Italics 3 K Keyboard cleaning 35 connecting 12 keyboard port 13 L LED 29 Limited cable routing 23 Line voltage range 25 Lithium battery changing 66 Locking server 34 M Main memory upgrading 66 Main switch 31 Memory scrubbing 2 Message error 42 Modular power supply 16 26 Monitor connecting to power voltage 14 drifting di...

Page 91: ... and slots 24 server 1 P Packing material 11 Parallel port 13 PDA technology 2 Ports 13 24 Power cord selection 8 Power supply hot plug 26 modular 16 26 redundant 25 standard 14 25 Power supply module 60 installing 61 removing 63 Power voltage connecting to 14 25 Power on preventing 37 Power on indicator 31 doesn t fail to light 39 Processor upgrading 66 Property protection 37 Protection theft 37 ...

Page 92: ...3 RemoteView chipdisk 53 SCSI hard disk drive 50 RTDS 2 S Safety 5 board 6 SCA interface 1 48 SCO UNIX 33 Screen flickering 40 SCSI hard disk drive installing 48 49 removing 48 50 SCSI ID accessible drives 55 72 SCU 33 Security function BIOS Setup 37 Security measures 37 Security standards 77 Select power cord 8 Serial port 13 Server opening 43 switches itself off 39 Server management 2 ServerStar...

Page 93: ...lling 12 locking 34 service compartment 35 system expansions 43 unlocking 27 Transport 10 Trouble drive defect 42 drive reported as dead 42 flickering screen 40 floppy disk cannot be read written 41 message on the screen 42 no mouse pointer 41 screen 39 screen display drifts 40 server 39 server switches itself off 39 system does not boot 41 Troubleshooting and tips 39 U Ultra Wide SCSI controller ...

Page 94: ...tsu com Copyright Fujitsu Technology Solutions 2009 Hinweise zum vorliegenden Dokument Zum 1 April 2009 ist Fujitsu Siemens Computers in den alleinigen Besitz von Fujitsu übergegangen Diese neue Tochtergesellschaft von Fujitsu trägt seit dem den Namen Fujitsu Technology Solutions Das vorliegende Dokument aus dem Dokumentenarchiv bezieht sich auf eine bereits vor längerer Zeit freigegebene oder nic...

Reviews: