


42
L i f e B o o k P 5 0 0 0 N o t e b o o k – S e c t i o n F o u r
Memory Upgrade
Module
Your LifeBook notebook comes with 256MB or 512MB
of in-slot high speed Double Data Rate (DDR) Synchro-
nous Dynamic RAM (SDRAM) factory installed. To
increase your LifeBook notebook’s memory capacity,
you may install a larger memory upgrade module.
If you have 256MB pre-installed, and you would like to
increase it to 512MB, you will need to remove the 256MB
module and replace it with a 512MB module. The
memory upgrade must be a dual-in-line (DIMM)
SDRAM module. To ensure 100% compatibility,
purchase the memory module only from the Fujitsu web
store at www.fujitsupc.com.
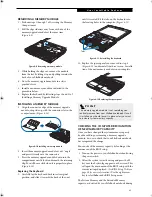
ACCESSING THE MEMORY COMPARTMENT
To gain access to the memory compartment, follow these
steps:
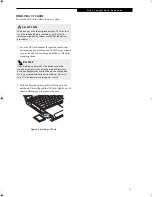
1. Turn off power to your LifeBook notebook, and
remove any power adapter (AC or auto/airline),
battery pack, and modem connection.
2. Place your LifeBook notebook with the bottom
facing up on a clean work surface.
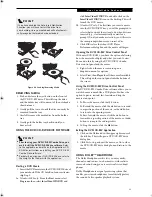
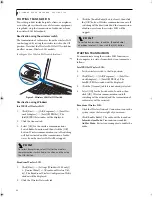
3. Using a Phillips screwdriver, remove the three screws
from the holes in the battery compartment.
(Figure 4-5)
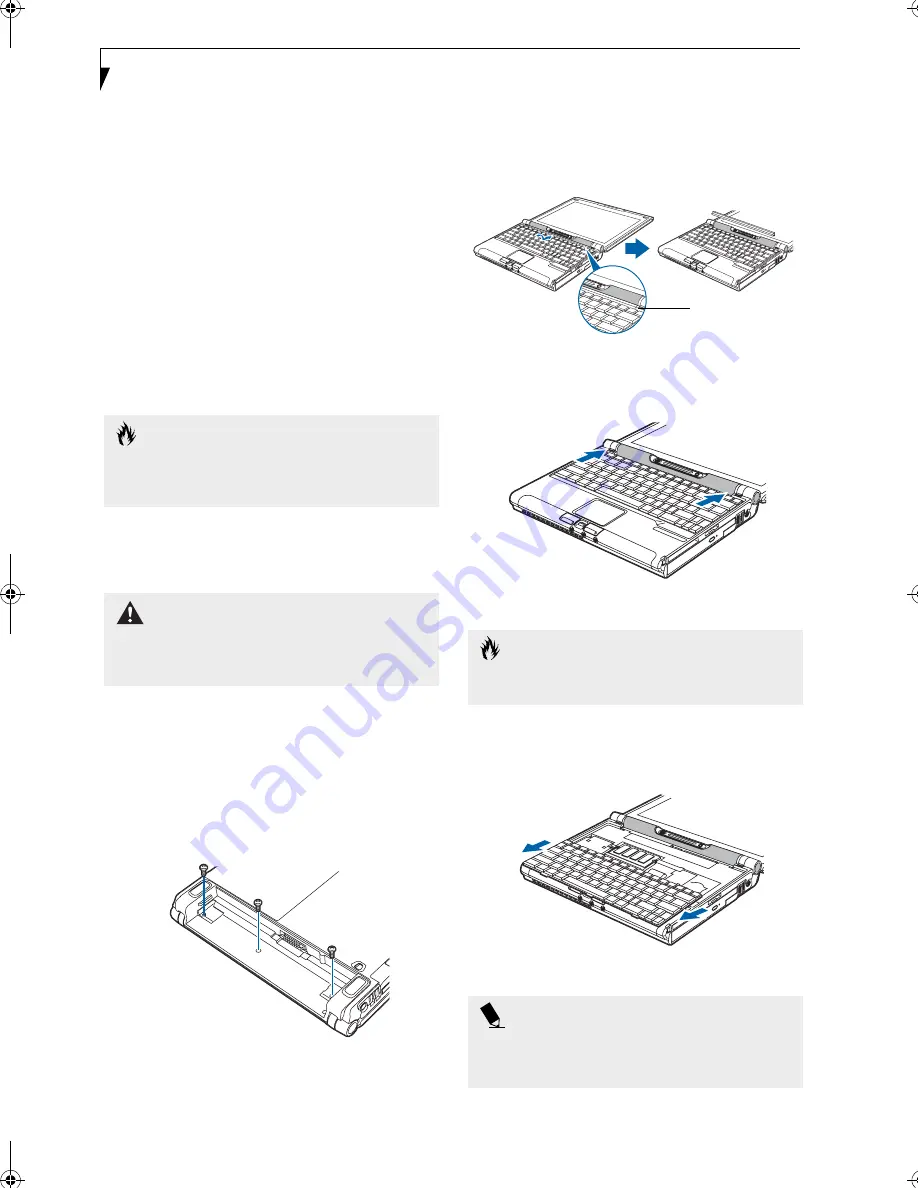
Figure 4-5 Removing screws from battery compartment
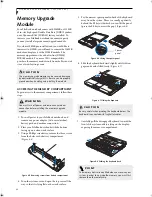
4. Turn the system over and open the top cover all the
way, so that it is lying flat on the work surface.
5. Pry the narrow spacer panel in back of the keyboard
away from the system. There is a small gap directly
behind the F9 key with which you can lift the panel
(press the F9 key to access the gap). (Figure 4-6)
Figure 4-6 Lifting the spacer panel
6. Slide the keyboard backward slightly until it disen-
gages and can be lifted freely. (Figure 4-7)
Figure 4-7 Sliding the keyboard
7. Carefully pull the disengaged keyboard towards the
front of the system until it is lying on the display,
exposing the memory compartment.
Figure 4-8 Folding the keyboard back
C A U T I O N
The memory upgrade module can be severely damaged
by electrostatic discharge (ESD). Be sure you are properly
grounded when handling and installing the module.
W A R N I N G
You must turn off power and remove any modem
connection before installing the memory upgrade
module.
C A U T I O N
Be very careful when pivoting the keyboard below. The
keyboard is connected with fragile flat cables.
P O I N T
The memory slot is already filled when you receive your
system. In order to upgrade the memory, you must first
remove the old memory chip.
Spacer
panel
P5010.book Page 42 Monday, April 7, 2003 6:39 PM
Summary of Contents for FPCM11642 - LB T5010 C2D/2.4 13.3 2GB-160GB DVDR WLS CAM W7P
Page 2: ...L i f e B o o k P 5 0 0 0 N o t e b o o k ...
Page 6: ...L i f e B o o k P 5 0 0 0 N o t e b o o k ...
Page 7: ...1 Preface ...
Page 8: ...L i f e B o o k P 5 0 0 0 N o t e b o o k ...
Page 10: ...2 L i f e B o o k P 5 0 0 0 N o t e b o o k S e c t i o n O n e ...
Page 11: ...3 2 Getting to Know Your LifeBook Notebook ...
Page 12: ...4 L i f e B o o k P 5 0 0 0 N o t e b o o k S e c t i o n T w o ...
Page 28: ...20 L i f e B o o k P 5 0 0 0 N o t e b o o k S e c t i o n T w o ...
Page 29: ...21 3 Getting Started ...
Page 30: ...22 L i f e B o o k P 5 0 0 0 N o t e b o o k S e c t i o n T h r e e ...
Page 37: ...29 4 User Installable Features ...
Page 38: ...30 L i f e B o o k P 5 0 0 0 N o t e b o o k S e c t i o n F o u r ...
Page 56: ...48 L i f e B o o k P 5 0 0 0 N o t e b o o k S e c t i o n F o u r ...
Page 57: ...49 5 Using the Integrated Wireless LAN Optional device ...
Page 58: ...50 L i f e B o o k P 5 0 0 0 N o t e b o o k S e c t i o n F I v e ...
Page 83: ...75 6 Troubleshooting ...
Page 84: ...76 L i f e B o o k P 5 0 0 0 N o t e b o o k S e c t i o n S i x ...
Page 98: ...90 L i f e B o o k P 5 0 0 0 N o t e b o o k S e c t i o n S i x ...
Page 99: ...91 7 Care and Maintenance ...
Page 100: ...92 L i f e B o o k P 5 0 0 0 N o t e b o o k S e c t i o n S e v e n ...
Page 104: ...96 L i f e B o o k P 5 0 0 0 N o t e b o o k S e c t i o n S e v e n ...
Page 105: ...97 8 Specifications ...
Page 106: ...98 L i f e B o o k P 5 0 0 0 N o t e b o o k S e c t i o n E i g h t ...
Page 110: ...102 L i f e B o o k P 5 0 0 0 N o t e b o o k S e c t i o n E i g h t ...
Page 114: ...106 L i f e B o o k P 5 0 0 0 N o t e b o o k S e c t i o n E i g h t ...
Page 115: ...107 9 Glossary ...
Page 116: ...108 L i f e B o o k P 5 0 0 0 N o t e b o o k S e c t i o n N i n e ...