69
E
Before Reading This Manual
Thank you for your purchasing the 19-inch rack. This manual provides basic information on
handling the 19-inch rack Model 1740 ("this product") and optional products.
Before using this product, read this manual and the "User's Guide" supplied with the server to ensure
the correct use of this product.
December 2008
Remarks
Warning Descriptions
Various symbols are used throughout this manual. These are provided to emphasize important points
for your safety and that of others. The symbols and their meanings are as follows. Make sure to fully
understand these before reading this manual.
For Your Safety
This manual contains important information, required to operate this product safely.
Thoroughly review the information in this manual before using this product. Especially note the points under "Safety",
and only operate this product with a complete understanding of the material provided.
This manual should be kept in an easy-to-access location for quick reference when using this product.
High Safety
The Products are designed, developed and manufactured as contemplated or general use, including without limitation,
general office use, personal use, household use, and ordinary industrial use, but are not designed, developed and
manufactured as contemplated for use accompanying fatal risks or dangers that, unless extremely high safety is secured,
could lead directly to death, personal injury, severe physical damage, or other loss (hereinafter "High Safety Required
Use"), including without limitation, nuclear reaction control in nuclear facility, aircraft flight control, air traffic control,
mass transport control, medical life support system, missile launch control in weapon system. You shall not use this
Product without securing the sufficient safety required for the High Safety Required Use. If you wish to use this Product
for High Safety Required Use, please consult with our sales representatives in charge before such use.
WARNING
Ignoring this symbol could be potentially lethal.
CAUTION
Ignoring this symbol may lead to injury and/or damage this product.
Summary of Contents for 1740
Page 1: ...J E ...
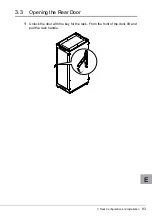
Page 15: ...3 ラックの構成と設置 15 J 3 3 リヤドアの開き方 1 扉用キーを回し ラックハンドルを持ち上げ 手前に引きます ...
Page 28: ...28 1 マイナスドライバの先端をケージナットの爪とラック柱の間に挿入して ケージナットの爪に押し込みます 2 マイナスドライバを押し下げて取り外します ...
Page 36: ...36 8 富士通ロゴを取り付けます 富士通ロゴを扉の裏から M4 ネジで固定します 標準的な取り付け位置は 横方向寸法が 103 縦方向寸法が 122 です ࡀࠫ ን ㅢࡠࠧ ...
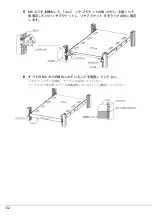
Page 54: ...54 5 必要に応じてラックの柱に固定している M6 ネジを緩め 再調整をしてく ださい ...
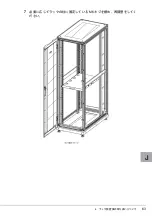
Page 63: ...4 ラック設置後の取り扱いについて 63 J 7 必要に応じてラックの柱に固定している M6 ネジを緩め 再調整をしてく ださい ...
Page 67: ...4 ラック設置後の取り扱いについて 67 J 図は 1U 2U 3U 用をまとめて表示していますが 実際の取り付けは空きスペー スに応じて 適切なサイズを選択し 取り付けてください ...
Page 68: ...68 ...


