


© 2015 Flanders Scientific, Inc.
11
Function Menu
SD Aspect Ratio
Toggles between 4:3 and Anamorphic display of Standard Definition source. This function should be set to match the SD
source being viewed. The default setting is 4:3. If used in conjunction with 1:1 pixel mapping this function can also activate
a PAL SD FHA viewing mode.
Full Screen
This function simply stretches any incoming source to fill the entire screen. Unlike the Zoom feature this full screen stretch
does not preserve aspect ratio, but it does keep all of the active video signal present. Though the full screen mode has
many potential uses it was designed primarily for use with rasterizers that generate a 16:10 or 16:9 aspect 1024x768 output.
Enabling Full Screen mode allows the monitor to stretch the image as intended by the rasterizer.
Pixel Zoom
The Pixel Zoom function will generate a positionable and resizable rectangle on screen. The rectangle may be moved using
the directional arrow buttons. The A1 and A2 buttons may be used to change the size of the onscreen rectangle. Press the
A3 button zoom to the selected area. This pixel zoom feature is designed to work with any HD signal formats. A flashing tally
light will be activated on your monitor whenever you are in a zoomed mode as a reminder/warning that the entire incoming
signal is not being shown on the monitor. To exit the zoomed mode simply press down on the A3 button once more. To exit
the Pixel Zoom feature entirely simply press the function button assigned to this feature once more. The Pixel Zoom function
allows for an essentially artifact free, high quality zoom on any portion of an HD signal.
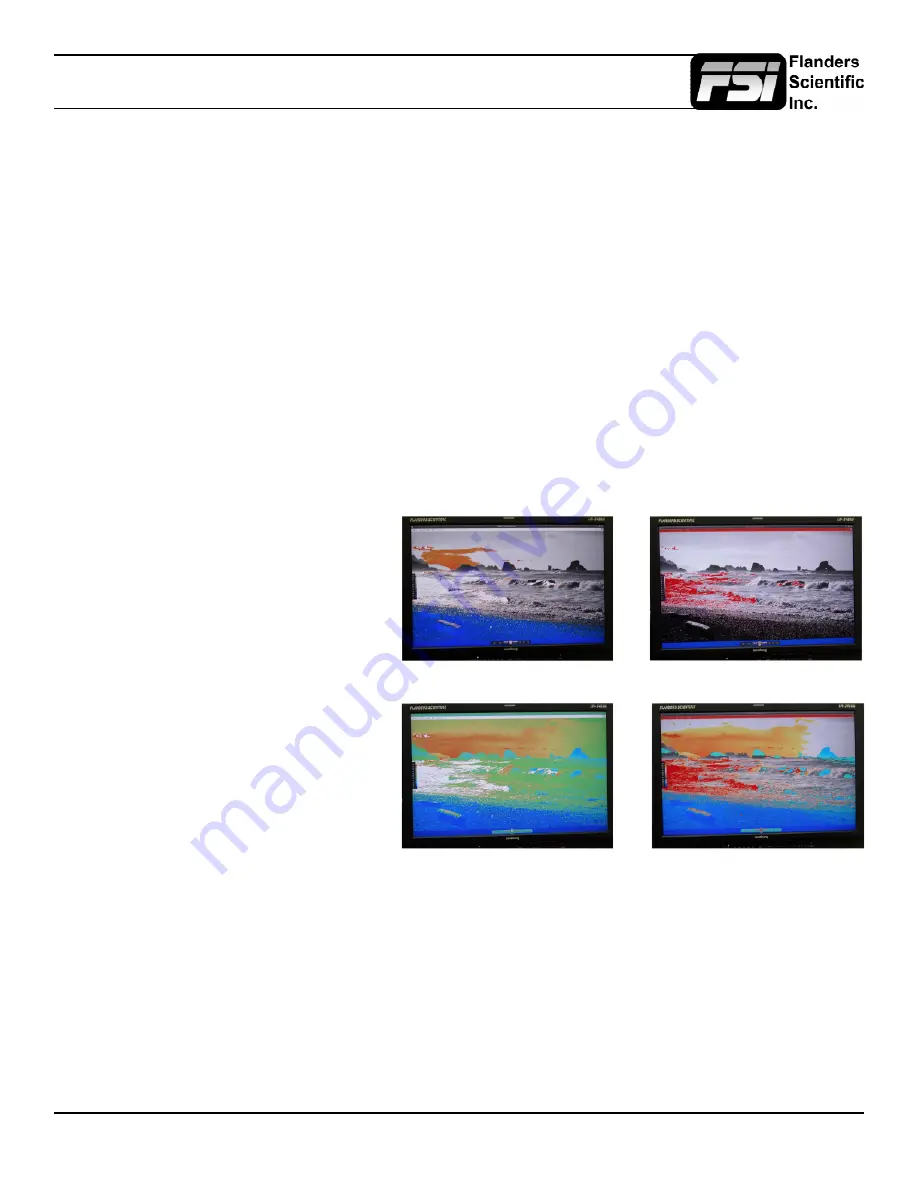
LUM Coloring
The A1 and A2 buttons will adjust the lower limit of the upper color coded region.
The A3 and A4 buttons will adjust the upper limit of the upper color coded region. These color coded ranges are retained in
memory so you can exit and reenter LUM Coloring Mode without having to reset your desired threshold levels.
LUM Coloring with Custom Range
LUM Coloring with All Legal Levels Shown in Greyscale
Underexposed Areas in Blue
Overexposed Areas in Red
LUM Coloring in Default Mode
Overexposed Areas in White
Underexposed Areas in Black
LUM Coloring with Custom Range
This function generates an artificial luminance
map of the incoming source that can be
particularly useful in identifying overexposed
areas in any given shot. An onscreen scale
helps indicate what artificial color corresponds
to what luminance level. The scale will follow
the selected Waveform Scale set in the Scopes
& VU Meters Profile 1: you can choose from
IRE, Digital Levels, or Voltage. In its default
configuration the LUM Coloring feature will
highlight all levels above 100IRE as white and
all levels below 0 IRE as black. In default mode
levels between 0 and 100 IRE will be color
coded.
You
can
change
the
range
of
these color coded regions to any preferred
setting by using the monitor’s buttons.
The Left and Right buttons will adjust the lower
limit of the lower color coded region. The
Up and Down buttons will adjust the upper limit
of the lower color coded region.


