background image

FR500A&FR510A Series Vector Control Inverter

- 124 -

1: keypad potentiometer

2: AI1

3: Process PID output

4: X7/HI pulse input

5: AI2

6: AI3

It determines the setting channel of reference 0. You can perform convenient switchover between

the setting channels. When multi-reference or simple PLC is used as frequency source, the switchover

between two frequency sources can be realized easily.

F12.17

Running mode of simple PLC

Range:0000

1132

Default:0000

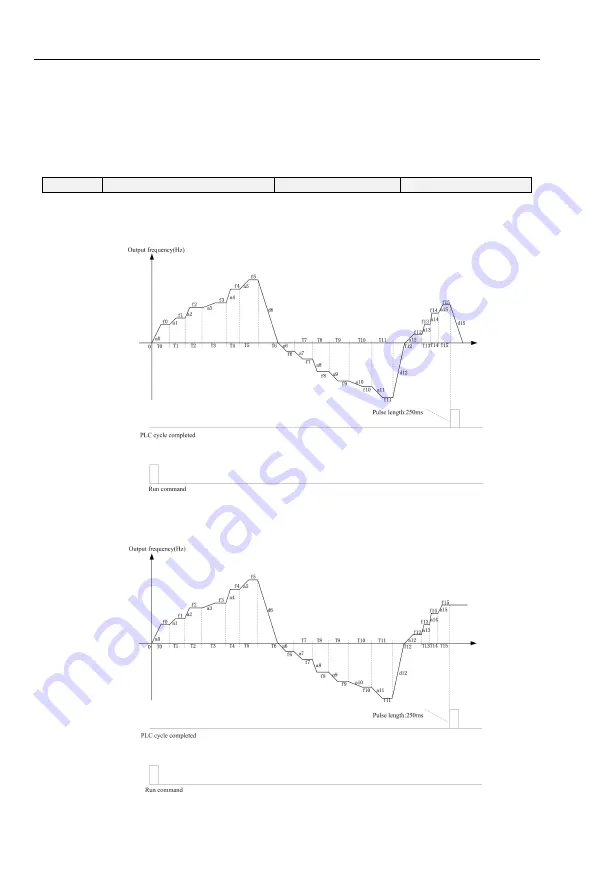
Unit's place: PLC running mode

0: Stop after a single cycle

PLC stops upon the completion of one cycle and it won’t be started unless another run command

is given, shown as Fig. 6-22.

Fig. 6-30

1: Continue to run with the last frequency after a single cycle

After the completion of one cycle, PLC maintains the running frequency and direction of the last

step. See the figure below:

Fig. 6-31

2: Repeat cycles

Summary of Contents for FR500-4T-0.7G/1.5PB

Page 1: ...nce and other contents Be sure to carefully read through the safety precautions before use and use this product on the premise that personnel and equipment safety is ensured IMPORTANT NOTES To illustr...

Page 2: ...ION OF PERIPHERAL DEVICES 24 3 7 WIRING WAY 28 3 8 TERMINAL CONFIGURATION 29 3 9 EMI SOLUTIONS 37 CHAPTER 4 OPERATION AND DISPLAY 39 4 1 INTRODUCTION OF KEYPAD 39 4 2 VIEWING AND MODIFYING FUNCTION CO...

Page 3: ...F18 PARAMETERS OF MOTOR 2 136 GROUP F19 V F CONTROL PARAMETERS OF MOTOR 2 136 GROUP F20 VECTOR CONTROL PARAMETERS OF MOTOR 2 136 GROUP F21 POSITION CONTROL 137 GROUP F22 VIRTUAL IO 144 GROUP U00 STATU...

Page 4: ...the inverters missing component Risk of injury Do not touch the parts of control system with bare hands Risk of ESD hazard Installation Danger Installation base shall be metal or other non flammable...

Page 5: ...nd W T3 wiring of inverter and its peripheral circuits and all wires should be in good connection Risk of inverter damage After Power on Danger Do not open the cover after power Rick of electrical haz...

Page 6: ...topped by switching the contactor on or off If the AC drive has to be operated by the contactor ensure that the time interval between switching is at least one hour since frequent charge and discharge...

Page 7: ...t values based on actual conditions Otherwise the running result and protection performance will be affected The AC drive may alarm or even be damaged when short circuit exists on cables or inside the...

Page 8: ...es Vector Control Inverter 8 Chapter 2 Product Information 2 1 Nameplate information Fig 2 1 Nameplate information Model Explanation Model show on product nameplate contains information below Fig 2 2...

Page 9: ...FR500A 4T 030G 037PB 40 62 60 30 40 FR500A 4T 037GB 57 76 75 37 50 FR500A 4T 037G 045P 57 76 75 37 50 FR500A 4T 037G 045PB FR500A 4T 045G 055P 69 92 91 45 60 FR500A 4T 045G 055PB FR500A 4T 055G 075P...

Page 10: ...onse 10ms sensor less vector control 1 2 Starting torque 0 5Hz 180 V f control sensor less vector control 1 0 25Hz 180 sensor less vector control 2 Basic functions Carrier frequency 0 7kHz 16kHz Overl...

Page 11: ...flexible parameter displayed hidden Common DC bus Contains below 30 KW Various master auxiliary command and switchover Reliable speed search started A variety of Accel Decel curves programmable Timing...

Page 12: ...allation Wall mounted or Flange mounting IP grade IP20 Cooling method Fan cooled 2 4 Parts Drawing 0 7 2 2kW Outline Fan cover Nameplate Keypad Cover Lower case Upper case Fig 2 3 0 7 2 2kW Outline 4...

Page 13: ...l Inverter 13 30 450kW Outline Fan cover Chassis Keypad Nameplate Fig 2 5 30 450Kw Outline 2 5 Configuration Mounting Dimensions and Weight 0 7 2 2KW Dimensions and wall mounting dimensions Fig 2 6 0...

Page 14: ...KW Wall installation diagram Table 2 3 Configuration mounting dimensions and weight Model NO External and installation dimensions mm Weight Kg W W1 H H1 D Mounting Hole Diameter 3 Phase 380V 50 60Hz R...

Page 15: ...G 132P 310 200 650 620 350 11 5 45 FR500A 4T 132G 160P FR500A 4T 160G 185P 400 300 750 724 300 11 5 68 FR500A 4T 185G 200P 500 300 855 822 320 12 112 FR500A 4T 200G 220P FR500A 4T 220G 250P FR500A 4T...

Page 16: ...FR510A 4T 4 0G 5 5PB FR510A 4T 5 5G 7 5PB FR510A 4T 7 5GB FR510A 4T 7 5G 011PB 146 100 147 21 279 262 251 5 5 88 177 5 5 6 FR510A 4T 011G 015PB FR510A 4T 015G 018PB 198 160 199 17 330 313 302 5 5 91 1...

Page 17: ...t keyboard pad into the mounting panel and then insert the keyboard module into the keyboard pad Before removing the keyboard pad first remove the keyboard then remove as shown in the scheme 80 0 2 0...

Page 18: ...be installed outside from harsh environment e g Textile facilities with fiber particles and chemical facilities filled with corrosive gases or Loaded dust cover 3 2 Installation Direction Space and Co...

Page 19: ...Ventilation clearance Ventilation clearance Fig 3 2 Single inverter mounting orientation and space requirements 3 2 2 Multiple installations a Multiple parallel installations Fig 3 3 multiple inverte...

Page 20: ...ition tighten 4 holes with screws for strengthened installation Hole A Hole A Hole A Hole A Fig 3 5 Wall mounting b Wall mounting 4 22kW Install the drive mounting bracket as shown in FIG 3 6 a Wall i...

Page 21: ...in Direction 1 first and then lift up the keypad in Direction 2 b Mount keypad Assemble keypad See following Figure Place keypad in the slot in Direction 1 and then press the keypad in Direction 2 un...

Page 22: ...remove terminal cover in the direction as shown in the Figure below Screw Fig 3 7 d Open cover e Assemble keypad See following Figure Place the upper buckle of the terminal cover in the slot of upper...

Page 23: ...to the assembly when the shell shown method to be assembled in place and then tighten the screws Screw Fig 3 7 f Disassemble and installation of the cover g Stringing board disassembly and installati...

Page 24: ...Removing dust cover cording to the dust cover arrow direction at one end of the dust cover and hard to lift the dust cover under the desirable Fig 3 8 Dust cover installation and removal 3 6 Configur...

Page 25: ...nducted and radiated interference of the drive to peripheral device Braking resistor Purpose consume motor feedback energy to attain quick brake Output filter Output filter and radiated interference o...

Page 26: ...mage the rectifier components need to install AC reactor in input side of inverter and it can also improve the input power factor When the motor cable is over 50 meters because of the higher leakage c...

Page 27: ...drop 2 15 Output reactor input rated voltage drop 1 15 2 Input and output reactors are external and optional 3 6 3 Filter Input filter Can reduce the wire interference caused from the inverter to othe...

Page 28: ...fers to control circuit terminals 2 User selects braking resistor based on real needs Please refer to the braking resistor Selection Guide 3 Signal cable and power cable should be separated Try to cro...

Page 29: ...Terminals 0 7 2 2KW Main Circuit Terminals Fig 3 11 0 7 2 2kW Schematic of main circuit terminals 4 5 5KW Main Circuit Terminals R S T UV POWER Fig 3 12 4 5 5kW Schematic of main circuit terminals 7...

Page 30: ...rminals PB DC Fig 3 14 30 37kW Schematic of main circuit terminals 45 90KW Main Circuit Terminals PB DC Fig 3 15 45 90kW Schematic of main circuit terminals 110 132KW 250 280KW 315 450KW Main Circuit...

Page 31: ...nutes before touching the equipment Otherwise you may get electric shock Do not connect the braking resistor directly to the DC bus Otherwise it may damage the AC drive and even cause fire 3 Braking r...

Page 32: ...pply Connect to 24 V by default When DI1 DI7 need to be driven by external signal PLC needs to be connected to external power supply and be disconnected from 24 V Analog input AI1 GND Analog input 1 I...

Page 33: ...ignal Terminals 1 Description Use the analog input terminal Weak analog voltage signals are easy to suffer external interference and therefore the shielded cable must be used and the cable length must...

Page 34: ...damage The voltage range of external power supply should be DC20 30V Otherwise normal operation could not be assured and or result in equipment damage B Open collector NPN connection a Internal power...

Page 35: ...y ATTENTION When relay coil voltage is lower than 24V a resistor as voltage divider should be mounted between relay and output terminal based on coil impedance 4 Wiring instruction of relay output ter...

Page 36: ...10V AI2 I current input 0 20mA V voltage input 0 10V 0 10V AO1 I current output 0 20mA V voltage output 0 10V 0 10V AO2 I current output 0 20mA V voltage output 0 10V 0 10V RS485 Selection of 485 term...

Page 37: ...nevitable In order to reduce or avoid the interference of drive to external environment and protect drive against interference from external environment this section makes a brief description of noise...

Page 38: ...stributed capacitor and the carrier frequency Leakage current is classified into ground leakage current and line to line leakage current Ground leakage current not only circulates inside drive system...

Page 39: ...ces level by level and confirm the parameter setting Increment Increase data or function code Decrement Decrease data or function code Shift Select the displayed parameters in turn in the stop or runn...

Page 40: ...eypad control Flash Communication control Green border Running state ON Running state OFF Stopped state Flash In process of stop Red border Fault state ON Fault state OFF Normal state Flash Warning st...

Page 41: ...ay the current function code settings and it will be automatically transferred to the next function code when press the ENT key again Press the ESC key to abandon the current parameter changes directl...

Page 42: ...hod 1 Set F16 02parameter to nonzero then press the ESC ENT key Method 2 Set F16 02 parameter to nonzero and then do not use the keypad within five minutes Method 3 Set F16 02 parameter to nonzero the...

Page 43: ...arameters F01 Frequency Command F02 Start Stop Control Start Stop Control F03 Accelerate Decelerate Parameters Input Output Terminals F04 Digital Input F05 Digital Output F06 Analog and Pulse Input F0...

Page 44: ...his parameter programmable F00 03 G P type display 0 G type constant torque load 0 1 P type variable torque load e g fan and pump F00 04 Parameter Initialization 0 No operation 0 1 Restore all paramet...

Page 45: ...automatic switchover Hundred s place over modulation coefficient 0 Invalid 1 9 1 01 1 09 times of over modulation F00 13 Carrier frequency 0 700 16 000kHz Model defined F00 14 Upper carrier frequency...

Page 46: ...output 7 X7 HI pulse input 8 Analog input AI2 9 Analog input AI3 F01 04 Auxiliary frequency digital setting 0 00 Fmax 50 00Hz F01 05 Auxiliary frequency range 0 Relative to maximum frequency 0 1 Relat...

Page 47: ...Jog function takes the priority 0 Disable 1 Enable Ten thousand s place Tracking direction 0 Last direction when stop 1 Positive direction 2 Negative direction 3 Starting direction F02 05 Start freque...

Page 48: ...and deceleration 0 0 1s 0 1 0 01s F03 13 Frequency switchover point between acceleration time 1 and acceleration time 2 0 00 Fmax 0 00Hz F03 14 Frequency switchover point between deceleration time 1...

Page 49: ...to terminal control 31 Run command switched to communication control 32 Count input 33 Count clear 34 Length count 35 Length clear 36 DC brake input command at Stop 37 Speed torque control switch 38...

Page 50: ...ee wire mode 1 3 Three wire mode 2 F04 16 Terminal UP DOWN frequency adjustment control Unit s place action when stop 0 Clear 1 Holding 00001 Ten s place action on power loss 0 Clear 1 Holding Hundred...

Page 51: ...tput 22 DI1 23 DI2 24 When reach the range of set frequency FDT1 25 Spindle orientation completion FR510A only 26 PID feedback loss 27 operation status inching without output 28 communication setting...

Page 52: ...of inflection point 2 of curve AI1 100 0 F06 03 Set value corresponding to input of inflection point 1 of curve AI1 100 0 100 0 100 0 F06 04 Input of inflection point 2 of curve AI1 Input of inflecti...

Page 53: ...um input of curve keypad potentiometer 0 0 Maximum input of curve keypad potentiometer 0 5 F06 25 Set value corresponding to minimum input of curve keypad potentiometer 100 0 100 0 0 0 F06 26 Maximum...

Page 54: ...only 0 00 10 00 1 00 F07 12 Ho output encoder pulse proportion 2 FR510A only 0 00 10 00 1 00 Group F08 Parameters of Motor 1 F08 00 Motor 1 type selection 0 Three phase asynchronous motors 0 1 PMSM FR...

Page 55: ...pe FR510A only 0 ABZ encoder 1 UVW encoder 2 Rotary encoder 3 ECN1313 4 Sine cosine encoder 0 F08 25 AB Phase Sequence of ABZ Incremental Encoder FR510A only 0 Positive 1 Negative 0 F08 26 Speed feedb...

Page 56: ...boost gain 0 0 200 0 100 0 F09 14 Oscillation Suppression 0 0 300 0 100 0 F09 15 Voltage source for V F separation 0 Digital setting F09 16 0 1 keypad potentiometer 2 AI1 3 Multi reference 4 Pulse set...

Page 57: ...l mode 80 0 200 0 165 0 F10 11 Excitation adjustment proportional gain Kp1 0 00 10 00 0 50 F10 12 Excitation adjustment integral gain Ti1 0 0 3000 0ms 10 0ms F10 13 Torque adjustment proportional gain...

Page 58: ...z F10 34 PMSM excitation current frequency low point FR510A only 0 0 F10 33 10 00Hz F10 35 PMSM excitation current conversion delay FR510A only 0 0 10 0s 1 0s F10 36 PMSM speed estimation Kp FR510A on...

Page 59: ...rr15 Same as unit s place Hundred s place Communication overtime error Err18 Same as unit s place Thousand s place PID feedback loss Err19 Same as unit s place Ten thousand s place Continuous running...

Page 60: ...Detection time of load loss 0 1 60 0s 5 0s F11 24 Action selection at instantaneous power failure 0 Disabled 0 1 Deceleration 2 Bus voltage constant control F11 25 Decel time at instantaneous power fa...

Page 61: ...peed detection time FR510A only 0 0 60 0s 1 0s F11 43 Detection value of excessive velocity deviation FR510A only 0 0 50 0 20 0 F11 44 Detection time of excessive velocity deviation FR510A only 0 0 60...

Page 62: ...of step 3 0 0 6000 0s h 0 0s h F12 22 Running time of step 4 0 0 6000 0s h 0 0s h F12 23 Running time of step 5 0 0 6000 0s h 0 0s h F12 24 Running time of step 6 0 0 6000 0s h 0 0s h F12 25 Running...

Page 63: ...PLC reference 12 0 3 0 F12 47 Acceleration deceleratio n time of simple PLC reference 13 0 3 0 F12 48 Acceleration deceleratio n time of simple PLC reference 14 0 3 0 F12 49 Acceleration deceleratio n...

Page 64: ...and Td1 0 1 Auto switch on the basis of input offset 2 Switched by terminal F13 15 PID parameter switchover deviation 1 0 0 100 0 20 0 F13 16 PID parameter switchover deviation 2 0 0 100 0 80 0 F13 17...

Page 65: ...t judging feedback loss 100 0 F13 29 Detection time for high value of PID feedback loss 0 0 30 0s 1 0s F13 30 PID upper limit source 0 F13 22 1 F13 22 VP 2 F13 22 AI1 3 F13 22 AI2 4 F13 22 HI 5 F13 22...

Page 66: ...HI pulse input 3 AI3 0 Ten s place pressure dormancy mode 0 Positive direction dormancy on big pressure and wakeup on small pressure 1 Negative direction dormancy on small pressure and wakeup on big...

Page 67: ...peed coefficient F16 11 Hundred s digit Decimal places 0 No decimal places 1 One decimal places 2 Two decimal places 3 Three decimal places F16 02 Keys locked option 0 Not locked 0 1 Full locked 2 Key...

Page 68: ...Display Parameter 7 00 00 49 99 02 12 F17 08 User defined Display Parameter 8 00 00 49 99 03 00 F17 09 User defined Display Parameter 9 00 00 49 99 03 01 F17 10 User defined Display Parameter 10 00 0...

Page 69: ...ed frequency of motor 2 20 00 Fmax Model defined F18 05 Rated speed of motor 2 1 30000 Model defined F18 08 Stator resistance R1 of async motor 2 0 001 65 535 Model defined F18 09 Rotor resistance R2...

Page 70: ...F19 00 V f curve setting 00 Linear V F 0 01 Multi stage V F 02 1 2nd power V F 03 1 4nd power V F 04 1 6nd power V F 05 1 8nd power V F 06 2 0nd power V F 07 V F complete separation 08 V F half separa...

Page 71: ...ter time above 2Hz in VVF mode 1ms F19 18 100ms F19 20 Torque revision when run forward 0 0 5 0 0 0 F19 21 Torque revision when run reverse 0 0 5 0 1 0 F19 22 PMSM acceleration current compensation se...

Page 72: ...limited value under torque control 0 00 Fmax 50 00Hz F20 19 Reverse speed limited value under torque control 0 00 Fmax 50 00Hz F20 20 Set torque accel time 0 0 6000 0s 0 0s F20 21 Set torque decel tim...

Page 73: ...tion loop gain 0 000 40 000 1 000 F21 02 Zero Servo Initiation Frequency 0 00Hz Fmax 1 00Hz F21 03 Location completion width 0 3000 10 F21 04 Location completion time 0 000 40 000s 0 200s F21 05 Spind...

Page 74: ...ncoder gives A B phase pulse A phase ahead B phase 90 reads forward 2 Encoder gives A B phase pulse B phase ahead A phase 90 reads forward 0 F21 34 Electronic Gear Ratio Molecule 1 9999 1000 F21 35 El...

Page 75: ...F22 12 Virtual VDO1 output delay time 0 0s 6000 0s 0 0s F22 13 Virtual VDO2 output delay time 0 0s 6000 0s 0 0s F22 14 Virtual VDO3 output delay time 0 0s 6000 0s 0 0s F22 15 Virtual VDO4 output dela...

Page 76: ...0 0 0 U00 32 PTC motor temperature detection 40 200 0 U00 33 Speed that detected by encoder 0 60000rpm 0rpm U00 34 Monitoring of encoder line number 0 65535 0 U00 35 Power consumption 0 65535kWh 0kWh...

Page 77: ...motor temperature too high Err40 Setting operation time ends Err41 Overload warning U01 01 Running frequency when the latest fault occurred 0 00 Fup 0 00Hz U01 02 Output current when the latest fault...

Page 78: ...ts The same with U01 00 Err00 U01 18 Previous 6 categories of faults The same with U01 00 Err00 U01 19 Previous 7 categories of faults The same with U01 00 Err00 U01 20 Previous 8 categories of faults...

Page 79: ...ifferent with factory default F00 02 Parameter protection Range 0 1 Default 0 0 All parameter programming allowed 1 Only this parameter programming allowed F00 03 G P type display Range 0 1 Default 0...

Page 80: ...0utput terminal 2 1 Pulse output F00 12 PWM optimization Range 000 923 Default 500 Unit s place PWM modulation mode 0 Fixed carrier Carrier of inverter is a fixed value set by F00 13 1 Random carrier...

Page 81: ...but it will increase temperature of inverter When the carrier frequency is higher than the default inverter rated power shall be decreased by 5 for every additional 1 kHz carrier frequency F00 14 Uppe...

Page 82: ...F01 03 2 Master Auxiliary The frequency source is determined by Master Auxiliary 3 Master Auxiliary The frequency source is determined by Master Auxiliary 4 MAX Master Auxiliary The frequency source...

Page 83: ...0A supports a maximum of 16 speeds implemented by 16 state combinations of four DI terminals allocated with functions 13 to 16 in Group F04 The multiple references indicate percentages of the value of...

Page 84: ...input AI2 9 AI3 Auxiliary frequency command is determined by analog input AI3 F01 04 Digital setting of auxiliary frequency Range 0 00 Fmax Default 50 00Hz When auxiliary frequency command F01 03 is...

Page 85: ...pad 1 Terminal control LED on Controls run command via DI terminals Perform FORWARD and REVERSE by DI terminals The control modes are two wire mode and three wire mode selectable See Group F04 for det...

Page 86: ...detection 0 No grounding short circuit detection No grounding short circuit detection 1 Grounding short circuit detection before the first start After inverter power on when first time received runni...

Page 87: ...30 0 100 corresponds to rated current of the drive When output current of drive is less than this parameter value it will be deemed that the output frequency of drive has been kept in step with motor...

Page 88: ...re quick stop In such a case it is necessary to select appropriate dynamic brake resistor and break unit The AC drives equal and below 30kW is provided with a standard built in brake unit Built in bra...

Page 89: ...ge 0 0 6000 0s Default 15 0s F03 04 Accel time 3 Range 0 0 6000 0s Default 15 0s F03 05 Decel time 3 Range 0 0 6000 0s Default 15 0s F03 06 Accel time 4 Range 0 0 6000 0s Default 15 0s F03 07 Decel ti...

Page 90: ...eration and deceleration time F03 00 F03 07 jog acceleration and deceleration time 4 section S curve time F03 11 F03 15 F03 17 is two F03 13 Frequency switchover point between acceleration time 1 and...

Page 91: ...indicates reverse JOG running The JOG frequency acceleration time and deceleration time are described respectively in F01 07 F03 08 and F03 09 5 Reverse JOG RJOG 6 Coast to stop The AC drive blocks it...

Page 92: ...d The status running time and step of PLC will be cleared and the output frequency is step 0 When this terminal is disabled again the drive resumes PLC running from step 0 22 Simple PLC paused When si...

Page 93: ...brake setting time is effective take the bigger value between time when terminal is ON and DC brake setting time at stop 37 Speed torque control switch When motor control mode is sensor less vector c...

Page 94: ...the motor position is synchronized if the positive position offset enable terminal is valid the frequency converter controls the phase of the motor to gradually change forward if the reverse position...

Page 95: ...ant 1 Acceleration Deceleratio n Time Selection Corresponding Parameters OFF OFF Acceleration Deceleratio n time 1 F03 00 F03 01 OFF ON Acceleration Deceleratio n time 2 F03 02 F03 03 ON OFF Accelerat...

Page 96: ...d s place DI4 same as DI1 Ten thousand s place DI5 same as DI1 F04 14 Terminal DI6 AI3 positive negative logic Range 00000 11111 Default 00000 Unit s place DI6 0 Positive logic The DI terminal is vali...

Page 97: ...e RUN REV Figure 6 9 setting of two line mode 2 As shown in the preceding figure if K1 is ON the AC drive instructs forward rotation when K2 is OFF and instructs reverse rotation when K2 is ON If K1 i...

Page 98: ...function selection 2 Reverse RUN REV F04 02 DI3 function selection 3 Three line control Figure 6 11 setting of three line mode 2 As shown in the preceding figure if SB1 is ON the AC drive starts runni...

Page 99: ...1 Integral function enabled When frequency is adjusted through terminal UP DOWN initial step size is set by F04 17 With the effective lasting time of the terminals adjustment step size will increase g...

Page 100: ...n is running at 0Hz and also outputs ON signal at stop 7 Upper limit frequency attained When output frequency attains F01 09 upper limit frequency outputs ON 8 Lower limit frequency attained no output...

Page 101: ...PID feedback loss F13 28 or less than the low value of PID feedback loss F13 24 and duration reaches their accordingly detection time then ON signal output 27 Operation status exclude Jog When invert...

Page 102: ...und Range 0 00 Fmax Default 30 00Hz F05 11 FDT1 lower bound Range 0 00 Fmax Default 30 00Hz F05 12 FDT2 upper bound Range 0 00 Fmax Default 30 00Hz F05 13 FDT2 lower bound Range 0 00 Fmax Default 30 0...

Page 103: ...n is invalid F05 16 Accumulative running time Range 0 65535h Default 0h This parameter should be set with digital output terminal Accumulative running time attained When accumulative running time atta...

Page 104: ...te to the F05 22 set brake closing frequency and then operate on the constant frequency 5 After running frequency reaches the F05 22 set frequency after delay the F05 23 set brake closing delay time t...

Page 105: ...F06 01 F06 03 F06 05 F06 07 When the corresponding set value is frequency 100 is the maximum frequency while 100 is the maximum negative frequency When corresponding set value is torque 100 means 2 ti...

Page 106: ...curve AI2 Range 100 0 100 0 Default 100 0 F06 14 Maximum input of curve AI2 Range Input of inflection point 2 of curve AI2 100 0 Default 100 0 F06 15 Set value corresponding to maximum input of curve...

Page 107: ...han or equal to 0 corresponds to 0V voltage The difference is thatcurve keypad potentiometer is a straight line while curve AI1 AI3 is a broken line with two inflection points F06 28 AI1 terminal filt...

Page 108: ...mes the rated voltage of motor 5 Output power 0 2 times the rated power 6 Bus voltage 0 1000V 7 10V 10V 8 Keypad potentiometer 0 5V 9 AI1 0 10V 0 20mA 10 AI2 0 10V 0 20mA 11 AI3 10 10V 12 HI 0 01kHz 1...

Page 109: ...ronous motors remove capacitance 3 Single phase asynchronous motors not remove capacitance Set the parameters according to the motor nameplate no matter whether V F control or vector control is adopte...

Page 110: ...rs in F08 16 to F08 19 are synchronous motor parameters These parameters are unavailable on the motor nameplate and are obtained by means of motor auto tuning F08 21 Pole number of motor Range 0 1000...

Page 111: ...rameters of F08 08 to F08 10 by static auto tuning Set this parameter to 1 and press RUN Then the AC drive starts static auto tuning 2 Motor complete auto tuning To perform this type of auto tuning en...

Page 112: ...lationship between V and F is V F 2 X Rated motor voltage Rated motor frequency 9 1 2 power inverse curve 10 1 4 power inverse curve 11 1 6 power inverse curve 12 1 8 power inverse curve 13 2 0 power...

Page 113: ...5 F09 09 Default 25 0Hz F09 08 Multi point V F voltage 3 V3 Range 0 0 100 0 Default 50 0 F09 09 Multi point V F frequency 4 F4 Range F09 07 rated motor frequency Default 50 0Hz F09 10 Multi point V F...

Page 114: ...age digital setting for V F separation Range 0 0 100 0 Default 0 0 V F separation is generally applicable to scenarios such as induction heating inverse power supply and motor torque control If V F se...

Page 115: ...by the difference between set torque and load torque When the set torque is bigger than load torque motor will be accelerated continuously When the set torque is smaller than load torque motor will be...

Page 116: ...i1 Range 0 0 3000 0ms Default 10 0ms F10 13 Torque adjustment proportional gain Kp2 Range 0 00 10 00 Default 0 50 F10 14 Torque adjustment integral gain Ti2 Range 0 0 3000 0ms Default 10 0ms These are...

Page 117: ...ster in speed control and the other as slave in torque control The slave receives the master s output torque as the torque command and must follow the master rapidly In this case the acceleration dece...

Page 118: ...spindle when the synchronous motor is running these two parameters can be adjusted properly Group F11 Protection Parameters F11 00 Current limit control Range 0 2 Default 2 F11 01 Current limit Range...

Page 119: ...voltage stall voltage F11 06 inverter stops deceleration process and remains at present running frequency After DC bus voltage decreases inverter will decelerate as per previous deceleration time see...

Page 120: ...Fault reported and coast to stop 1 Stop according to the stop mode 2 Fault reported but continues to run Ten s place Load becoming 0 Err25 Same as unit s place F11 14 Frequency selection for continuin...

Page 121: ...reshold set by F11 19 F11 21 Inverter overheat warning threshold Range 50 0 overheat Temperature Default Model defined Sets the threshold of drive t overheat alarm When the maximum internal temperatur...

Page 122: ...t 0 It is used to set the times of fault auto resets if this function is used After the value is exceeded the AC drive will remain in the fault state F11 28 Interval of automatic trip fault reset Rang...

Page 123: ...protection action F11 40 mode When the detection time of speed deviation is 0 0s the fault detection of speed deviation is cancelled Group F12 Multi Reference and Simple PLC Function F12 00 Reference...

Page 124: ...hover between two frequency sources can be realized easily F12 17 Running mode of simple PLC Range 0000 1132 Default 0000 Unit s place PLC running mode 0 Stop after a single cycle PLC stops upon the c...

Page 125: ...drive saves PLC running status on power loss including the running step running frequency and finished running time at the moment of power loss After the next power up the running will be continued in...

Page 126: ...PLC reference 8 Range 0 3 Default 0 F12 43 Acceleration deceleration time of simple PLC reference 9 Range 0 3 Default 0 F12 44 Acceleration deceleration time of simple PLC reference 10 Range 0 3 Defa...

Page 127: ...t 0 Select the feedback source of PID control 0 AI1 1 AI2 2 Communication 3 AI1 AI2 4 AI1 AI2 5 Max AI1 AI2 6 Min AI1 AI2 7 DI7 HI pulse input 8 AI3 F13 03 PID setting feedback range Range 0 0 6000 0...

Page 128: ...nsity is When the deviation between PID feedback and PID setting is 100 0 the integral regulator performs continuous adjustment for the time set in FA 06 Then the adjustment amplitude reaches the maxi...

Page 129: ...l mode 1 Position mode F13 19 PID differential limit Range 0 0 100 0 Default 0 5 Set differential output limit of PID control F13 20 PID initial value Range 0 0 100 0 Default 0 0 F13 21 Holding time o...

Page 130: ...100 corresponding to 50Hz F13 30 PID upper limit source Range 0 5 Default 0 This function code set the upper limit source of PID mode 0 F13 22 1 F13 22 VP Potentiometer on keypad 2 F13 22 AI1 3 F13 22...

Page 131: ...y amplitude If relative to the central frequency F14 00 0 the jump frequency is a variable value If relative to the maximum frequency F14 00 1 the jump frequency is a fixed value The swing frequency i...

Page 132: ...gital output terminal length attained outputs ON signal no matter the drive is set to stop or not stop Actual length is saved at power loss and can be read in both stop and running F14 08 Set count va...

Page 133: ...efault 0 0 Frequency When inverter in dormancy wake up mode is frequency wake up 1 Pressure When inverter in dormancy wake up mode is pressure wake up F14 15 Dormancy mode selection Range 0 1 Default...

Page 134: ...tion error Range 0 1 Default 1 0 No return 1 Return F15 08 Group U00 00 output frequency numerical attribute Range 0 1 Default 0 0 Positive and negative value Forward Positive value reverse negative v...

Page 135: ...U00 01 is within the set value of F16 13 then the value of U00 00 will be stable Group F17 User defined Display Parameters F17 00 User defined Display Parameter 0 Range 00 00 49 99 Default 00 03 F17...

Page 136: ...arameter 26 Range 00 00 49 99 Default 13 09 F17 27 User defined Display Parameter 27 Range 00 00 49 99 Default 00 00 F17 28 User defined Display Parameter 28 Range 00 00 49 99 Default 00 00 F17 29 Use...

Page 137: ...s valid the motor slows down and stops at the set position The orientation position is the angle relative to the Z signal of the encoder When the spindle orientation terminal is invalid the frequency...

Page 138: ...rotation After finding Z signal it decelerates immediately according to the directional deceleration time set by F21 11 When the motor stops it stops at the set position In this process the direction...

Page 139: ...whole orientation process Please set it reasonably according to the practical application F21 11 Spindle orientation deceleration time Range 0 0 60 0s Default 2 0s In the course of orientation after t...

Page 140: ...uency converter returns to the origin every time it starts from the downtime state When the converter starts if the origin signal input terminal signal is OFF that is when it is not in the origin posi...

Page 141: ...return origin 1 is small the action of return origin is slow but the position of return origin is overshoot The process is shown in the following Fig 6 32 F21 16 Regression Origin frequency 2 Range 0...

Page 142: ...carried out from step 2 Note 1 In simple carry control the direction of rotation of the motor is determined by the forward carry and reverse carry terminals which have nothing to do with the directio...

Page 143: ...fault 1000 F21 35 Electronic gear denominator Range 1 9999 Default 1000 The change ratio of given pulse and feedback pulse can be changed by electronic gear Molecule Denominator Feedback Pulse Variati...

Page 144: ...es to set status of virtual VDI terminal and selected by F22 05 0 the validity of VDI depends on validity of VDO output and VDOx uniquely bound with VDOx x range 1 5 1 Binary digit of F22 06 determine...

Page 145: ...ep Range 1 15 Default 1 U00 09 Program Operation Time Range 0 0 6000 0s h Default 0 0s h U00 10 PID set Range 0 60000 Default 0 U00 11 PID feedback Range 0 60000 Default 0 They display the PID setting...

Page 146: ...der C signal Range 0 4096 Default 0 U00 40 Sine cosine encoder D signal Range 0 4096 Default 0 C D signals used to monitor the sine and cosine encoder U00 41 UVW encoder UVW signal Range 000 111 Defau...

Page 147: ...vious 5 categories of faults The same with U01 00 Default Err00 U01 18 Previous 6 categories of faults The same with U01 00 Default Err00 U01 19 Previous 7 categories of faults The same with U01 00 De...

Page 148: ...voltage to normal range 5 Select rotational speed tracking restart or start the motor after it stops 6 Remove the added load 7 Select an AC drive of higher power class Err02 Decel overcurrent 1 The ou...

Page 149: ...circuit 1 The output circuit is grounded or short circuited 2 The connecting cable of the motor is too long 3 The module overheats 4 The internal connections become loose 5 The main control board is...

Page 150: ...l fault 1 check the connection between the inverter and motor 2 The motor is disengaged load 3 Check the motor Err18 Communication overtime error 1 The PC is not working properly 2 The communication l...

Page 151: ...ually torque boost or V F curve not appropriate 4 Voltage too low 5 Start the running motor 6 Sudden load in the acceleration process 7 Model selection of inverter power is too small 1 Troubleshooting...

Page 152: ...abnormal discoloration heating and cooling fan status Confirm whether the overload tighten the screws if the inverter heatsink fan is dirty confirm whether the stall Motor Whether the motor is abnorma...

Page 153: ...late jobs in the state power is turned on otherwise there is danger of electric shock to cause death When conducting related operations turn off the power and make sure the main circuit DC voltage has...

Page 154: ...death When conducting related operations turn off the power and make sure the main circuit DC voltage has dropped to a safe level five minutes before the related operations 2 the drive to work due to...

Page 155: ...00bps Data format 1 8 N 1 1 8 O 1 1 8 E 1 optional bits rates 4800bps 9600bps 19200bps 38400bps 57600bps and 115200bps can be selected Shielded twisted pair cable is recommended Communication cable to...

Page 156: ...odify F01 02 function code value and the corresponding need to power down when storing the register address referred to as EEPROM address to 8102H Function code group RAM address high byte EEPROM addr...

Page 157: ...is valid Bit5 0 user password is invalid 1 valid user password Bit6 7 00 basic function code group 01 user defined function code group 10 different functions with the factory default code group 11 Ot...

Page 158: ...ates that there is error during transmission Calculation process of CRC parity 1 Define a CRC parity register and initialize it as FFFFH 2 Conduct XOR calculation between the first byte of sending mes...

Page 159: ...command code Error code 1 0x01 0x13 CRC parity Low bytes go first 2 Responding command code at normal Communication and error Communication Responding Command Code at Normal Communication Responding C...

Page 160: ...00Hz send the data content of 3000 To send data 01 06 20 01 0B B8 D4 88 The received data is 01 06 20 01 0B B8 D4 88 3 communications sent on the 1st drive forward run command write to the address 200...

Page 161: ...00W 150 1 100 FR500A 4T 5 5G 7 5PB 600W 100 1 80 FR500A 4T 7 5GB 800W 75 1 60 FR500A 4T 7 5G 011PB 800W 75 1 60 FR500A 4T 011G 015PB 1 1kW 50 1 43 FR500A 4T 015G 018PB 1 6kW 40 1 31 FR500A 4T 018G 022...

Page 162: ...erter 162 Cables listed in above table refer to the lead cable of single resistor The DC bus should be updated if the resistors are in parallel connection Cable should withstand voltage above AC450V a...

Page 163: ...g Range Default Attr F00 08 Motor control method Unit s place Motor1 control method 11 0 V F control 1 Sensor less vector control mode1 2 Sensor less vector control mode2 3 Close loop control with PG...

Page 164: ...IN interface of PG card to J3 interface of control board Fig C 1 PG card installation C 1 ABZ encoder PG card External view Fig C 2 a EXC PG01 Fig C 2 b EXC PG02 Table C 1 Technical parameter Model Po...

Page 165: ...B B Encoder output signal B maximum frequency 300kHz Z Z Encoder output singal Z zero signal 5V Supply 5V 200mA power COM Power earthing EXC PG 02 Open collector Push input incremental encoder interf...

Page 166: ...to loading PG card 2 Follow Figure C 4 C 5 C 6 to connect PG card and encoder 3 Shielded cable earthing line PE is connected directly to the fixed screw of PG card 4 According to the actual situation...

Page 167: ...ng object Pin name Description EXC PG03 Rotary transformer COS COS Cosine signal SIN SIN Sine signal REF REF Voltage reference signal Null Null Usage method 1 Follow Figure C 1 to loading PG card 2 Sh...

Page 168: ...pt AB signals from upper computer exc pg04 in addition to encoder signals Fig c 10a EXC PG04 Fig c 10b EXC PG04B J1 terminal description J1 is mainly used to receive a and B signals from the upper com...

Page 169: ...der differential signal U 11 V Encoder differential signal V 12 V Encoder differential signal V 13 W Encoder differential signal W 14 W Encoder differential signal W 15 16 PE Shielding ground Usage me...

Page 170: ...24V Y2 A signal OC output 24V CLK CLK ECN1313 differential clock input DATA DATA ECN1313 differential data input Usage method 1 Follow Figure C 1 to loading PG card 2 Shielded cable earthing line PE i...

Page 171: ...N Num Pin Name Description 1 B Differential signal B 2 NC Null 3 R Differential signal R 4 R Differential signal R 5 A Differential signal A 6 A Differential signal A 7 GND Power ground 8 B Differenti...

Reviews: