background image

NIRS™ DA1650

4:12

User Manual 6008 1286 / Rev. 8

Instrument Calibration

1. Place the EWC tool in the instrument with the help of the small cup holder and 

close the lid.

2. Insert the EWC USB key in the USB port on the back panel.
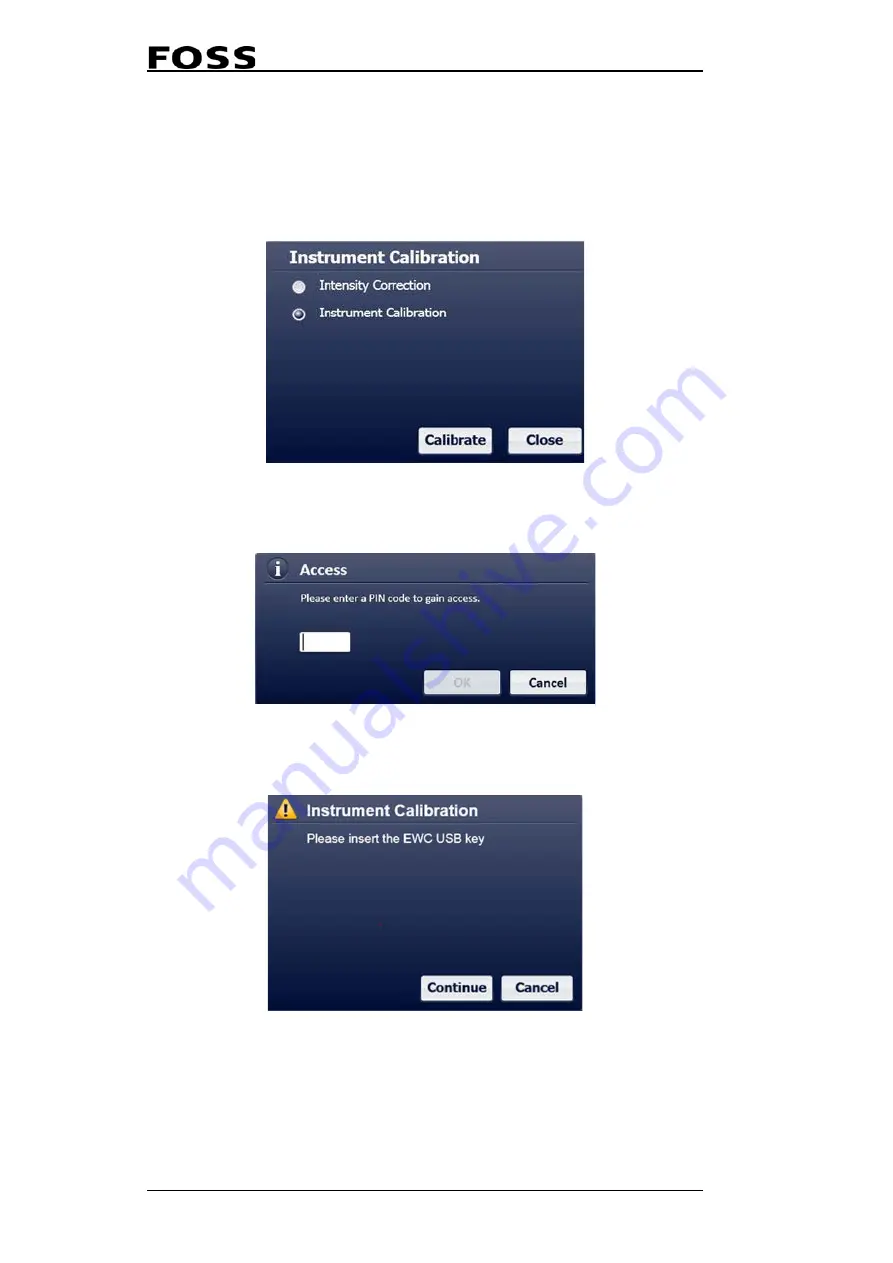
3. Select 

Instrument Calibration

 and press 

Calibrate

.

Fig. 4:20

4.  Running instrument calibration requires you to enter the 4-digit password 

"1234" (preventing un-intentional start of the calibration sequence).

Fig. 4:21

5. If the EWC key is not properly connected to the instrument, a message will 

appear.

Fig. 4:22

6. Press 

Continue

 and wait for calibration to complete.

Summary of Contents for NIRS DA1650

Page 1: ...Copyright 2020 All rights reserved FOSS Analytical A S Nils Foss Allé 1 DK 3400 Hillerød Denmark Tel Int 45 7010 3370 Fax 45 7010 3371 E mail info foss dk NIRS DA1650 User Manual 6008 1286 Rev 8 ...

Page 2: ...011 05 10 First edition 2 2013 03 25 General update to reflect ISIscan Nova software version 5 2 3 2013 09 13 General update to reflect ISIscan Nova software version 6 0 4 2015 10 21 FOSS address updated 5 2017 06 15 Safety sections moved to seperate manual General update to reflect Plug and Play installation 6 2019 04 23 Name change 7 2019 11 12 Small Updates 8 2020 12 17 Detailed steps how to in...

Page 3: ...ral 2 3 2 3 2 Radio Frequency Identification System 2 4 2 3 3 Other Cups and Accessories 2 5 2 4 NIRS DA1650 Software 2 7 2 4 1 ISIscan Nova 2 7 2 4 2 local configuration 2 7 2 4 3 Routine Operation Software 2 9 3 Installation 3 1 3 1 Site Preparation 3 1 3 2 Unpacking and Checking 3 1 3 3 Lifting and Placement of the Instrument 3 1 3 4 Software Installation and Initial Configuration 3 1 3 5 PC co...

Page 4: ...nstrument Information 4 18 4 3 9 Remote Support 4 18 4 3 10 Export Logs 4 19 4 3 11 Configuration 4 20 4 4 Check Samples 4 22 4 4 1 Check Sample 4 22 4 4 2 FOSS Check Sample 4 27 5 Maintenance 5 1 5 1 Cleaning the Instrument 5 1 5 2 Cleaning the Touch Screen 5 1 5 3 Cleaning the Sample Cups 5 1 5 4 Replacement of Lamp 5 2 5 5 FOSS Preventive Maintenance Agreement 5 3 6 Troubleshooting 6 1 6 1 Gene...

Page 5: ... to be operated in atmospheres which could constitute an explosion risk Warning The marking labels must be visible to the user and shall not be removed from the instrument or made unreadable in any way Warning label placed on lamp module The lamp module can be very warm if the operating temperature is high Cotton gloves must be used when replacing the lamp to avoid burn injuries Symbol Description...

Page 6: ...tion When nothing is connected the sealing caps should be mounted to maintain dust protection Caution The air circulation around the lamp cooling flange must not be inhibited Leave uncovered with sufficient space for air circulation at all times Caution Do not touch the lamp glass or reflector or let any rough surface come into contact with the lamp glass A microscopic scratch in the glass might c...

Page 7: ...erference in a residential installation This equipment generates uses and can radiate radio frequency energy and if not installed and used in accordance with the instructions may cause harmful interference to radio communications However there is no guarantee that interference will not occur in a particular installation If this equipment does cause harmful interference to radio or television recep...

Page 8: ...ing conditions are met 1 Redistributions of source code must retain the above copyright notice this list of conditions and the following disclaimer 2 Redistributions in binary form must reproduce the above copyright notice this list of conditions and the following disclaimer in the documentation and or other materials provided with the distribution 3 The name of the author may not be used to endor...

Page 9: ...nections An Internet Protocol IP address is dynamically requested upon connection This address may be permanently installed if required for network purposes Connection through a FossManager networking system allows for remote surveillance and diagnostic checks of the instrument if necessary and authorized The instrument enclosure is completely sealed to prevent contamination by dust or other subst...

Page 10: ...NIRS DA1650 2 2 User Manual 6008 1286 Rev 8 Fig 2 2Rear view of NIRS DA1650 1 On Off switch 4 Ethernet connection 2 Fuse holder 5 USB connection 3 Power cable connection ...

Page 11: ...s The most commonly used are the Small cup and the Large cup Other cup types are shown in section 2 3 3 The small cup is intended for fine samples in granular or powder form and products that are easy to compress When placing the small cup in the sample presentation unit the holder must be used The holder is shown between the sample cups in the illustration below The large cup is intended for ungr...

Page 12: ...ID The CupType information can be used to ensure that the correct Cup Type is used for each measurement The analysis is aborted and a automatic warning is displayed if analysis is started with a different cup type than what is specified in the application setup The unique Cup ID is stored with each measurement so it afterwards can be traced which cup that was used for the individual analyses RFID ...

Page 13: ...anual 6008 1286 Rev 8 2 5 2 3 3 Other Cups and Accessories Fig 2 5Other cups and accessories A Large cup extension D Lid for large cup B Slurry cup E Petri dish holder 89 mm C Lid for small cup F Petri dish holder 58 mm ...

Page 14: ...analysed at a well defined temperature since temperature have a large influence on the shape of the moisture spectrum When the sample is placed in the cup the gold reflector is placed over the sample The sample will quickly heat up or cool down to the temperature of the cup and gold reflector Keeping the cup and reflector at the same temperature thus ensures consistent results Depending on the pro...

Page 15: ...ata transfer and backup paths Configuration and commands for communication with FossConnect server Initiate remote support session via Internet 2 4 2 local configuration FossManager is used for configuration of the User Interface of ISIscan Nova determining what is available for the routine analysis operations Active Products Calibrations Operation profiles e g which cup type to use for different ...

Page 16: ...p Instrument configurations managed remotely by the Network manager using FossManager software Routine Operator operates the NIRS DA1650 via ISIscan Nova software via the built in touch screen FossConnect server is used for backup of data and configuration settings The FossConnect server can either be FOSS hosted or Customer hosted Please contact your local FOSS representative for more details Net...

Page 17: ...ation on the last sample analysed or the last historical sample inspected using toggle arrows Go to previous sample Press to display information about the previous sample Go to next sample Press to display information about the next sample 1 Care Menu 7 Current product 2 Product and sample information 8 Select Product 3 Go to previous sample 9 Task indicator 4 Go to next sample 10 Event indicator ...

Page 18: ...to be handled by the operator Press the task icon to access the task list Event indicator If something happened during analysis like an unexpected error or if the lid was opened this will be shown with a colour indication Errors are indicated with red and warnings with yellow Press the event icon to access the event log Once the event has been read press RESET to remove and upload the event Print ...

Page 19: ...They are described in chapter 4 and you need to go through some of them during installation to ensure your instrument is configured correctly This is also the view you use for some regular or ad hoc activities e g database backup instrument diagnostics FossManager synchronisations for Networked instruments Fig 2 11 Fig 2 12 ...

Page 20: ...NIRS DA1650 2 12 User Manual 6008 1286 Rev 8 ...

Page 21: ...velope If anything is damaged missing or if you have any questions please contact your FOSS representative 3 3 Lifting and Placement of the Instrument Place the instrument on the workbench The workbench should be as free from vibrations as possible Heavy vibrations can affect the analysis results Caution The air circulation around the lamp cooling flange must not be inhibited Leave uncovered with ...

Page 22: ... connect and install Mosaic Solo on the external PC This instruction also contains a guide for the initial configuration required in Mosaic Solo during installation Connecting a PC installing Mosaic Solo and initial configuration is normally done at time of instrument installation by a trained technician Mosaic Solo is operated from an external computer which needs to be connected the NIRS DA1650 ...

Page 23: ...Computer name if the instrument is connected to an office network with DHCP and name server otherwise you need to use the IP address of the instrument A log in is required to access the internal folder of the NIRS DA1650 Username administrator Password ms2361 4 Press OK ...

Page 24: ...NIRS DA1650 3 4 User Manual 6008 1286 Rev 8 Fig 3 3 5 You will now see a shared folder in the NIRS DA1650 Open the folder DA1650Setup exe Fig 3 4 6 Start installation via setup exe ...

Page 25: ... have had Mosaic installed before or not on this PC you will see a number of components being installed At this stage you might get a request to install Crystal Reports Runtime This happens if you don t have Crystal Reports installed or if you have an older version on your computer 8 Click Accept ...

Page 26: ...NIRS DA1650 3 6 User Manual 6008 1286 Rev 8 Fig 3 7 9 Press Install to start installation ...

Page 27: ...n takes five to fifteen minutes depending on whether you need to have the Crystal Report Runtime installed or not Fig 3 9 After the installation the Mosaic Solo will start automatically It can also be started via the icon which now should be on your PC desktop Fig 3 10 ...

Page 28: ... DA1650 MeatScan Olivia Dairy When this happens SMBv1 needs to be enabled This is procedure to enable the SMBv1 feature 1 Navigate to Control Panel All Control Panel Items Programs and Features 2 Select Turn Windows feature on or off Fig 3 11 3 When Windows Features pops up scroll down and check the SMB 1 0 CIFS File Sharing Support and click on the OK button Fig 3 12 4 Done ...

Page 29: ...t the correct instrument serial number is entered when prompted first time ISIscan Nova is started If the LAN is connected to the Internet no other connections are needed to synchronise with FossConnect server 3 6 Printer Connecting a printer to the NIRS DA1650 is done via the USB port on the rear panel For ticket printers it is required to select a matching printer template to fit the paper size ...

Page 30: ...NIRS DA1650 3 10 User Manual 6008 1286 Rev 8 ...

Page 31: ...trument will go through the start up tests The instrument is ready for analysis when the start up test has succeeded Fig 4 1 If the startup test fails you should create a diagnostic report to obtain and document the information about why it failed This report is created via the Report button in lower left hand corner select the built in diagnostic report and press Save Fig 4 2 The report is now st...

Page 32: ...to start the instrument in order to change configuration in FossManager or other actions that are not real analysis Fig 4 3 You can still carry out analysis after cancelling the test but every result will be highlighted in yellow with a warning stating that the Startup test was not completed 4 2 Analysis Procedure 4 2 1 Sample Preparation Grinding a sample prior to analysis gives two advantages Th...

Page 33: ...t cup types 3 Carefully prepare your sample and fill the sample cup all way up Sample types that tend to form voids if simply poured in should be compressed using the back of a spoon or similar 4 Place the filled sample cup in the sample compartment and close the lid Fig 4 4 5 Select product by pressing the Select Product icon Choose product to analyse from the list of products Press Cancel if you...

Page 34: ...oduct can be indicated along with the product name This cup type indication can be enabled disabled in the Operation profile in FossManager 7 Register sample information by clicking in the ID fields on the right hand side These Sample ID fields and User Defined Fields can be configured in FossManager They can there be enabled disabled and set to be optional mandatory If they are set to be mandator...

Page 35: ...evious results can be viewed by scrolling backward forward with the arrows in top right corner 11 The results are presented on the screen and can be printed reported via the Reports view Configuration of manual reports to be available in the Reports view is done in FossManager under Instrument Settings For setting up automatic reporting or LIMS transfer please refer to the on line help in FossMana...

Page 36: ...duct name Fig 4 10 Press Start to run the first cup and wait for the message to continue with the next cup sample After scanning all cups the results are presented as the average of all sub scans Results of the individual cups are not presented Fig 4 11 4 2 4 Turning off the Analyser When the instrument has been switched on it takes about 30 minutes for it to warm up for the first analysis The ins...

Page 37: ...re described on the following pages and you need to go through some of them during installation to ensure your instrument is configured correctly This is also the view you use for some regular or ad hoc activities e g database backup instrument diagnostics FossManager synchronisations for Networked instruments Fig 4 12 Fig 4 13 ...

Page 38: ...hanged data with the server To view the content of a session select it and press View Log Fig 4 14 Pressing Update now performs a manual synchronisation which will upload all relevant data to the FossConnect Server download all available updates from the FossConnect server and automatically activate the updates on the local instrument Automatic synchronisations are performed at certain intervals f...

Page 39: ...Up test After the Instrument Diagnostics is completed you can create and store the Diagnostic Report in the same way as after the Start up test see section 4 1 Routine Start up 4 3 3 Clean Screen Activating the CleanSscreen menu will disable the touch sensitive display for a small period of time allowing for a thorough cleaning of the screen without interference See chapter 5 Maintenance for clean...

Page 40: ...SS for any customer wanting to do their own instrument calibrations Instrument Calibration in NIRS DA1650 is found in the Care menu and it includes two functions Intensity Correction using the ERC tool external reference correction Instrument Calibration using the EWC tool external wavelength calibration Note For instrument calibration it is important that the instrument is thoroughly warmed up an...

Page 41: ... port on the back panel 2 Select Intensity Correction and press Calibrate Fig 4 17 3 Running instrument calibration requires you to enter the 4 digit password 1234 preventing un intentional start of the calibration sequence Fig 4 18 4 If the ERC key is not properly connected to the instrument a message will appear Fig 4 19 5 Press Continue and wait for calibration to complete ...

Page 42: ...in the USB port on the back panel 3 Select Instrument Calibration and press Calibrate Fig 4 20 4 Running instrument calibration requires you to enter the 4 digit password 1234 preventing un intentional start of the calibration sequence Fig 4 21 5 If the EWC key is not properly connected to the instrument a message will appear Fig 4 22 6 Press Continue and wait for calibration to complete ...

Page 43: ...atabase see section 4 3 11 Configuration Restore of existing database backup Deletion of samples Fig 4 23 Backup Backup will create a backup file e g DA1650_sn26090_v6 0_D20130325T115035 name includes serial number date and time and save this to the destination as set in Configuration view 4 3 11 Fig 4 24Example of database backup file ...

Page 44: ...NIRS DA1650 4 14 User Manual 6008 1286 Rev 8 Fig 4 25 Fig 4 26 Fig 4 27 ...

Page 45: ...tore will open a view where you are asked to browse to the backup file you want to restore 1 Press Restore Fig 4 28 Note Restoring a database will erase all existing data and configurations from your ISIscan Nova installation 2 Press Yes to continue Fig 4 29 ...

Page 46: ... samples older than the date specified in the text This date is determined by settings in FossManager Default setting in FossManager is older than 60 days Pressing Delete now will prompt you for the PIN code 1234 to avoide unintentional deletion Fig 4 31 4 3 6 Shut Down Press SHUT DOWN to shut down the instrument ...

Page 47: ...o a later version and or configuration this requires that a USB with the relevant software package is connected to the instrument The Upgrade procedure can then be initiated locally on site from the Care view in ISIscan Nova Please request the latest version of this USB and SW package when needed for on site upgrades Note Upgrade of ISIscan Nova will preserve all data and settings Fig 4 32 ...

Page 48: ...ddress etc If you need to report a problem it is recommended that you include this type of info when contacting the FOSS representative Fig 4 33Example of instrument information 4 3 9 Remote Support Remote Support is a tool to set up a TeamViewer session to enable a remote support session with a support engineer An internet connection is required ...

Page 49: ...n detailed and traceable information about the instruments operation but they do not contain any sample data or results This command is used when log files are requested by your FOSS representative e g for support issues Log files can be exported to the internal hard drive but the recommendation is to export them direct to a USB memory key so they can be forwarded via e mail or archived elsewhere ...

Page 50: ... the FossConnect server can be established Should an incorrect address or port number be entered or the Internet connection does not allow for the Instrument to contact the server an error message will appear Fig 4 36 Failure to connect to the FossManager Network server could be caused by a number of different reasons E g Internet availability firewalls in local IT systems blocked IP address range...

Page 51: ...work then the recommendation is to set these paths to point to a USB memory connected to the instrument allowing easy access to the reports and exported files Format of the reports and the frequency of the reporting is configured in FossManager and initiated manually via the Report button in the main view of ISIscan Nova On the Backup tab you set the destination path for storage of database backup...

Page 52: ...ines but a daily check sample test is the normal recommendation The local check sample is a real sample and as such it will not last forever It will dry out or in other ways change its properties over time The check sample needs therefore to be replaced on a regular basis and this frequency can either be determined in advance based on experience with your samples or monitored in ISIscan Nova by lo...

Page 53: ...l s you imported above Add the Instrument Group where the instrument in question is registered Set check sample limits for this new product See separate section below for information Fig 4 41 4 If you are on a FossManager Network you can now set up an Update session in order to download the check sample Product to the instrument s If you are on Mosaic Solo then the check sample Product is availabl...

Page 54: ...NIRS DA1650 4 24 User Manual 6008 1286 Rev 8 Absolute limits Relative limits with a defined target Relative limits without a defined target ...

Page 55: ...e is already set in FossManager Note Running a check sample definition in ISIscan Nova will not overwrite a defined target value in FossManager Relative limits without a defined target If Relative limits without a defined target is used then FossManager has defined low high warning errors in terms of relative deviation in from the target but no specific target value has been set in FossManager Exa...

Page 56: ...rt to analyse the check sample The check sample will now go through a series of analysis ISIscan Nova may ask you for a Sample number depending on settings in Operation profile A Sample number is not required but if you have more than one check sample it could be wise to enter the Serial number of the check sample in this field for future reference 5 Result for the check sample test is displayed a...

Page 57: ...al quality routines but the normal recommendation is to run daily check sample controls Running the check sample is done in ISIscan Nova just like you run a normal sample The check sample requires a check sample product to be set up in FossManager with a proper operation profile and check sample prediction model The check sample equation is delivered on a USB key together with the check sample Thi...

Page 58: ... the Check Sample product is available in ISIscan Nova after you have saved the new product Setting Check Sample limits FossManager Limits can be defined in three different ways in FossManager Absolute limits Relative limits with a defined target Relative limits without a defined target For the artificial check sample it is strongly recommended to use relative limits without a defined target Relat...

Page 59: ...ress Start to analyze the check sample The check sample will now go through a series of analysis ISIscan Nova may ask you for a Sample number depending on settings in Operation profile A Sample number is not required but if you have more than one check sample it could be wise to enter the Serial number of the check sample in this field for future reference 5 Result for the check sample definition ...

Page 60: ...after a failed check sample but they will be high lighted as Warning in yellow to indicate that last check sample was not OK Please consult your local standard operating procedures how to act on a failed check sample The artificial check sample should not change over time but it may have been physically damaged or altered Please check that correct check sample was used and that the glass surfaces ...

Page 61: ...he Touch Screen During normal use it may be necessary to clean the touch screen for example if the screen stops responding to touch or if the screen is too greasy This can be done without interrupting the routine operations of the instrument Procedure 1 Go to the Care menu 2 Press CLEAN SCREEN 3 The screen will now make a 20 second countdown during which there is no response to touch and during th...

Page 62: ... the lamp to avoid burn injuries Caution Do not touch the lamp glass or reflector or let any rough surface come into contact with the lamp glass A microscopic scratch in the glass might cause a lamp explosion later Caution The lamp can be damaged by fingerprints and oily residues Cotton gloves must be used when replacing the lamp to avoid any damages Replace the halogen lamp as follows 1 Switch of...

Page 63: ...ce FOSS also recommends that preventive maintenance is performed at intervals according to the Preventive Maintenance Protocol see the Owner s Guide During this maintenance all critical components are replaced before they are worn out and have a negative impact on more complex and expensive parts This will help prevent unexpected downtime and also ensure quality and consistency of results at the h...

Page 64: ...NIRS DA1650 5 4 User Manual 6008 1286 Rev 8 ...

Page 65: ...horized distributor To get a fast and accurate response when you are reporting a malfunction it is essential that you try to report and describe as much relevant and specific information as possible Before calling for help ask yourself the following questions Can I already pinpoint the root cause of the problem myself When did I first see the problem Can I repeat the problem with a certain action ...

Page 66: ...ion The instrument doesn t start Check incoming power Check the Power Supply Check the fuse Unfamiliar internal noise Restart the instrument Turn off if problem persists Display is black Contact your FOSS representative Touch screen doesn t work Contact your FOSS representative ...

Page 67: ...representative 11 Sample cup cannot find start position Check if sample cup is jammed 12 Sample cup motor cannot maintain speed Check if sample cup is jammed 13 Sample cup has slipped during measurement Check if sample cup is jammed 14 Spectrometer communication error Contact your FOSS representative 15 Problem in light path Contact your FOSS representative 16 Instrument is in the process of stabi...

Page 68: ...NIRS DA1650 6 4 User Manual 6008 1286 Rev 8 ...

Page 69: ...NIRS DA1650 User Manual 6008 1286 Rev 8 7 1 7 Parts Accessories and Consumables See the Owner s Guide ...

Page 70: ...NIRS DA1650 7 2 User Manual 6008 1286 Rev 8 ...

Page 71: ...mbient temperature 5 40 C Storage temperature 20 C to 70 C Ambient humidity 93 RH Mechanical environment Stationary and moveable occasionally EMC environment Laboratory use Industry requirements Operation Indoor use Altitude Up to 2000 m Transient over voltage According to category II Pollution Degree 2 Vibrations random two different spectras 0 19 Grms at 10 150 Hz to IEC 60068 2 64 spectra 0 19 ...

Page 72: ...h 10 44 0 5 nm Number of data points 1100 Absorbance range Up to 2 AU Number of sub samples Default 7 for analysis in Small Cup 8 for analysis in Large Cup can be set via FossManager Analysis time 1 minute for 8 sub samples Self test 30 minutes at room temperature Spectral resolution 0 5 nm data point Wavelength accuracy 0 5 nm Wavelength precision 0 05 nm standard deviation Wavelength temperature...

Reviews: