background image

h.- Create everytime the application is started/crear siempre al iniciar la aplicación: if this option is

selected, the channel will be created everytime the program is started.

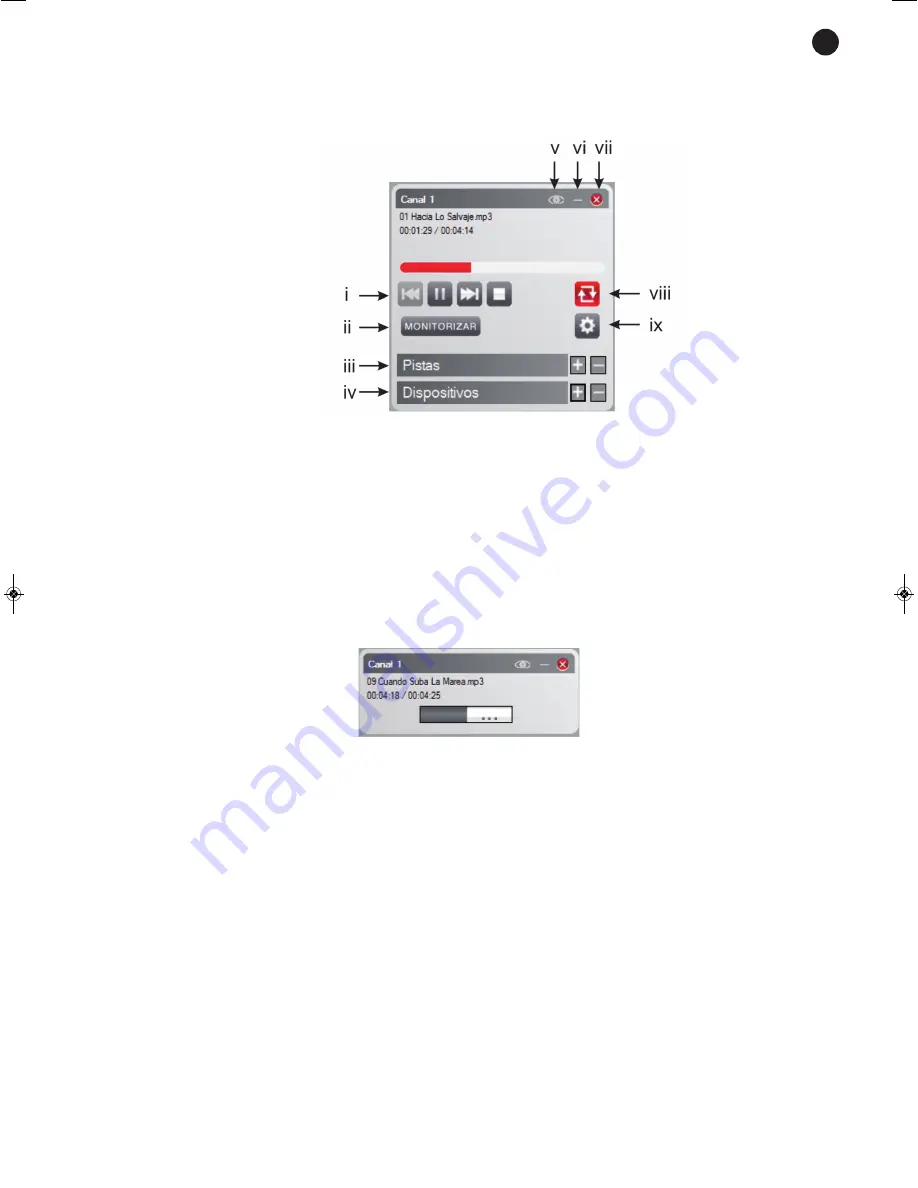
Once the channel has been set, press the Create/crear option and a channel playback window will appear.
The following are the available options:

i.-  Playback controls: previous track, playback/pause, following track and stop playback.

The upper bar lets you move within the song.

ii.-  Monitoring/monitorizar: for listening to the selected channel in the server PC being used. 

Note: 

take into account that only the audio channel will be heard. Programmed, instant or

voice messages will not be heard.

iii.-  Tracks/pistas: shows the channel playback list. Select the track and double click over it to start

playback. Using the “+” and “-” tracks can be added to or deleted from the playback list. 

Note: 

tracks can only be inserted in the channels created by the server itself.

iv.-  Devices/dispositivos: to show the devices that are listening to the channel. The buttons “+” and

“-” add or delete devicess that listen to the channel.

v.-  To hide the channel playback window.  
vi.-  Player minimized mode. Click on the lower button to go back to normal mode.

vii.-  Close and delete the channel.
viii.- Repeat: the channel playback list will be repeated indefinitely.
ix.-  Channel switch on options.

5.-  Delete/borrar: for deleting the selected channel. Take into account that you can only delete channels

created from the server PC.

6.-  Assign devices/asignar dispositivos: it shows a window to assign the receivers to the selected channel.
7.-  Monitoring/monitorizar: for listening to the channel selected in the PC being used as server. 

Note: 

take  into  account  that  only  the  audio  channel  will  be  heard.  Programmed,  instant  and  voice

messages will not be heard.

8.-  Insert tracks/insertar pistas: for adding tracks to the channel in the same way as when a channel is

created.

9.-  Show/mostrar: if the channel was hidden, it shows the player window. 
10.- Filters/filtros: for selecting the visible channels in the channels in the network list.

- 9 -

EN

AIP-3010_MANUAL_(EN)_20170529_Maquetación 1  29/5/17  9:35  Página 9

Summary of Contents for AIP-3010

Page 1: ...AIP 3010 IP AUDIO RECEIVER WITH LINE OUTPUT INSTRUCTION MANUAL...

Page 2: ...t to allow ventilation Avoid direct sunlight heat sources and excessive dust Do not place the machine near magnetic fields or static electricity Do not use surfaces which vibrate or receive impact Do...

Page 3: ...line shows that when the pro duct is disposed of it must be done properly placing it in a special selective electronic and electrical equipment container or through a dealer when purchasing a similar...

Page 4: ...he same time the left and right selection keys let you move one of the digits from every group of eight and the up and down selection keys let you modify the value of the selected digit Once the desir...

Page 5: ...channel in the selected device 5 Instant instantaneo to send a prerecorded audio file to the device The window below will appear a Audio file archivo de audio press the Examine examinar button and sel...

Page 6: ...to the computer The window below will appear g Devices available dispositivos select the devices that you want to send the voice message to and press the button to add them to the list of destiny dev...

Page 7: ...stay together ii Sensor activation activaci n de sensores for selecting the condition to activate an event under C Closed cerrado the event will be activated if the sensor detects circuit closure C Op...

Page 8: ...the channel they can be files from a folder files directories directories playback lists previously selected and saved and accessible from the channel menu playback list or files of playback lists fi...

Page 9: ...f iv Devices dispositivos to show the devices that are listening to the channel The buttons and add or delete devicess that listen to the channel v To hide the channel playback window vi Player minimi...

Page 10: ...es dispositivos quick access to the options described in the Devices section The desired device must be selected previously 3 Area rea quick accesses to the options described in the previous sections...

Page 11: ...f the corresponding receiver 3 Delete the finished ones from the register borrar los terminados del registro lets you clean the actions window by deleting the actions that are not active 4 See only ac...

Page 12: ...an event in the output relays of each one independently Furthermore the specific volume that you want the message to be played at can be selected 3 Information informaci n shows the name of the messa...

Page 13: ...name of the event 2 Sensor select the sensor that will activate the event The sensor configuration by default must be selected as E S in devices 3 Configuration configuraci n select the type of event...

Page 14: ...n In this case you can also choose the output volume volumen espec fico 3 Edit editar to modify the configuration of the selected event 4 Delete borrar to delete the selected event AUDIO PRIORITY Audi...

Page 15: ...ation through contact closure message playback alarms switching on devices etc euroblock 1 USB SD port for firmware upgrading OUTPUTS 1 line 2 x RCA 4 separate programmable outputs for opening and clo...

Page 16: ...onents by unauthorized persons and in general any use that is unrelated to the nature and purpose of the product If any service is needed during the warranty period because of lack of conformity pleas...

Reviews: