background image

63

s

5. General information

Important parts

Main frame 

1

Transport wheel 

4

Frame base set 

1

Support post 

2

Handrail set 

2

Handlerail cover set 

4

11 

Incline motor motor 220V     

         1

12 

Folding shock set 

1

13 

Roller set   

2

14 

Motor 


1

15 

Deive belt   

1

16 

Sensor set  

1

17 

MCB group 


         1

19 

Console   

1

20 

Console overlay  

1

21 

Safety key set 

1

22 

Cable set   

1

24 

Running deck set 

1

26 

Running belt 

1

27 

Side rail set 

2

28 

Motor cover set 

1

29 

Rear end cap set 

2

33 

AC power cord 220V 

1

35 

Cup set   

1

36 

iPad houder 

1

Summary of Contents for RUNNER DTM600

Page 1: ...www flowfitness nl Gebruiksaanwijzing Manual...

Page 2: ...lke vorm of op welke wijze dan ook zondervoorgaande schriftelijke toestemming van Flow Fitness B V All rights reserved Nothing in this instruction manual may be used or reproduced in any form or way w...

Page 3: ...aties 3 Fitness 3 1 Trainen op hartslag 3 2 Warming up cooling down 4 Gebruik 4 1 Montage 4 2 Opbergen in gebruik nemen 4 3 Gebruik computer 4 4 Onderhoud 5 Algemene informatie 5 1 Trainingsschema s 5...

Page 4: ...product juist functioneert In geval van storing of defect stoppen met trainen en direct contact opnemen met uw dealer Gebruik het product nooit als deze defect is Dit product is alleen bedoeld voor t...

Page 5: ...deze gebruiksanwijzing Dit product is bedoeld voor gebruik in een schone droge omgeving Opslag in koude en of vochtige ruimtes zou tot problemen in de loopband kunnen leiden Dit product is niet geschi...

Page 6: ...nen is kan deze optimaal op uw behoeften worden afgestemd In deze handleiding staat alle informatie die nodig is voor het gebruiken en bedienen van de loopband Tevens bevat deze handleiding tips en ad...

Page 7: ...9 18 16 10 10 7B 21 24 22 23 5 Inbusbout M10 X 60L 2x 10 Inbusbout M8 X 70L 4pcs Inbussleutel6mm Inbussleutel5mm Multitool Schroevendraaier 6 Brogmoer M10 X 10t 2x 15 Schroef 8 X 5 8 L 2pcs 18 Schroe...

Page 8: ...e onderdelen computer bidon houder hand hartslagmeter aansluiting veiligheidskoord sneltoetsen snelheid sneltoetsen helling loopvlak motorkap handvat telefoon MP3 speler houder Handvat snelheidregelaa...

Page 9: ...eting Polar hartslag ontvanger Handsensoren Borstband optioneel Lengte 167 cm Hoogte 126 cm Breedte 77 cm Gewicht 70 kg Aansluiting 230 V AC 50Hz 15A Techniek Motor 1 7 PK continuous Hoekverstelling 0...

Page 10: ...p in twee vormen koolhydraten en vetten Bij een inspanning gebruiken we een combinatie van deze twee engergievoorraden Wanneer de in span ningsintensiteit hoog is kiest het lichaam grotendeels voor sn...

Page 11: ...s weergeven Deze schema s kunt u gebruiken bij het bereiken van uw trainingsdoel Het programma is verdeeld in twee fasen De eerste fase bestaat uit zes weken en is een goede richtlijn voor beginners o...

Page 12: ...en de muur Houd uw achterste been recht zodat uw onderbeen gestrekt wordt Houd dit vijf seconden vast en herhaal dit vervolgens met uw andere been Doe dit twee of drie keer Side Stretch Steek uw beide...

Page 13: ...dsredenen en ter voorkoming van beschadigingen adviseren wij u om de loopband met 2 personen te monteren 1 Zet het hoofdframe op de plek waar u de loopband gaat monteren 2 Verwijder de inbusbouten 5 e...

Page 14: ...een bedrading klem zit tussen de metalen onderdelen 4 Plaats vervolgens de bidonhouder 11 in de ronde uitsparing aan de linker kant van de computer 9 Stap 3 Vastzetten van computer 1 Zet de computer i...

Page 15: ...uiste positie zitten b de kunstof pinnen A in Fig 6 in de daarvoor aangebrachte gaten in de handvaten vallen 3 Schroef eerst de handvatkap links 14 onder vast aan de handgreep met behulp van bout 15 e...

Page 16: ...ts de twee iPadhouder steunen 22 aan de achterkant van de computer en schroef ze vast met de 4 bouten 23 Fig 7 2 Schuif de iPadhouder 21 over de steunen 22 en monteer deze met behulp van de 4 bouten 2...

Page 17: ...is de loopband verrijdbaar Uitvouwen Om de loopband weer uit te vouwen voor gebruik voert u de volgende stappen uit 1 druk met uw handen het loopvlak omhoog 2 ontgrendel het loopvlak met uw voet zoal...

Page 18: ...w veiligheid dat het netsnoer in een geaard stopcontact wordt gebruikt Veiligheidskoord De veiligheidssleutel dient op de daarvoor bestemde plek te zitten op de computer Zonder deze veiligheidssleutel...

Page 19: ...en 10 Snelkeuze toetsen voor snelheid 4 6 8 10 km uur Linker handgreep toets Hellingshoek in te stellen met 1 Rechter handgreep toets Snelheid in te stellen met 0 1 km uur energy Cardio Control DTM60...

Page 20: ...De ingestelde tijd zal terug lopen naar 00 00 Daarna zal de loopband automatisch stoppen Tijdens een training kan de hellingshoek en de snelheid worden veranderd met behulp van de INCLINE toets of de...

Page 21: ...geeft aan op welk hartslag niveau u dient te trainen om een bepaald trainingsdoel te bereiken Het niveau is tevens afhankelijk van uw leeftijd 1 Selecteer met behulp van de INCLINE of de SPEED toetsen...

Page 22: ...n Hiermee krijgt u een accurate meting van de hartslag en kunt u op efficiente wijze uw doel bereiken De hartslagband wordt niet standaard geleverd bij de Runner DTM600 loopband U kunt hiervoor terech...

Page 23: ...n 5 km u draait Aan de achterkant van het frame zitten 2 stelbouten Hiermee kunt u de achter ste roller afstellen In het geval dat loopband naar links loopt dient u de stelbout aan de linkerkant met d...

Page 24: ...jk schakel eerst de loopband uit voordat u de loopband gaat schoonmaken De aan uit schakelaar zit achter de motorkap Verwijder transpiratievocht na elk gebruik met een vochtige doek De metalen en kuns...

Page 25: ...25...

Page 26: ...up 5 10 minuten Train 4 minuten Rust 1 minuut Train 2 minuten 1 minuut rustig bewegen Cooling down 5 minuten Trainingsschema week 3 en 4 Train op 60 van uw maximale hartslag programma 7 Maximaal 4 ke...

Page 27: ...ningss chema om gewicht te verliezen of een trainingsschema om conditie te ver beteren Beide trainingsschema s staan weergegeven op de volgende pagina s Trainingsschema week 5 en 6 Train op 60 van uw...

Page 28: ...aximaal 6 keer per week Warming up 5 10 minuten Train 10 minuten Rust 1 minuut Train 10 minuten Herhaal training 1 a 2 keer 1 minuut rustig bewegen Cooling down 5 minuten Trainingsschema week 7 en 8 T...

Page 29: ...5 10 minuten Train 7 minuten Rust 1 minuut Train 5 minuten 1 minuut rustig bewegen Cooling down 5 minuten Ga naar www flowfitness nl en controleer uw vooruitgang Trainingsschema week 9 en verder Trai...

Page 30: ...30 5 Algemene informatie 5 2 Exploded view...

Page 31: ...1 Hellinkshoek motor 220V 1 12 Gasveer 1 13 Roller set 2 14 Aandrijfmotor 1 15 Aandrijfriem 1 16 Speed sensor 1 17 Motor controller board 1 19 Computer 1 20 display Sticker 1 21 Veiligheids sleutel 1...

Page 32: ...het aanraken van metalen delen van de loopband ontstaat er statische elektriciteit Oplossing De loopband dient op een geaard stopcontact aangesloten te zijn Het loopvlak dient gesmeerd te worden met g...

Page 33: ...ngebracht b de band strak genoeg zit c de hartslagband niet gecodeerd is d de batterij vol is Probleem Computer geeft fout code E6 Oplossing De helling incline motor is beschadigd Neem contact op met...

Page 34: ...inzicht verhelpen Indien het defect binnen het garantietermijn valt zal dit kosteloos gebeuren De garantie vervalt wanneer er gebreken zijn onstaan aan het product door een onjuiste montage van het to...

Page 35: ...tions 3 Fitness 3 1 Training by hart rate 3 2 Warming up cooling down 4 Use 4 1 Assembly 4 2 Storage usage 4 3 Use of the console 4 4 Maintenance 5 General information 5 1 Training schedule 5 2 Explod...

Page 36: ...l muscles Only use this product as described in this instruction manual Before using this product check that the product functions as it should In case of malfunction or a defect stop training immedia...

Page 37: ...arnings and instructions as mentioned in this instruction manual This product is intended for use in a clean and dry environment Storage in cold and or moist areas could lead to problems with the prod...

Page 38: ...n this instruction manual you will find all information necessary to use the treadmill Your also will find tips and advice on how to make the most of your training sessions We advise you to carefully...

Page 39: ...18 13 9 18 16 10 10 7B 21 24 22 23 M10 X 60L 2x M8 X 70L 4pcs Multitool M10 X 10t 2x 8 X 5 8 L 2pcs 8 X 3 4 L 2pcs M8 X 15L 4pcs M8 4pcs 5 Allen bolt 6 Self locking nut 20 Allen bolt 19 Washer 10 Alle...

Page 40: ...mportant parts console bottle holder hand heart rate sensor connection safety cord quick keys speed quick keys incline running deck motor cover handrail holder for phone MP3 player handrail speed keys...

Page 41: ...eceiving Polar heart rate receiver Hand sensors Chest belt optional Length 167 cm Height 126 cm Width 77 cm Weight 70 kg Connection 230V AC 50Hz 15A Technical Motor 1 7 HP continuous Incline 0 12 0 12...

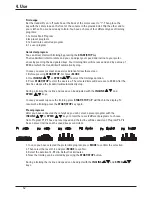
Page 42: ...ermined by this Secondly the most effective heart rate depends on your training goals If your training goal is to lose weight then the most effective training is at 60 of your maximum heart rate If yo...

Page 43: ...fferent training sched ules chapter 5 general information You can use these schedules to reach your training goals The schedules are divided in two phases The first phase can be used for beginners or...

Page 44: ...n against the wall Stretch your back leg and feel the muscle in your calf stretch Hold this position for five seconds and repeat with your other leg Repeat this two or three times Side Stretch Extend...

Page 45: ...asons and to prevent damaging the treadmill we advise you to assemble the treadmill with two persons 1 Place the Frame in an area where you can assemble the product 2 Remove the Allen bolts 5 and self...

Page 46: ...supporting post Make sure that no wires are pressed between the metal parts 4 Place the water bottle holder 11 in the round hole on the left side of the console 9 Step 3 Fasten the console 1 Place the...

Page 47: ...e mounting pins B Fig 6 are in correct position b the plastic pins A Fig 6 are aligned with the designated holes in the hand rail 3 First fasten the bolts 15 in support post housing lower left 14 then...

Page 48: ...lder 1 The two iPad holder brackets 22 on the back of the console and fasten them with 4 bolts 23 Fig 7 2 Slide the iPad holder 21 over the brackets 22 and fasten the holder with 4 bolts 24 4 Use Back...

Page 49: ...treadmill is mobile for transport Unfolding To unfold the treadmill 1 Push the running deck upwards with your hands 2 Release the running deck as described in the drawing 3 Release the deck and move...

Page 50: ...safety it is important that the power cord is plugged into a grounded outlet Safety cord The security key must sit at the designated place in the console Without this security key the treadmill cannot...

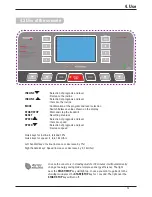
Page 51: ...eft handrail keys Incline increase or decrease by 1 Right handrail keys Speed increase or decrease by 0 1 km hrs energy Cardio Control DTM600 Designed by Flow Fitness Remove safety key when not in use...

Page 52: ...to select the trainings duration 3 Press START STOP to start the exercise The selected time will decrease to 00 00 After the time has elapsed the treadmill will automatically stop During a training th...

Page 53: ...shows witch heart rate is required to achieve an particular trainings goal The level also depends on your age 1 Select with the INCLINE or SPEED keys program H Press MODE to confirm the selection 2 Th...

Page 54: ...will receive a accurate measuring of the heart rate which result in an more efficient way to reach your goal The chest belt is not supplied as standard with the Runner DTM600 treadmill For a chest be...

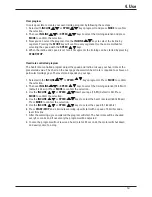
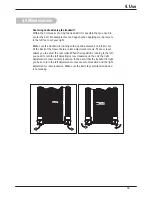
Page 55: ...between 3 and 5 km hrs At the back of the frame there are two adjustment screws These screws allows you to adjust the rear roller When the treadmill is running to the left you need to turn the left a...

Page 56: ...e adjustment screws Cleaning and maintenance Important Switch the treadmill off before cleaning The on off switch is located behind the motor cover Wipe the product and al its parts clean after every...

Page 57: ...57...

Page 58: ...Max 3 times a week Warming up 5 10 minutes Train 4 minutes Rest 1 minute Train 2 minutes Calmly train 1 minute Cooling down 5 minutes Training schedule week 3 and 4 Train at 60 of your maximum heart r...

Page 59: ...nutes Calmly train 3 minutes Cooling down 5 minutes 5 General information After completing the introduction training schedule for six weeks you can choose the follow up training schedule that is best...

Page 60: ...ax 6 times a week Warming up 5 10 minutes Train 7 minutes Rest 1 minute Train 5 minutes Calmly train 1 minute Cooling down 5 minutes Training schedule week 9 and beyond Train at 85 of your maximum hea...

Page 61: ...r maximum heart rate Max 6 times a week Warming up 5 10 minutes Train 7 minutes Rest 1 minute Train 5 minutes Calmly train 1 minute Cooling down 5 minutes Training schedule week 9 and beyond Train at...

Page 62: ...62 5 General information 5 2 Exploded view...

Page 63: ...4 11 Incline motor motor 220V 1 12 Folding shock set 1 13 Roller set 2 14 Motor 1 15 Deive belt 1 16 Sensor set 1 17 MCB group 1 19 Console 1 20 Console overlay 1 21 Safety key set 1 22 Cable set 1 24...

Page 64: ...ing the belt is described in chapter 4 2 Problem When touching metal parts of the treadmill static electricity is released Solution The treadmill should be powered by an grounded outlet The running su...

Page 65: ...ng to the skin b The belt is worn tight enough c The chest belt in not coded d The battery is not empty Problem The display shows error code E6 Solution The incline motor is damaged Please contact you...

Page 66: ...Fitness will then in collaboration with the dealer or distributor correct the defect If the defect is reported within the warranty period the repair will be free of charge The warranty does not cover...

Page 67: ...www flowfitness nl...

Reviews: