background image

Handling the camera

7

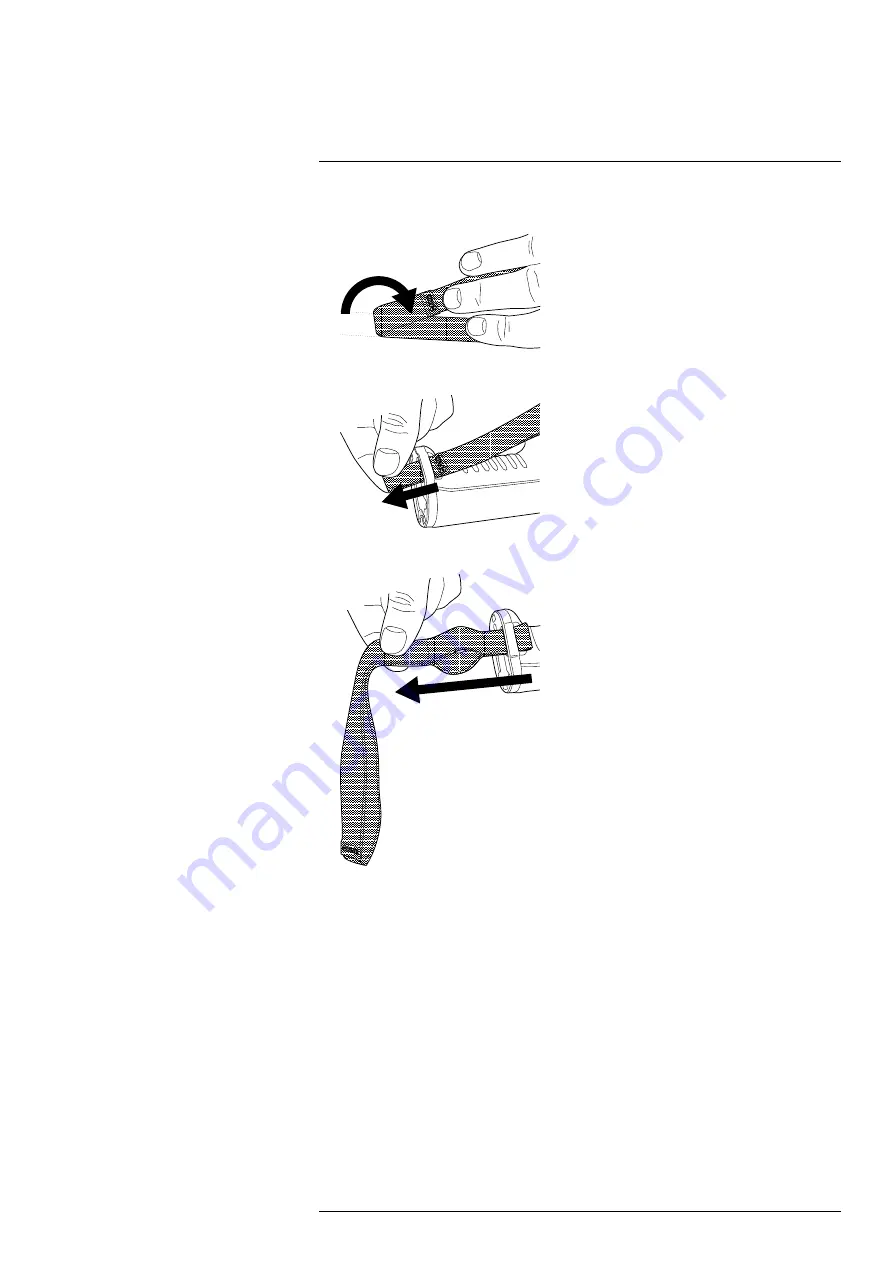
2. Fold the wrist strap. Make sure that the part with the FLIR logo faces away from the

bend.

3. Thread the bent wrist strap through the attachment point at the base of the camera.

4. Pull the entire wrist strap through the attachment point until it stops.

7.16

Front protection

To protect the camera lens and the laser distance meter, you can attach the front protec-
tion by using the supplied fastening device.

#T810583; r. AA/75420/75423; en-US

29

Summary of Contents for E-EST Series

Page 1: ...User s manual FLIR Exx EST series...

Page 2: ...tos megjegyz s Az eszk z haszn lata el tt figyelmesen olvassa el s tartsa be az sszes utas t st figyelmeztet st vint zked st s jogi nyilatkozatot Nota importante Prima di utilizzare il dispositivo imp...

Page 3: ...12 6 3 1 General 12 6 3 2 Menu system 12 6 3 3 Swipe down menu 12 6 3 4 Status icons and indicators 13 6 3 5 Camera overlay 13 6 4 Navigating the menu system 13 6 4 1 Navigating using the navigation...

Page 4: ...oving average 36 8 4 2 Max min temperature range 37 9 Getting started 38 9 1 Auto and Button mode screening 38 9 1 1 Set up the screening station 38 9 1 2 Operate the screening station 38 9 2 Operator...

Page 5: ...creen short tall persons 58 12 5 6 Too cold and Too warm messages 58 12 5 7 Many Too cold messages 59 12 5 8 Too hot background 59 12 6 Visitor FAQ 59 13 Operator mode screening 61 13 1 Introduction 6...

Page 6: ...folders 70 14 3 9 Deleting a folder 70 14 3 10 Deleting an image or video file 70 14 3 11 Deleting multiple files 71 14 3 12 Deleting all files 71 14 4 About image and video files 71 14 4 1 File namin...

Page 7: ...face of the product 1 6 Usage statistics FLIR Systems reserves the right to gather anonymous usage statistics to help maintain and improve the quality of our software and services 1 7 Copyright 2021 F...

Page 8: ...lowing two conditions 1 this device may not cause harmful interference and 2 this device must accept any interference received including interference that may cause undesired operation WARNING Applica...

Page 9: ...r radiation or the sun This can have an unwanted effect on the accuracy of the camera It can also cause damage to the detector in the camera CAUTION Do not use the camera in temperatures more than 50...

Page 10: ...ut of this range it can cause the battery to become hot or to break It can also decrease the performance or the life cycle of the battery CAUTION The temperature range through which you can remove the...

Page 11: ...capsulation rating is only applicable when all the openings on the camera are sealed with their correct covers hatches or caps This includes the compartments for data storage batteries and connectors...

Page 12: ...ou must log in to your FLIR account or sign up for a new account You will also need the serial number of your camera The serial number is displayed by the registration wizard in the camera To start th...

Page 13: ...materials components and substan ces that may be hazardous and present a risk to human health and the environment when waste electrical and electronic equipment WEEE is not handled correctly Equipment...

Page 14: ...l The camera serial number The communication protocol or method between the camera and your device e g SD card reader HDMI Ethernet USB or FireWire Device type PC Mac iPhone iPad Android device etc Ve...

Page 15: ...person has fever symptoms The FLIR ESTsystems automatically measure the surface temperature around the tear duct analyze the measured temperature and display a screening result If the measured temper...

Page 16: ...gger 6 Lamp for the digital camera left and right sides 7 Digital camera 8 Attachment point for the hand strap bracket left and right sides 9 Tripod mount 10 Attachment point for the hand strap wrist...

Page 17: ...B connector and memory card slot 2 Microphone 3 Speaker 4 Touch screen LCD 5 Image archive button 6 Programmable button 7 Button to operate the laser 8 Back button 9 On off button 10 Navigation pad wi...

Page 18: ...the menu system button The main menu includes the following Temperature scale Measurement parameters Image mode Measurement Color Settings 6 3 3 Swipe down menu To open the swipe down menu place your...

Page 19: ...vides additional information such as the date emissivity and atmospheric temperature The image information is activated on the Settings menu see section 15 5 Device settings 6 4 Navigating the menu sy...

Page 20: ...ser receiver 2 WARNING Do not look directly into the laser beam The laser beam can cause eye irritation 6 5 1 Laser warning label A laser warning label with the following information is attached to th...

Page 21: ...g to a mains socket 4 When the white LED on the battery charger glows continuously the batteries are fully charged 5 It is good practice to disconnect the stand alone battery charger from the mains so...

Page 22: ...t the top of the screen and swipe down The battery status is displayed on the swipe down menu If the camera is turned off The battery charging indicator is displayed on the screen 6 It is good practic...

Page 23: ...to a computer takes considerably longer than using the USB battery charger or the stand alone battery charger 7 2 Removing the battery 1 Turn off the camera 2 Remove the battery from the camera 7 3 Tu...

Page 24: ...by pushing the autofocus button The camera can also be set up to perform continuous autofocusing 7 4 1 Manual focus To adjust the focus manually rotate the focus ring Note Do not touch the lens surfac...

Page 25: ...de is activated the laser is automatically disabled 7 4 3 Continuous autofocus The camera can be set up to perform continuous autofocusing When the continuous autofocus function is enabled the camera...

Page 26: ...n pad up down to select one of the functions Push the center of the navigation pad to confirm 7 6 Remote operation button The Remote operation button is used to trigger the screening in Button mode Th...

Page 27: ...s and spread the fingers apart Zoom out Touch the screen with two fingers and pinch the fingers together 7 8 Connecting external devices and storage media You can connect the following external device...

Page 28: ...nce They appear in the list as Unti tled To connect to such a network you will be prompted to enter additional parameters 7 9 2 Setting up a wireless access point 1 Select Settings Connections Wi Fi S...

Page 29: ...button WARNING Do not look directly into the laser beam The laser beam can cause eye irritation 7 12 Cleaning the camera 7 12 1 Camera housing cables and other items Use one of these liquids Warm wat...

Page 30: ...the procedure below Note This section only applies to cameras where removing the lens exposes the infrared detector In some cases the dust cannot be removed by following this procedure the infrared de...

Page 31: ...Handling the camera 7 7 13 1 Mounting the hand strap 1 Fit the upper part of the hand strap into the bracket T810583 r AA 75420 75423 en US 25...

Page 32: ...t in place on the camera and tighten the screw with the supplied Torx key 3 Thread the loose strap through the attachment point at the base of the camera Se cure the strap with the hook and loop faste...

Page 33: ...Handling the camera 7 7 14 Lanyard strap To mount the lanyard strap do the following 1 Remove the camera battery T810583 r AA 75420 75423 en US 27...

Page 34: ...ent point at the base of the camera 3 Pull the entire lanyard strap through the attachment point until it stops 7 15 Wrist strap The wrist strap can also be used to attach a carabiner to the camera To...

Page 35: ...wrist strap through the attachment point at the base of the camera 4 Pull the entire wrist strap through the attachment point until it stops 7 16 Front protection To protect the camera lens and the l...

Page 36: ...lens has been mounted See section 7 18 Calibrat ing the lens camera combination for information on how to do this Note Do not touch the lens surface when you change lenses If this happens clean the le...

Page 37: ...7 2 Carefully pull out the lens 3 The infrared detector is now fully exposed Do not touch this surface If you see dust on the detector follow the instructions in 7 12 3 Infrared detector T810583 r AA...

Page 38: ...era lens is fully in its open position Correct The tooth 1 is in its end position at the black stop pin 2 Wrong You must rotate the inner ring until the tooth 1 reaches the black stop pin 2 5 Carefull...

Page 39: ...Camera models with an exchangeable lens 7 18 1 Introduction Before a new lens can be used with the camera the lens camera combination must be calibrated This is a process that previously had to be pe...

Page 40: ...1 second and let the excess drip off 2 Tape or hang the calibration target on a wall 3 Mount the new lens on the camera according to the procedure in section 7 17 Changing camera lenses When the lens...

Page 41: ...t a later time go to Settings Camera information Calibrate lens 7 19 Calibrating the compass It is recommended that the compass is calibrated every time you move the camera to a new location Follow th...

Page 42: ...the camera measures the temperature of the hottest spot within a measurement box evaluates the measure ment and displays a result 8 2 Button mode Button mode is intended for screening at a screening...

Page 43: ...hanged if you experience problems and understand the consequences In a situation where all visitors come directly from a cold outdoor environment without possibility to adapt to the indoor temperature...

Page 44: ...m and supporting materials 9 Clearly mark the screening position 10 Mark the positions of all equipment For detailed instructions see chapter 10 Setup Screening station Auto and Button mode 9 1 2 Oper...

Page 45: ...ned in section 10 1 Screening station setup For step by step instructions see section 10 3 Step by step setup instructions 10 1 Screening station setup The figures below show a typical screening stati...

Page 46: ...g is about and why they need to do it Optional Instruction roll up Roll up that tells people to remove eyeglasses before they are screened Note Removing eyeglasses is crucial for a correct screening r...

Page 47: ...ee section 10 4 Height of screened persons 10 3 1 Main steps The setup procedure includes the following main steps 1 Plan and prepare the screening station 2 Prepare the camera 3 Prepare the button Bu...

Page 48: ...onfigure the camera do the following 1 Make sure automatic image adjustment mode is active by selecting Temperature scale and then Auto 2 Disable continuous autofocus by selecting Settings Device sett...

Page 49: ...the center of the display shall be 150 cm 4 9 ft The camera shall be placed under the display and vertically aligned with the display The distance from the floor to the camera lens shall be 95 cm 3 1...

Page 50: ...eening do the following 1 Enter initiation mode by first selecting another Recording mode and then selecting the Screening mode again To change the Recording mode select Settings Recording mode 2 In t...

Page 51: ...hair to sit on 10 3 9 Test the setup Button mode To test the setup for Button mode screening do the following 1 Enter initiation mode by first selecting another Recording mode and then selecting the S...

Page 52: ...on 2 Look at the live image on the display and make sure the camera only sees the backdrop Optional Information materials 1 Place the information roll up 2 Place the instruction roll up 10 3 11 Clearl...

Page 53: ...n persons with a height of 150 195 cm 4 9 6 4 ft Very short persons may need e g a high chair to sit on Very tall persons may have to bend their knees To adapt the screening station for a shorter or t...

Page 54: ...r improved measurement accuracy it is important that the screened person is at the correct distance from the camera The screening position indicates where the person should stand for the screening For...

Page 55: ...he queueing system will guide the visitors into the screening station to the correct screening position and out of the screening station A recommended standard is to keep the queue at least 90 cm 36 i...

Page 56: ...isitor display Otherwise it can be difficult for the visitors to see the graphics and messages on the display Visitors and queueing Plan how the visitors will flow into the screening station and out b...

Page 57: ...as described in chapter 10 Setup Screening station Auto and Button mode Fig ure 12 1 Typical screening station shows a typical screening station Figure 12 1 Typical screening station The screening st...

Page 58: ...new screening session 2 The screening normally does not require any action from you Depending on your workflow you may need to be available for guidance and alarms See also section 12 3 2 Screening p...

Page 59: ...camera 9 Check that A screening result is displayed with the person standing at the screening position not closer The measurement was done at the tear duct If not deactivate and activate the Screenin...

Page 60: ...e the visitor to make sure the eyes are inside the box on the display 4 The visitor stands still and looks into the camera The system automatically measures and evaluates the temperature Note It is im...

Page 61: ...on see section 12 4 2 Screening procedure If you run into problems see section 12 5 Problems What shall I do You may get questions from the visitors about the screening For answers to common questions...

Page 62: ...is out of focus or the measurement was not done at the tear duct deac tivate and activate the Screening mode again and repeat the initiation Note If the camera is turned off the system must be initiat...

Page 63: ...exits the screening station Elevated temperature detected You and the visitor follow the process for screening alarms that your company has established 12 5 Problems What shall I do This section descr...

Page 64: ...of the following If the position of the stand is marked e g by tape on the floor make sure to put the stand back in the correct position If there are no markings for the stand or if the marking for th...

Page 65: ...t come both from a cold outdoor environment and a warm indoor environment you need to be careful about changing the Min skin temperature setting With a lower value there is a risk that people with an...

Page 66: ...ature in the area around the tear duct and a thermal camera cannot measure temperatures through eyeglasses For a correct screening re sult removing eyeglasses is crucial Do you save any information ab...

Page 67: ...g results the following factors should be considered Screening is best with room temperatures maintained below 24 C 76 F and relative humidity below 50 Screening should be carried out in an area with...

Page 68: ...lace 13 3 2 Turn on the camera To turn on the camera push the on off button To turn off the camera push and hold the on off button for more than 0 5 second 13 3 3 Configure the camera For accurate scr...

Page 69: ...this person represents normal people who will pass the screening e g coming directly from out doors since this affects the skin temperature 1 Aim the camera toward a healthy person Make sure the perso...

Page 70: ...apply a red color to all parts of the image with an elevated temperature 4 Optionally Record a new sample Tap Sample on the screen or push the P button Note Push the P button shortly If you push and h...

Page 71: ...ore of the following To simultaneously change the temperature scale minimum and maximum limits place your finger on the screen and move it up down To change the minimum or the maximum limit do the fol...

Page 72: ...set temperature levels The color alarms are available on the Color menu 14 1 6 Non uniformity correction NUC When the thermal camera displays Calibrating it is performing what in thermography is call...

Page 73: ...he save conditions Save interval The time interval between each saved image Total number of images Periodic saving will stop when the set number of images have been saved Note If you select the camera...

Page 74: ...ive folder at the top of the Gallery You can create new folders rename a folder change the active folder move files between the folders and delete folders 14 3 2 Opening a saved image 1 Push the image...

Page 75: ...y the top toolbar 4 2 On the top toolbar select the icon and push the navigation pad 4 3 To play or pause the video clip push the navigation pad 5 To view the previous next video clip push the navigat...

Page 76: ...ouching the screen Selected items are marked with a tick 5 On the right toolbar select the icon and push the navigation pad 6 Select the destination folder for the selected items and push the navigati...

Page 77: ...ete the selected items select Delete and push the navigation pad 14 3 12 Deleting all files You can delete all image and video files from the memory card Follow this procedure 1 Push the navigation pa...

Page 78: ...mode and add measurement tools The image jpg file is fully radiometric and saved lossless which enables full post proc essing in image analysis and reporting software from FLIR Systems There is also a...

Page 79: ...options storage Preview image before saving This setting defines if a preview image will be displayed before the image is saved Add annotation after saving This setting defines if an annotation tool...

Page 80: ...e added to the filename including the date and the text IR_ for images and MOV_ for videos Examples IR_2015 04 22_0002 and MOV_2015 04 22_0003 The date format will follow the Date time format setting...

Page 81: ...ons This submenu includes the following settings Manual adjustment using touch This setting is used to enable disable the touch functionality for manual image adjustments Manual adjustment mode This s...

Page 82: ...This will start the lens camera calibration wizard Battery The remaining battery capacity in percent Register camera This will start the registration wizard Licenses Open source license information Re...

Page 83: ...Mechanical drawings 16 See next page T810583 r AA 75420 75423 en US 77...

Page 84: ...G E A 6 Rev B 1 2 Scale 2016 FLIR Systems Inc All rights reserved worldwide No part of this drawing may be reproduced stored in a retrieval system or transmitted in any form or by any means electroni...

Page 85: ...CE Declaration of conformity 17 See next page T810583 r AA 75420 75423 en US 79...

Page 86: ...Directive RED Directive 1999 519 EC Limitation of exposure to electromagnetic fields SAR Directive 2011 65 EU RoHS and 2015 830 EU Standards Emission EN 61000 6 3 A1 2011 Electromagnetic Compability...

Page 87: ...support flir com Copyright 2021 FLIR Systems Inc All rights reserved worldwide Disclaimer Specifications subject to change without further notice Models and accessories subject to regional market cons...

Reviews: