background image


57

10.1.3    View the DGR201 video from a remote PC 

Follow the instructions below to use the Network Viewer to browse video from a remote location. 

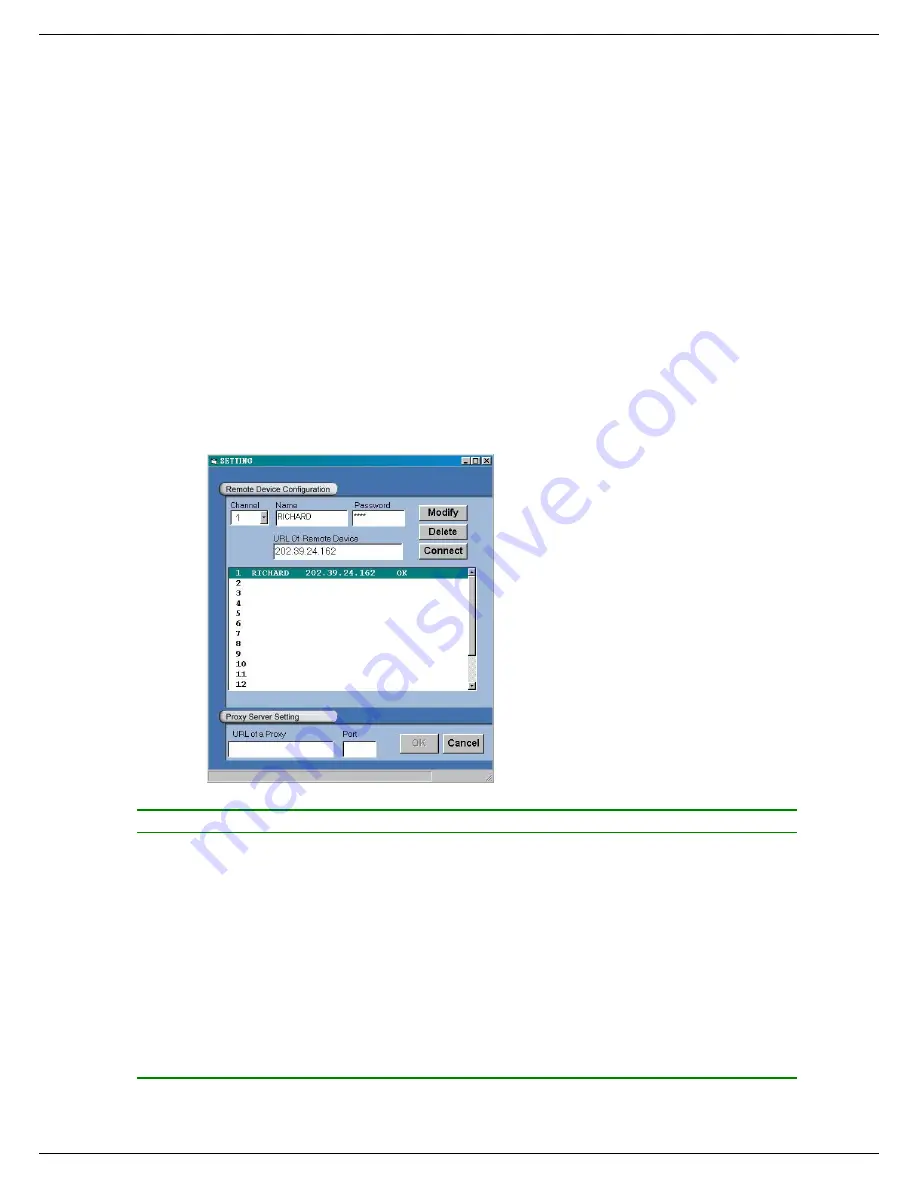
Upon entering the Network Viewer; the connection box will appear as follows.   

1.  Choose a channel number from the Channel drop-down list. 

2.  Assign a name for the selected DGR201. 

3.  Type in the password and IP of the device and click the 

Add

 tag to add the device to the 

connection list. 

4. Click 

the 

Connect

 tag to establish the connection between the devices and the computer. Click 

OK to begin viewing images. 


NOTE: Upon connection, the connection status box indicates the name and IP address of the 

selected device. If there’s a failure to connect, a “Fail” message appears on the screen 

right after the device IP address; otherwise an “OK” appears. To add more connections 

or units to the DGR201, please repeat the above instructions. 


Functions 

Description 


Channel 

Assign a display location when you have multiple devices connected. 


Name 

This box allows you to assign a name to the chosen device.   


Password 

Type the preset password for making a connection.   


URL of the Remote Device 

Type the IP address which you preset for the device 


URL of a Proxy 

Type your proxy server address when accessing the Internet via a proxy 
server.      


Port 

Enter the designated port setting of your proxy server. 


Modify 

Click to change the settings of a chosen device.   


Delete 

Click to remove the connection of a chosen device 


Connect 

Click to establish the connection between the devices and the computer.


OK 

Click to access the display page of the Network Viewer 


Cancel 

Click to exit the program of the Network Viewer. 

Summary of Contents for DGR201

Page 1: ... hazard CAUTION Danger of explosion if the Lithium battery RTC Battery is incorrectly replaced Danger of explosion if battery is incorrectly replaced Replace only with the same or equivalent type recommended by the manufacturer Dispose of used batteries according to the manufacturer s instructions Risk of explosion if replaced by an incorrect type Dispose of used batteries according to the instruc...

Page 2: ...10 3 2 Hard Disk Drive Installation 13 3 3 System Information 14 3 4 Updating System Software 15 4 BASIC OPERATIONS 16 4 1 Configuring Recording Settings 16 4 2 Recording Operations 19 4 3 Playback Viewing Options 23 4 4 Search Operations 25 4 5 Data Backup 28 4 6 Key Lock Operation 31 5 MENU SETUP 32 5 1 RECORD Option page 32 5 2 ALARM SETTING 33 5 3 CLOCK TIMER 36 5 4 COMMUNICATION 37 5 5 DISK S...

Page 3: ... NETWORK VIEWER AND IMAGE VIEWER 55 10 1 The Network Viewer 55 10 2 The Image Viewer 63 11 INDEX TABLE 64 12 NETWORK CONFIGURATION 65 12 1 Cable Connections 65 12 2 Configure Your DGR201 Network Settings 66 12 3 TCP IP Communication Software 68 12 4 TCP IP installation 70 12 5 TCP IP Configuration setting 70 12 6 Connection Testing 71 13 SPECIFICATIONS 73 14 COMPATIBLE MULTIPLEXER DRIVES 74 15 LIM...

Page 4: ... Multiplexer compatible Time lapse and real time recording Refresh rate up to 60 IPS 50 IPS for PAL Image quality selectable at 4 different levels for recording Event Timer Alarm recording mode Quick search by time alarm event and recording list Fast and slow playback of recorded video at various speeds Single picture playback On screen setup menu title and system timer Password protection Video M...

Page 5: ... from the hard disk compartment PAUSE button Press the PAUSE button to pause the video during playback Pressing the PAUSE button while in the PAUSE MODE will advance the video by one frame The green PAUSE LED will be illuminated PLAY button Press the PLAY button to play recorded video from the hard disk The green LED under the PLAY button will be illuminated STOP button Press the STOP button to st...

Page 6: ...splayed when connected with a multiplexer When the MONITOR button LED is illuminated the unit is displaying decoded video The images are not multiplexing While in this mode the DGR201 will not display the OSD message of the unit on the screen although the OSD message is being recorded onto the hard disk drives When the MONITOR button LED is off the unit is displaying encoded video The images switc...

Page 7: ...l The Jog Dial can be used to step frame by frame in the forward or reverse direction SD CARD Slot The SD Card Slot has two purposes 1 to upgrade the internal system software and 2 to archive critical video data ...

Page 8: ...to expand the storage capacity RS 232 Port The RS 232 communication port functions as a connector to an external control device Please refer to RS 232 RS 485 Protocol for more details VIDEO OUT Connector This connector provides the unit s composite video signals to a MUX MONITOR Connector This connector provides the unit s composite video or a MUX s live signal if connected to a display device AUD...

Page 9: ...or lights 5V 0V Active 4 ALARM RESET INPUT When this pin is activated an alarm condition will be cleared 5V 0V Active 5 RECORD INPUT When this PIN is activated the unit will start recording for the duration it is active 5V 0V Active 6 SWITCH OUT MUX SYNC OUTPUT This pin sends out timing signals falling negative to a multiplexer s trigger terminal to synchronize the multiplexer with the DGR201 7 NO...

Page 10: ... IN IN OUT OUT VIDEO TO MONITOR TO MUX S VCR IN FROM MUX MAIN MONITOR I O Camera Monitor RS 485 ETHERNET 10 100 CONNECTING WITH A MULTIPLEXER When connecting the DGR201 to a multiplexer go to the REC Setting page in the setup menu and turn the MULTIPLEXER option ON when it is connected to the multiplexer Please refer to section 5 1 MULTIPLEXER option CONNECTING WITH A QUAD When connecting the DGR2...

Page 11: ...MAIN MONITOR I O Audio IN OUT S video Trig In Multiplexer GROUND SWITCH OUT PC RS 485 ETHERNET 10 100 Monitor Video in Audio in SD Card RS 232 ALARM DC12V AUDIO IN IN OUT OUT VIDEO TO MONITOR TO MUX S VCR IN FROM MUX MAIN MONITOR I O Audio IN OUT S video Quad Monitor Video in Audio in PC RS 485 ETHERNET 10 100 ...

Page 12: ...alarm input and a peripheral device as shown in the diagram below RS 232 ALARM DC12V AUDIO IN IN OUT OUT VIDEO TO MONITOR TO MUX S VCR IN FROM MUX MAIN MONITOR I O 1 2 3 4 5 6 7 8 9 Alarm Reset Normally Open Normally Open Alarm in Ground RS 485 ETHERNET 10 100 Lamp ...

Page 13: ...3 2 A are shown in the tables below Table 3 2 A The jumper settings of hard disk drives in the system Location Jumper IDE 1 Compartment HD 1 Master Default IDE 2 Compartment HD 2 Master Table 3 2 B Compatible hard disk drives Manufacturer Model Capacity Rotation WD800AB 80GB 5400 RPM WD1200AB 120GB 5400 RPM WD800BB 80GB 7200 RPM WD1200BB 120GB 7200 RPM Western Digital WD1800BB 180GB 7200 RPM ST380...

Page 14: ...display the following sample message plus the default display Press the Display button again the unit will not display any OSD message Press the button one more time to back to the default display Table 3 3 A Description of Table 3 3 A 1 2 59G Total capacity of installed hard disk 59 GB 12 4 HR Total 12 4 hour recording time available Timer record activated Alarm record activated QUALITY BEST Reco...

Page 15: ...e and display the message XXXXXX BYTES READ Now the DGR201 is updating the system software which will take approximately 90 seconds to process 5 Restart the unit when the device sounds a tone twice and displays the message PLEASE RESTART The process is complete NOTE If the DGR201 does not power up after updating the software ensure that the file on the SD card is functioning properly and the file ...

Page 16: ...h rate and picture quality the recording time will be approx 45 hours 3 times the rate of an 80GB hard disk drive Set up the REC Time Mode when a multiplexer is connected If a multiplexer is connected for optimum image recording and playback the record speed of the multiplexer must be correctly adjusted to match the DGR201 and set the MULTIPLEXER option on the setup menu to ON This can be done by ...

Page 17: ... 1 67 7 135 5 293 6 564 7 971 3 2733 4 4088 9 5444 3 STANDARD 22 5 30 1 60 2 90 3 180 7 391 5 753 0 1295 1 3644 6 5451 8 7259 1 Image Quality BASIC 30 1 45 1 90 3 135 5 271 0 587 3 1129 5 1942 7 5466 9 8177 8 10888 6 Refresh Rate Field Sec 60 30 20 12 5 5 2 4 1 22 0 71 1 4 1 6 1 8 REC Time Mode 2 hr 4 hr 6 hr 12 hr 24 hr 48 hr 96 hr 168 hr 480 hr 720 hr 960 hr PAL MUX ON Audio ON Possible Recordin...

Page 18: ...52 0 88 1 4 1 6 1 8 REC Time Mode 3 hr 6 hr 9 hr 12 hr 24 hr 48 hr 96 hr 168 hr 480 hr 720 hr 960 hr NOTE Recording times on the tables above are estimated For actual available recording time of a recording configuration please refer to the system information of the DGR201 Please refer to section 3 3 system information for more details NOTE No audio function at the refresh rate in NTSC 60 fields s...

Page 19: ...e To program the DGR201 to record according to a schedule perform the following steps 1 Press the Setup button to enter the MAIN MENU 2 Select the CLOCK TIMER option and press the Enter button to enter the CLOCK TIMER page 3 Select the TIMER SET 4 Press the Enter button to enter the REC SCHEDULE table 5 Use the and buttons to locate the specific day hour minute for the start and stop time The time...

Page 20: ...END START END S 00 00 00 00 00 00 00 00 M 00 00 00 00 00 00 00 00 T 00 00 00 00 00 00 00 00 W 00 00 00 00 00 00 00 00 T 00 00 00 00 00 00 00 00 F 00 00 00 00 00 00 00 00 S 00 00 00 00 00 00 00 00 OK CANCEL TO MOVE TO CHANGE MAIN MENU RECORD ALARM CLOCK TIMER COMMUNICATION DISK SYSTEM GOTO CLOCK TIMER PAGE CLOCK TIMER CLOCK SET REC ENABLE OFF TIMER SET MAIN PAGE TIMER REC ENABLE ...

Page 21: ... ALARM to ON 4 To activate the alarm recording set ALM OPERATION to ON To deactivate it set ALM OPERATION option to OFF 5 To activate the motion alarm recording Select MOTION SETTING and press the Enter button to enter the MOTION SETTING PAGE set MOTION ENABLE TO ON and set a suitable sensitivity according to the video sources MAIN MENU RECORD ALARM CLOCK TIMER COMMUNICATION DISK SYSTEM GOTO ALARM...

Page 22: ...n 2 3 for more details NOTE The status of recording operations when an alarm takes place are shown in the diagrams below 1 2 3 4 Manual or Externally Triggered Recording Alarm Takes Place Actual Recording Speed Normal Alarm Normal Timer Recording Actual Recording Speed Alarm Takes Place Timer Recording Actual Recording Speed Alarm Takes Place Timer Recording Actual Recording Speed Alarm Takes Plac...

Page 23: ...w an end of file message Search again or rewind to replay the file if required STOP PLAY Play the file from the stop position C Play Back From The Oldest Data Stop Press the STOP button for three seconds PLAY play back from the beginning of the HDD recorded data 4 3 1 Fast Forward Reverse There are 7 speeds available for playback 1x 2x 4x 8x 16x 30x and 100x During playback turn the Shuttle Dial c...

Page 24: ... by Frame Playback While playing back recorded video at the recorded speed 1 Press the PAUSE button to pause the playback of the video 2 There are two ways to playback video one frame at a time A Using the PAUSE button Press the PAUSE button to display one frame field of a picture at a time in the forward direction When playing back video recorded by a multiplexer each sequential press of the PAUS...

Page 25: ...number of lists for a respective HDD is 3000 4 4 2 Alarm list Search Take the following steps to proceed with the alarm list search function 1 Press the Search button to enter the search mode 2 Select the ALARM LIST and press the Enter button to access the complete list of alarm event recorded video 3 Highlight the specific recorded video of your requirement and press the Enter button to display t...

Page 26: ...utton to access the thumbnail page 3 Set the desired date to search for the video 4 Press the Enter button to display the corresponding images 5 There are 5 levels of recording range modes to choose from 1 Hour 10 Minutes 1 Minute 10 Seconds and 1 Second Select the desired field and press the Enter button to access the next level To return to the previous level press the Setup button 6 Once reachi...

Page 27: ...image 5 To access another image return to the SD card JPG file list page and repeat steps 3 and 4 NOTE To delete the JPG file on the SD card enter the SD CARD JPG FILE list page highlight the desired JPG file to be deleted and press the Setup button followed by Yes to delete the image SEARCH FULL LIST ALARM LIST TIME SEARCH THUMBNAIL SD CARD THUMBNAIL MM DD YEAR 03 13 2003 SEARCH FULL LIST ALARM L...

Page 28: ... to HD2 On the DISK SETTING page highlight the BACKUP option select FULL press the Enter button to proceed ALARM Duplicate all the alarm event recorded video from HD 1 to HD2 on the DISK SETTING page highlight the BACKUP option and select ALARM press the Enter button to proceed MAIN MENU RECORD ALARM CLOCK TIMER COMMUNICATION DISK SYSTEM GOTO DISK PAGE DISK SETTING REFORMAT HD 2 USAGE REC BACKUP B...

Page 29: ...larger capacity hard disk drive and start the process again 4 5 2 Secure Digital Card SD Card Backup Operations The SD card slot located on the front of the unit has three functions 1 Archive Single image Clips onto SD Card 1 Insert a SD Card into the SD card slot MAIN MENU RECORD ALARM CLOCK TIMER COMMUNICATION DISK SYSTEM GOTO DISK PAGE DISK SETTING REFORMAT HD2 USAGE BACKUP FULL ALARM SELECT MA...

Page 30: ...ow SAVE TO J0000 JPG SAVE TO J0001 JPG SAVE TO J000N JPG 2 Backup the System configuration settings onto an SD Card The DGR201 offers a quick setup method by using a SD card If a user wants to set many DGR201 devices with the same settings the DGR201 could save the all the setting onto the SD card then transfer the setting to another DGR201 To save the system configuration settings onto an SD card...

Page 31: ...s as shown below for approx 3 seconds to lock the unit to release the Key Lock simultaneously press these two buttons again 11 14 A rec T rec DISK Power Display Setup Search Enter Monitor Play Pause Stop SD Card Rec MAIN MENU RECORD ALARM CLOCK TIMER COMMUNICATION DISK SYSTEM GOTO SYSTEM SETTING SYSTEM OPERATION LOG ENTER MENU BACKGND 2 BUZZER ON PASSWORD SET SETUP PWD OFF DEFAULT LOAD SD SETUP SA...

Page 32: ...r second 30F S 20F S 12F S 5 5F S 2 4F S 1 22F S 0 71F S 1 F 4S 1F 6S and 1F 8S For a PAL unit there are 11 different recording rates you can select from 50F S 50 fields per second 25F S 17F S 10F S 5 5F S 2 9F S 1 52F S 0 88F S 1 F 4S 1F 6S and 1F 8S Please refer to the table in section 4 1 for details NOTE The 60 f s 50 f s for a PAL unit recording rate can only function in a 352x240 352x288 for...

Page 33: ...d in the following refresh rate in NTSC PAL 20 17 12 10 5 5 5 5 2 4 2 9 1 22 1 52 0 71 0 88 fields sec MULTIPLEXER For optimum image recording set this option to ON when the DGR201 is connected to a multiplexer If the DGR201 is not connected to a single camera or quad processor set this option to OFF 5 2 ALARM SETTING This option is used to program the configuration of alarm recording when an alar...

Page 34: ...ression Ratio Image Quality Best High Standard Basic Image Size 48KB 32KB 21KB 16KB AUDIO This option determines the way to record sound if necessary ON Enables AUDIO recording OFF Disables AUDIO recording NOTE Audio function can only be activated in the following refresh rate in NTSC PAL 20 17 12 10 5 5 5 5 2 4 2 9 1 22 1 52 0 71 0 88 fields sec ALM TYPE This option allows users to set a type of ...

Page 35: ...ables this function OFF Disables this function NOTE If the device is already recording before the alarm the pre alarm recording would not take effect MOTION SETTING The video motion detection feature works similar to an external alarm trigger input but triggers when there are changes within the motion region of the image To enable motion detection function turn the ENABLE option ON and set the SEN...

Page 36: ...that the DGR201 will start and stop recording CLOCK This entry allows users to set the system time NOTE Clock data is retained for about 3 months after the 15 hour power supply is used up Operate On mode REC ENABLE This option enables disables the programmed scheduled recording ON Enables the scheduled recording OFF Disables the scheduled recording TIMER This entry allows users to program the time...

Page 37: ...unication After the DGR201 receives an RS232 or RS485 command it checks if the Dest ID within the code is the same as the COMM ID before accepting it RS 232 The RS 232 communication port can be in an importing or exporting mode depending on the application ON Enables the RS 232 communication port when the DGR201 is to be controlled by an external device OFF Disables the RS 232 communication port M...

Page 38: ... Enables it NOTE If the DGR201 is connected to a DHCP server it will get an IP address automatically by setting this option to ON NET IP This option is used to configure the Ethernet communication settings to make a network connection Please consult with a qualified IT professional to configure the IP settingst IP XXX XXX XXX XXX MASK XXX XXX XXX XXX GATEWAY XXX XXX XXX XXX FTP SETTING This entry ...

Page 39: ...r There are 4 levels of recording rates to choose from 1 F 1 S 1 F 10 S 1 F 30 S and 1 F 60 S ACCOUNT This option is used to configure the FTP account settings This is required to make an FTP connection Please consult with a qualified IT professional to configure it FTP IP Every FTP server has to own an IP address to be identified on the network Input the IP address of the FTP server USER Input th...

Page 40: ...ular recording hard disk drive REC Used for the regular recording hard disk drive NOTE When you wish to play back recorded video from a HD2 this option must be set to REC For more details please refer to section 4 3 4 BACKUP This function is used to duplicate data from HD 1 to HD 2 Note Set HD 2 as BACKUP first For operation details please refer to section 4 5 1 FULL Duplicates all the recorded vi...

Page 41: ...stem software Note The log keeps an operation history on a revolving basis and is limited to 4000 events When the log is full the newly registered event will replace the existing records from the oldest one MENU BACKGND There are 3 levels of background color transparency that can be selected level 1 is totally transparent level 3 is opaque and level 2 is between level 1 and 3 05 15 03 18 19 32 ON ...

Page 42: ...se by a network viewer The default password is 9999 OLD PASSWORD Enter the pre set password or the default password if this is the initial setting to access the password setting system NEW PASSWORD Enter a 4 digit number password to replace the pre set password or the default password 9999 SETUP PWD When this option is on the user must enter the password before entering the setup menu ON Enabled O...

Page 43: ...D Loads the whole setting to the SD card VERSION This option allows the user to see the network MAC BIOS version software version and last update date MAC 00 0c 0c 00 00 07 BIOS 1 03 SW 0 01 DATE Mar 10 2003 ...

Page 44: ...n the COMMUNICATION page of the setup menu 6 1 3 Set the PC communication parameters 9600 bps No Parity 8 Data Bits 1 Stop Bit 6 2 Communication Protocol 6 2 0 General Command Format Lead Code 0x41 Dest ID Src ID Main category Second category Number of parameters Parameter 1 Parameter 2 End Code 0x4f Lead Code 0x41 Dest ID 0x01 Src ID 0x20 Main Category 0x01 Keys and Signals 0x02 Command Second Ca...

Page 45: ...R 5 KEY_REC 6 KEY_SETUP 7 KEY_ENTER 8 KEY_SEARCH 10 KEY_DISPLAY 11 KEY_UP 13 KEY_DOWN 14 KEY_LEFT 15 KEY_RIGHT 16 KEY_MONITOR 36 JOG_L 128 JOG_R 129 KEY_SHUT_L8 130 KEY_SHUT_L7 131 KEY_SHUT_L6 132 KEY_SHUT_L5 133 KEY_SHUT_L4 134 KEY_SHUT_L3 135 KEY_SHUT_L2 136 KEY_SHUT_L1 137 KEY_SHUT_CT 138 KEY_SHUT_R1 139 KEY_SHUT_R2 140 KEY_SHUT_R3 141 KEY_SHUT_R4 142 KEY_SHUT_R5 143 KEY_SHUT_R6 144 KEY_SHUT_R7...

Page 46: ...46 SIGNAL_REC_OUT 169 SIGNAL_ALARM_IN 189 ...

Page 47: ... 17 05 00 0xD1 0x07 0x06 0x14 0x11 0x05 0x00 DGR201 Act Changing the time and date 6 2 2 4 Request State Second Category 0x06 PC Request 0x41 0x01 0x20 0x02 0x06 0x00 0x4f DGR201 Response 0x41 0x20 0x01 0x02 0x06 0x01 System State 0 0x4f Description of System State STATE_STOP 0 STATE_REC 1 STATE_PREREC 2 STATE_PLAY 3 STATE_MENU 4 STATE_PLAYIDLE 5 STATE_SETUP 6 STATE_SEARCH 7 STATE_BACKUP 13 STATE_...

Page 48: ...s The jumper settings of hard disk drives for the system Location Jumper IDE 1 Compartment HD 1 Master IDE 2 Compartment HD 2 Master 7 1 Built in hard disk 1 1 Unscrew all the mounting screws on the mobile rack of the unit and detach it 2 3 2 Carefully lift the mobile rack to a vertical position 3 Unscrew the secured screws to detach the hard disk rack 4 5 4 Setting the jumper of your hard disk dr...

Page 49: ...vice screwing in all the four screws 8 Attach the interface connector and the power connector to the drive Please note the red lining of the IDE cable and the red wire of power cable must line up side by side 10 Place the mobile rack back onto the device and screw it in 7 2 Mobile Rack 1 Make sure that the key unlocked 2 Pull the active handle outward to remove the carrier body away from the mobil...

Page 50: ...nstructions on the driver to set the jumpers in the master position 5 Attach the interface connector and the power connector to the drive Please note the red lining of the IDE cable and the red wire of power cable must line up side by side 6 Place the HDD inside mobile rack Use four of the provided screws 7 Place the top cover back to the carrier body by sliding forward to secure ...

Page 51: ...51 8 Slide the carrier body back in the mobile rack 9 Push the carrier body further into the mobile rack until fully inserted 10 Push the active handle inward 11 Lock the Key ...

Page 52: ...C RATE MAIN MENU RECORD ALARM CLOCK TIMER COMMUNICATION DISK SYSTEM GOTO CLOCK TIMER PAGE CLOCK TIMER CLOCK SET REC ENABLE OFF TIMER SET MAIN PAGE TIMER REC ENABLE MAIN MENU RECORD ALARM CLOCK TIMER COMMUNICATION DISK SYSTEM GOTO ALARM PAGE ALARM SETTING ALM OPERATION OFF REC RATE 20F S REC QUALITY BEST AUDIO OFF ALM TYPE NO ALM DURATION 0 SEC PRE ALARM OFF MOTION SETTING MAIN PAGE ALARM REC ENABL...

Page 53: ...85 ID MAIN MENU RECORD ALARM CLOCK TIMER COMMUNICATION DISK SYSTEM GOTO SYSTEM SETTING SYSTEM OPERATION LOG ENTER MENU BACKGND 2 BUZZER ON PASSWORD SET SETUP PWD OFF DEFAULT LOAD SD SETUP SAVE VERSION ENTER MAIN PAGE VIEW OPERATION LOG MAIN MENU RECORD ALARM CLOCK TIMER COMMUNICATION DISK SYSTEM GOTO DISK PAGE DISK SETTING REFORMAT HD 1 2 HD 2 USAGE REC BACKUP FULL MAIN PAGE DISK REFORMAT CLEAR ...

Page 54: ...sses the PLAY button or uses the SEARCH function but no video can be played 17 SET TO NTSC PLS RESTART System has to be set to NTSC please reboot PAL is similar 18 SOFTWARE UPDATE Software update 19 PLEASE RESTART The system should be rebooted after the software has been updated 20 NO DISK The user has pressed the Save key without putting in a SD card or there is a disk error 21 DATA NOT CONTINUOU...

Page 55: ...work Viewer allows you to potentially access 16 units of the DGR201 from a remote desktop or a laptop in a TCP IP networking environment It can perform the following functions View live images from the DGR201 Store search and review recorded video from the DGR201 HDD Change the regular record event record and timer properties Before you are ready to view images from a PC you need to have your DGR2...

Page 56: ...d point to Programs Picture Viewer to open up the program selection page as shown below Click the Network Viewer tag to start the Network Viewer program Install the Network Viewer for the ZIP file 1 Save the ZIP file to your PC and extract the file to a designated directory 2 Open the extracted folder DGR201 The folder contains 5 files 3 Click on the icon to execute the installation and then follo...

Page 57: ...on the screen right after the device IP address otherwise an OK appears To add more connections or units to the DGR201 please repeat the above instructions Functions Description Channel Assign a display location when you have multiple devices connected Name This box allows you to assign a name to the chosen device Password Type the preset password for making a connection URL of the Remote Device T...

Page 58: ...to display the connected device in multi format screens of 1 2x2 3x3 and 4x4 Press to enter the selected device the Single device display mode Select a device from the DEVICE LIST box to enable this button Press to open the device setting page to add more devices for viewing Press to leave the Network Viewer program Connected devices display box This box indicates the title and IP address of all c...

Page 59: ...the desired device from the DEVICE LIST box on the Multi device Mode The button will enable Click the button to view the image of the selected device and have access to certain functional operations of the device via the network See the sample screen below 2 Double click the image display area of each screen ...

Page 60: ... will display cameras in the thumbnail format Sequentially displaying images will appear one after another in the adjacent display window Recorded video list box This box allows you to access all recorded video which are stored in the HDD of the connected devices To review a recorded video just click an entry from the list and click the button PgUp PgDn To scroll up and down the list DGR201 Status...

Page 61: ...mple screen as in A above 2 Set the ALRM SETTING to ON to enable the drop down list in the ALARM SETTING area 3 Select a desired recording rate and Quality from the corresponding drop down list 4 Click the OK tag to proceed Set the record timer 1 When in the single device mode click to enter the SETUP page See the sample screen as in A above 2 Set the RECORD TIMER to ON to enable the RECORD TIMER ...

Page 62: ...back mode 2 Select a folder in the computer for copying images in 3 Enter the number of images into the NUMBER OF SAVING box you wish to save in 4 Click the SAVE tag the program will automatically copy the displayed images into the designated folder The images are saved in the DGR201xxx jpg file name which is displayed in the box on the right hand side To view a saved image please follow the instr...

Page 63: ... instructions below to open an archived image from a SD card or a HDD 1 Pop up the START menu from your computer and point to Programs Picture Viewer to open up the program selection page Click the Image Viewer tag to start the Image Viewer program See a sample screen below 2 Select a folder where the files are kept and click a file you wish to display from the upper right box or click the AUTOPLA...

Page 64: ...t oldest data will be kept in the index of the corresponding oldest data For any newly recorded data this approach will be applied until the disk becomes full HD1 HD1 1 12 02 02 12 20 55 1 12 02 02 12 20 55 2 12 02 02 13 30 33 2 01 30 03 16 00 34 3 01 30 03 16 00 34 2999 02 03 03 16 00 56 3000 LISTS 3000 02 03 03 16 00 56 3000 02 08 03 17 30 58 3000 LISTS In the rewrite recording mode when the arc...

Page 65: ...iguration Straight Through PC Wiring Configuration Cross Over 12 1 1 Connect to a computer Use a crossover LAN cable to connect directly to a computer RJ 45 CROSSOVER CABLE RS 232 ALARM DC12V AUDIO IN IN OUT OUT VIDEO TO MONITOR TO MUX S VCR IN FROM MUX MAIN MONITOR I O RS 485 ETHERNET 10 100 12 1 2 Connect to a LAN Hub INTRANET The RJ 45 PIN configuration for connecting with a LAN Hub is shown be...

Page 66: ...R201 Network Settings Upon network hardware connection you need to activate the network function and configure the proper network settings of the DGR201 12 2 1 Enable DGR201 Network Function Press the Setup button to enter the OSD MAIN MENU Please use the buttons and to highlight COMMUNICATION then press the Enter button to enter the COMM SETTING page Use the v buttons and to highlight NET ENABLE ...

Page 67: ...t is connected to has a DHCP server Otherwise please follow the instructions given below Use the and v buttons and to highlight the NET IP Press the Enter button to enter the NET IP page Set the IP MASK and GATEWAY Then press the Enter button to proceed The following is a sample setting IP 192 168 0 1 MASK 255 255 255 0 GATEWAY 0 0 0 0 MAIN MENU RECORD ALARM CLOCK TIMER COMMUNICATION DISK SYSTEM G...

Page 68: ...a network each connected DGR201 must be assigned a unique IP which must be in the same class type as your network address IP addresses are written as four sets of numbers separated by periods for example 192 168 0 1 Therefore if the connected network is identified as Class C for example the first three sets of numbers of the DGR201 IP address must be the same as the network address If the connecte...

Page 69: ...er the NETWORK setting windows Click on the Configuration tag check if the TCP IC is included among the network components list If the TCP IP is included please process step 5 If it is not included please follow step 4 to install the TCP IP ...

Page 70: ...After installation the PC will be restarted 12 5 TCP IP Configuration setting Click Start Settings Control Panel Network Select TCP IP and then click Properties Before processing the DGR201 installation in a WAN please make sure the Internet connection works properly If not please contact your ISP provider ...

Page 71: ...om the DGR201 IP but in the same class type NOTE The IP address of a DGR201 in a network must be unique to itself as opposed to those of the other chosen PCs but in the same class type 12 6 Connection Testing With the previous settings follow the instructions below to ensure whether you have established the connection successfully Click Start Programs MS DOS Prompt Type in ping 192 168 0 1 then En...

Page 72: ...essfully established Please re check all the hardware and software installation by repeating steps 1 to 5 If you still can t establish the connection after rechecking please contact your dealer If you receive a response as in the sample screen below you have successfully made the connection ...

Page 73: ...x 1x 2x 4x 8x 16x 30x 100x Record Search Alarm Time Event list Filter thumbnail SD card Set up Menu Multi layer Network setting Log list 4000 records Alarm In Out 1 Alarm Input Output Built in Buzzer Yes Motion Detection Yes Communication Port RS 232 RS 485 and Ethernet Port Network Interface Ethernet RJ 45 10 100 base Tx x 1 Network Protocol TCP IP DHCP HTTP UDP FTP PPP Software Upgrade Upgrade v...

Page 74: ...ideoline S9116 NTSC 16CH COLOR OK OK Sensormatic RV2216 NTSC 16CH COLOR OK OK GYYR DSP9C NTSC 9CH COLOR OK N A ATV DPX16 NTSC 16CH COLOR OK OK ATV DPX9 NTSC 9CH COLOR OK OK PELCO MX4016CD NTSC 16CH COLOR OK OK TOSHIBA JK MX16A NTSC 16CH COLOR OK OK DM SPC2 D N 04M NTSC 4CH COLOR OK OK DM SLDX16C NTSC 16CH COLOR OK OK ROBOT MV16 NTSC 16CH B W OK N A ROBOT MV96 NTSC 16CH COLOR OK OK IMPAC CBR 16CDT ...

Page 75: ... PROVIDED UNDER THIS LIMITED WARRANTY IS THE EXCLUSIVE REMEDY OF THE PURCHASER DIGIMERGE SHALL IN NO EVENT BE LIABLE FOR ANY SPECIAL INDIRECT INCIDENTAL PUNITIVE OR CONSEQUENTIAL DAMAGES OF ANY KIND OR CHARACTER INCLUDING WITHOUT LIMITATION PERSONAL INJURY LOSS OF REVENUE OR PROFITS FAILURE TO REALIZE SAVINGS OR OTHER BENEFITS OR CLAIMS AGAINST THE PURCHASER BY ANY THIRD PERSON EVEN IF DIGIMERGE H...

Reviews: