background image


  ENTER                                                                                                                                                                                  End 


*/

$

%

ENT

*


*

ZEN

D

*


74

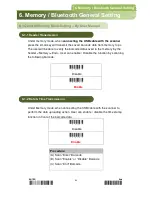
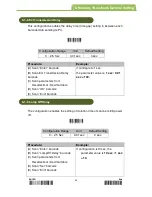
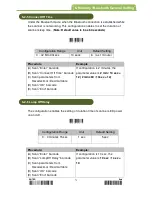
6-2-7 Standby Time 

This configuration enables the time configuration for the main power switch off 

after scanner LED turns off. 

*

6062

*


0 ~ 99 sec 

1 sec 

0 sec 


(A) Scan “Enter” barcode 

(B) Scan “Standby Time” barcode 

(C) Scan parameters from 

Hexadecimal / Decimal table   

(D) Scan “OK“ barcode 

(E) Scan “End” barcode 


If configuration is10 sec, the 

parameter value is 

10 sec / 1 sec 

= 10. 


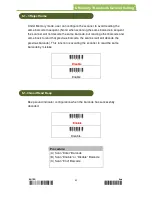
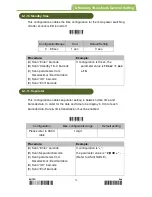
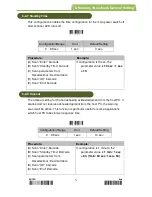
6-2-8 Timeout   

The timeout setting for the handshaking acknowledgment from the host PC, if 

scanner did not receive acknowledgement from the host PC, the warning 

sound will be active. This function is particular useful for some applications 

which host PC takes longer response time. 


*

6072

*


0 ~ 99 sec 

1 sec 

10 sec 


(A) Scan “Enter” Barcode 

(B) Scan “Standby Time” Barcode 

(C) Scan parameters from 

Hexadecimal / Decimal table   

(D) Scan “OK“ barcode 

(E) Scan “End” Barcode 

If configuration is 1 minute, the 

parameter value is 

1 min / 1 sec 

= 60. (1min: 60 sec /1sec= 60) 


6. Memory / Bluetooth General Setting 

6-2-7 Standby Time 

6-2-8 Timeout   

Configuration Range

Unit 

Default Setting 

Procedure: 

Example: 

Configuration Range

Unit 

Default Setting 

Procedure: 

Example: 

Summary of Contents for BT-49

Page 1: ...BT 49i Bluetooth Barcode Scanner User manual ...

Page 2: ...th mode to Memory mode 25 4 1 2 Transmitting barcode data in memory mode 25 4 1 3 Erase barcode data single data all data 26 4 2 Bluetooth Mode 27 4 2 1 Function switch Memory Mode to Bluetooth mode 27 4 2 2 LED indication under Bluetooth Mode 28 4 2 3 Bluetooth mode selection Code Table 29 4 2 4 Bluetooth mode configuration by user manual 30 4 2 4 1 Slave Mode Third party Bluetooth devices Mode s...

Page 3: ...ing barcode data by Hyper Terminal USB COM Mode 52 5 4 HID Mode Connection For Third party Bluetooth devices 53 5 5 iPad OSK MODE CONNECTION 58 5 6 Econnect Bluetooth Dongle II Mode CONNECTION USB HID only 62 Chapter 6 Memory Bluetooth General Setting 63 6 1 General Memory Mode Setting By User Manual 64 6 1 1 Header Transmission 64 6 1 2 Date Time Transmission 64 6 1 3 Reject Same 65 6 1 4 Good Re...

Page 4: ...pe 88 7 2 1 1 USB HID Keyboard 88 7 2 1 2 Caps lock 89 7 2 1 3 Transmission Gap 90 7 2 1 4 Transmission Delay 91 7 2 1 5 Timeout 92 7 2 1 6 Keyboard HID Layout Setting 93 7 2 1 7 Bluetooth HID Dongle Keyboard Layout Setting 94 7 2 2 Virtual Com Type 95 7 2 2 1 Virtual Com 95 7 2 2 2 Transmission gap 95 7 2 2 3 Transmission Delay 96 7 2 2 4 Timeout 97 7 3 System Control 98 7 3 1 Power On Music 98 7...

Page 5: ...11 7 12 2 Double Confirm Count 111 7 13 Global Min Max Length 112 7 13 1 Global Min Length 113 7 13 2 Global Max Length 113 7 14 Set Date Time 114 Chapter 8 Symbology Settings 115 8 1 Barcode Symbologies Default Setting Chart 116 8 2 UPC A 117 8 2 1 Read 117 8 2 2 Add on Type 117 8 2 3 Wait Add on 118 8 2 4 Transmission Checksum 118 8 3 UPC E 119 8 3 1 Read 119 8 3 2 Wait Add on 119 8 3 3 Add on T...

Page 6: ...8 7 3 Same Start End Pair 132 8 7 4 Transmission Start End 132 8 7 5 Checksum Verfification 132 8 7 6 Transmission Checksum 133 8 8 Code 128 134 8 8 1 Read 134 8 8 2 Type 134 8 8 3 Checksum Verificaiton 135 8 8 4 Transmission Checksum 135 8 8 5 Connection data 136 8 9 Interleaved 2 of 5 137 8 9 1 Read 137 8 9 2 Checksum Verification 137 8 9 3 Transmission Checksum 137 8 10 Industrial 2 of 5 138 8 ...

Page 7: ...ead 147 8 16 2 Checksum Verification 147 8 16 3 Type 148 8 16 4 Transmission Checksum 148 8 17 RSS GS1 DataBar 14 149 8 17 1 Read 149 8 17 2 Code Mark 149 8 17 3 Application ID 149 8 17 4 Transmission Checksum 150 8 18 RSS GS1 DataBar Limited 151 8 18 1 Read 151 8 18 2 Code mark 151 8 18 3 Application ID 151 8 18 4 Transmission Checksum 152 8 19 RSS GS1 DataBar 14 Stack 153 8 19 1 Read 153 8 19 2 ...

Page 8: ... 3 Preamble Data 161 9 2 4 Postamble Data 162 9 3 Prefix Suffix 163 9 3 1 Prefix Data 163 9 3 2 Suffix Data 164 9 4 Code ID Sub Code ID 165 9 4 1 Code ID Setting 165 9 4 2 Sub Code ID Setting 167 9 5 Wait Addon Count 168 9 6 Min Max Length 169 9 6 1 Min Length 170 9 6 2 Max Length 172 9 7 Truncate Zero 174 9 8 Truncate Leading 177 9 9 Truncate Ending 179 9 10 Insert 0 Position 181 9 11 Insert 1 Po...

Page 9: ...tice Chapter 1 important Notice Important Notice 1 1 Regulations 1 2 TECHNICAL REGULATIONS CONFORMITY FOR SPECIFIED RADIO EQUIPMENT IN JAPAN 1 3 NATIONAL COMMUNICATION COMMISSION 1 4 RoHS DIRECTIVES 1 5 SAFETY PRECAUT ...

Page 10: ...cy energy and if not installed and used in accordance with the instructions may cause harmful interference to radio communications However there is no guarantee that interference will not occur in a particular installation If this equipment does cause harmful interference to radio or television reception which can be determined by turning the equipment off and on the user is encouraged to try to c...

Page 11: ... 1 2006 Canmax Technology committed to the environment which makes the necessary changes to our products in order to comply with the directive This involves converting most of the non compliant components electronics PC boards etc of our products to the compliant equivalent We also changed the assembly processes solder glue etc to fully compliant with the directive These changes will not affect th...

Page 12: ...ry charge will take 4 hours for fully charge Battery Life time Memory Mode Approx 18000 scans 5 sec per scan Bluetooth Mode Approx 15000 scans 5 sec per scan Do not assemble disassemble the battery without technical support Do not use unspecified power adaptor to charge the battery During the charging process if red color LED indicator flashing rapidly discontinued the charging process and return ...

Page 13: ... Chapter 2 Introduction Introduction 2 1 PRODUCT FEATURES 2 2 PRODUCT SPECIFICATION 2 3 PACKAGE INFORMATION 2 4 DEFAULT SYMBOLOGIES 2 5 FUNCTION KEYS AND LED INDICATOR 2 6 QUICK START GUIDE 2 Introduction ...

Page 14: ...ing from flash memory and battery charging cable Four different Bluetooth mode Master Slave USB HID and iPad mode to communicate between PC mobile phone and PDA Programmable time stamp and output data format Programmable Beep tone volume Flash memory can stored up to 4500 barcode data with time stamp bas on EAN 13 barcode symbology 2 1 PRODUCT FEATURES 2 Introduction ...

Page 15: ...Scan rate 100 scan sec Scan distance 50mm 350mm Main battery Built in Rechargeable Li polymer battery pack 3 7V 420mAH charging via USB port Wireless Communication 2 4Ghz Bluetooth Class 1 Keys 2 keys 1 for scan 1 for clear data LED indicator 1 LED 2 colors green and orange for good read indication 1 LED red for low battery 1 LED blue for wireless communication on line status Beep indicator Buzzer...

Page 16: ...t Bluetooth Dongle optional power adaptor optional Lanyard USB cable Quick start guide product CD Note The product CD includes Quick start guide user manual Bluetooth setting software barcode scanner setting software Optional 2 3 PACKAGE INFORMATION 2 Introduction ...

Page 17: ...9 Enabled Interleaved 2 5 Disabled Industrial 2 5 Disabled Matrix 2 5 Disabled Codabar NW7 Enabled Code 128 Enabled Code 93 Disabled Code 11 Disabled MSI Plessey Disabled UK Plessey Disabled Telepen Disabled GS1 Databar RSS RSS14 Disabled RSS14 Limited Disabled RSS 14 Stacked Disabled RSS Expansion Disabled RSS Expansion Stacked Disabled 2 4 DEFAULT SYMBOLOGIES ...

Page 18: ...All barcode data saved in the memory will be erased Power indicator When the battery is running low pressing the scan key the red LED will be indicated During the recharging process the red LED will be always on When recharging process is completed the red LED will be flashing slowly while cable is still plugged in Good read indicator When the barcode is successfully read the orange LED will be in...

Page 19: ...ection successful the Blue LED indicator will be on Step 4 When Bluetooth Connection established execute any word processing software for example Word notepad Excel and etc to receive to barcode data Note Bluetooth connection will switch to sleep mode if not in use Press Scan OR erase key once will reestablish the Bluetooth connection 2 6 QUICK START GUIDE The Quick Start guide demonstrates how to...

Page 20: ...ode will transmit the barcode data to the word processing software in real time c When the barcode is successfully read beep sound and green LED will be indicated d Press the Erase key for few seconds until beep sound indicates any saved barcode data will be upload to PC at once Note after uploading the barcode data to PC the barcode data in the memory will not be erase User needs to erase the bar...

Page 21: ...21 Chapter 3 Scanner Configuration Scanner Configuration Quick Start 3 1 CONFIGURATION BY USER MANUAL 3 2 CONFIGURATION BY SOFTWARE 3 Scanner Configuration Quick Start ...

Page 22: ...The configuration barcode with RED BOLD font represents default setting For more detail configuration please refer to related configuration chapters ENTER ENT Enter configuration Good read Beep Disable 7A60 Enable 7A61 End ZEND Exit Configuration ABORT ZEXT Abort current setting before exit configuration ENTER ENT Enter configuration ALL DEFAULT ZADE Restore to factory default setting 3 Scanner Co...

Page 23: ...nd Barcode scanner setting to configure the parameters Bluetooth parameter settings CM500 Software Bluetooth setting Bluetooth Setting exe Scanner general settings CM500 Software barcode scanner setting Scanner Setting exe Note Please refer to the related configuration chapters or additional manual for how to use the software 3 2 CONFIGURATION BY SOFTWARE ...

Page 24: ...iguration by user manual 4 2 4 1 Slave Mode Third party Bluetooth devices Mode selection code 0 4 2 4 2 Master Mode Third party Bluetooth devices Mode selection code 1 4 2 4 3 Econnect Bluetooth dongle Mode I Mode selection code 2 4 2 4 4 HID Mode For third party Bluetooth devices Mode selection code 3 4 2 4 5 iPad OSK MODE Mode selection code 4 4 2 4 6 Econnect Bluetooth dongle Mode II Mode selec...

Page 25: ...om Bluetooth Mode to Memory Mode TOM Switch from Bluetooth to Memory Mode 4 1 2 Transmitting barcode data in memory mode There are two methods of sending the barcode data from barcode scanner 1 Connect the USB cable between scanner and PC hold the erase key for few seconds The barcode data will transmit all the scanned barcode data to your word processing software e g Word excel or notepad 4 1 Mem...

Page 26: ...ta in the memory Erase all data Press and hold the erase key for approximately 8 seconds until the red light indicator ON and beep sound indicates All barcode data saved in the memory will be erased OR By scanning the send barcode as below MCR Clear Clear all barcode data in the memory Caution Scan the Clear Barcode will erase all the barcode data saved in the memory make sure you have back up all...

Page 27: ...AD iPhone OSK Mode iPad iPhone3Gs and 4 6 Econnect Bluetooth Dongle Mode2 Original factory dongle USB HID only 4 2 1 Function switch Memory Mode to Bluetooth mode There are two methods of switching from Memory mode to Bluetooth Mode 1 Press and hold the scan key for 8 seconds the green LED indicator will flash until a beep sound indicated OR 2 Scan the following barcode from Memory Mode to Bluetoo...

Page 28: ...ge LED turns from steady to blinking With this action the power will also be shut down To power on the scanner press scan or delete key again Orange LED ON When scanner is set as iPad OSK mode and the connection with iOS is successful press the delete key once to enable or disable the virtual keyboard in iOS Blue Flashing Under Bluetooth mode and Bluetooth connection is not yet connected the blue ...

Page 29: ...ter Mode Applied to third party Bluetooth dongle or build in Bluetooth devices 1 Econnect Bluetooth Dongle mode I Applied to original factory dongle USB HID USB COM configurable 2 HID Mode Third party Bluetooth dongle or build in Bluetooth device with USB HID mode only 3 iPAD iPhone OSK Mode iPad iPhone devices 4 4 2 3 Bluetooth mode selection Code Table Econnect Bluetooth Dongle Mode II Original ...

Page 30: ...mode selection code 00 4 OK Selection code confirmed OK 5 End Exit setting ZEND 4 2 4 2 Master Mode Third party Bluetooth devices Mode selection code 1 This mode is for user to configure with third party Bluetooth dongle or build in Bluetooth device For master mode configuration please scan below barcodes step by step Procedure 1 BT Module Enter Enter Bluetooth setting BTM 2 Mode Mode selection ZB...

Page 31: ...de selection code 02 4 OK Selection code confirmed OK 5 End Exit setting ZEND 4 2 4 4 HID Mode For third party Bluetooth devices Mode selection code 3 This mode is for user to configure with third party Bluetooth dongle or build in Bluetooth device with USB HID only For HID mode Configuration please scan below barcodes step by step Procedure 1 BT Module Enter Enter Bluetooth setting BTM 2 Mode Mod...

Page 32: ...K Selection code confirmed OK 5 End Exit setting ZEND 4 2 4 6 Econnect Bluetooth dongle Mode II Mode selection code 5 This mode is for user to configure with purchased original factory dongle but it only support USB HID Econnect Bluetooth mode II please scan below barcodes step by step 1 BT Module Enter Enter Bluetooth setting BTM 2 Mode Mode selection ZBT4 3 5 mode selection code 05 4 OK Selectio...

Page 33: ...BTM 2 BT Local name ZBT1 3 Scan Hexadecimal Decimal Barcode table for input characters 4 OK Selection confirmed OK 5 End Exit setting ZEND Set Local name as BT Scanner A Scan BT Module Enter barcode B Scan BT Local name barcode C Scan parameters from Hexadecimal Decimal barcode table 4 2 5 4 2 0 5 3 6 3 6 1 6 E 6 E 6 5 7 2 OK configured as BT Scanner Please refer to ASCII TABLE D Scan End Barcode ...

Page 34: ...can BT Module Enter barcode B Scan Remote Mac Address barcode C Scan parameters from Hexadecimal decimal barcode table 0 0 1 2 6 F 0 0 6 E A A OK Set Remote Mac Address value to 00126F006EAA D Scan End barcode Note 1 If scanner connection mode is Slave or HID or iPad OSK Mode Mac Address configuration does not required 2 If scanner connection mode is Master or Econnect Bluetooth Dongle I or Econne...

Page 35: ... OSK Mode during pairing process the PC or other devices will generate the pin code user will need to referred to that pin code and scan the pin code digits from Hexadecimal Decimal table 0000 9999 4 digits 1234 1 BT Module Enter Enter Bluetooth setting BTM 2 Pin Code ZBT3 3 Scan Hexadecimal Decimal Barcode table for input digits 4 OK Selection confirmed OK 5 End Exit setting ZEND Set Pin Code to ...

Page 36: ...wo barcodes in order to perform software configuration When the scanner is in ISP mode the PC might request for driver installation the driver is located in the CD CM500 driver C0801 inf Execute Bluetooth Setting software file located in the CD CM500 Software Bluetooth setting Bluetooth Setting exe Go to device manager in windows system to make sure which com port your scanner connected with contr...

Page 37: ...ser can also transfer the saved configuration to the scanner The procedure as following For synchronization procedure please refer to above steps and select File Open and selected your saved configuration file Download T parm File Exit the software and disconnect the connection between Bluetooth Setting software and scanner Note for more detail please refer to Bluetooth Setting instruction guide C...

Page 38: ...third party Bluetooth Devices 5 2 1 How to receive barcode data by WINDOWS HYPER TERMINAL in Master Mode 5 3 Econnect Bluetooth Dongle Mode I Connection USB HID USB COM 5 3 1 HID MODE 5 3 2 USB COM mode 5 3 2 1 How to received barcode data in USB COM Mode by Windows Hyper Terminal 5 4 HID Mode Connection For Third party Bluetooth devices 5 5 iPad OSK MODE CONNECTION 5 6 Econnect Bluetooth Dongle I...

Page 39: ...as 0 Please refer to chapter 4 2 4 1 Insert the third party Bluetooth dongle to PC or build in Bluetooth device in windows system Go to Control Panel Please refer to the screen below Select Bluetooth devices please refer to the following screen 5 Bluetooth Connection Mode Instruction 5 Bluetooth Connection Mode Instruction 5 Bluetooth Connection Mode Instruction 5 1 Slave mode Connection For Third...

Page 40: ...dd button After Scanner and Bluetooth dongle is in pair status select Next the device wizard will start searching for Bluetooth scanner if Bluetooth scanner found it will appear as following 5 Bluetooth Connection Mode Instruction ...

Page 41: ...Serial Adaptor And select Next button This enables to configure the Bluetooth passkey setting From the screen the searched scanner Device name serial adaptor will display on the screen 5 Bluetooth Connection Mode Instruction ...

Page 42: ...y select Next button To connect with scanner please select Let me choose my own passkey and specify passkey as 1234 This screen shows the Bluetooth connection status and verifying the passkey 5 Bluetooth Connection Mode Instruction ...

Page 43: ...ner connection established please execute Hyper Terminal to received barcode data What is Outgoing COM port and Incoming COM port Outgoing COM port When the scanner is set as Slave mode and connected by other Bluetooth devices Outgoing COM port must be selected Incoming COM port When the scanner is set as Master mode and initiates the connection to Bluetooth device Incoming COM port must be select...

Page 44: ... Data bits 8 bits Stop Bits 1 Bits Parity None After specified the COM port select OK button for connection When the connection succeeded it will indicate with a beep sound When configuration with hyper terminal succeeded it is ready to receive the barcode data from scanner 5 1 1 receive barcode data by WINDOWS HYPER TERMINAL in slave mode 5 Bluetooth Connection Mode Instruction 5 1 1 receive barc...

Page 45: ... code is configured as 1 Please refer to chapter 4 2 4 2 Insert the third party Bluetooth devices in windows system go to Control Panel and select Bluetooth devices Please refer to the screen below Please go to Com Port option Select Add button 5 2 Master mode Connection For third party Bluetooth Devices 5 Bluetooth Connection Mode Instruction 5 2 Master mode Connection For third party Bluetooth D...

Page 46: ...46 Select Incoming device initiates the connection and OK Wait for COM port detection From the screen the COM port is detected as COM5 And select OK 5 Bluetooth Connection Mode Instruction ...

Page 47: ...0 Data bits 8 bits Stop Bits 1 Bits Parity None Select OK to start connection IF connection is successful it will show as following screen From the scanner please press the small key for pairing process press and hold for few seconds until the BLUE led flashing rapidly and release the key And from the PC screen you may see the following indication 5 2 5 Bluetooth Connection Mode Instruction 5 2 1 ...

Page 48: ...48 Select the Bluetooth Device Wizard from the bottom right corner Key in the passkey for example 1234 and select Next 5 Bluetooth Connection Mode Instruction ...

Page 49: ...he Bluetooth device wizard when connection succeeds the scanner BLUE LED will be ON Now scan the barcode the barcode data will appear on Hyper Terminal 5 Bluetooth Connection Mode Instruction 5 Bluetooth Connection Mode Instruction ...

Page 50: ...old the Pairing delete small key until blue LED flashing rapidly and then release it The scanner will establish the Bluetooth connection If connection successful the Blue LED indicator will be on If not please repeat the above mention action or check the Bluetooth parameters setting Insert Econnect Bluetooth Dongle to PC 5 3 Econnect Bluetooth Dongle Mode I Connection USB HID USB COM 5 3 1 HID MOD...

Page 51: ... Dongle is in paired status When connecting scanner and Bluetooth Dongle Press and hold the Pairing delete small key until blue LED flashing rapidly and then release it The scanner will establish the Bluetooth connection If connection successful the Blue LED indicator will be on If not please repeat the above mention action or check the Bluetooth parameters setting Insert Econnect Bluetooth Dongle...

Page 52: ...Hyper Terminal USB COM Mode COM port setting Baud rate 115200 Data bits 8 bits Stop Bits 1 Bits Parity None Select OK to start connection IF connection is successful it will show as following screen 5 Bluetooth Connection Mode Instruction ...

Page 53: ...for how to configure in Bluetooth mode Make sure the Mode selection code is configured as 3 Please refer to chapter 4 2 4 4 Plug in the third party Bluetooth dongle to PC and access to build in Windows Bluetooth Devices Select Add button 5 Bluetooth Connection Mode Instruction 5 4 HID Mode Connection For Third party Bluetooth devices ...

Page 54: ...LED start flashing rapidly and then release the key On Add Bluetooth Device wizard and select Next It will start searching for the Bluetooth devices If searching succeeds it will show as following screen Select the device for paring process 5 Bluetooth Connection Mode Instruction 5 Bluetooth Connection Mode Instruction ...

Page 55: ...e screen will request for Passkey information From the screen select Let me Choose my own passkey and specify the passkey for example 1234 Note user can specify preferred passkey 5 Bluetooth Connection Mode Instruction ...

Page 56: ...ner to scan the passkey barcode for example 1234 Please print out the Hexadecimal Decimal table page189 and scan the digits for example 1 2 3 4 and OK If the passkey verification fails please select Back to resume the previous action Re entering the passkey and scanning passkey action 5 Bluetooth Connection Mode Instruction ...

Page 57: ...wing Select Finish completing the Bluetooth device wizard when connection succeeded the scanner BLUE LED indicator will be ON User now can access to Word or Excel word processing software to receive the barcode data by the scanner 5 Bluetooth Connection Mode Instruction ...

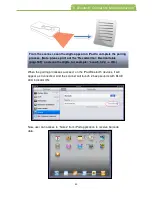
Page 58: ...n Bluetooth mode Make sure the Mode selection code is configured as 4 Please refer to chapter 4 2 4 5 Please turn on iPad and select settings as below Please access to General Bluetooth Bluetooth ON At this stage iPad will start searching for Bluetooth devices 5 Bluetooth Connection Mode Instruction 5 5 iPad OSK MODE CONNECTION ...

Page 59: ...ED turns off and Blue LED flashing rapidly at this stage release the pairing key From iPad the Bluetooth will search for the Bluetooth device Serial Adaptor as scanner name When iPad searched Serial Adaptor select the device for Bluetooth pairing 5 Bluetooth Connection Mode Instruction ...

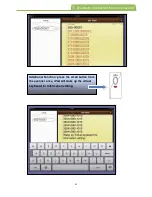
Page 60: ...unds with BLUE LED indicator ON Now user can access to Notes from iPad application to receive barcode data From the scanner scan the digits appear on iPad to complete the pairing process Note please print out the Hexadecimal Decimal table page189 and scan the digits for example scan 5 3 2 4 OK 5 Bluetooth Connection Mode Instruction ...

Page 61: ...61 Additional Function press the small button from the scanner once iPad will wake up the virtual keyboard for information editing 5 Bluetooth Connection Mode Instruction ...

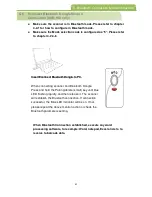
Page 62: ...arcode data When connecting scanner and Bluetooth Dongle Press and hold the Pairing delete small key until blue LED flashing rapidly and then release it The scanner will establish the Bluetooth connection If connection successful the Blue LED indicator will be on If not please repeat the above mention action or check the Bluetooth parameters setting Insert Econnect Bluetooth Dongle to PC 5 6 Econn...

Page 63: ... Ext Transmission Delay 6 1 9 Lamp Off Delay 6 1 10 Standby Time 6 1 11 Separator 6 2 General Bluetooth Mode Setting By User Manual 6 2 1 BT List 6 2 2 BT Default Setting 6 2 3 Good Read Beep 6 2 4 Good Read Vibrator 6 2 5 Connect Off Time 6 2 6 Lamp Off Delay 6 2 7 Standby Time 6 2 8 Timeout 6 2 9 Date and Time Transmission 6 2 10 Time Format 6 2 11 Date Format 6 3 Scanner Configuration by Softwa...

Page 64: ...le 6 1 2 Date Time Transmission Under Memory mode when connecting the USB cable with the scanner to perform the data uploading action User can enable disable the time stamp function in front of the barcode data 7A10 Disable 7A11 Enable A Scan Enter Barcode B Scan Enable or Disable Barcode C Scan End Barcode 6 Memory Bluetooth General Setting 6 1 General Memory Mode Setting By User Manual 6 1 1 Hea...

Page 65: ...evious barcode the scanner will still decode the previous barcode This function is avoiding the scanner to read the same barcode by mistake 7A20 Disable 7A21 Enable 6 1 4 Good Read Beep Beep sound indicator configuration when the barcode has successfully decoded 7A61 Enable 7A60 Disable A Scan Enter Barcode B Scan Enable or Disable Barcode C Scan End Barcode 6 1 3 Reject Same 6 1 4 Good Read Beep ...

Page 66: ...able 7A70 Disable 6 1 6 Time Format Time format configuration in order for the time stamp to be display in front of each barcode data Date and Time Transmission must be enabled Chapter 6 1 2 and configure the following formats 7B90 hh mm ss 7B91 hh mm A Scan Enter Barcode B Scan hh mm ss or hh mm Barcode C Scan End Barcode 6 Memory Bluetooth General Setting 6 1 5 Good Read Vibrator 6 1 6 Time Form...

Page 67: ...d Time Transmission must be enabled and configure the following formats chapter 6 1 2 7BD0 yyyy mm dd 7BD1 mm dd yyyy 7BD2 yy mm dd 7BD3 mm dd yy 7BD4 yyyy mm dd 7BD5 mm dd yyyy 7BD6 yy mm dd 7BD7 mm dd yy A Scan Enter Barcode B Scan Date Format Barcode C Scan End Barcode 6 1 7 Date Format 6 Memory Bluetooth General Setting 6 1 7 Date Format Date Format Procedure ...

Page 68: ...TER End ENT ZEND 68 7BD8 dd mm yyyy 7BD9 dd mm yy 7BDA dd mm yyyy 7BDB dd mm yy A Scan Enter Barcode B Scan Date Format Barcode C Scan End Barcode 6 Memory Bluetooth General Setting Date Format Procedure ...

Page 69: ...100 6 1 9 Lamp Off Delay The configuration enables the setting of duration time of scanner LED power off 7052 A Scan Enter barcode B Scan LampOff Delay barcode C Scan parameters from Hexadecimal Decimal table D Scan Set barcode E Scan End barcode If configuration is10 sec the parameter value is 10 sec 1 sec 10 0 2 5 Sec 0 01 sec 0 sec 6 Memory Bluetooth General Setting 6 1 8 Ext Transmission Delay...

Page 70: ...nables separator setting in between date time and barcode data In order for the date and time to be display in front of each barcode data Date time transmission must be enabled 707A Please refer to ASCII table 1 digit A Scan Enter barcode B Scan Separator barcode C Scan parameters from Hexadecimal Decimal table D Scan OK barcode E Scan End barcode If configuration is the parameter value is 2 B Ref...

Page 71: ...Mac Address of your Bluetooth device 1234 Configured Bluetooth scanner Pin Code 4 Configured Bluetooth Mode 0 Disregard 0 Disregard 6 2 2 BT Default Setting User can restore the default setting for the Bluetooth Parameter Note Default value listed as below BT Local name Serial Adaptor Remote Mac Address 000000000000 Pin Code 1234 BT Mode 0 BT Module ENTER BTM BT List ZLST BT Module ENTER BTM BT De...

Page 72: ... Read Vibrator The vibration configuration if barcode reading is successfully decoded Note Vibration function is only available for the scanner with vibrator installed 6A71 Enable 6A70 Disable A Scan Enter Barcode B Scan Enable or Disable Barcode C Scan End Barcode 6 Memory Bluetooth General Setting 6 2 3 Good Read Beep 6 2 4 Good Read Vibrator Procedure ...

Page 73: ...is 2 minutes the parameter value is 2 min 10 sec 12 2minx 60 10sec 12 6 2 6 Lamp Off Delay The configuration enables the setting of duration time of scanner LED power on and off 6052 0 4 minutes 15 sec 1 sec 5 sec A Scan Enter barcode B Scan LampOff Delay barcode C Scan parameters from Hexadecimal Decimal table D Scan OK barcode E Scan End barcode If configuration is 10 sec the parameter value is ...

Page 74: ...t from the host PC if scanner did not receive acknowledgement from the host PC the warning sound will be active This function is particular useful for some applications which host PC takes longer response time 6072 0 99 sec 1 sec 10 sec A Scan Enter Barcode B Scan Standby Time Barcode C Scan parameters from Hexadecimal Decimal table D Scan OK barcode E Scan End Barcode If configuration is 1 minute...

Page 75: ...0 Time Format Time format configuration in order for the time stamp to be display in front of each barcode data Date and Time Transmission must be enabled and configure the following formats 6B90 hh mm ss 6B91 hh mm A Scan Enter Barcode B Scan hh mm ss or hh mm Barcode C Scan End Barcode 6 Memory Bluetooth General Setting 6 2 9 Date Time Transmission 6 2 10 Time Format Procedure ...

Page 76: ...a Date and Time Transmission must be enable and configure the following formats 6BD0 yyyy mm dd 6BD1 mm dd yyyy 6BD2 yy mm dd 6BD3 mm dd yy 6BD4 yyyy mm dd 6BD5 mm dd yyyy 6BD6 yy mm dd 6BD7 mm dd yy A Scan Enter Barcode B Scan Date Format Barcode C Scan End Barcode 6 Memory Bluetooth General Setting 6 2 11 Date Format Date Format Procedure ...

Page 77: ...TER End ENT ZEND 77 6BD8 dd mm yyyy 6BD9 dd mm yy 6BDA dd mm yyyy 6BDB dd mm yy A Scan Enter Barcode B Scan Date Format Barcode C Scan End Barcode 6 Memory Bluetooth General Setting Date Format Procedure ...

Page 78: ...P mode Scan below barcodes to set the scanner to ISP mode 1 ENTER ENT 2 ISP Z232 Note ISP mode means scanner configuration mode Before any configuration with the software scanner must scan above two barcodes in order to perform software configuration When the scanner is in ISP mode the PC might request for driver installation the driver is located in the CD CM500 driver C0801 inf 6 Memory Bluetoot...

Page 79: ...lashing then proceed to Device Manager to check COM Port For example The COM Port used by scanner is COM6 In barcode scanner setting software Sync Properties And select the COM port for example COM6 Note Baud rate is 115200 Select OK for software synchronization 6 Memory Bluetooth General Setting ...

Page 80: ...ENTER End ENT ZEND 80 Under Communication Download Kernel File Select the kernel file for example 0002 0008 Bin Select Open for firmware update 6 Memory Bluetooth General Setting ...

Page 81: ...ENTER End ENT ZEND 81 After firmware updated please exit the software The scanner will reboot 6 Memory Bluetooth General Setting ...

Page 82: ...an below barcodes step by step to set the scanner to ISP mode 1 ENTER ENT 2 ISP Z232 Note ISP mode means scanner configuration mode Before any configuration with the software scanner must scan above two barcodes in order to perform software configuration When the scanner is in ISP mode the PC might request for driver installation the driver is located in the CD CM500 driver C0801 inf 6 Memory Blue...

Page 83: ... indicator will be flashing then proceed to Device Manager to check COM Port For example The COM Port used by scanner is COM6 In barcode scanner setting software Sync Properties And select the COM port for example COM6 Note Baud rate is 115200 6 Memory Bluetooth General Setting ...

Page 84: ...a file name in your local drive Under communication Download Setting File the settings will download to the scanner Exit the software will exit the barcode scanner setting configuration and scanner will reboot Note For detail configuration please refer to additional manual barcode scanner user manual CM500 manual barcode scanner user manual pdf 6 Memory Bluetooth General Setting ...

Page 85: ...l 7 4 Scan mode of the Cable 7 5 Buzzer 7 6 Standby Time 7 7 LED Off Delay 7 8 Lamp Off Delay 7 9 Good Read Time 7 10 Setup Timeout 7 11 Vibrator Off Delay 7 12 Double Confirm 7 13 Global Min Max Length 7 14 Set Date Time Note It is recommended to print out the Hexadecimal Decimal table page 189 for parameter setting 7 General Configuration Setting ...

Page 86: ...version and Bluetooth module version if scanner Bluetooth function is available ZVER 1 Scan Enter Barcode 2 Scan Version barcode Note Firmware version listing as below Family Scanner family category contents 0006 0001 0008 0000 0000 0000 0000 0000 Version 0002 0008 Firmware version V100 T028B Bluetooth module version this is only available for Bluetooth model 7 General Configuration Setting 7 Gene...

Page 87: ... cancel the setting before you scan END barcode 7 1 4 ISP Mode For software configuration User must connect the scanner with PC via USB cable and scan Enter ISP to enter the ISP mode PC might request for Driver installation please find the driver file C0801 inf in the CD ZISP 1 Scan Enter Barcode 2 Scan ISP barcode 7 General Configuration Setting 7 1 3 Abort Setting 7 1 4 ISP Mode Procedure ...

Page 88: ...sing software to receive barcode data 2 USB COM Virtual Com Type With USB COM type user need to use terminal software to receive the barcode data 7 2 1 USB HID Keyboard Type 7 2 1 1 USB HID Keyboard With USB HID type user can use Word Excel or any word processing software to receive barcode data ZKBD A Scan Enter Barcode B Scan HID Keyboard Default Barcode 7 2 Output Interface 7 2 1 USB HID Keyboa...

Page 89: ...s Lock status If Alt Keypad were selected Caps Lock and output will be independent The Auto function can be effect when USB HID is enable When you set Auto the scanner will detect the status of Keyboard Caps Lock So the barcode data output will follow the status of Keyboard Caps Lock Example Barcode data ABCdef Status Selection Caps Lock On Caps Lock Off Caps Lock On ABCdef abcDEF Caps Lock Off ab...

Page 90: ...receive all the barcode data characters due to transmission speed 1052 0 0 25 sec 0 001 sec 0 A Scan Enter barcode B Scan Transmission gap barcode C Scan parameters from Hexadecimal Decimal table D Scan OK barcode E Scan End barcode If configuration is 0 02 sec the parameter value is 0 02 sec 0 001 sec 20 7 General Configuration Setting Configuration Range Unit Default Setting Procedure Example ...

Page 91: ... Scan OK barcode E Scan End barcode If configuration is 0 2 sec the parameter value is 0 2 sec 0 01 sec 20 Example Barcode Data ABCD Transmit Gap 2ms Transmit Delay 10ms 1 ENTER Entry Programming 2 Transmission Gap 0 2 SET 2ms Inter char Delay 02 1ms Unit 2ms 3 Transmission Delay 0 1 SET 10ms Transmit Delay 01 10ms Unit 10ms 4 END Exit Programming Output A 2ms B 2ms C 2ms D 2ms 10ms 0 2 5 sec 0 01...

Page 92: ...tion is particularly useful for some application which host PC takes longer response time 1072 0 4 minutes 15 sec 1 sec 3 sec A Scan Enter barcode B Scan Timeout barcode C Scan parameters from Hexadecimal Decimal table D Scan OK barcode E Scan End barcode If configuration is 2 sec the parameter value is 2 sec 1 sec 2 7 General Configuration Setting Configuration Range Unit Default Setting Procedur...

Page 93: ... user to specify HID keyboard layout language This function is applicable in USB cabled mode 1DC0 US 1DC1 UK 1DC2 JP 1DC3 FR 1DC4 GR 1DC5 IT 1DC6 SP 1DC7 PO A Scan Enter Barcode B Scan layout barcode C Scan End Barcode 7 General Configuration Setting Keyboard Layout setting Procedure ...

Page 94: ... UK 1DC2 JP 1DC3 FR 1DC4 GR 1DC5 IT 1DC6 SP 1DC7 PO ZEND End A Please make sure you have plug in the Econnect dongle to PC and successfully connect with Bluetooth connection B Scan Enter barcode C Scan Bluetooth dongle keyboard layout setting D Scan End barcode 7 General Configuration Setting Bluetooth HID Dongle Keyboard Layout setting Procedure ...

Page 95: ...he delay time setting is too high the application program may not be able to receive all the barcode data characters due to transmission speed 2052 0 0 25 sec 0 001 sec 0 A Scan Enter barcode B Scan Transmission gap barcode C Scan parameters from Hexadecimal Decimal table D Scan OK barcode E Scan End barcode If configuration is 0 02 sec the parameter value is 0 02 sec 0 001 sec 20 7 General Config...

Page 96: ...cimal Decimal table D Scan OK barcode E Scan End barcode If configuration is 0 2 sec the parameter value is 0 2 sec 0 01 sec 20 Example Barcode Data ABCD Transmit Gap 2ms Transmit Delay 10ms 1 ENTER Entry Programming 2 Transmission Gap 0 2 SET 2ms Inter char Delay 02 1ms Unit 2ms 3 Transmitssion Delay 0 1 SET 10ms Transmit Delay 01 10ms Unit 10ms 4 END Exit Programming Output A 2ms B 2ms C 2ms D 2...

Page 97: ...tion is particularly useful for some application which host PC takes longer response time 2072 0 4 minutes 15 sec 1 sec 3 sec A Scan Enter barcode B Scan Timeout barcode C Scan parameters from Hexadecimal Decimal table D Scan OK barcode E Scan End barcode If configuration is 5 sec the parameter value is 5 sec 1 sec 5 7 General Configuration Setting Configuration Range Unit Default Setting Procedur...

Page 98: ...d Read Beep This configuration enables the Beep sound when the barcode data has been successfully read and decoded Note this configuration is only applicable when the scanner is in USB cabled mode 8B01 Enable 8B00 Disable A Scan Enter Barcode B Scan Enable or Disable Barcode C Scan End Barcode 7 General Configuration Setting 7 3 System Control 7 3 1 Power On Music 7 3 2 Good Read Beep Procedure ...

Page 99: ...mission Length When the barcode data length is not fixed Length ex Code 39 if user needs to know the length of the barcode data this configuration enables to indicate the barcode length in front of barcode data 8C51 Enable 8C50 Disable A Scan Enter Barcode B Scan Enable or Disable Barcode C Scan End Barcode 7 3 3 Good Read Vibrator 7 3 4 Transmission Length 7 General Configuration Setting 7 3 3 Go...

Page 100: ...arcode 7 3 6 Transmission Code ID When scanning the barcode User might want to know the symbology of the barcode ID This configuration enables to display the Code ID or Sub Code ID 8C31 Enable 8C30 Disable A Scan Enter Barcode B Scan Enable or Disable Barcode C Scan End Barcode 8E82 Lowercase 8E83 Uppercase 7 3 5 Force Case 7 3 6 Transmission Code ID 7 General Configuration Setting 7 3 5 Force Cas...

Page 101: ...ode B Scan After or Before Barcode C Scan End Barcode 7 3 8 Transmission Code Name This configuration enables to show the barcode symbology name Symbology name will be showing in front of barcode data 8C01 Enable 8C00 Disable A Scan Enter Barcode B Scan Enable or Disable Barcode C Scan End Barcode 7 General Configuration Setting 7 3 7 Code ID Position 7 3 8 Transmission Code Name Procedure Procedu...

Page 102: ...s successfully read and decoded If there is no barcode reading while triggering on the scanning LED will turn off in some period of time For the LED turn off time it can be configured in Lamp Off Delay 8AC2 A Scan Enter Barcode B Scan Good Read Off Barcode C Scan End Barcode 7 4 2 Momentary The trigger acts as a switch Triggering to activate scanning and release to stop scanning When holding the t...

Page 103: ...Scan Enter Barcode B Scan Alternate Barcode C Scan End Barcode 7 4 4 Timeout Off Triggering to activate the scanner LED will always be ON until certain period of time The scanning LED will turn off when the time elapsed For the LED turn off time it can be configured in Lamp Off Delay 8AC3 A Scan Enter Barcode B Scan Timeout Off Barcode C Scan End Barcode 7 General Configuration Setting 7 4 3 Alter...

Page 104: ... Continue Barcode C Scan End Barcode 7 4 6 Test This option enables the scanner to keep reading continuously and same barcode reading is allowed without double confirm The feature can test the scanning performance and sensitivity Diagnostic mode Only 8AC0 A Scan Enter Barcode B Scan Test Barcode C Scan End Barcode 7 General Configuration Setting 7 4 5 Continue 7 4 6 Test Procedure Procedure ...

Page 105: ...e configuration includes Beep volume Beep tone and Beep time 7 5 1 Beep Volume Beep volume configuration enables to configure the volume of the Beep sound 8142 1 10 10 A Scan Enter barcode B Scan Beep Volume barcode C Scan parameters from Hexadecimal Decimal table D Scan OK barcode E Scan End barcode 7 5 Buzzer 7 5 1 Beep Volume 7 General Configuration Setting 7 5 Buzzer 7 5 1 Beep Volume Configur...

Page 106: ... 3000Hz 100 Hz 30 7 5 3 Beep Time Beep time configuration enables to configure the duration of the beep sound 8152 0 2 5 Sec 0 01 sec 0 1 sec A Scan Enter barcode B Scan Beep Time barcode C Scan parameters from Hexadecimal Decimal table D Scan OK barcode E Scan End barcode If configuration is 0 2 sec the parameter value is 0 2 sec 0 01 sec 20 7 General Configuration Setting 7 5 2 Beep Tone 7 5 3 B...

Page 107: ...r value is 10 sec 1 sec 10 Note this configuration is only applicable when the scanner is in USB cable mode 7 7 LED Off Delay When the barcode is successfully read and decoded The Green LED indicator will be shown user can configure the duration time for LED indicator Note when the configuration set as 0 or 00 the Green LED will be always ON 8192 0 2 5 sec 0 01 sec 0 2 sec 7 7 LED OFF Delay 7 Gene...

Page 108: ...anning LED will automatically turn off if duration time elapsed This setting is only available when the trigger mode is set as Good read off or Timeout Off 8172 0 4 minutes 15 Sec 1 sec 5 sec A Scan Enter barcode B Scan LampOff Delay barcode C Scan Scan parameters from Hexadecimal Decimal table D Scan OK barcode E Scan End barcode If configuration is 10 sec the parameter value is 10 sec 1 sec 10 N...

Page 109: ... needed User can scan the same barcode label without any delay time 8112 0 25 sec 0 1 sec 0 5 sec A Scan Enter barcode B Scan Good Read Time barcode C Scan Scan parameters from Hexadecimal Decimal table D Scan OK barcode E Scan End barcode If configuration is 1 sec the parameter value is 1 sec 0 1 sec 10 Note this configuration is only applicable when the scanner is in USB cable mode 7 General Con...

Page 110: ...s configuration enables to set the duration of vibrating time when the barcode is successfully read and decoded Note this configuration is only applicable with optional purchased vibrator installed and Good read Vibrator function set as Enable Chapter 7 3 3 81A2 0 2 5 Secs 0 01 sec 0 1 sec A Scan Enter barcode B Scan Vibrator Off Delay barcode C Scan Scan parameters from Hexadecimal Decimal table ...

Page 111: ... configuration the more confirm counts will inhibit miss reading barcodes 8B71 Enable 8B70 Disable 7 12 2 Double Confirm Count This enables the user to configure the double confirm count selecting higher value will affect the decoding speed 8102 1 99 2 A Scan Enter barcode B Scan Double Confirm Count barcode C Scan Scan parameters from Hexadecimal Decimal table D Scan OK barcode E Scan End barcode...

Page 112: ...th is not limited 2 If Min Length is 0 and Max Length is not 0 the barcode data will decode by the length is under the Max length 3 If Max Length is 0 and Min Length is not 0 the barcode data will decode by the length is over the Min length 4 If Min Length and Max Length are specified and Min length Max Length the barcode data will only decoded by the length of Min Length value 5 If Min Length and...

Page 113: ...de E Scan End barcode 7 13 2 Global Max Length This function enables to set the maximum barcode length if the barcode length is greater than configured maximum length the barcode will not be decoded If configured value is 0 it means no limits in max length 81F2 0 64 0 A Scan Enter barcode B Scan Global Max length barcode C Scan Scan parameters from Hexadecimal Decimal table D Scan OK barcode E Sca...

Page 114: ...MDDHHMM ZCLK For the example setting the scanner date and time as 2012 8 30 13 30 1 Scan Enter barcode 2 Scan Set Date time barcode please refer to Hexadecimal Decimal table 3 Scan Decimal Barcode 1 2 0 8 3 0 1 3 3 0 OK as 2012 8 30 13 30 4 Scan End barcode 7 General Configuration Setting 7 14 Set Date Time Example ...

Page 115: ...AN 8 8 6 Code 39 8 7 Codebar NW7 8 8 Code 128 8 9 Interleaved 2 of 5 8 10 Industrial 2 of 5 8 11 Matrix 2 of 5 8 12 Code 93 8 13 Code 11 8 14 MSI Plessey 8 15 UK Plessey 8 16 Telepen 8 17 RSS GS1 DataBar 14 8 18 RSS GS1 DataBar Limited 8 19 RSS GS1 DataBar 14 Stack 8 20 RSS GS1 DataBar Expansion 8 21 RSS GS1 DataBar Expansion Stack 8 Symbology Settings ...

Page 116: ... 0 0 G Code 93 Disable 0 0 0 0 L Code 11 Disable 0 0 0 0 O MSI Plessey Disable 0 0 0 0 P UK Plessey Disable 0 0 0 0 R Telepen Disable 0 0 0 0 S RSS GS1 DataBar 14 Disable 0 0 T RSS GS1 DataBar Limited Disable 0 0 U RSS GS1 DataBar 14 Stack Disable 0 0 V RSS GS1 DataBar Expansion Disable 0 0 W RSS GS1 DataBar Expansion Stack Disable 0 0 X 8 Symbology Settings Chart 8 Symbology Settings 8 Symbology ...

Page 117: ... User can configure Add on2 Add on5 or Add on2 5 supplemental characters AB90 None AB91 Add on 2 AB92 Add on 5 AB93 Add on 2 5 A Scan Enter Barcode B Scan Add on Type Barcode C Scan End Barcode Procedure A Scan Enter Barcode B Scan Enable or Disable Barcode C Scan End Barcode 8 2 UPC A 8 2 1 Read 8 2 2 Add on Type 8 Symbology Settings 8 2 UPC A 8 2 1 Read 8 2 2 Add on Type Procedure Procedure ...

Page 118: ...n count for the reading of Add on code Chapter 9 5 AA01 Enable AA00 Disable 8 2 4 Transmission Checksum The option enables to display the check digits AA61 Enable AA60 Disable A Scan Enter Barcode B Scan Enable or Disable Barcode C Scan End Barcode 8 2 3 Wait Add on 8 2 4 Transmission Checksum 8 Symbology Settings 8 2 3 Wait Add on 8 2 4 Transmission Checksum Procedure ...

Page 119: ... want the UPC can be output with add on code together Please enable this function first and refer Wait Add on count for the reading of Add on code Chapter 9 5 BA01 Enable BA00 Disable A Scan Enter Barcode B Scan Enable or Disable Barcode C Scan End Barcode 8 3 UPC E 8 3 1 Read 8 3 2 Wait Add On 8 Symbology Settings 8 3 UPC E 8 3 1 Read 8 3 2 Wait Add On Procedure ...

Page 120: ... Type Barcode C Scan End Barcode 8 3 4 Expansion This expansion function is for UPC E and EAN 8 only It will extend the barcode to be 13 digits by 0 BA11 Enable BA10 Disable A Scan Enter Barcode B Scan Enable or Disable Barcode C Scan End Barcode Example Barcode data 01236547 Output 0012360000057 BB91 Addon2 BB93 Addon2 5 8 3 4 Expansion 8 3 3 Add On Type 8 Symbology Settings 8 3 4 Expansion 8 3 3...

Page 121: ...n Checksum The option enables to display the check digits BA61 Enable BA60 Disable A Scan Enter Barcode B Scan Enable or Disable Barcode C Scan End Barcode 8 3 5 Transmission Checksum 8 Symbology Settings 8 3 5 Transmission Checksum Procedure ...

Page 122: ...to set Enable if you want the UPC can be output with add on code together Please enable this function first and refer Wait Add on count for the reading of Add on code Chapter 9 5 CA01 Enable CA00 Disable A Scan Enter Barcode B Scan Enable or Disable Barcode C Scan End Barcode 8 Symbology Settings 8 4 2 Wait Add On 8 4 1 Read 8 4 EAN 13 Procedure ...

Page 123: ...N International Standard Serial Number are especial barcode for books and magazines The ISBN has 10 digits with leading 978 and the ISSN has 8 digits with leading 977 of EAN 13 symbology CA11 Enable CA10 Disable A Scan Enter Barcode B Scan Enable or Disable Barcode C Scan End Barcode Example Barcode data 9789572222720 Output 9572222724 Example Barcode data 9771019248004 Output 10192484 CB91 Addon2...

Page 124: ...n Checksum The option enables to display the check digits CA61 Enable CA60 Disable A Scan Enter Barcode B Scan Enable or Disable Barcode C Scan End Barcode 8 4 5 Transmission Checksum 8 Symbology Settings 8 4 5 Transmission Checksum Procedure ...

Page 125: ... want the UPC can be output with add on code together Please enable this function first and refer Wait Add on count for the reading of Add on code Chapter 9 5 DA01 Enable DA00 Disable A Scan Enter Barcode B Scan Enable or Disable Barcode C Scan End Barcode 8 5 EAN 8 8 5 1 Read 8 5 2 Wait Add On 8 Symbology Settings 8 5 EAN 8 8 5 1 Read 8 5 2 Wait Add On Procedure ...

Page 126: ... Add on Type Barcode C Scan End Barcode 8 5 4 Expansion This expansion function is for UPC E and EAN 8 only It will extend the barcode to be 13 digits by 0 Example Barcode 01236547 Output 0012360000057 DA11 Enable DA10 Disable A Scan Enter Barcode B Scan Enable or Disable Barcode C Scan End Barcode DB91 Addon2 DB93 Addon2 5 8 5 3 Add On Type 8 5 4 Expansion 8 Symbology Settings 8 5 3 Add On Type 8...

Page 127: ...n Checksum The option enables to display the check digits DA61 Enable DA60 Disable A Scan Enter Barcode B Scan Enable or Disable Barcode C Scan End Barcode 8 5 5 Transmission Checksum 8 Symbology Settings 8 5 5 Transmission Checksum Procedure ...

Page 128: ...8 6 2 Type The Full ASCII function is an enhanced setting for Code 39 which is with total 128 digits to represent Full ASCII code It must be combined by either one of or and one of alpha character A to Z EB90 Standard EB91 Full ACSII A Scan Enter Barcode B Scan Standard or Full ACSII Barcode C Scan End Barcode 8 Symbology Settings 8 6 1 Read 8 6 Code 39 8 6 2 Type Procedure Procedure ...

Page 129: ...32 with A Procedure A Scan Enter Barcode B Scan Format Barcode C Scan End Barcode 8 6 4 Transmission Start End The Start and End character of Code 39 with You can transmit all data digits including two by set Enable EA21 Enable EA20 Disable A Scan Enter Barcode B Scan Enable or Disable Barcode C Scan End Barcode EBA1 Code 32 8 6 4 Transmission Start End 8 6 3 Code 32 Translation 8 Symbology Settin...

Page 130: ...de the sum module 43 as the numerical value of the data digits EBB1 Enable EBB0 Disable A Scan Enter Barcode B Scan Enable or Disable Barcode C Scan End Barcode 8 6 6 Transmission Checksum The option enables to display the check digits EA61 Enable EA60 Disable A Scan Enter Barcode B Scan Enable or Disable Barcode C Scan End Barcode 8 Symbology Settings 8 6 5 Checksum Verification 8 6 6 Transmissio...

Page 131: ...Barcode C Scan End Barcode 8 7 2 Start End Symbol Types The Codabar has four kinds of Start End patterns you may choose one to match your application GB90 ABCD ABCD GB92 ABCD TN E A Scan Enter Barcode B Scan Type Barcode C Scan End Barcode GB91 abcd abcd GB93 abcd tn e 8 Symbology Settings 8 7 Codabar NW7 8 7 1 Read 8 7 2 Start End Symbol types Procedure Procedure ...

Page 132: ...ion enables to verify the check digits if this option is enable any barcodes without check digits will not be able to scan The checksum is made as the sum module 16 of the numerical values of all data digits GBB1 Enable GBB0 Disable A Scan Enter Barcode B Scan Enable or Disable Barcode C Scan End Barcode 8 7 3 Same Start End Pair 8 7 4 Transmission Start End 8 7 5 Checksum Verification 8 Symbology...

Page 133: ...n Checksum The option enables to display the check digits GA61 Enable GA60 Disable A Scan Enter Barcode B Scan Enable or Disable Barcode C Scan End Barcode 8 7 6 Transmission Checksum 8 Symbology Settings 8 7 6 Transmission Checksum Procedure ...

Page 134: ...slated to UCC 128 format if it starts with FNC1 character The first FNC1 will be translated to C1 and next to be a connection code as GS UCC 128 data format FB90 Standard FB91 UCC 128 A Scan Enter Barcode B Scan Standard or UCC 128 Barcode C Scan End Barcode C1 Data GS Data Checksum 8 Symbology Settings 8 8 Code 128 8 8 1 Read 8 8 2 Type Procedure ...

Page 135: ...be able to scan The checksum is presented as the sum module 103 of all data digits FBB1 Enable FBB0 Disable 8 8 4 Transmission Checksum The option enables to display the check digits FA61 Enable FA60 Disable A Scan Enter Barcode B Scan Enable or Disable Barcode C Scan End Barcode 8 Symbology Settings 8 8 3 Checksum Verification 8 8 4 Transmission Checksum Procedure ...

Page 136: ...for related setting F16B Please refer to ASCII table 2 digits Null e g Set Connection data to AB A Scan Enter Barcode B Scan Connection data Barcode C Scan Hexadecimal barcode table 4 1 4 2 OK means set Connection data value to AB please refer to ASCII Code table D Scan End barcode Connection data will show AB 8 8 5 Connection Data 8 Symbology Settings 8 8 5 Connection Data Configuration Range Len...

Page 137: ...without check digits will not be able to scan The checksum is made the sum module 10 as the numerical values of all data digits HBB1 Enable HBB0 Disable 8 9 3 Transmission Checksum The option enables to display the check digits HA61 Enable HA60 Disable A Scan Enter Barcode B Scan Enable or Disable Barcode C Scan End Barcode 8 Symbology Settings 8 9 Interleaved 2 of 5 8 9 1 Read 8 9 2 Checksum Veri...

Page 138: ...ithout check digits will not be able to scan The checksum is made the sum module 10 as the numerical values of all data digits IBB1 Enable IBB0 Disable 8 10 3 Transmission Checksum The option enables to display the check digits IA61 Enable IA60 Disable A Scan Enter Barcode B Scan Enable or Disable Barcode C Scan End Barcode 8 Symbology Settings 8 10 Industrial 2 of 5 8 10 1 Read 8 10 2 Checksum Ve...

Page 139: ...hout check digits will not be able to scan The checksum is made the sum module 10 as the numerical values of all data digits JBB1 Enable JBB0 Disable 8 11 3 Transmission Checksum The option enables to display the check digits JA61 Enable JA60 Disable A Scan Enter Barcode B Scan Enable or Disable Barcode C Scan End Barcode 8 Symbology Settings 8 11 Matrix 2 of 5 8 11 1 Read 8 11 2 Checksum Verifica...

Page 140: ...smission Checksum The option enables to display the check digits KA61 Enable KA60 Disable A Scan Enter Barcode B Scan Enable or Disable Barcode C Scan End Barcode 8 12 Code 93 8 12 1 Read 8 12 2 Transmission Checksum 8 Symbology Settings 8 12 Code 93 8 12 1 Read 8 12 2 Transmission Checksum Procedure ...

Page 141: ...e any barcodes without check digits will not be able to scan The checksum is presented as the sum module 47 of all data digits KBB0 Disable KBB2 Two A Scan Enter Barcode B Scan Disable or One or Two Barcode C Scan End Barcode KBB1 One 8 12 3 Checksum Verification 8 Symbology Settings Procedure 8 12 3 Checksum Verification ...

Page 142: ...digits if this option is enable any barcodes without check digits will not be able to scan By setting Enable checksum1 and checksum2 will be transmitted upon your selected checksum verification method LA61 Enable LA60 Disable A Scan Enter Barcode B Scan Enable or Disable Barcode C Scan End Barcode 8 Symbology Settings 8 13 Code 11 8 13 1 Read 8 13 2 Checksum Transmission Procedure ...

Page 143: ...cksum is presented as the sum module 11 of all data digits LBB0 Disable LBB2 Two A Scan Enter Barcode B Scan Disable or One or Two Barcode C Scan End Barcode LBB1 One 8 13 3 Checksum Verification 8 Symbology Settings Procedure 8 13 3 Checksum Verification ...

Page 144: ...tion MA71 Enable MA70 Disable 8 14 2 Transmission Checksum The option enables to display the check digits MA61 Enable MA60 Disable A Scan Enter Barcode B Scan Enable or Disable Barcode C Scan End Barcode 8 Symbology Settings 8 14 MSI Plessey 8 14 1 Read 8 14 2 Transmission Checksum Procedure ...

Page 145: ...s one or two optional checksum characters The checksum is presented by 3 kinds of method as Mod 10 Mod 10 10 and Mod 11 10 The checksum1 and checksum2 will be calculated as the sum module 10 or 11 of the data digits MBB0 Disable MBB2 Mod 10 10 MBB3 Mod 11 10 MBB1 Mod 10 A Scan Enter Barcode B Scan Verify Checksum Barcode C Scan End Barcode 8 Symbology Settings 8 14 3 Checksum Verification Procedur...

Page 146: ... option is enable any barcodes without check digits will not be able to scan NBB1 Enable NBB0 Disable 8 15 3 Transmission Checksum The option enables to display the check digits NA61 Enable NA60 Disable A Scan Enter Barcode B Scan Enable or Disable Barcode C Scan End Barcode 8 Symbology Settings 8 15 UK Plessey 8 15 1 Read 8 15 2 Verify Checksum 8 15 3 Transmission Checksum Procedure Procedure ...

Page 147: ...arcodes without check digits will not be able to scan The option enables to verify the check digits if this option is enable any barcodes without check digits will not be able to scan OBB1 Enable OBB0 Disable A Scan Enter Barcode B Scan Enable or Disable Barcode C Scan End Barcode 8 16 Telepen 8 16 1 Read 8 16 2 Checksum Verification 8 Symbology Settings 8 16 Telepen 8 16 1 Read 8 16 2 Checksum Ve...

Page 148: ...I by character DEL 7F16 automatically OB90 Numeric OB92 Auto switching A Scan Enter Barcode B Scan Numeric or ASCII or Auto switching Barcode C Scan End Barcode 8 16 4 Transmission Checksum The option enables to display the check digits OA61 Enable OA60 Disable A Scan Enter Barcode B Scan Enable or Disable Barcode C Scan End Barcode OB91 ASCII 8 Symbology Settings 8 16 3 Type 8 16 4 Transmission C...

Page 149: ...tput of e0 Code Mark function needs to be Enable PA21 Enable PA20 Disable 8 17 3 Application ID For the output of 01 Application ID function needs to be Enable PA31 Enable PA30 Disable A Scan Enter Barcode B Scan Enable or Disable Barcode C Scan End Barcode 8 Symbology Settings 8 17 RSS GS1 DataBar 14 8 17 1 Read 8 17 2 Code Mark 8 17 3 Application ID Procedure ...

Page 150: ... ZEND 150 8 17 4 Transmission Checksum The option enables to display the check digits PA61 Enable PA60 Disable A Scan Enter Barcode B Scan Enable or Disable Barcode C Scan End Barcode 8 Symbology Settings Procedure ...

Page 151: ...le QA70 Disable 8 18 2 Code mark For the output of e0 Code Mark function needs to be Enable QA21 Enable QA20 Disable 8 18 3 Application ID For the output of 01 Application ID function needs to be Enable QA31 Enable QA30 Disable A Scan Enter Barcode B Scan Enable or Disable Barcode C Scan End Barcode 8 Symbology Settings Procedure ...

Page 152: ... 4 Transmission Checksum The option enables to display the check digits QA61 Enable QA60 Disable A Scan Enter Barcode B Scan Enable or Disable Barcode C Scan End Barcode 8 Symbology Settings 8 18 4 Transmission Checksum Procedure ...

Page 153: ...ogy configuration RA71 Enable RA70 Disable 8 19 2 Code Mark For the output of e0 Code Mark function needs to be Enable RA21 Enable RA20 Disable A Scan Enter Barcode B Scan Enable or Disable Barcode C Scan End Barcode 8 Symbology Settings 8 19 RSS GS1 DataBar 14 Stack 8 19 1 Read 8 19 2 Code Mark Procedure ...

Page 154: ...s to be Enable RA31 Enable RA30 Disable 8 19 4 Transmission Checksum The option enables to display the check digits RA61 Enable RA60 Disable A Scan Enter Barcode B Scan Enable or Disable Barcode C Scan End Barcode 8 Symbology Settings 8 19 3 Application ID 8 19 4 Transmission Checksum Procedure ...

Page 155: ...ology configuration SA71 Enable SA70 Disable 8 20 2 Code Mark For the output of e0 Code Mark function must be Enable SA21 Enable SA20 Disable A Scan Enter Barcode B Scan Enable or Disable Barcode C Scan End Barcode 8 Symbology Settings 8 20 RSS GS1 DataBar Expansion 8 20 1 Read 8 20 2 Code Mark Procedure ...

Page 156: ...st be Enable SA31 Enable SA30 Disable 8 20 4 Transmission Checksum The option enables to display the check digits SA61 Enable SA60 Disable A Scan Enter Barcode B Scan Enable or Disable Barcode C Scan End Barcode 8 Symbology Settings 8 20 3 Application ID 8 20 4 Transmission Checksum Procedure ...

Page 157: ...ology configuration TA71 Enable TA70 Disable 8 21 2 Code Mark For the output of e0 Code Mark function must be Enable TA21 Enable TA20 Disable A Scan Enter Barcode B Scan Enable or Disable Barcode C Scan End Barcode 8 Symbology Settings 8 21 RSS GS1 DataBar Expansion Stack 8 21 1 Read 8 21 2 Code Mark Procedure ...

Page 158: ...st be Enable TA31 Enable TA30 Disable 8 21 4 Transmission Checksum The option enables to display the check digits TA61 Enable TA60 Disable A Scan Enter Barcode B Scan Enable or Disable Barcode C Scan End Barcode 8 Symbology Settings 8 21 3 Application ID 8 21 4 Transmission Checksum Procedure ...

Page 159: ...uncate length of the barcode data 4 Add Preamble Postamble Prefix Suffix data before transmission 9 1 String Output Flowchart 9 2 Preamble Postamble 9 3 Prefix Suffix 9 4 Code ID Sub Code ID 9 5 Wait addon count 9 6 Min Max Length 9 7 Truncate Zero 9 8 Truncate Leading 9 9 Truncate Ending 9 10 Insert0 Position 9 11 Insert1 Position 9 12 Insert0 Data 9 13 Insert1 Data 9 Output Format Setting ...

Page 160: ...ring output flow chart 8C61 Enable 8C60 Disable A Scan Enter Barcode B Scan Enable or Disable Barcode C Scan End Barcode Preamble Prefix Code Name Code ID Code Data Suffix Postamble Code Length 9 Output Format Settings 9 2 Preamble Postamble 9 2 1 Transmission Preamble 9 Output Format Setting 9 Output Format Settings 9 1 String Output Flow Chart 9 2 Preamble Postamble 9 2 1 Transmission Preamble P...

Page 161: ...code is decoded The string of Preamble data will be before the barcode data 830D Please refer ASCII Code Table 8 digits NULL Append the code CR LF before barcode transmitted 1 Scan Enter Barcode 2 Scan Preamble data Barcode 3 Scan Hexadecimal Barcode 0 D 0 A OK This means set the Preamble Data value to CR LF Please refer to ASCII table 4 Scan End Barcode Note Please make sure Transmission Preamble...

Page 162: ... of Postamble data will be behind the barcode data 838D Please refer ASCII Code Table 8 digits CR LF Append the code CR LF after barcode transmitted 1 Scan Enter barcode 2 Scan Postamble data barcode 3 Scan Hexadecimal barcode 0 D 0 A OK means set the Postamble Data value to CR LF Please refer to ASCII table 4 Scan End barcode Note Please make sure Transmission Postamble must be enabled before the...

Page 163: ...ng of prefix data will be behind the preamble data and before the barcode data The prefix data can be set up to 8 characters Please refer to the string output flow chart 820D Please refer ASCII Code Table 8 digits NULL Append a string ABCD before each barcode transmission 1 Scan Enter Barcode 2 Scan Prefix data Barcode 3 Scan Hexadecimal Barcode table 4 1 4 2 4 3 4 4 OK This means set Prefix data ...

Page 164: ... to 8 characters Please refer to sting output flow chart 828D Please refer ASCII Code Table 8 digits NULL Append a string EFGH after each barcode transmission 1 Scan Enter Barcode 2 Scan Suffix data Barcode 3 Scan Hexadecimal Barcode 4 5 4 6 4 7 4 8 OK This means set Suffix data value to EFGH please refer to ASCII table 4 Scan End Barcode 9 3 2 Suffix Data 9 Output Format Setting 9 3 2 Suffix Data...

Page 165: ...ID please configure the Transmission Code ID as Enable 9 4 Code ID Sub Code ID 9 4 1 Code ID Setting A12B Code ID for UPC A B12B Code ID for UPC E C12B Code ID for EAN 13 D12B Code ID for EAN 8 E12B Code ID for Code 39 G12B Code ID for Codebar NW7 F12B Code ID for Code 128 H12B Code ID for Interleaved 2 of 5 I12B Code ID for Industrial 2 of 5 J12B Code ID for Matrix 2 of 5 K10B Code ID for Code 93...

Page 166: ...cimal Barcode table 4 2 OK This means set UPC A Code ID to B please refer to ASCII table D Scan End Barcode O12B Code ID for Telepen P12B Code ID for RSS GS1 S12B Code ID for RSS GS1 DataBar Expansion R12B Code ID for RSS GS1 DataBar 14 Stack Q12B Code ID for RSS GS1 DataBar Limited T12B Code ID for RSS GS1 DataBar Expansion Stack 9 Output Format Setting Configuration Max Configurable Length Defau...

Page 167: ... set UCC 128 It will be prefixed in front or behind the barcode data Code ID Position can be configured There are some symbologies i e EAN 8 include 2 Sub Code ID If your application needs Sub Code ID please enable the Transmission Code ID function Please refer ASCII Code Table 2 digits Please refer to 8 1 section for default value B14B Sub Code ID for UPC E C14B Sub Code ID for EAN 13 D14B Sub Co...

Page 168: ...st be decoded first then Add on code Add on code may not be decoded with WPC at the same time Therefore you can set wait add on count to force the add on code must be output with WPC code together 8132 0 99 10 A Scan Enter barcode B Scan Wait Addon Count barcode C Scan parameters from Hexadecimal decimal table D Scan OK barcode E Scan End barcode 9 5 Wait Add on Count 9 Output Format Setting Proce...

Page 169: ...ode data will decode by the length is under the Max length 3 If Max Length is 0 and Min Length is not 0 the barcode data will decode by the length is over the Min length 4 If Min Length and Max Length are specified and Min length Max Length the barcode data will only decoded by the length of Min Length value 5 If Min Length and Max Length are specified and Min length Max Length the barcode data wi...

Page 170: ... and Global Min length value 0 0 0 0 AND Min Length Global Min Length 2 Min Length value 0 and Global Min length value 0 E0A2 Min Length for Code 39 G0A2 Min Length for Codebar NW7 F0A2 Min Length for Code 128 H0A2 Min Length for Interleaved 2 of 5 I0A2 Min Length for Industrial 2 of 5 J0A2 Min Length for Matrix 2 of 5 K0A2 Min Length for Code 93 L0A2 Min Length for Code 11 M0A2 Min Length for MSI...

Page 171: ...fer to 8 1 section for default value A Scan Enter barcode B Scan Min Length barcode C Scan parameters from Hexadecimal decimal table D Scan OK barcode E Scan End barcode 9 Output Format Setting Configuration Range Default setting Procedure ...

Page 172: ...d Global Max length value 0 0 0 0 AND Max Length Global Max Length 2 Max Length value 0 and Global Max length value 0 E0B2 Max Length for Code 39 G0B2 Max Length for Codebar NW7 F0B2 Max Length for Code 128 H0B2 Max Length for Interleaved 2 of I0B2 Max Length for Industrial 2 of 5 J0B2 Max Length for Matrix 2 of 5 K0B2 Max Length for Code 93 L0B2 Max Length for Code 11 M0B2 Max Length for MSI Ples...

Page 173: ...fer to 8 1 section for default value A Scan Enter Barcode B Scan Max Length Barcode C Scan parameters from Hexadecimal decimal table D Scan OK barcode E Scan End barcode 9 Output Format Setting Configuration Range Default setting Procedure ...

Page 174: ...54321 Output 54321 Truncate Zero for UPC A AA51 Enable AA50 Disable Truncate Zero for UPC E BA51 Enable BA50 Disable Truncate Zero for EAN 13 CA51 Enable CA50 Disable Truncate Zero for EAN 8 DA51 Enable DA50 Disable Truncate Zero for Code 39 EA51 Enable EA50 Disable Truncate Zero for Codebar NW7 GA51 Enable GA50 Disable 9 Output Format Setting 9 7 Truncate Zero ...

Page 175: ...e Zero for Industrial 2 of 5 IA51 Enable IA50 Disable Truncate Zero for Matrix 2 of 5 JA51 Enable JA50 Disable Truncate Zero for Code 93 KA51 Enable KA50 Disable Truncate Zero for Code 11 LA51 Enable LA50 Disable Truncate Zero for MSI Plessey MA51 Enable MA50 Disable Truncate Zero for UK Plessey NA51 Enable NA50 Disable 9 Output Format Setting ...

Page 176: ...Zero for RSS GS1 DataBar 14 PA51 Enable PA50 Truncate Zero for RSS GS1 DataBar Limited QA51 Enable QA50 Disable Truncate Zero for RSS GS1 DataBar 14 Stack RA51 Enable RA50 Disable Truncate Zero for RSS GS1 DataBar Expansion SA51 Enable SA50 Disable Truncate Zero for RSS GS1 DataBar Expansion Stack TA51 Enable TA50 Disable 9 Output Format Setting Procedure ...

Page 177: ... leading for UPC A B082 Truncate leading for UPC E C082 Truncate leading for EAN 13 D082 Truncate leading for EAN 8 E082 Truncate leading for Code 39 G082 Truncate leading for Codebar NW7 F082 Truncate leading for Code 128 H082 Truncate leading for Interleaved 2 of 5 I082 Truncate leading for Industrial 2 of 5 J082 Truncate leading for Matrix 2 of 5 K082 Truncate leading for Code 93 L082 Truncate ...

Page 178: ...arcode E Scan End barcode O082 Truncate leading for Telepen P082 Truncate leading for RSS GS1 DataBar 14 Q082 Truncate leading for RSS GS1 DataBar Limited R082 Truncate leading for RSS GS1 DataBar 14 Stack S082 Truncate leading for RSS GS1 DataBar Expansion T082 Truncate leading for RSS GS1 DataBar Expansion Stack 9 Output Format Setting Configuration Range Default setting Procedure ...

Page 179: ...uncate Ending for UPC A B092 Truncate Ending for UPC E C092 Truncate Ending for EAN 13 D092 Truncate Ending for EAN 8 E092 Truncate Ending for Code 39 G092 Truncate Ending for Codebar NW7 F092 Truncate Ending for Code 128 H092 Truncate Ending for Interleaved 2 of 5 I092 Truncate Ending for Industrial 2 of 5 J092 Truncate Ending for Matrix 2 of 5 K092 Truncate Ending for Code 93 L092 Truncate Endin...

Page 180: ...K barcode E Scan End barcode O092 Truncate Ending for Telepen P092 Truncate Ending for RSS GS1 DataBar 14 Q092 Truncate Ending for RSS GS1 DataBar Limited R092 Truncate Ending for RSS GS1 DataBar 14 Stack S092 Truncate Ending for RSS GS1 DataBar Expansion T092 Truncate Ending for RSS GS1 DataBar Expansion Stack 9 Output Format Setting Configuration Range Default setting Procedure ...

Page 181: ...behind the barcode 9 10 Insert 0 Position A0C2 Insert0 Position for UPC A B0C2 Insert0 Position for UPC E C0C2 Insert0 Position for EAN 13 D0C2 Insert0 Position for EAN 8 E0C2 Insert0 Position for Code 39 G0C2 Insert0 Position for Codebar NW7 F0C2 Insert0 Position for Code 128 H0C2 Insert0 Position for Interleaved 2 of 5 I0C2 Insert0 Position for Industrial 2 of 5 J0C2 Insert0 Position for Matrix ...

Page 182: ...I Plessey N0C2 Insert0 Position for UK Plessey O0C2 Insert0 Position for Telepen P0C2 Insert0 Position for RSS GS1 DataBar 14 Q0C2 Insert0 Position for RSS GS1 DataBar Limited R0C2 Insert0 Position for RSS GS1 DataBar 14 Stack S0C2 Insert0 Position for RSS GS1 DataBar Expansion T0C2 Insert0 Position for RSS GS1 DataBar Expansion Stack 9 Output Format Setting Configuration Range Default setting Pro...

Page 183: ...s 255 the inserted position will be behind the barcode 9 11 Insert 1 Position A0D2 Insert1 Position for UPC A B0D2 Insert1 Position for UPC E C0D2 Insert1 Position for EAN 13 D0D2 Insert1 Position for EAN 8 E0D2 Insert1 Position for Code 39 G0D2 Insert1 Position for Codebar NW7 F0D2 Insert1 Position for Code 128 H0D2 Insert1 Position for Interleaved 2 of 5 I0D2 Insert1 Position for Industrial 2 of...

Page 184: ...lessey N0D2 Insert1 Position for UK Plessey O0D2 Insert1 Position for Telepen P0D2 Insert1 Position for RSS GS1 DataBar 14 Q0D2 Insert1 Position for RSS GS1 DataBar Limited R0D2 Insert1 Position for RSS GS1 DataBar 14 Stack S0D2 Insert1 Position for RSS GS1 DataBar Expansion T0D2 Insert1 Position for RSS GS1 DataBar Expansion Stack 9 Output Format Setting Configuration Range Default setting Proced...

Page 185: ...ta for UPC A B0EB Insert0 Data for UPC E C0EB Insert0 Data for EAN 13 D0EB Insert0 Data for EAN 8 E0EB Insert0 Data for Code 39 G0EB Insert0 Data for Codebar NW7 F0EB Insert0 Data for Code 128 H0EB Insert0 Data for Interleaved 2 of 5 I0EB Insert0 Data for Industrial 2 of 5 J0EB Insert0 Data for Matrix 2 of 5 K10B Insert0 Data for Code 93 L0EB Insert0 Data for Code 11 M0EB Insert0 Data for MSI Ples...

Page 186: ...rcode E Scan End barcode O1EB Insert0 Data for Telepen P0EB Insert0 Data for RSS GS1 DataBar 14 Q0EB Insert0 Data for RSS GS1 DataBar Limited R0EB Insert0 Data for RSS GS1 DataBar 14 Stack S0EB Insert0 Data for RSS GS1 DataBar Expansion T0EB Insert0 Data for RSS GS1 DataBar Expansion Stack 9 Output Format Setting Configuration Max Configurable Length Default Setting Procedure ...

Page 187: ... A B10B Insert1 Data for UPC E C10B Insert1 Data for EAN 13 D10B Insert1 Data for EAN 8 E10B Insert1 Data for Code 39 G10B Insert1 Data for Codebar NW7 F10B Insert1 Data for Code 128 H10B Insert1 Data for Interleaved 2 of 5 I10B Insert1 Data for Industrial 2 of 5 J10B Insert1 Data for Matrix 2 of 5 K0EB Insert1 Data for Code 93 L10B Insert1 Data for Code 11 M10B Insert1 Data for MSI Plessey N10B I...

Page 188: ...decimal table D Scan OK barcode E Scan End barcode O10B Insert1 Data for Telepen P10B Insert1 Data for RSS GS1 DataBar 14 Q10B Insert1 Data for RSS GS1 DataBar R10B Insert1 Data for RSS GS1 S10B Insert1 Data for RSS GS1 DataBar T10B Insert1 Data for RSS GS1 DataBar 9 Output Format Setting Configuration Max Configurable Length Default Setting Procedure ...

Page 189: ...ZEND 189 Hexadecimal Decimal TABLE 00 0 01 1 02 2 08 8 03 3 09 9 04 4 0A A 05 5 0B B 06 6 0C C 07 7 0D D 0E E 0F F OK Appendix Hexadecimal Decimal table Appendix Hexadecimal Decimal Table Hexadecimal Decimal TABLE OK ...

Page 190: ...J Z j z B K k C L l D M m E N n F O _ o DEL L H 0 1 0 1 0 Null NUL DLE 1 Up F1 SOH DC1 2 Down F2 STX DC2 3 Left F3 ETX DC3 4 Right F4 EOT DC4 5 PgUp F5 ENQ NAK 6 PgDn F6 ACK SYN 7 F7 BEL ETB 8 Bs F8 BS CAN 9 Tab F9 HT EM A F10 LF SUM B Home Esc VT ESC C End F11 FF FS D Enter F12 CR GS E Insert Ctrl SO RS F Delete Alt SI US Appendix ASCII Code Table Appendix ASCII code table Appendix ASCII Code Tab...

Reviews: