4
e
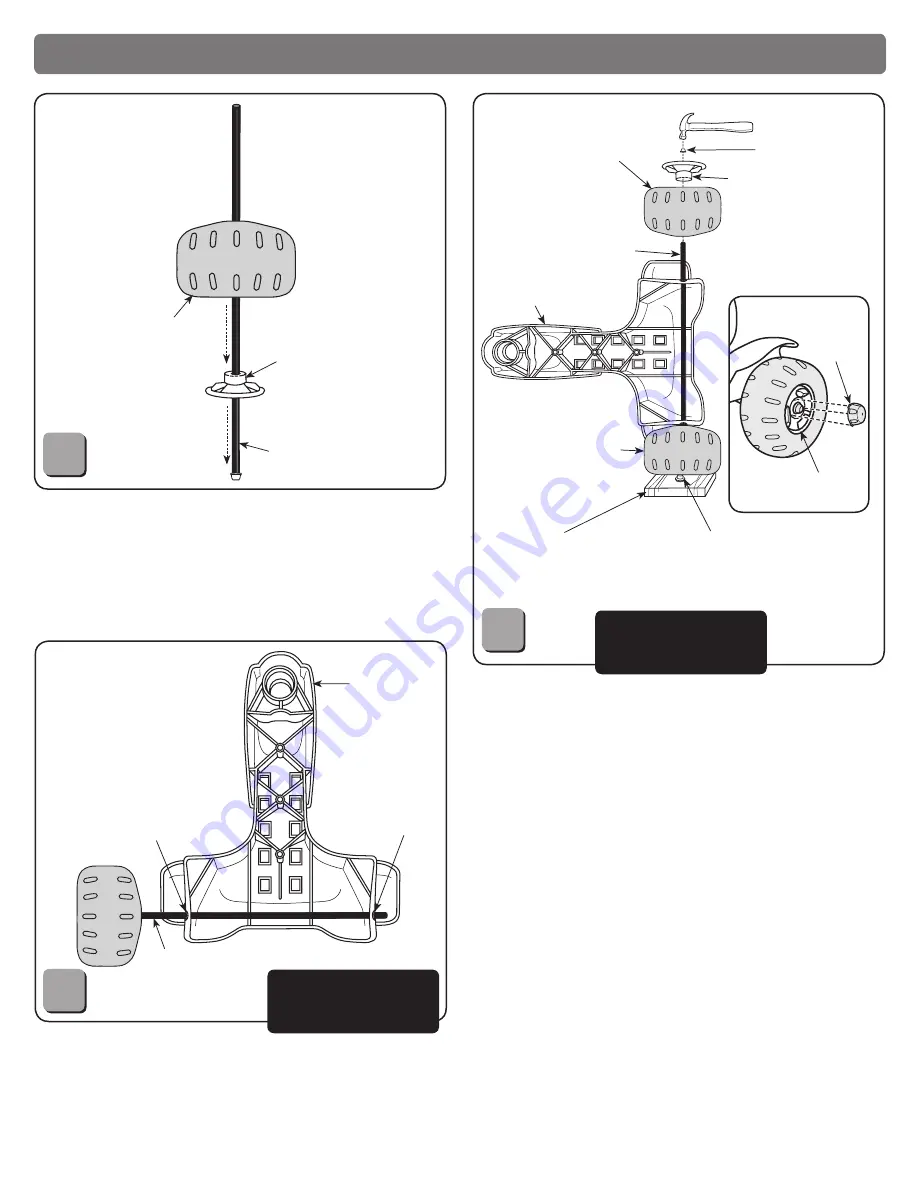
Assembly
f
Assemblage
S
Montaje
P
Montagem
e
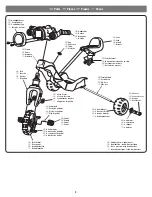
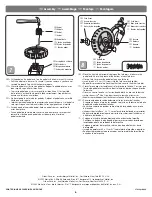
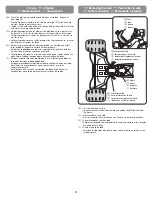
Cap Nut
f
Écrou borgne
S
Tuerca ciega
P
Porca de retenção
e
Rear Wheel
(Indented Side Up)
f
Roue arrière
(côté creux vers le haut)
S
Rueda trasera
(Lado irregular hacia arriba)
P
Roda traseira
Lado “dentado” para cima
e
Cap Nut Assembly Tool
f
Outil pour écrou borgne
S
Herramienta de montaje de tuerca ciega
P
Ferramenta para colocação da porca
de retenção.
e
Assembled Rear Wheel
f
Roue arrière assemblée
S
Rueda trasera montada
P
Estrutura da roda traseira
e
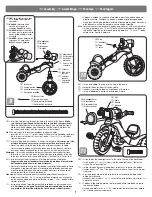
Straight Axle
f
Essieu droit
S
Eje recto
P
Eixo reto
e
Hole
f
Trou
S
Orificio
P
Abertura
e
Frame
f
Cadre
S
Armazón
P
Estrutura
e
Straight Axle
f
Essieu droit
S
Eje recto
P
Eixo reto
e
BOTTOM VIEW
f
VUE DU DESSOUS
S
VISTA DESDE ABAJO
P
VISÃO DA BASE
e
Hubcap
(Peg Side Down)
f
Enjoliveur
(côté saillant vers le bas)
S
Tapón
(Lado con clavija hacia abajo)
P
Calota
Lado da pega para baixo
e
Frame
f
Cadre
S
Armazón
P
Estrutura
2
3
e
Scrap Block of Wood
f
Bloc de bois
S
Bloque de madera
P
Pedaço de madeira
e
Cover
f
Bouton
S
Tapa
P
Proteção
e
Hubcap
f
Enjoliveur
e
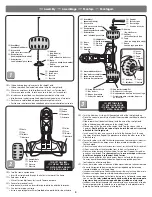
• Slide a hubcap
(peg side up) onto the straight axle.
• Slide a rear wheel
(indented side down) onto the straight axle.
f
• Glisser un enjoliveur,
le côté saillant vers le haut, sur l’essieu droit.
• Glisser une roue arrière,
le côté creux vers le bas, sur l’essieu droit.
S
• Introducir un tapón
(lado con clavija hacia arriba) en el eje recto.
• Introducir una rueda trasera
(lado irregular hacia abajo) en el eje recto.
P
• Deslize uma calota
(lado da pega para cima) pelo eixo reto.
• Deslize uma roda traseira
(lado trabalhado deve ficar para baixo) pelo eixo reto.
e
• Turn the frame upside down.
• Insert the straight axle through the holes in the rear of the frame.
f
• Retourner le cadre.
• Glisser l’essieu droit dans les trous à l’arrière du cadre.
S
• Poner el armazón al revés.
• Introducir el eje recto en los orificios de la parte de atrás del armazón.
P
• Vire a estrutura ao contrário.
• Insira o eixo reto pelos orifícios localizados na parte de trás da estrutura.
e
Hole
f
Trou
S
Orificio
P
Abertura
S
Tapón
P
Calota
e
BOTTOM VIEW
f
VUE DU DESSOUS
S
VISTA DESDE ABAJO
P
VISÃO DA BASE
e
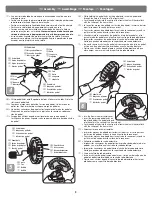
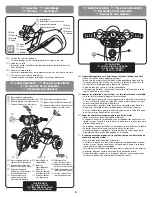
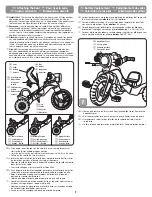
• Turn the frame on its side with the exposed end of the straight axle up.
• Place the cap nut assembly tool under the assembled rear wheel and onto
the cap nut.
• Slide a rear wheel
(indented side up) onto the end of the straight axle.
• Slide a hubcap
(peg side down) onto the straight axle.
• Place a cap nut on the end of the straight axle. Tap the cap nut with a
hammer.
Gently pull the rear wheel up to be sure the cap nut is securely
attached to the straight axle.
• Insert one of the tabs on a cover into a slot in the hubcap. Push to snap
the cover into place. Repeat this procedure to attach the other cover to the
other hubcap.
f
• Tourner le cadre sur le côté, l’extrémité exposée de l’essieu droit sur le dessus.
• Placer l’outil pour écrou borgne sous la roue arrière assemblée et sur
l’écrou borgne.
• Glisser une roue arrière,
le côté creux vers le haut, sur l’extrémité de l’essieu droit.
• Glisser un enjoliveur,
le côté saillant vers le bas, sur l’essieu droit.
• Placer un écrou borgne à l’extrémité de l’essieu droit. Frapper l’écrou bor-
gne avec un marteau.
Tirer doucement sur la roue arrière pour s’assurer
que l’écrou borgne est solidement fixé à l’essieu.
• Insérer une des pattes d’un des boutons dans une fente de l’enjoliveur.
Pousser pour bien emboîter le bouton. Répéter ce procédé pour fixer
l’autre bouton à l’autre enjoliveur.
S
• Poner el armazón sobre un lado con el lado expuesto del eje recto hacia arriba.
• Poner la herramienta de montaje de tuerca ciega debajo de la rueda
trasera montada y en la tuerca ciega.
• Introducir una rueda trasera
(lado irregular hacia arriba) en el extremo del eje recto.
• Introducir un tapón
(lado con clavija hacia abajo) en el eje recto.
• Poner una tuerca ciega en el extremo del eje recto. Golpear la tuerca ciega
con un martillo.
Jalar cuidadosamente hacia arriba la rueda trasera para
asegurarse de que la tuerca ciega está bien ajustada en el eje recto.
• Introducir una de las lengüetas de una cubierta en una ranura en el tapón.
Empujar para ajustar la cubierta en su lugar. Repetir este procedimiento
para ajustar la otra cubierta en el otro tapón.
e
Rear Wheel
(Indented Side Down)
f
Roue arrière
(côté creux vers le bas)
S
Rueda trasera
(Lado irregular hacia abajo)
P
Roda traseira
Lado “dentado” para baixo
e
Hubcap
(Peg Side Up)
f
Enjoliveur
(côté saillant sur le dessus)
S
Tapón
(Lado con clavija hacia arriba)
P
Calota
lado da pega para cima
e
Straight Axle
f
Essieu droit
S
Eje recto
P
Eixo reto
1


