


Page 18
BASIC OPERATION
RECORDING
Audio/Video Recording
Caution: Audio surveillance in some states is illegal or requires permission from one or both parties to
record someone’s voice. Laws are also different from residential vs. commercial applications. Some federal,
state, and local laws prohibit certain surveillance activities and/or the use or distribution of the information
obtained from such activities. Prior to using this system, you should become familiar with the pertinent laws to
ensure compliance with those applicable to surveillance activities.
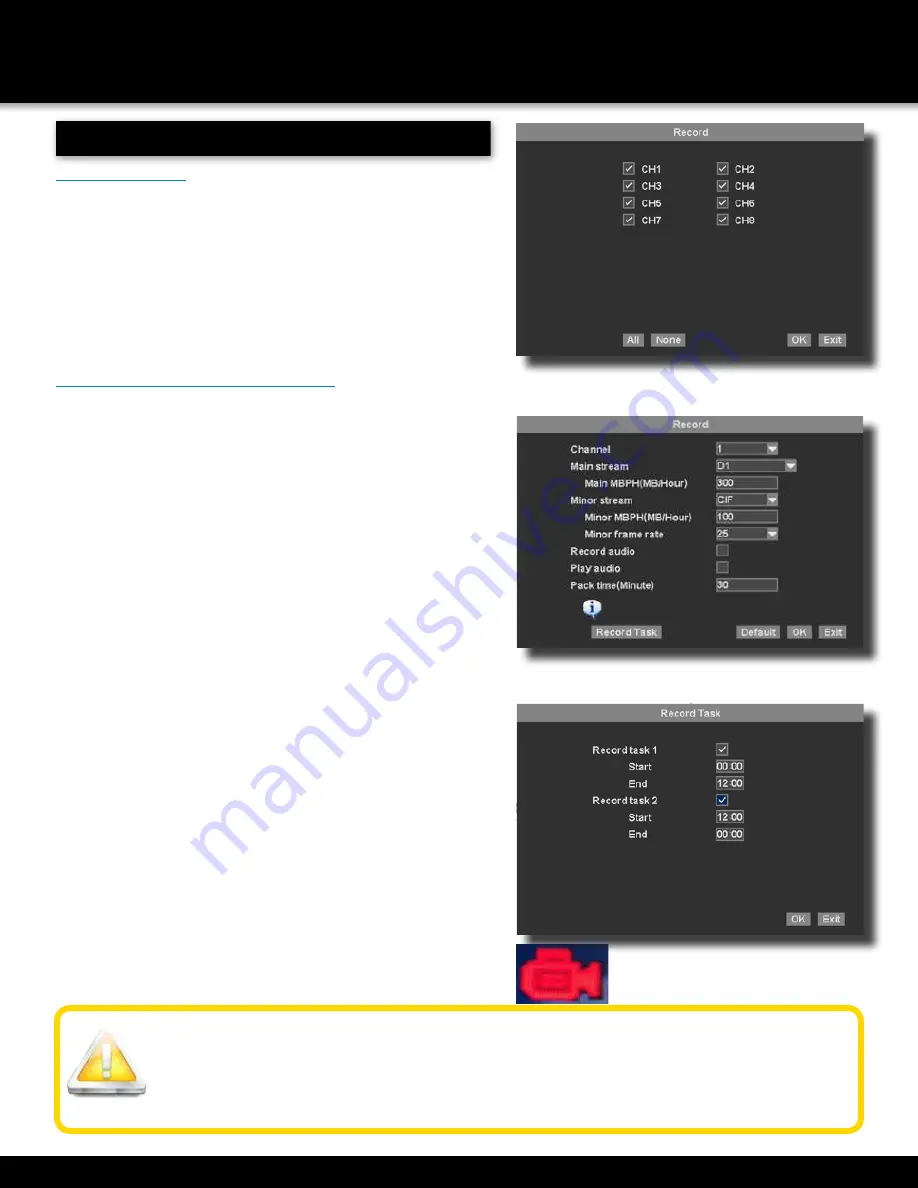
8 Channel Drop Down Menu RECORD Screen
Configuring Recording Channels
This symbol means
channel is recording.
Recording
Manual Record
There are multiple ways to set a channel to Record. The most simple
way is to record all the time. Right click the mouse to reach the drop
down menu. From there select RECORD by highlighting and clicking
the mouse. The following screen will appear.
Select a channel to record by placing a check mark in the box to the
left of the channel. Or select ALL/None to quickly select or deselect all
channels for recording.
Click OK to confirm. This action will immediately place the appropriate
channels into record or non-record mode. You will see a red camera
show up in the lower left corner to symbolize the system is running.
Configuring Recording Channels
The DVR system provides flexibility to set the quality level and length
of the recorded information.
To configure record settings:
1. From the Setting Menu, choose RECORD.
2. Using the drop down, select the channel to configure.
3. Mainstream refers to the local recording quality. Under Mainstream,
choose either D1 (highest quality) or CIF or Standard. D1 is not
available on the 16 channel DVR. The MB/Hour is automatically
set to 300 for D1 and 160 for CIF. These settings can be changed/
lowered. Lowering the MB/Hour lowers the quality of the recording,
but saves hard drive space.
4. Minor stream refers to the video stream available when accessing
the DVR from a network or mobile device. Under Minor stream, the
choices are CIF, QCIF and Closed.
Minor MBPH (MB/Hour): network transmission file size
per hour.
Minor frame rate: there are “25fps”, “20fps” and
“12fps” optional.
5.
Record Audio:
Select the button to record audio in local and client.
Camera must be audio capable.
6.
Play Audio:
Select the button so that you can play the audio file
recorded in local.
7.
Pack time (Minute):
Pack time refers to the length of the recorded
videos. The range of video length is 5 to 90 minutes. As an example,
If set to 5, then recorded files will be comprised of 5 minutes of
video. Modify recorded file pack time, 5 min–90 mins optional. Set
the Pack Time to 30 mins, and the recorded file will be 30 minutes in
length.
8.
Record task:
Allows you to set up 2 recording time periods tasks
per day. Set the Begin and End time for tasks 1 and tasks 2. Check
the record task box to enable the recording task. As an example, To
record all day, make the start and end times set at 0:00 and 12:00,
and check both tasks.
9. Repeat steps as needed to configure each channel as desired.


