FIREPOWER 160 S
OPERATION
Operation 4-6
Manual 0-5371
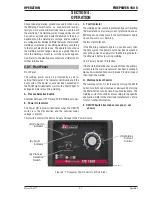
4.06 LIFT TIG (GTAW) Setup
Set Process Selection
Switch to GTAW (Lift TIG).
Positive Output
Terminal
(Dinse™ 50)
Negative
Output
Terminal
(Dinse™ 50)
Art #: A-09880
Set Welding Current
as specified by the
Electrode Manufacturer.
Secure the gas cylinder in an
upright position by chaining it
to a stationary support to prevent
falling or tipping.
Figure 4-6: Setup for LIFT TIG (GTAW) Welding
LIFT TIG (GTAW) Sequence of Operation
CAUTION
Before any welding is to begin, be sure to
wear all appropriate and recommended
safety equipment.
1. Switch the ON/OFF Switch (located on the rear panel)
to OFF.
2. Connect the work lead to positive output terminal,
and the TIG torch cable to the negative output ter-
minal.
NOTE
This set up is know as Straight Polarity or
DC Electrode Negative. This is commonly
used for DC TIG welding on most materials
such as steel and stainless steel.
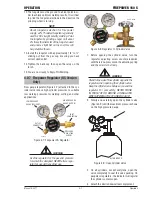
3. Using a secured Argon cylinder, slowly crack open
then close the cylinder valve while standing off to
the side of the valve. This will remove any debris
that may be around the valve & regulator seat area.
4. Install the regulator (for details of Firepower regula-
tor, please refer to 4.07 ) and tighten with a wrench.
5. Connect the gas hose to the outlet of the Argon
regulator, and tighten with a wrench.
6. Be sure the gas valve on the torch is closed, and
slowly open the Argon Cylinder Valve to the fully
open position.
7. Set the desired shielding gas flow by opening the
valve on the torch and adjusting the flow at the
regulator. Close valve when not welding, open the
torch valve before starting to weld.
8. Connect the work clamp to your work piece.
9. Plug the power cable into the appropriate outlet,
and turn the switch to the “ON” position. The power
L.E.D. light should illuminate.
10. Set the “Process Selection Switch” to LIFT TIG
11. Set the weld current control knob to the desired
amperage.
Summary of Contents for TIG 160S
Page 6: ...This Page Intentionally Blank ...
Page 18: ...FIREPOWER 160 S INTRODUCTION Introduction 2 2 Manual 0 5371 Notes ...
Page 30: ...FIREPOWER 160 S SAFETY AND INSTALLATION Safety and Installation 3 12 Manual 0 5371 Notes ...
Page 40: ...FIREPOWER 160 S THEORY OF OPERATION Theory of Operation 5 2 Manual 0 5371 Notes ...
Page 54: ...FIREPOWER 160 S TROUBLESHOOTING Troubleshooting 6 14 Manual 0 5371 Notes ...
Page 59: ...DISASSEMBLY PROCEDURE FIREPOWER 160 S Manual 0 5371 7 5 Disassembly Procedure 4 Art A 09866 ...
Page 66: ...FIREPOWER 160 S DISASSEMBLY PROCEDURE Disassembly Procedur 7 12 Manual 0 5371 Notes ...
Page 69: ...ASSEMBLY PROCEDURES FIREPOWER 160 S Manual 0 5371 8 3 Assembly Procedures 8 Art A 09883 ...
Page 74: ...FIREPOWER 160 S ASSEMBLY PROCEDURES Assembly Procedures 8 8 Manual 0 5371 Notes ...
Page 78: ...FIREPOWER 160 S REPLACEMENT PARTS Replacement Parts 9 4 Manual 0 5371 Notes ...
Page 80: ...FIREPOWER 160 S ACCESSORIES Accessories 10 2 Manual 0 5371 Notes ...
Page 83: ......

