Finlux 42F7077-D Owner'S Manual Download Page 6

English

   - 5 -

NOTE

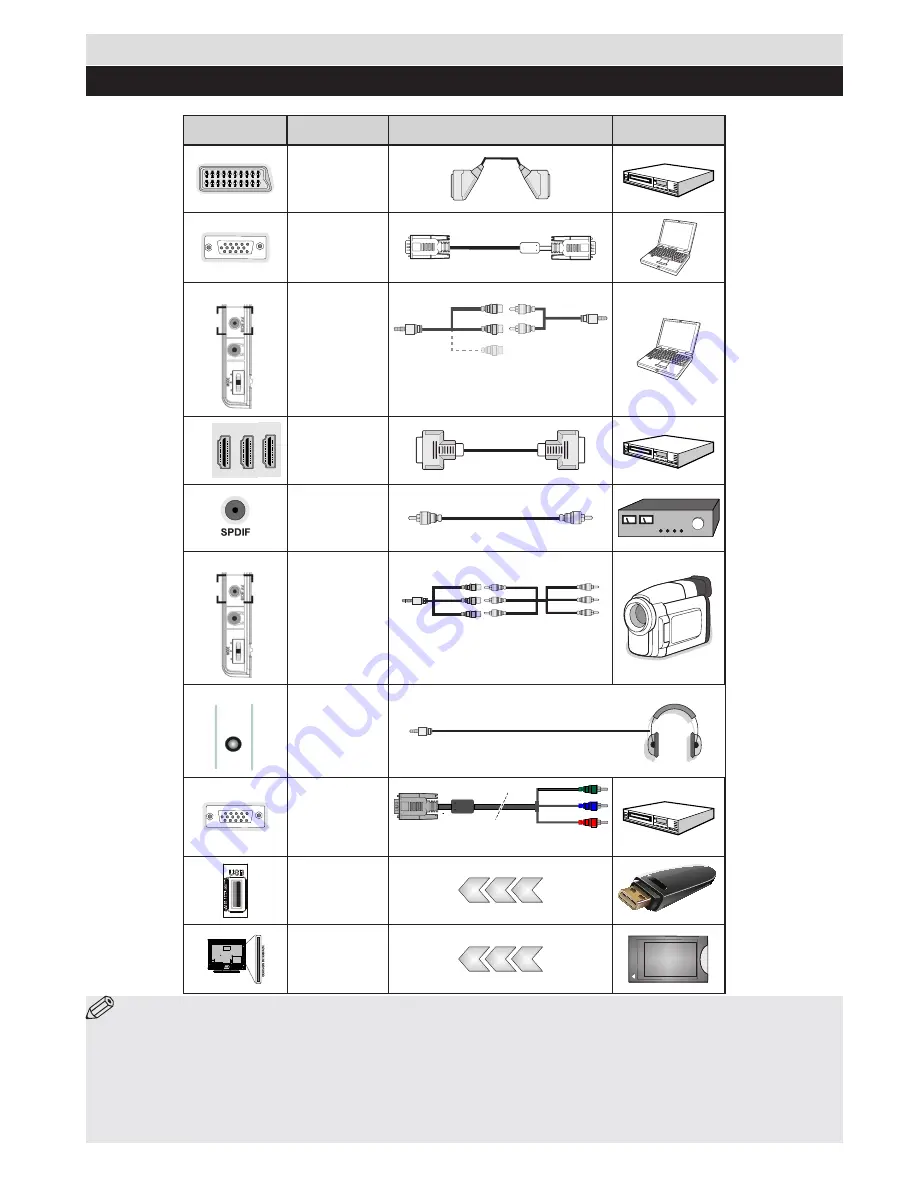
When connecting a device via the Side AV input, you must use a connection cables to enable connection.


See the illustrations above. | YPbPr can be used only when you connect a device that has a YPbPr output through the PC input 

with YPbPr to PC cable (YPbPr to PC cable is not supplied). When the connection is made, switch to YPbPr source. To enable PC 

audio, you will need to use the SIDE AV CONNECTION cable’s WHITE & RED inputs. 

|

 If an external device is connected 

via the SCART socket, the TV will automatically switch to AV mode.

|

 When receiving DTV channels (Mpeg4 H.264) or while 

in Media Browser mode, output will not be available via the scart socket. 

|

 When using the wall mounting kit (optional), 

we recommend that you plug all your cables into the back of the TV before mounting on the wall. 

|

 Insert or remove the CI 

module only when the TV is SWITCHED OFF. You should refer to the module instruction manual for details of the settings. 

Getting Started 

Connections

Connector

Type

Cables

Device

Scart

Connection

(back)

VGA

Connection

(back)

SIDE AV 

PC/YPbPr 

Audio

Connection

(side)

Side Audio/Video 

Connection Cable  

(Supplied)


PC Audio Cable 

(Not supplied)

HDMI

Connection

(back)
SPDIF

Connection

(back)

SIDE AV

Side AV

Connection

(side)

AV Connection Cable 

(supplied)

HEADPHONE

HEADPHONE

Headphone
Connection

(side)

YPbPr Video

Connection

(back)

PC to YPbPr Connection Cable (Not supplied)

USB

Connection

(side)

CI

Connection

(side)

CAM 

module

Summary of Contents for 42F7077-D

Page 1: ......

Page 2: ...on instructions if the option is available Occasionally a few non active pixels may appear on the screen as a fixed blue green or red point Please note that this does not affect the performance of you...

Page 3: ...r TV Fully integrated digital cable TV DVB T C HDMI inputs are for connecting a device that has a HDMI socket USB input OSD menu system Scart socket for external devices such as DVD Players PVR video...

Page 4: ...igh Definition Multimedia Interface are trademarks or registered trademarks of HDMI Licensing LLC Information for Users on Disposal of Old Equipment and Batteries European Union only These symbols ind...

Page 5: ...rowser mode 19 Image size 20 Teletext Mix 21 Media Browser 22 Electronic programme guide 23 Exit 24 Navigation buttons 25 Quick menu On Off 26 Info Reveal in TXT mode 27 Programme up down 28 Mute 29 P...

Page 6: ...utput will not be available via the scart socket When using the wall mounting kit optional we recommend that you plug all your cables into the back of the TV before mounting on the wall Insert or remo...

Page 7: ...allation If you select CABLE option and press OK button on the remote control To continue please select YES and press OK To cancel operation select NO and press OK You can select frequency ranges from...

Page 8: ...nts for recording Press STOP button to cancel instant recording Note You can not switch broadcasts or view the Media Browser during the recording mode While recording a programme or during the timeshi...

Page 9: ...nd and Settings menu options Pressing the MENU button again will exit from this screen You can set your Media Browser preferences by using the Settings Menu Loop Shuffle Mode Operation Start playback...

Page 10: ...ge switching HDMI True Black optional While watching from HDMI source this feature will be visible in the Picture Settings menu You can use this feature to enhance blackness in the picture Film Mode F...

Page 11: ...s for selected programmes USB Record Recording Configuration Displays the recording configuration menu Usb connection required Date Time Sets date and time Sources Enables or disables selected source...

Page 12: ...ock setting enables or disables the menu access Maturity Lock optional When set this option gets the maturity information from the broadcast and if this maturity level is disabled disables access to t...

Page 13: ...ned above have them stop watching in 3D immediately Do not use the 3D Glasses as sunglasses or general eyeglasses Do not move around while watching in 3D and wearing the glasses as your vision is modi...

Page 14: ...ahead and the TV must be at eye level while wearing the 3D glasses The picture may not be visible or may look dark if you do not stay within the viewing angle Operating the 3D Mode 3D picture may not...

Page 15: ...V accordingly in its stand or wall mount 3D Viewing Information continued HDMI MBV MBP 1080p 24 FP Supported Not Supported Not Supported 720p 50 FP Supported Not Supported Not Supported 720p 60 FP Sup...

Page 16: ...re suitable plugs used to connect the antenna If you are in doubt consult your dealer No sound Has the TV been set to mute To cancel mute press the button or increase the volume level Sound is coming...

Page 17: ...O HDMI1 HDMI2 HDMI3 480I 60Hz O 480P 60Hz O 576I 576P 50Hz O 720P 50Hz 60Hz O 1080I 50Hz 60Hz O 1080P 24Hz 25Hz 30Hz 50Hz 60Hz O Supported File Formats for USB Mode X Not Available O Available In som...

Page 18: ...green or green and yellow The wire which is coloured blue or black must be connected to the terminal which is marked with the letter N or coloured Black The wire which is coloured brown or red must b...

Page 19: ...77 D E Energy efficiency class A F Visible screen size diagonal approx inch cm 42 inches 106 cm G On mode average power consumption Watt 69 H Annual energy consumption kWh annum 100 I Standby power co...

Page 20: ......

Reviews: